Java EE学习笔记(四)
Spring的数据库开发
1、Spring JDBC
1)、Spring JDBC模块的作用:Spring的JDBC模块负责数据库资源管理和错误处理,大大简化了开发人员对数据库的操作,使得开发人员可以从繁琐的数据库操作中解脱出来,从而将更多的精力投入到编写业务逻辑当中。 (只要由new实例就可以用IOC实现,只要有setter方法就可以用DI实现)
2)、Spring JdbcTemplate的解析:
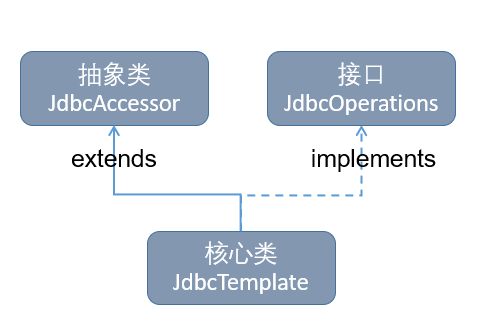
a)、JdbcTemplate类是Spring JDBC的核心类。
b)、JdbcTemplate类的继承结构具体如下图所示:
c)、DataSource(连接池,也称数据源):其主要功能是获取数据库连接,还可以引入对数据库连接的缓冲池和分布式事务的支持,它可以作为访问数据库资源的标准接口。
d)、SQLExceptionTranslator:该接口负责对SQLException进行转译工作。通过必要的设置获取SQLExceptionTranslator中的方法,可以使JdbcTemplate在需要处理SQLException时,委托SQLExceptionTranslator的实现类来完成相关的转译工作。
e)、JdbcOperations接口定义了在JdbcTemplate类中可以使用的操作集合,包括添加、修改、查询和删除等操作。
3)、Spring JDBC的配置
a)、Spring JDBC模块主要由4个包组成,分别是core(核心包)、dataSource(数据源包)、object(对象包)和support(支持包)。
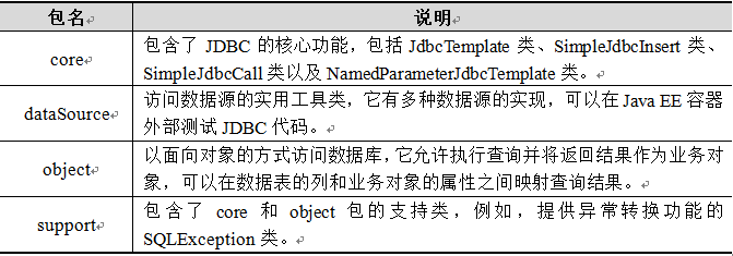
b)、从上表可以看出,Spring对数据库的操作都封装在了这几个包中,而想要使用Spring JDBC,就需要对其进行配置,配置模板如下:
 <!--1、配置数据源-->

 <bean id="dataSourceID" class="org.springframework.jdbc.datasource.DriverManagerDataSource">

     <property name="driverClassName" value="com.mysql.jdbc.Driver"/>

     <property name="url" value="jdbc:mysql://localhost:3306/spring"/>

     <property name="username" value="root"/>

     <property name="password" value="****"/>

 </bean>

 <!--配置JDBC模板-->

 <bean id="jdbcTemplateID" class="org.springframework.jdbc.core.JdbcTemplate">

     <property name="dataSource" ref="dataSourceID"/> <!--注入数据源-->

 </bean>

 <!--配置需要实例化的Bean-->

 <bean id="xxx" class="Xxx">

     <property name="jdbcTemplate" ref="jdbcTemplateID"/> <!--注入JDBC模板-->

 </bean>
c)、关于上述示例dataSource配置中的4个属性说明,如下表所示:

上表中的属性值在实际配置时,需要根据数据库类型和设置进行相应配置。
2、Spring JdbcTemplate的常用方法
1)、在JdbcTemplate核心类中,提供了大量的更新和查询数据库的方法:
a)、execute(String sql)方法可用于执行sql语句;
b)、update()用于执行插入、更新和删除操作;
c)、query()用于执行数据查询操作。

2)、execute()的使用:
a)、src->applicationContext.xml
 <?xml version="1.0" encoding="UTF-8"?>

 <beans xmlns="http://www.springframework.org/schema/beans"

     xmlns:xsi="http://www.w3.org/2001/XMLSchema-instance"

 xsi:schemaLocation="http://www.springframework.org/schema/beans

      http://www.springframework.org/schema/beans/spring-beans-4.3.xsd">

     <!-- 1、配置数据源 -->

     <bean id="dataSourceID" class="org.springframework.jdbc.datasource.DriverManagerDataSource">

         <!--1.1、数据库驱动 -->

         <property name="driverClassName" value="com.mysql.jdbc.Driver" />

         <!--1.2、连接数据库的url(即数据库所在地址) -->

         <property name="url" value="jdbc:mysql://localhost:3306/spring" />

         <!--1.3、连接数据库的用户名 -->

         <property name="username" value="root" />

         <!--1.4、连接数据库的密码 -->

         <property name="password" value="******" />

     </bean>

     <!-- 2、配置JDBC模板,并且注入数据源 -->

     <bean id="jdbcTemplateID" class="org.springframework.jdbc.core.JdbcTemplate">

         <!-- 2.1、默认必须使用数据源 -->

         <property name="dataSource" ref="dataSourceID" />

     </bean>

     <!--3、定义id为accountDaoID的Bean,即配置DAO层-->

     <bean id="accountDaoID" class="com.itheima.jdbc.AccountDaoImpl">

         <!-- 3.1、将jdbcTemplate注入到accountDao类实例中 -->

         <property name="jdbcTemplate" ref="jdbcTemplateID" />

     </bean>

 </beans>
b)、src->com.itheima.jdbc
①JdbcTemplateTest.java
 package com.itheima.jdbc;

 import java.util.List;

 import org.junit.Test;

 import org.springframework.context.ApplicationContext;

 import org.springframework.context.support.ClassPathXmlApplicationContext;

 import org.springframework.jdbc.core.JdbcTemplate;

 public class JdbcTemplateTest {

     /**

      * 使用execute()方法建表

      */

     public static void main(String[] args) {

         // 1、加载配置文件

         ApplicationContext applicationContext = new ClassPathXmlApplicationContext("applicationContext.xml");

         // 2、获取JdbcTemplate实例

         JdbcTemplate jdTemplate = (JdbcTemplate) applicationContext.getBean("jdbcTemplateID");

         // 3、使用该实例的execute()方法执行SQL语句,创建用户账户管理表account

         jdTemplate.execute("create table account(" +

                              "id int primary key auto_increment," +

                              "username varchar(50)," +

                              "balance double)");

         System.out.println("账户表account创建成功!");

     }

 }
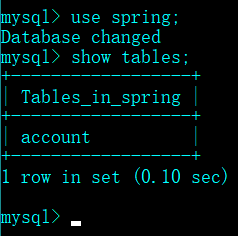
②运行结果:

3)、update()的使用
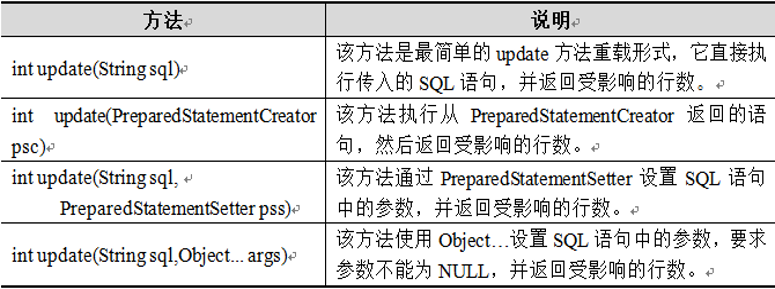
a)、update()方法可以完成插入、更新和删除数据的操作。在JdbcTemplate类中,提供了一系列的update()方法,其常用方法下表所示:
b)、src->com.itheima.jdbc
①普通账户类:Account.java
 package com.itheima.jdbc;

 public class Account { // 账户的信息

     private Integer id;       // 账户id

     private String username; // 用户名

     private Double balance;  // 账户余额

     public Integer getId() {

         return id;

     }

     public void setId(Integer id) {

         this.id = id;

     }

     public String getUsername() {

         return username;

     }

     public void setUsername(String username) {

         this.username = username;

     }

     public Double getBalance() {

         return balance;

     }

     public void setBalance(Double balance) {

         this.balance = balance;

     }

     public String toString() {

         return "Account [id=" + id + ", " + "username=" + username + ", balance=" + balance + "].";

     }

 }
②用户接口类:AccountDao.java
 package com.itheima.jdbc;

 import java.util.List;

 public interface AccountDao { // 创建接口

     // 添加

     public int addAccount(Account account);

     // 更新

     public int updateAccount(Account account);

     // 删除

     public int deleteAccount(int id);

     // 通过id查询

     public Account findAccountById(int id);

     // 查询所有账户

     public List<Account> findAllAccount();

 }
③用户接口实现类:AccountDaoImpl.java
 package com.itheima.jdbc;

 import java.util.List;

 import org.springframework.jdbc.core.BeanPropertyRowMapper;

 import org.springframework.jdbc.core.JdbcTemplate;

 import org.springframework.jdbc.core.RowMapper;

 public class AccountDaoImpl implements AccountDao { // 数据访问层DAO

     // 1、声明JdbcTemplate属性及其setter方法

     private JdbcTemplate jdbcTemplate;

     public void setJdbcTemplate(JdbcTemplate jdbcTemplate) { // 由Spring容器注入JBDC模板来操作mysql

         this.jdbcTemplate = jdbcTemplate;

     }

     // 2、添加账户

     public int addAccount(Account account) {

         // 2.1、定义SQL

         String sql = "insert into account(username,balance) value(?,?)";

         // 2.2、定义数组来存放SQL语句中的参数

         Object[] obj = new Object[] { account.getUsername(), account.getBalance() };

         // 2.3、执行添加操作,返回的是受SQL语句影响的记录条数

         int num = this.jdbcTemplate.update(sql, obj);

         return num;

     }

     // 3、更新账户

     public int updateAccount(Account account) {

         // 3.1、定义SQL

         String sql = "update account set username=?,balance=? where id = ?";

         // 3.2、定义数组来存放SQL语句中的参数

         Object[] params = new Object[] { account.getUsername(), account.getBalance(),  account.getId() };

         /*

          *  3.3、执行添加操作,返回的是受SQL语句影响的记录条数

          *  第1个参数:sql操作语句

          *  第2个参数:

          */

         int num = this.jdbcTemplate.update(sql, params);

         return num;

     }

     // 4、删除账户

     public int deleteAccount(int id) {

         // 4.1、定义SQL

         String sql = "delete  from account where id = ? ";

         // 4.2、执行添加操作,返回的是受SQL语句影响的记录条数

         int num = this.jdbcTemplate.update(sql, id);

         return num;

     }

     // 5、通过id查询账户数据信息

     public Account findAccountById(int id) {

         //5.1、定义SQL语句

         String sql = "select * from account where id = ?";

         // 5.2、创建一个新的BeanPropertyRowMapper对象

         RowMapper<Account> rowMapper = new BeanPropertyRowMapper<Account>(Account.class);

         // 5.3、将id绑定到SQL语句中,并通过RowMapper返回一个Object类型的单行记录

         return this.jdbcTemplate.queryForObject(sql, rowMapper, id);

     }

     // 6、查询所有账户信息

     public List<Account> findAllAccount() {

         // 6.1、定义SQL语句

         String sql = "select * from account";

         // 6.2、创建一个新的BeanPropertyRowMapper对象

         RowMapper<Account> rowMapper = new BeanPropertyRowMapper<Account>(Account.class);

         // 6.3、执行静态的SQL查询,并通过RowMapper返回结果

         return this.jdbcTemplate.query(sql, rowMapper);

     }

 }
④测试类:JdbcTemplate中添加一个测试方法addAccountTest(),用于添加用户信息:
     @Test

     public void addAccountTest() {

         // 1、加载配置文件

         ApplicationContext applicationContext = new ClassPathXmlApplicationContext("applicationContext.xml");

         // 2、获取AccountDao的Bena实例AccountDaoID

         AccountDao accountDao = (AccountDao) applicationContext.getBean("accountDaoID");

         // 3、创建Account对象,并向Account对象中添加数据

         Account account = new Account();

         account.setUsername("joy");

         account.setBalance(100.00);

         // 4、执行addAccount()方法,并获取返回结果

         int num = accountDao.addAccount(account);

         if (num > 0) {

             System.out.println("成功插入了" + num + "条数据!");

         } else {

             System.out.println("插入操作执行失败!");

         }

     }
⑤运行结果:


⑥测试类:JdbcTemplate中添加一个测试方法updateAccountTest(),用于更新用户信息:
     @Test

     public void updateAccountTest() {

         // 1、加载配置文件

         ApplicationContext applicationContext = new ClassPathXmlApplicationContext("applicationContext.xml");

         // 2、获取AccountDao的Bean实例accountDaoID

         AccountDao accountDao = (AccountDao) applicationContext.getBean("accountDaoID");

         // 3、创建Account对象,并向Account对象中添加数据

         Account account = new Account();

         account.setId(1);

         account.setUsername("tom");

         account.setBalance(2000.00);

         // 4、执行updateAccount()方法,并获取返回结果

         int num = accountDao.updateAccount(account);

         if (num > 0) {

             System.out.println("成功修改了" + num + "条数据!");

         } else {

             System.out.println("修改操作执行失败!");

         }

     }
⑦运行结果:

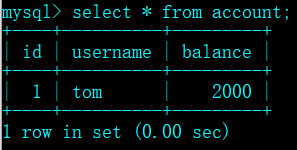
⑧测试类:JdbcTemplate中添加一个测试方法deleteAccountTest(),用于删除用户信息:
     @Test

     public void deleteAccountTest() {

         // 1、加载配置文件

         ApplicationContext applicationContext =  new ClassPathXmlApplicationContext("applicationContext.xml");

         // 2、获取AccountDao的Bean实例accountDaoID

         AccountDao accountDao = (AccountDao) applicationContext.getBean("accountDaoID");

         // 3、执行deleteAccount()方法,并获取返回结果

         int num = accountDao.deleteAccount(1);

         if (num > 0) {

             System.out.println("成功删除了" + num + "条数据!");

         } else {

             System.out.println("删除操作执行失败!");

         }

     }
⑨运行结果:


4)、query()的使用
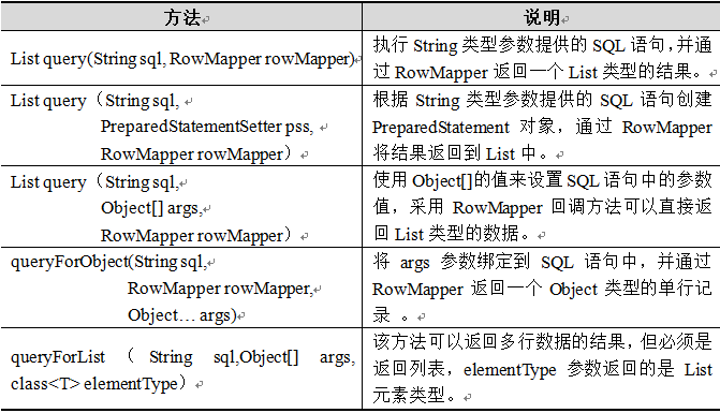
a)、JdbcTemplate类中还提供了大量的query()方法来处理各种对数据库表的查询操作。其中,常用的几个query()方法如下表所示:
b)、向数据表account中插入几条数据:

①测试类JdbcTemplate中添加一个测试方法findAccountByIdTest(),用于查找用户id的信息:
     @Test

     public void findAccountByIdTest() {

         // 1、加载配置文件

         ApplicationContext applicationContext = new ClassPathXmlApplicationContext("applicationContext.xml");

         // 2、获取AccountDao的Bean实例accountDaoID

         AccountDao accountDao = (AccountDao) applicationContext.getBean("accountDaoID");

         // 3、执行findAccountById()方法

         Account account = accountDao.findAccountById(1);

         System.out.println(account);

     }
②运行结果:

③测试类JdbcTemplate中添加一个测试方法findAllAccountTest(),用于查找所有用户的信息:
     @Test

     public void findAllAccountTest() {

         // 1、加载配置文件

         ApplicationContext applicationContext = new ClassPathXmlApplicationContext("applicationContext.xml");

         // 2、获取AccountDao实例

         AccountDao accountDao = (AccountDao) applicationContext.getBean("accountDaoID");

         // 3、执行findAllAccount()方法,获取Account对象的集合

         List<Account> account = accountDao.findAllAccount();

         // 4、循环输出集合中的对象

         for (Account act : account) {

             System.out.println(act);

         }

     }
④运行结果:

个人总结:
如何管理用户的数据库?首先应单独写一个类来存储用户的所有信息;其次“管理员”创建实现操作用户的接口类(拥有的操作方法)以及对应的接口实现类,其中接口实现类要注入JdbcTemplate属性和它的setter方法,因为用JdbcTemplate管理数据库起来很方便,并且要实现对用户的增删查改的具体方法;然后测试操作时,首先都要加载配置文件,因为这些都由Spring容器来管理,然后获取容器中管理用户的Bean实例,若要对用户信息进行增加或更新,则要先new一个普通用户的实例,向这个实例中传入需要操作的数据,最后通过Bean实例去调用相应的操作用户的方法即可。
Java EE学习笔记(四)的更多相关文章
- 零拷贝详解 Java NIO学习笔记四(零拷贝详解)
转 https://blog.csdn.net/u013096088/article/details/79122671 Java NIO学习笔记四(零拷贝详解) 2018年01月21日 20:20:5 ...
- Java IO学习笔记四:Socket基础
作者:Grey 原文地址:Java IO学习笔记四:Socket基础 准备两个Linux实例(安装好jdk1.8),我准备的两个实例的ip地址分别为: io1实例:192.168.205.138 io ...
- Java设计模式学习笔记(四) 抽象工厂模式
前言 本篇是设计模式学习笔记的其中一篇文章,如对其他模式有兴趣,可从该地址查找设计模式学习笔记汇总地址 1. 抽象工厂模式概述 工厂方法模式通过引入工厂等级结构,解决了简单工厂模式中工厂类职责太重的问 ...
- Java基础学习笔记(四) - 认识final关键字、权限修饰符和内部类
一.final关键字 为什么要使用 final 关键字? 通过继承我们知道,子类可以重写父类的成员变量和方法.final 关键字可以用于修饰父类,父类成员变量和方法,使其内容不可以被更改. 1.被修饰 ...
- Java基础学习笔记四 Java基础语法
数组 数组的需求 现在需要统计某公司员工的工资情况,例如计算平均工资.最高工资等.假设该公司有50名员工,用前面所学的知识完成,那么程序首先需要声明50个变量来分别记住每位员工的工资,这样做会显得很麻 ...
- java jvm学习笔记四(安全管理器)
欢迎装载请说明出处:http://blog.csdn.net/yfqnihao 前面已经简述了java的安全模型的两个组成部分(类装载器,class文件校验器),接下来学习的是java安全模型的另外一 ...
- Java EE学习笔记(七)
MyBatis的核心配置 1.MyBatis的核心对象 1).SqlSessionFactory是MyBatis框架中十分重要的对象,它是单个数据库映射关系经过编译后的内存镜像,其主要作用是创建Sql ...
- Java NIO学习笔记四 NIO选择器
Java NIO选择器 A Selector是一个Java NIO组件,可以检查一个或多个NIO通道,并确定哪些通道已准备就绪,例如读取或写入.这样一个线程可以管理多个通道,从而管理多个网络连接. 为 ...
- 《Thinking in Java》学习笔记(四)
1.Java中的闭包与回调 闭包(Closure)是一种能被调用的对象,它保存了创建它的作用域的信息.JAVA并不能显式地支持闭包,但是在JAVA中,闭包可以通过“接口+内部类”来实现,因为对于非静态 ...
随机推荐
- Android 如何永久性开启adb 的root权限【转】
本文转载自:https://www.2cto.com/kf/201702/593999.html adb 的root 权限是在system/core/adb/adb.c 中控制.主要根据ro.secu ...
- 青岛理工交流赛 H题 素数间隙
13110581088注销 素数间隙 Time Limit: 1000MS Memory limit: 262144K 题目描述 Neko猫是一个很喜欢玩数字游戏的会说话的肥猫,经常会想到很多很好玩的 ...
- Experimental Educational Round: VolBIT Formulas Blitz K. Indivisibility —— 容斥原理
题目链接:http://codeforces.com/contest/630/problem/K K. Indivisibility time limit per test 0.5 seconds m ...
- struts2 学习日记1
struts2 简介 struts2的前身可以说是framework.strut1作为当时很流行的框架,但是有很多的不足之处,framework出生后,它带来了很好的框架,但是很多人已经习惯了stru ...
- 在Angular.js中的H5页面调用Web api时跨域问题处理
/// <summary> /// 被请求时 /// 在Angular.js中的H5页面调用Web api时跨域问题处理 /// </summary> /// <para ...
- python 基础之第十一天(面向对象)
#############面向对象##################### 类: In [1]: class MyClass(object): ##用class定义一个类 ...: def psta ...
- 洛谷P1073最优贸易——双向取值
题目:https://www.luogu.org/problemnew/show/P1073 由于任何城市都可以多次经过,所以可以随便走,也就不用太在意有向边和无向边,把无向边当做两条有向边处理: 根 ...
- 洛谷P1119灾后重建——Floyd
题目:https://www.luogu.org/problemnew/show/P1119 N很小,考虑用Floyd: 因为t已经排好序,所以逐个加点,Floyd更新即可: 这也给我们一个启发,如果 ...
- Storm 1.0 新特性
Storm 1.0.0版本增加了很多新的特性,可用性以及性能也得到了很大的改善,该版本是Storm发展历程上一个里程碑式的版本,主要特点如下. 性能提升 Storm 1.0.0版本最大的亮点就是性能提 ...
- MongoDB监控之一:运行状态、性能监控,分析
为什么要监控? 监控及时获得应用的运行状态信息,在问题出现时及时发现. 监控什么? CPU.内存.磁盘I/O.应用程序(MongoDB).进程监控(ps -aux).错误日志监控 1.4.1 Mong ...