Python3 与 C# 并发编程之~ 进程篇
上次说了很多Linux下进程相关知识,这边不再复述,下面来说说Python的并发编程,如有错误欢迎提出~
如果遇到听不懂的可以看上一次的文章:https://www.cnblogs.com/dotnetcrazy/p/9363810.html
官方文档:https://docs.python.org/3/library/concurrency.html
在线预览:http://github.lesschina.com/python/base/concurrency/2.并发编程-进程篇.html
1.进程篇
官方文档:https://docs.python.org/3/library/multiprocessing.html
Code:https://github.com/lotapp/BaseCode/tree/master/python/5.concurrent/PythonProcess
1.1.进程(Process)
Python的进程创建非常方便,看个案例:(这种方法通用,fork只适用于Linux系)
import os

# 注意一下,导入的是Process不是process(Class是大写开头)

from multiprocessing import Process

def test(name):

    print("[子进程-%s]PID:%d,PPID:%d" % (name, os.getpid(), os.getppid()))

def main():

    print("[父进程]PID:%d,PPID:%d" % (os.getpid(), os.getppid()))

    p = Process(target=test, args=("萌萌哒", )) # 单个元素的元组表达别忘了(x,)

    p.start()

    p.join()  # 父进程回收子进程资源(内部调用了wait系列方法)

if __name__ == '__main__':

    main()
运行结果:
[父进程]PID:25729,PPID:23434

[子进程-萌萌哒]PID:25730,PPID:25729
创建子进程时,传入一个执行函数和参数,用start()方法来启动进程即可
join()方法是父进程回收子进程的封装(主要是回收僵尸子进程(点我))
其他参数可以参考源码 or 文档,贴一下源码的init方法:
def __init__(self,group=None,target=None,name=None,args=(),kwargs={},*,daemon=None)
扩展:name:为当前进程实例的别名
p.is_alive()判断进程实例p是否还在执行p.terminate()终止进程(发SIGTERM信号)
上面的案例如果用OOP来实现就是这样:(如果不指定方法,默认调Run方法)
import os

from multiprocessing import Process

class My_Process(Process):

    # 重写了Proce类的Init方法

    def __init__(self, name):

        self.__name = name

        Process.__init__(self)  # 调用父类方法

    # 重写了Process类的run()方法

    def run(self):

        print("[子进程-%s]PID:%d,PPID:%d" % (self.__name, os.getpid(),

                                          os.getppid()))

def main():

    print("[父进程]PID:%d,PPID:%d" % (os.getpid(), os.getppid()))

    p = My_Process("萌萌哒") # 如果不指定方法,默认调Run方法

    p.start()

    p.join()  # 父进程回收子进程资源(内部调用了wait系列方法)

if __name__ == '__main__':

    main()
PS:multiprocessing.Process自行处理僵死进程,不用像os.fork那样自己建立信号处理程序、安装信号处理程序
1.1.源码拓展
现在说说里面的一些门道(只想用的可以忽略)
新版本的封装可能多层,这时候可以看看Python3.3.X系列(这个算是Python3早期版本了,很多代码都暴露出来,比较明了直观)
multiprocessing.process.py
# 3.4.x开始,Process有了一个BaseProcess

# https://github.com/python/cpython/blob/3.7/Lib/multiprocessing/process.py

# https://github.com/lotapp/cpython3/tree/master/Lib/multiprocessing/process.py

def join(self, timeout=None):

    '''一直等到子进程over'''

    self._check_closed()

    # 断言(False就触发异常,提示就是后面的内容

    # 开发中用的比较多,部署的时候可以python3 -O xxx 去除所以断言

    assert self._parent_pid == os.getpid(), "只能 join 一个子进程"

    assert self._popen is not None, "只能加入一个已启动的进程"

    res = self._popen.wait(timeout) # 本质就是用了我们之前讲的wait系列

    if res is not None:

        _children.discard(self) # 销毁子进程
multiprocessing.popen_fork.py
# 3.4.x开始,在popen_fork文件中(以前是multiprocessing.forking.py)

# https://github.com/python/cpython/blob/3.7/Lib/multiprocessing/popen_fork.py

# https://github.com/lotapp/cpython3/tree/master/Lib/multiprocessing/popen_fork.py

def wait(self, timeout=None):

    if self.returncode is None:

        # 设置超时的一系列处理

        if timeout is not None:

            from multiprocessing.connection import wait

            if not wait([self.sentinel], timeout):

                return None

        # 核心操作

        return self.poll(os.WNOHANG if timeout == 0.0 else 0)

    return self.returncode

# 回顾一下上次说的:os.WNOHANG - 如果没有子进程退出,则不阻塞waitpid()调用

def poll(self, flag=os.WNOHANG):

    if self.returncode is None:

        try:

            # 他的内部调用了waitpid

            pid, sts = os.waitpid(self.pid, flag)

        except OSError as e:

            # 子进程尚未创建

            # e.errno == errno.ECHILD == 10

            return None

        if pid == self.pid:

            if os.WIFSIGNALED(sts):

                self.returncode = -os.WTERMSIG(sts)

            else:

                assert os.WIFEXITED(sts), "Status is {:n}".format(sts)

                self.returncode = os.WEXITSTATUS(sts)

    return self.returncode
关于断言的简单说明:(别泛滥)
如果条件为真,它什么都不做,反之它触发一个带可选错误信息的AssertionError
def test(a, b):

    assert b != 0, "哥哥,分母不能为0啊"

    return a / b

def main():

    test(1, 0)

if __name__ == '__main__':

    main()
结果:
Traceback (most recent call last):

  File "0.assert.py", line 11, in <module>

    main()

  File "0.assert.py", line 7, in main

    test(1, 0)

  File "0.assert.py", line 2, in test

    assert b != 0, "哥哥,分母不能为0啊"

AssertionError: 哥哥,分母不能为0啊运行的时候可以指定-O参数来忽略assert,eg:
python3 -O 0.assert.py
Traceback (most recent call last):

  File "0.assert.py", line 11, in <module>

    main()

  File "0.assert.py", line 7, in main

    test(1, 0)

  File "0.assert.py", line 3, in test

    return a / b

ZeroDivisionError: division by zero
扩展:
https://docs.python.org/3/library/unittest.html
https://www.cnblogs.com/shangren/p/8038935.html
1.2.进程池
多个进程就不需要自己手动去管理了,有Pool来帮你完成,先看个案例:
import os

import time

from multiprocessing import Pool  # 首字母大写

def test(name):

    print("[子进程-%s]PID=%d,PPID=%d" % (name, os.getpid(), os.getppid()))

    time.sleep(1)

def main():

    print("[父进程]PID=%d,PPID=%d" % (os.getpid(), os.getppid()))

    p = Pool(5) # 设置最多5个进程(不设置就默认为CPU核数)

    for i in range(10):

        # 异步执行

        p.apply_async(test, args=(i, )) # 同步用apply(如非必要不建议用)

    p.close() # 关闭池,不再加入新任务

    p.join() # 等待所有子进程执行完毕回收资源(join可以指定超时时间,eg:`p.join(1)`)

    print("over")

if __name__ == '__main__':

    main()
图示:(join可以指定超时时间,eg:p.join(1)) 
调用join()之前必须先调用close(),调用close()之后就不能继续添加新的Process了(下面会说为什么)
1.3.源码拓展
验证一下Pool的默认大小是CPU的核数,看源码:
multiprocessing.pool.py
# https://github.com/python/cpython/blob/3.7/Lib/multiprocessing/pool.py

# https://github.com/lotapp/cpython3/tree/master/Lib/multiprocessing/pool.py

class Pool(object):

    def __init__(self, processes=指定的进程数,...):

        if processes is None:

            processes = os.cpu_count() or 1 # os.cpu_count() ~ CPU的核数
源码里面apply_async方法,是有回调函数(callback)的
def apply_async(self,func,args=(),kwds={},callback=None,error_callback=None):

    if self._state != RUN:

        raise ValueError("Pool not running")

    result = ApplyResult(self._cache, callback, error_callback)

    self._taskqueue.put(([(result._job, 0, func, args, kwds)], None))

    return result
来看个例子:(和JQ很像)
import os

import time

from multiprocessing import Pool  # 首字母大写

def test(name):

    print("[子进程%s]PID=%d,PPID=%d" % (name, os.getpid(), os.getppid()))

    time.sleep(1)

    return name

def error_test(name):

    print("[子进程%s]PID=%d,PPID=%d" % (name, os.getpid(), os.getppid()))

    raise Exception("[子进程%s]啊,我挂了~" % name)

def callback(result):

    """成功之后的回调函数"""

    print("[子进程%s]执行完毕" % result)  # 没有返回值就为None

def error_callback(msg):

    """错误之后的回调函数"""

    print(msg)

def main():

    print("[父进程]PID=%d,PPID=%d" % (os.getpid(), os.getppid()))

    p = Pool()  # CPU默认核数

    for i in range(5):

        # 搞2个出错的看看

        if i > 2:

            p.apply_async(

                error_test,

                args=(i, ),

                callback=callback,

                error_callback=error_callback)  # 异步执行

        else:

            # 异步执行,成功后执行callback函数(有点像jq)

            p.apply_async(test, args=(i, ), callback=callback)

    p.close()  # 关闭池,不再加入新任务

    p.join()  # 等待所有子进程执行完毕回收资源

    print("over")

if __name__ == '__main__':

    main()
输出:
[父进程]PID=12348,PPID=10999

[子进程0]PID=12349,PPID=12348

[子进程2]PID=12351,PPID=12348

[子进程1]PID=12350,PPID=12348

[子进程3]PID=12352,PPID=12348

[子进程4]PID=12352,PPID=12348

[子进程3]啊,我挂了~

[子进程4]啊,我挂了~

[子进程0]执行完毕

[子进程2]执行完毕

[子进程1]执行完毕

over接着上面继续拓展,补充说说获取函数返回值。上面是通过成功后的回调函数来获取返回值,这次说说自带的方法:
import time

from multiprocessing import Pool, TimeoutError

def test(x):

    """开平方"""

    time.sleep(1)

    return x * x

def main():

    pool = Pool()

    task = pool.apply_async(test, (10, ))

    print(task)

    try:

        print(task.get(timeout=1))

    except TimeoutError as ex:

        print("超时了~", ex)

if __name__ == '__main__':

    main()
输出:(apply_async返回一个ApplyResult类,里面有个get方法可以获取返回值)
<multiprocessing.pool.ApplyResult object at 0x7fbc354f50b8>

超时了~再举个例子,顺便把Pool里面的map和imap方法搞个案例(类比jq)
import time

from multiprocessing import Pool

def test(x):

    return x * x

if __name__ == '__main__':

    with Pool(processes=4) as pool:

        task = pool.apply_async(test, (10, ))

        print(task.get(timeout=1))

        obj_list = pool.map(test, range(10))

        print(obj_list)

        # 返回一个可迭代类的实例对象

        obj_iter = pool.imap(test, range(10))

        print(obj_iter)

        next(obj_iter)

        for i in obj_iter:

            print(i, end=" ")
输出:
100

[0, 1, 4, 9, 16, 25, 36, 49, 64, 81]

<multiprocessing.pool.IMapIterator object at 0x7ff7f9734198>

1 4 9 16 25 36 49 64 81
微微看一眼源码:(基础忘了可以查看==> 点我 )
class IMapIterator(object):

    def __init__(self, cache):

        self._cond = threading.Condition(threading.Lock())

        self._job = next(job_counter)

        self._cache = cache

        self._items = collections.deque()

        self._index = 0

        self._length = None

        self._unsorted = {}

        cache[self._job] = self

    def __iter__(self):

        return self # 返回一个迭代器

    # 实现next方法

    def next(self, timeout=None):

        with self._cond:

            try:

                item = self._items.popleft()

            except IndexError:

                if self._index == self._length:

                    raise StopIteration from None

                self._cond.wait(timeout)

                try:

                    item = self._items.popleft()

                except IndexError:

                    if self._index == self._length:

                        raise StopIteration from None

                    raise TimeoutError from None

        success, value = item

        if success:

            return value

        raise value

......
扩展:优雅杀死子进程的探讨 https://segmentfault.com/q/1010000005077517
1.4.拓展之subprocess
官方文档:https://docs.python.org/3/library/subprocess.html
还记得之前李代桃僵的execlxxx系列吗?
这不,subprocess就是它的一层封装,当然了要强大的多,先看个例子:(以os.execlp的例子为引)
import subprocess

def main():

    # os.execlp("ls", "ls", "-al")  # 执行Path环境变量可以搜索到的命令

    result = subprocess.run(["ls", "-al"])

    print(result)

if __name__ == '__main__':

    main()
输出
总用量 44

drwxrwxr-x 2 dnt dnt 4096 8月   7 17:32 .

drwxrwxr-x 4 dnt dnt 4096 8月   6 08:01 ..

-rw-rw-r-- 1 dnt dnt  151 8月   3 10:49 0.assert.py

-rw-rw-r-- 1 dnt dnt  723 8月   5 18:00 1.process2.py

-rw-rw-r-- 1 dnt dnt  501 8月   3 10:20 1.process.py

-rw-rw-r-- 1 dnt dnt 1286 8月   6 08:16 2.pool1.py

-rw-rw-r-- 1 dnt dnt  340 8月   7 16:38 2.pool2.py

-rw-rw-r-- 1 dnt dnt  481 8月   7 16:50 2.pool3.py

-rw-rw-r-- 1 dnt dnt  652 8月   5 17:01 2.pool.py

-rw-rw-r-- 1 dnt dnt  191 8月   7 17:33 3.subprocess.py

CompletedProcess(args=['ls', '-al'], returncode=0)
文档
现在看下官方的文档描述来理解一下:
r"""

具有可访问I / O流的子进程

Subprocesses with accessible I/O streams

此模块允许您生成进程,连接到它们输入/输出/错误管道,并获取其返回代码。

This module allows you to spawn processes, connect to their

input/output/error pipes, and obtain their return codes.

完整文档可以查看:https://docs.python.org/3/library/subprocess.html

For a complete description of this module see the Python documentation.

Main API

========

run(...): 运行命令,等待它完成,然后返回`CompletedProcess`实例。

Runs a command, waits for it to complete,

then returns a CompletedProcess instance.

Popen(...): 用于在新进程中灵活执行命令的类

A class for flexibly executing a command in a new process

Constants(常量)

---------

DEVNULL: 特殊值,表示应该使用`os.devnull`

Special value that indicates that os.devnull should be used

PIPE:    表示应创建`PIPE`管道的特殊值

Special value that indicates a pipe should be created

STDOUT:  特殊值,表示`stderr`应该转到`stdout`

Special value that indicates that stderr should go to stdout

Older API(尽量不用,说不定以后就淘汰了)

=========

call(...): 运行命令,等待它完成,然后返回返回码。

Runs a command, waits for it to complete, then returns the return code.

check_call(...): Same as call() but raises CalledProcessError()

    if return code is not 0(返回值不是0就引发异常)

check_output(...): 与check_call()相同,但返回`stdout`的内容,而不是返回代码

Same as check_call but returns the contents of stdout instead of a return code

getoutput(...): 在shell中运行命令,等待它完成,然后返回输出

Runs a command in the shell, waits for it to complete,then returns the output

getstatusoutput(...): 在shell中运行命令,等待它完成,然后返回一个(exitcode,output)元组

Runs a command in the shell, waits for it to complete,

then returns a (exitcode, output) tuple

"""
其实看看源码很有意思:(内部其实就是调用的os.popen【进程先导篇讲进程守护的时候用过】)
def run(*popenargs, input=None, capture_output=False,

        timeout=None, check=False, **kwargs):

    if input is not None:

        if 'stdin' in kwargs:

            raise ValueError('stdin和输入参数可能都不会被使用。')

        kwargs['stdin'] = PIPE

    if capture_output:

        if ('stdout' in kwargs) or ('stderr' in kwargs):

            raise ValueError('不能和capture_outpu一起使用stdout 或 stderr')

        kwargs['stdout'] = PIPE

        kwargs['stderr'] = PIPE

    with Popen(*popenargs, **kwargs) as process:

        try:

            stdout, stderr = process.communicate(input, timeout=timeout)

        except TimeoutExpired:

            process.kill()

            stdout, stderr = process.communicate()

            raise TimeoutExpired(

                process.args, timeout, output=stdout, stderr=stderr)

        except:  # 包括KeyboardInterrupt的通信处理。

            process.kill()

            # 不用使用process.wait(),.__ exit__为我们做了这件事。

            raise

        retcode = process.poll()

        if check and retcode:

            raise CalledProcessError(

                retcode, process.args, output=stdout, stderr=stderr)

    return CompletedProcess(process.args, retcode, stdout, stderr)
返回值类型:CompletedProcess
# https://github.com/lotapp/cpython3/blob/master/Lib/subprocess.py

class CompletedProcess(object):

    def __init__(self, args, returncode, stdout=None, stderr=None):

        self.args = args

        self.returncode = returncode

        self.stdout = stdout

        self.stderr = stderr

    def __repr__(self):

    """对象按指定的格式显示"""

        args = [

            'args={!r}'.format(self.args),

            'returncode={!r}'.format(self.returncode)

        ]

        if self.stdout is not None:

            args.append('stdout={!r}'.format(self.stdout))

        if self.stderr is not None:

            args.append('stderr={!r}'.format(self.stderr))

        return "{}({})".format(type(self).__name__, ', '.join(args))

    def check_returncode(self):

        """如果退出代码非零,则引发CalledProcessError"""

        if self.returncode:

            raise CalledProcessError(self.returncode, self.args, self.stdout,

                                     self.stderr)
简单demo
再来个案例体会一下方便之处:
import subprocess

def main():

    result = subprocess.run(["ping", "www.baidu.com"])

    print(result.stdout)

if __name__ == '__main__':

    main()
图示: 
交互demo
再来个强大的案例(交互的程序都可以,比如 ftp,nslookup 等等):popen1.communicate
import subprocess

def main():

    process = subprocess.Popen(

        ["ipython3"],

        stdin=subprocess.PIPE,

        stdout=subprocess.PIPE,

        stderr=subprocess.PIPE)

    try:

        # 对pstree进行交互

        out, err = process.communicate(input=b'print("hello")', timeout=3)

        print("Out:%s\nErr:%s" % (out.decode(), err.decode()))

    except TimeoutError:

        # 如果超时到期,则子进程不会被终止,需要自己处理一下

        process.kill()

        out, err = process.communicate()

        print("Out:%s\nErr:%s" % (out.decode(), err.decode()))

if __name__ == '__main__':

    main()
输出:
IPython 6.4.0 -- An enhanced Interactive Python. Type '?' for help.

In [1]: hello

In [2]: Do you really want to exit ([y]/n)?

Err:
注意点:如果超时到期,则子进程不会被终止,需要自己处理一下(官方提醒)
通信demo
这个等会说进程间通信还会说,所以简单举个例子,老规矩拿ps aux | grep bash说事:
import subprocess

def main():

    # ps aux | grep bash

    # 进程1获取结果

    p1 = subprocess.Popen(["ps", "-aux"], stdout=subprocess.PIPE)

    # 得到进程1的结果再进行筛选

    p2 = subprocess.Popen(["grep", "bash"], stdin=p1.stdout, stdout=subprocess.PIPE)

    # 关闭写段(结果已经获取到进程2中了,防止干扰显示)

    p1.stdout.close()

    # 与流程交互:将数据发送到stdin并关闭它。

    msg_tuple = p2.communicate()

    # 输出结果

    print(msg_tuple[0].decode())

if __name__ == '__main__':

    main()
输出:(以前案例:进程间通信~PIPE匿名管道)
dnt       2470  0.0  0.1  24612  5236 pts/0    Ss   06:01   0:00 bash

dnt       2512  0.0  0.1  24744  5760 pts/1    Ss   06:02   0:00 bash

dnt      20784  0.0  0.1  24692  5588 pts/2    Ss+  06:21   0:00 /bin/bash

dnt 22377 0.0 0.0 16180 1052 pts/1 S+ 06:30 0:00 grep bash其他扩展可以看看这篇文章:subprocess与Popen()
1.5.进程间通信~PIPE管道通信
这个比较有意思,看个案例:
from multiprocessing import Process, Pipe

def test(w):

    w.send("[子进程]老爸,老妈回来记得喊我一下~")

    msg = w.recv()

    print(msg)

def main():

    r, w = Pipe()

    p1 = Process(target=test, args=(w, ))

    p1.start()

    msg = r.recv()

    print(msg)

    r.send("[父进程]滚犊子,赶紧写作业,不然我得跪方便面!")

    p1.join()

if __name__ == '__main__':

    main()
结果:
老爸,老妈回来记得喊我一下~

滚犊子,赶紧写作业,不然我得跪方便面!
multiprocessing.Pipe源码分析
按照道理应该子进程自己写完自己读了,和上次讲得不一样啊?不急,先看看源码:
# https://github.com/lotapp/cpython3/blob/master/Lib/multiprocessing/context.py

def Pipe(self, duplex=True):

    '''返回由管道连接的两个连接对象'''

    from .connection import Pipe

    return Pipe(duplex)
看看connection.Pipe方法的定义部分,是不是双向通信就看你是否设置duplex=True
# https://github.com/lotapp/cpython3/blob/master/Lib/multiprocessing/connection.py

if sys.platform != 'win32':

    def Pipe(duplex=True):

        '''返回管道两端的一对连接对象'''

        if duplex:

            # 双工内部其实是socket系列(下次讲)

            s1, s2 = socket.socketpair()

            s1.setblocking(True)

            s2.setblocking(True)

            c1 = Connection(s1.detach())

            c2 = Connection(s2.detach())

        else:

            # 这部分就是我们上次讲的pipe管道

            fd1, fd2 = os.pipe()

            c1 = Connection(fd1, writable=False)

            c2 = Connection(fd2, readable=False)

        return c1, c2

else:

    def Pipe(duplex=True):

        # win平台的一系列处理

        ......

        c1 = PipeConnection(h1, writable=duplex)

        c2 = PipeConnection(h2, readable=duplex)

        return c1, c2
通过源码知道了,原来双工是通过socket搞的啊~
再看个和原来一样效果的案例:(不用关来关去的了,方便!)
from multiprocessing import Process, Pipe

def test(w):

    # 只能写

    w.send("[子进程]老爸,咱们完了,老妈一直在门口~")

def main():

    r, w = Pipe(duplex=False)

    p1 = Process(target=test, args=(w, ))

    p1.start() # 你把这个放在join前面就直接死锁了

    msg = r.recv() # 只能读

    print(msg)

    p1.join()

if __name__ == '__main__':

    main()
输出:(可以思考下为什么start换个位置就死锁,提示:阻塞读写)
[子进程]老爸,咱们完了,老妈一直在门口~再举个Pool的例子,咱们就进入今天的重点了:
from multiprocessing import Pipe, Pool

def proc_test1(conn):

    conn.send("[小明]小张,今天哥们要见一女孩,你陪我呗,我24h等你回复哦~")

    msg = conn.recv()

    print(msg)

def proc_test2(conn):

    msg = conn.recv()

    print(msg)

    conn.send("[小张]不去,万一被我帅气的外表迷倒就坑了~")

def main():

    conn1, conn2 = Pipe()

    p = Pool()

    p.apply_async(proc_test1, (conn1, ))

    p.apply_async(proc_test2, (conn2, ))

    p.close()  # 关闭池,不再接收新任务

    p.join()  # 等待回收,必须先关才能join,不然会异常

if __name__ == '__main__':

    main()
输出:
[小明]小张,今天哥们要见一女孩,你陪我呗,我24h等你回复哦~

[小张]不去,万一被我帅气的外表迷倒就坑了~
pool.join源码分析
看看源码就理解了:看看Pool的join是啥情况?看源码:
# https://github.com/python/cpython/blob/3.7/Lib/multiprocessing/pool.py

# https://github.com/lotapp/cpython3/blob/master/Lib/multiprocessing/pool.py

def join(self):

    util.debug('joining pool')

    if self._state == RUN:

        # 没关闭就join,这边就会抛出一个异常

        raise ValueError("Pool is still running")

    elif self._state not in (CLOSE, TERMINATE):

        raise ValueError("In unknown state")

    self._worker_handler.join()

    self._task_handler.join()

    self._result_handler.join()

    for p in self._pool:

        p.join() # 循环join回收
在pool的__init__的方法中,这几个属性:
self._processes = processes # 指定的进程数

self._pool = [] # 列表

self._repopulate_pool() # 给列表append内容的方法
将池进程的数量增加到指定的数量,join的时候会使用这个列表
def _repopulate_pool(self):

    # 指定进程数-当前进程数,差几个补几个

    for i in range(self._processes - len(self._pool)):

        w = self.Process(target=worker,

                         args=(self._inqueue, self._outqueue,

                               self._initializer,

                               self._initargs, self._maxtasksperchild,

                               self._wrap_exception)

                        )

        self._pool.append(w) # 重点来了

        w.name = w.name.replace('Process', 'PoolWorker')

        w.daemon = True # pool退出后,通过pool创建的进程都会退出

        w.start()

        util.debug('added worker')
注意:池的方法只能由创建它的进程使用
1.5.进程间通信~Queue管道通信(常用)
一步步的设局,从底层的的pipe()->os.pipe->PIPE,现在终于到Queue了,心酸啊,明知道上面两个项目
里面基本上不会用,但为了你们能看懂源码,说了这么久%>_<%其实以后当我们从Queue说到MQ和RPC之后,现在
讲得这些进程间通信(IPC)也基本上不会用了,但本质你得清楚,我尽量多分析点源码,这样你们以后看开源项目压力会很小
欢迎批评指正~
引入案例
from multiprocessing import Process, Queue

def test(q):

    q.put("[子进程]老爸,我出去嗨了")

    print(q.get())

def main():

    q = Queue()

    p = Process(target=test, args=(q, ))

    p.start()

    msg = q.get()

    print(msg)

    q.put("[父进程]去吧比卡丘~")

    p.join()

if __name__ == '__main__':

    main()
输出:(get和put默认是阻塞等待的)
[子进程]老爸,我出去嗨了

[父进程]去吧比卡丘~
源码拓展
先看看Queue的初始化方法:(不指定大小就是最大队列数)
# 队列类型,使用PIPE,缓存,线程

class Queue(object):

    # ctx = multiprocessing.get_context("xxx")

    # 上下文总共3种:spawn、fork、forkserver(扩展部分会提一下)

    def __init__(self, maxsize=0, *, ctx):

        # 默认使用最大容量

        if maxsize <= 0:

            from .synchronize import SEM_VALUE_MAX as maxsize

        self._maxsize = maxsize  # 指定队列大小

        # 创建了一个PIPE匿名管道(单向)

        self._reader, self._writer = connection.Pipe(duplex=False)

        # `multiprocessing/synchronize.py > Lock`

        self._rlock = ctx.Lock()  # 进程锁(读)【非递归】

        self._opid = os.getpid()  # 获取PID

        if sys.platform == 'win32':

            self._wlock = None

        else:

            self._wlock = ctx.Lock()  # 进程锁(写)【非递归】

        # Semaphore信号量通常用于保护容量有限的资源

        # 控制信号量,超了就异常

        self._sem = ctx.BoundedSemaphore(maxsize)

        # 不忽略PIPE管道破裂的错误

        self._ignore_epipe = False

        # 线程相关操作

        self._after_fork()

        # 向`_afterfork_registry`字典中注册

        if sys.platform != 'win32':

            register_after_fork(self, Queue._after_fork)
关于get和put是阻塞的问题,看下源码探探究竟:
q.get():收消息
def get(self, block=True, timeout=None):

    # 默认情况是阻塞(lock加锁)

    if block and timeout is None:

        with self._rlock:

            res = self._recv_bytes()

        self._sem.release()  # 信号量+1

    else:

        if block:

            deadline = time.monotonic() + timeout

        # 超时抛异常

        if not self._rlock.acquire(block, timeout):

            raise Empty

        try:

            if block:

                timeout = deadline - time.monotonic()

                # 不管有没有内容都去读,超时就抛异常

                if not self._poll(timeout):

                    raise Empty

            elif not self._poll():

                raise Empty

            # 接收字节数据作为字节对象

            res = self._recv_bytes()

            self._sem.release()  # 信号量+1

        finally:

            # 释放锁

            self._rlock.release()

    # 释放锁后,重新序列化数据

    return _ForkingPickler.loads(res)
queue.put():发消息
def put(self, obj, block=True, timeout=None):

        # 如果Queue已经关闭就抛异常

        assert not self._closed, "Queue {0!r} has been closed".format(self)

        # 记录信号量的锁

        if not self._sem.acquire(block, timeout):

            raise Full  # 超过数量,抛个异常

        # 条件变量允许一个或多个线程等待,直到另一个线程通知它们

        with self._notempty:

            if self._thread is None:

                self._start_thread()

            self._buffer.append(obj)

            self._notempty.notify()
非阻塞get_nowait和put_nowait本质其实也是调用了get和put方法:
def get_nowait(self):

    return self.get(False)

def put_nowait(self, obj):

    return self.put(obj, False)
进程间通信1
说这么多不如来个例子看看:
from multiprocessing import Queue

def main():

    q = Queue(3)  # 只能 put 3条消息

    q.put([1, 2, 3, 4])  # put一个List类型的消息

    q.put({"a": 1, "b": 2})  # put一个Dict类型的消息

    q.put({1, 2, 3, 4})  # put一个Set类型的消息

    try:

        # 不加timeout,就一直阻塞,等消息队列有空位才能发出去

        q.put("再加条消息呗", timeout=2)

    # Full(Exception)是空实现,你可以直接用Exception

    except Exception:

        print("消息队列已满,队列数%s,当前存在%s条消息" % (q._maxsize, q.qsize()))

    try:

        # 非阻塞,不能put就抛异常

        q.put_nowait("再加条消息呗")  # 相当于q.put(obj,False)

    except Exception:

        print("消息队列已满,队列数%s,当前存在%s条消息" % (q._maxsize, q.qsize()))

    while not q.empty():

        print("队列数:%s,当前存在%s条消息 内容%s" % (q._maxsize, q.qsize(), q.get_nowait()))

    print("队列数:%s,当前存在:%s条消息" % (q._maxsize, q.qsize()))

if __name__ == '__main__':

    main()
输出:
消息队列已满,队列数3,当前存在3条消息

消息队列已满,队列数3,当前存在3条消息

队列数:3,当前存在3条消息 内容[1, 2, 3, 4]

队列数:3,当前存在2条消息 内容{'a': 1, 'b': 2}

队列数:3,当前存在1条消息 内容{1, 2, 3, 4}

队列数:3,当前存在:0条消息
补充说明一下:
q._maxsize队列数(尽量不用_开头的属性和方法)q.qsize()查看当前队列中存在几条消息q.full()查看是否满了q.empty()查看是否为空
再看个简单点的子进程间通信:(铺垫demo)
import os

import time

from multiprocessing import Process, Queue

def pro_test1(q):

    print("[子进程1]PPID=%d,PID=%d,GID=%d"%(os.getppid(), os.getpid(), os.getgid()))

    q.put("[子进程1]小明,今晚撸串不?")

    # 设置一个简版的重试机制(三次重试)

    for i in range(3):

        if not q.empty():

            print(q.get())

            break

        else:

            time.sleep((i + 1) * 2)  # 第一次1s,第二次4s,第三次6s

def pro_test2(q):

    print("[子进程2]PPID=%d,PID=%d,GID=%d"%(os.getppid(), os.getpid(), os.getgid()))

    print(q.get())

    time.sleep(4)  # 模拟一下网络延迟

    q.put("[子进程2]不去,我今天约了妹子")

def main():

    queue = Queue()

    p1 = Process(target=pro_test1, args=(queue, ))

    p2 = Process(target=pro_test2, args=(queue, ))

    p1.start()

    p2.start()

    p1.join()

    p2.join()

if __name__ == '__main__':

    main()
输出:(time python3 5.queue2.py)
[子进程1]PPID=15220,PID=15221,GID=1000

[子进程2]PPID=15220,PID=15222,GID=1000

[子进程1]小明,今晚撸串不?

[子进程2]不去,我今天约了妹子

real    0m6.087s

user    0m0.053s

sys 0m0.035s
进程间通信2
多进程基本上都是用pool,可用上面说的Queue方法怎么报错了?
import os

import time

from multiprocessing import Pool, Queue

def error_callback(msg):

    print(msg)

def pro_test1(q):

    print("[子进程1]PPID=%d,PID=%d,GID=%d" % (os.getppid(), os.getpid(),

                                           os.getgid()))

    q.put("[子进程1]小明,今晚撸串不?")

    # 设置一个简版的重试机制(三次重试)

    for i in range(3):

        if not q.empty():

            print(q.get())

            break

        else:

            time.sleep((i + 1) * 2)  # 第一次1s,第二次4s,第三次6s

def pro_test2(q):

    print("[子进程2]PPID=%d,PID=%d,GID=%d" % (os.getppid(), os.getpid(),

                                           os.getgid()))

    print(q.get())

    time.sleep(4)  # 模拟一下网络延迟

    q.put("[子进程2]不去,我今天约了妹子")

def main():

    print("[父进程]PPID=%d,PID=%d,GID=%d" % (os.getppid(), os.getpid(),

                                          os.getgid()))

    queue = Queue()

    p = Pool()

    p.apply_async(pro_test1, args=(queue, ), error_callback=error_callback)

    p.apply_async(pro_test2, args=(queue, ), error_callback=error_callback)

    p.close()

    p.join()

if __name__ == '__main__':

    main()
输出:(无法将multiprocessing.Queue对象传递给Pool方法)
[父进程]PPID=4223,PID=32170,GID=1000

Queue objects should only be shared between processes through inheritance

Queue objects should only be shared between processes through inheritance

real    0m0.183s

user    0m0.083s

sys 0m0.012s下面会详说,先看一下正确方式:(队列换了一下,其他都一样Manager().Queue())
import os

import time

from multiprocessing import Pool, Manager

def error_callback(msg):

    print(msg)

def pro_test1(q):

    print("[子进程1]PPID=%d,PID=%d,GID=%d" % (os.getppid(), os.getpid(),

                                           os.getgid()))

    q.put("[子进程1]小明,今晚撸串不?")

    # 设置一个简版的重试机制(三次重试)

    for i in range(3):

        if not q.empty():

            print(q.get())

            break

        else:

            time.sleep((i + 1) * 2)  # 第一次1s,第二次4s,第三次6s

def pro_test2(q):

    print("[子进程2]PPID=%d,PID=%d,GID=%d" % (os.getppid(), os.getpid(),

                                           os.getgid()))

    print(q.get())

    time.sleep(4)  # 模拟一下网络延迟

    q.put("[子进程2]不去,我今天约了妹子")

def main():

    print("[父进程]PPID=%d,PID=%d,GID=%d" % (os.getppid(), os.getpid(),

                                          os.getgid()))

    queue = Manager().Queue()

    p = Pool()

    p.apply_async(pro_test1, args=(queue, ), error_callback=error_callback)

    p.apply_async(pro_test2, args=(queue, ), error_callback=error_callback)

    p.close()

    p.join()

if __name__ == '__main__':

    main()
输出:
[父进程]PPID=4223,PID=31329,GID=1000

[子进程1]PPID=31329,PID=31335,GID=1000

[子进程2]PPID=31329,PID=31336,GID=1000

[子进程1]小明,今晚撸串不?

[子进程2]不去,我今天约了妹子

real    0m6.134s

user    0m0.133s

sys 0m0.035s
再抛个思考题:(Linux)
import os

import time

from multiprocessing import Pool, Queue

def error_callback(msg):

    print(msg)

q = Queue()

def pro_test1():

    global q

    print("[子进程1]PPID=%d,PID=%d,GID=%d" % (os.getppid(), os.getpid(),

                                           os.getgid()))

    q.put("[子进程1]小明,今晚撸串不?")

    # 设置一个简版的重试机制(三次重试)

    for i in range(3):

        if not q.empty():

            print(q.get())

            break

        else:

            time.sleep((i + 1) * 2)  # 第一次1s,第二次4s,第三次6s

def pro_test2():

    global q

    print("[子进程2]PPID=%d,PID=%d,GID=%d" % (os.getppid(), os.getpid(),

                                           os.getgid()))

    print(q.get())

    time.sleep(4)  # 模拟一下网络延迟

    q.put("[子进程2]不去,我今天约了妹子")

def main():

    print("[父进程]PPID=%d,PID=%d,GID=%d" % (os.getppid(), os.getpid(),

                                          os.getgid()))

    q = Queue()

    p = Pool()

    p.apply_async(pro_test1, error_callback=error_callback)

    p.apply_async(pro_test2, error_callback=error_callback)

    p.close()

    p.join()

if __name__ == '__main__':

    main()
输出:(为啥这样也可以【提示:fork】)
[父进程]PPID=12855,PID=16879,GID=1000

[子进程1]PPID=16879,PID=16880,GID=1000

[子进程2]PPID=16879,PID=16881,GID=1000

[子进程1]小明,今晚撸串不?

[子进程2]不去,我今天约了妹子

real    0m6.120s

user    0m0.105s

sys     0m0.024s
进程拓展
官方参考:https://docs.python.org/3/library/multiprocessing.html
1.上下文系
- spawn:(Win默认,Linux下也可以用【>=3.4】)
- 父进程启动一个新的python解释器进程。
- 子进程只会继承运行进程对象run()方法所需的那些资源。
- 不会继承父进程中不必要的文件描述符和句柄。
- 与使用fork或forkserver相比,使用此方法启动进程相当慢。
- 可在Unix和Windows上使用。Windows上的默认设置。
- fork:(Linux下默认)
- 父进程用于os.fork()分叉Python解释器。
- 子进程在开始时与父进程相同(这时候内部变量之类的还没有被修改)
- 父进程的所有资源都由子进程继承(用到多线程的时候可能有些问题)
- 仅适用于Unix。Unix上的默认值。
- forkserver:(常用)
- 当程序启动并选择forkserver start方法时,将启动服务器进程。
- 从那时起,每当需要一个新进程时,父进程就会连接到服务器并请求它分叉一个新进程。
- fork服务器进程是单线程的,因此它可以安全使用os.fork()。没有不必要的资源被继承。
- 可在Unix平台上使用,支持通过Unix管道传递文件描述符。
这块官方文档很详细,贴下官方的2个案例:
通过multiprocessing.set_start_method(xxx)来设置启动的上下文类型
import multiprocessing as mp

def foo(q):

    q.put('hello')

if __name__ == '__main__':

    mp.set_start_method('spawn') # 不要过多使用

    q = mp.Queue()

    p = mp.Process(target=foo, args=(q,))

    p.start()

    print(q.get())

    p.join()
输出:(set_start_method不要过多使用)
hello

real    0m0.407s

user    0m0.134s

sys     0m0.012s
如果你把设置启动上下文注释掉:(消耗的总时间少了很多)
real    0m0.072s

user    0m0.057s

sys 0m0.016s也可以通过multiprocessing.get_context(xxx)获取指定类型的上下文
import multiprocessing as mp

def foo(q):

    q.put('hello')

if __name__ == '__main__':

    ctx = mp.get_context('spawn')

    q = ctx.Queue()

    p = ctx.Process(target=foo, args=(q,))

    p.start()

    print(q.get())

    p.join()
输出:(get_context在Python源码里用的比较多,so=>也建议大家这么用)
hello

real    0m0.169s

user    0m0.146s

sys 0m0.024s
从结果来看,总耗时也少了很多
2.日记系列
说下日记相关的事情:
先看下multiprocessing里面的日记记录:
# https://github.com/lotapp/cpython3/blob/master/Lib/multiprocessing/context.py

def log_to_stderr(self, level=None):

    '''打开日志记录并添加一个打印到stderr的处理程序'''

    from .util import log_to_stderr

    return log_to_stderr(level)
更多Loging模块内容可以看官方文档:https://docs.python.org/3/library/logging.html
这个是内部代码,看看即可:
# https://github.com/lotapp/cpython3/blob/master/Lib/multiprocessing/util.py

def log_to_stderr(level=None):

    '''打开日志记录并添加一个打印到stderr的处理程序'''

    # 全局变量默认是False

    global _log_to_stderr

    import logging

    # 日记记录转换成文本

    formatter = logging.Formatter(DEFAULT_LOGGING_FORMAT)

    # 一个处理程序类,它将已适当格式化的日志记录写入流

    handler = logging.StreamHandler()  # 此类不会关闭流,因为用到了sys.stdout|sys.stderr

    # 设置格式:'[%(levelname)s/%(processName)s] %(message)s'

    handler.setFormatter(formatter)

    # 返回`multiprocessing`专用的记录器

    logger = get_logger()

    # 添加处理程序

    logger.addHandler(handler)

    if level:

        # 设置日记级别

        logger.setLevel(level)

    # 现在log是输出到stderr的

    _log_to_stderr = True

    return _logger
Logging之前也有提过,可以看看:https://www.cnblogs.com/dotnetcrazy/p/9333792.html#2.装饰器传参的扩展(可传可不传)
来个案例:
import logging

from multiprocessing import Process, log_to_stderr

def test():

    print("test")

def start_log():

    # 把日记输出定向到sys.stderr中

    logger = log_to_stderr()

    # 设置日记记录级别

    # 敏感程度:DEBUG、INFO、WARN、ERROR、CRITICAL

    print(logging.WARN == logging.WARNING)  # 这两个是一样的

    level = logging.INFO

    logger.setLevel(level)  # 设置日记级别(一般都是WARN)

    # 自定义输出

    # def log(self, level, msg, *args, **kwargs):

    logger.log(level, "我是通用格式")  # 通用,下面的内部也是调用的这个

    logger.info("info 测试")

    logger.warning("warning 测试")

    logger.error("error 测试")

def main():

    start_log()

    # 做的操作都会被记录下来

    p = Process(target=test)

    p.start()

    p.join()

if __name__ == '__main__':

    main()
输出:
True
[INFO/MainProcess] 我是通用格式
[INFO/MainProcess] info 测试
[WARNING/MainProcess] warning 测试
[ERROR/MainProcess] error 测试
[INFO/Process-1] child process calling self.run()
test
[INFO/Process-1] process shutting down
[INFO/Process-1] process exiting with exitcode 0
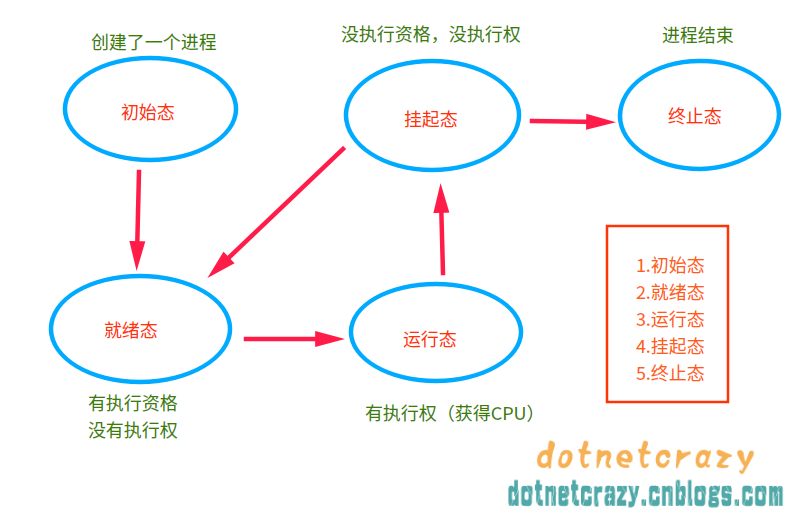
[INFO/MainProcess] process shutting down3.进程5态
之前忘记说了~现在快结尾了,补充一下进程5态:(来个草图)
1.6.进程间状态共享
应该尽量避免进程间状态共享,但需求在那,所以还是得研究,官方推荐了两种方式:
1.共享内存(Value or Array)
之前说过Queue:在Process之间使用没问题,用到Pool,就使用Manager().xxx,Value和Array,就不太一样了:
看看源码:(Manager里面的Array和Process共享的Array不是一个概念,而且也没有同步机制)
# https://github.com/lotapp/cpython3/blob/master/Lib/multiprocessing/managers.py

class Value(object):

    def __init__(self, typecode, value, lock=True):

        self._typecode = typecode

        self._value = value

    def get(self):

        return self._value

    def set(self, value):

        self._value = value

    def __repr__(self):

        return '%s(%r, %r)' % (type(self).__name__, self._typecode, self._value)

    value = property(get, set) # 给value设置get和set方法(和value的属性装饰器一样效果)

def Array(typecode, sequence, lock=True):

    return array.array(typecode, sequence)
以Process为例看看怎么用:
from multiprocessing import Process, Value, Array

def proc_test1(value, array):

    print("子进程1", value.value)

    array[0] = 10

    print("子进程1", array[:])

def proc_test2(value, array):

    print("子进程2", value.value)

    array[1] = 10

    print("子进程2", array[:])

def main():

    try:

        value = Value("d", 3.14)  # d 类型,相当于C里面的double

        array = Array("i", range(10))  # i 类型,相当于C里面的int

        print(type(value))

        print(type(array))

        p1 = Process(target=proc_test1, args=(value, array))

        p2 = Process(target=proc_test2, args=(value, array))

        p1.start()

        p2.start()

        p1.join()

        p2.join()

        print("父进程", value.value)  # 获取值

        print("父进程", array[:])  # 获取值

    except Exception as ex:

        print(ex)

    else:

        print("No Except")

if __name__ == '__main__':

    main()
输出:(Value和Array是进程|线程安全的)
<class 'multiprocessing.sharedctypes.Synchronized'>

<class 'multiprocessing.sharedctypes.SynchronizedArray'>

子进程1 3.14

子进程1 [10, 1, 2, 3, 4, 5, 6, 7, 8, 9]

子进程2 3.14

子进程2 [10, 10, 2, 3, 4, 5, 6, 7, 8, 9]

父进程 3.14

父进程 [10, 10, 2, 3, 4, 5, 6, 7, 8, 9]

No Except
类型方面的对应关系:
typecode_to_type = {

    'c': ctypes.c_char,

    'u': ctypes.c_wchar,

    'b': ctypes.c_byte,

    'B': ctypes.c_ubyte,

    'h': ctypes.c_short,

    'H': ctypes.c_ushort,

    'i': ctypes.c_int,

    'I': ctypes.c_uint,

    'l': ctypes.c_long,

    'L': ctypes.c_ulong,

    'q': ctypes.c_longlong,

    'Q': ctypes.c_ulonglong,

    'f': ctypes.c_float,

    'd': ctypes.c_double

}
这两个类型其实是ctypes类型,更多的类型可以去` multiprocessing.sharedctypes`查看,来张图: 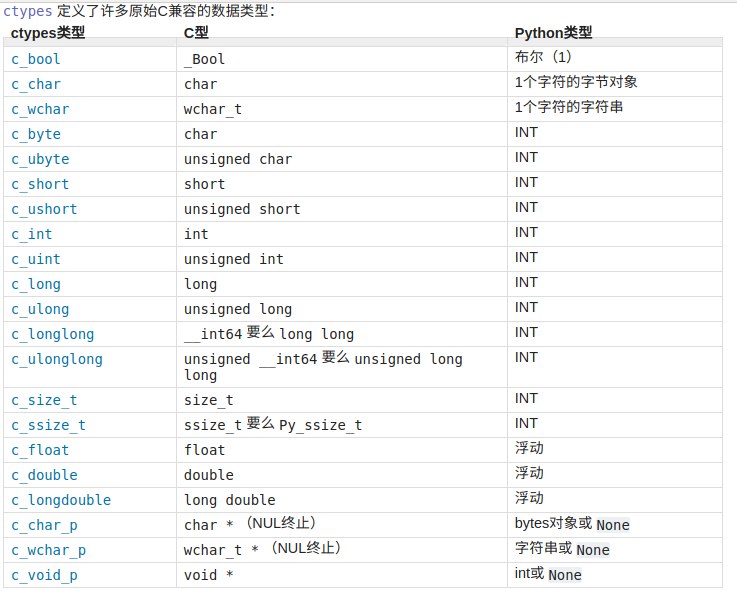 回头解决
回头解决GIL的时候会用到C系列或者Go系列的共享库(讲线程的时候会说)
关于进程安全的补充说明:对于原子性操作就不用说,铁定安全,但注意一下i+=1并不是原子性操作:
from multiprocessing import Process, Value

def proc_test1(value):

    for i in range(1000):

        value.value += 1

def main():

    value = Value("i", 0)

    p_list = [Process(target=proc_test1, args=(value, )) for i in range(5)]

    # 批量启动

    for i in p_list:

        i.start()

    # 批量资源回收

    for i in p_list:

        i.join()

    print(value.value)

if __name__ == '__main__':

    main()
输出:(理论上应该是:5×1000=5000)
2153稍微改一下才行:(进程安全:只是提供了安全的方法,并不是什么都不用你操心了)
# 通用方法

def proc_test1(value):

    for i in range(1000):

        if value.acquire():

            value.value += 1

        value.release()

# 官方案例:(Lock可以使用with托管)

def proc_test1(value):

    for i in range(1000):

        with value.get_lock():

            value.value += 1

# 更多可以查看:`sharedctypes.SynchronizedBase` 源码
输出:(关于锁这块,后面讲线程的时候会详说,看看就好【语法的确比C#麻烦点】)
5000看看源码:(之前探讨如何优雅的杀死子进程,其中就有一种方法使用了Value)
def Value(typecode_or_type, *args, lock=True, ctx=None):

    '''返回Value的同步包装器'''

    obj = RawValue(typecode_or_type, *args)

    if lock is False:

        return obj

    # 默认支持Lock

    if lock in (True, None):

        ctx = ctx or get_context() # 获取上下文

        lock = ctx.RLock() # 获取递归锁

    if not hasattr(lock, 'acquire'):

        raise AttributeError("%r has no method 'acquire'" % lock)

    # 一系列处理

    return synchronized(obj, lock, ctx=ctx)

def Array(typecode_or_type, size_or_initializer, *, lock=True, ctx=None):

    '''返回RawArray的同步包装器'''

    obj = RawArray(typecode_or_type, size_or_initializer)

    if lock is False:

        return obj

    # 默认是支持Lock的

    if lock in (True, None):

        ctx = ctx or get_context() # 获取上下文

        lock = ctx.RLock()  # 递归锁属性

    # 查看是否有acquire属性

    if not hasattr(lock, 'acquire'):

        raise AttributeError("%r has no method 'acquire'" % lock)

    return synchronized(obj, lock, ctx=ctx)
扩展部分可以查看这篇文章:http://blog.51cto.com/11026142/1874807
2.服务器进程(Manager)
官方文档:https://docs.python.org/3/library/multiprocessing.html#managers
有一个服务器进程负责维护所有的对象,而其他进程连接到该进程,通过代理对象操作服务器进程当中的对象
通过返回的经理Manager()将支持类型list、dict、Namespace、Lock、RLock、Semaphore、BoundedSemaphore、Condition、Event、Barrier、Queue
举个简单例子(后面还会再说):(本质其实就是多个进程通过代理,共同操作服务端内容)
from multiprocessing import Pool, Manager

def test1(d, l):

    d[1] = '1'

    d['2'] = 2

    d[0.25] = None

    l.reverse()

def test2(d, l):

    print(d)

    print(l)

def main():

    with Manager() as manager:

        dict_test = manager.dict()

        list_test = manager.list(range(10))

        pool = Pool()

        pool.apply_async(test1, args=(dict_test, list_test))

        pool.apply_async(test2, args=(dict_test, list_test))

        pool.close()

        pool.join()

if __name__ == '__main__':

    main()
输出:
{1: '1', '2': 2, 0.25: None}

[9, 8, 7, 6, 5, 4, 3, 2, 1, 0]服务器进程管理器比使用共享内存对象更灵活,因为它们可以支持任意对象类型。此外,单个管理器可以通过网络在不同计算机上的进程共享。但是,它们比使用共享内存慢(毕竟有了“中介”)
同步问题依然需要注意一下,举个例子体会一下:
from multiprocessing import Manager, Process, Lock

def test(dict1, lock):

    for i in range(100):

        with lock:  # 你可以把这句话注释掉,然后就知道为什么加了

            dict1["year"] += 1

def main():

    with Manager() as m:

        lock = Lock()

        dict1 = m.dict({"year": 2000})

        p_list = [Process(target=test, args=(dict1, lock)) for i in range(5)]

        for i in p_list:

            i.start()

        for i in p_list:

            i.join()

        print(dict1)

if __name__ == '__main__':

    main()
扩展补充:
multiprocessing.Lock是一个进程安全对象,因此您可以将其直接传递给子进程并在所有进程中安全地使用它。- 大多数可变Python对象(如list,dict,大多数类)不能保证进程中安全,所以它们在进程间共享时需要使用
Manager - 多进程模式的缺点是创建进程的代价大,在
Unix/Linux系统下,用fork调用还行,在Windows下创建进程开销巨大。
Manager这块官方文档很详细,可以看看:https://docs.python.org/3/library/multiprocessing.html#managers
WinServer的可以参考这篇 or 这篇埋坑记(Manager一般都是部署在Linux的,Win的客户端不影响)
扩展补充
还记得之前的:无法将multiprocessing.Queue对象传递给Pool方法吗?其实一般都是这两种方式解决的:
- 使用Manager需要生成另一个进程来托管Manager服务器。 并且所有获取/释放锁的调用都必须通过IPC发送到该服务器。
- 使用初始化程序在池创建时传递常规
multiprocessing.Queue()这将使Queue实例在所有子进程中全局共享
再看一下Pool的__init__方法:
# processes:进程数

# initializer,initargs 初始化进行的操作

# maxtaskperchild:每个进程执行task的最大数目

# contex:上下文对象

def __init__(self, processes=None, initializer=None, initargs=(),

                 maxtasksperchild=None, context=None):
第一种方法不够轻量级,在讲案例前,稍微说下第二种方法:(也算把上面留下的悬念解了)
import os

import time

from multiprocessing import Pool, Queue

def error_callback(msg):

    print(msg)

def pro_test1():

    print("[子进程1]PPID=%d,PID=%d" % (os.getppid(), os.getpid()))

    q.put("[子进程1]小明,今晚撸串不?")

    # 设置一个简版的重试机制(三次重试)

    for i in range(3):

        if not q.empty():

            print(q.get())

            break

        else:

            time.sleep((i + 1) * 2)  # 第一次1s,第二次4s,第三次6s

def pro_test2():

    print("[子进程2]PPID=%d,PID=%d" % (os.getppid(), os.getpid()))

    print(q.get())

    time.sleep(4)  # 模拟一下网络延迟

    q.put("[子进程2]不去,我今天约了妹子")

def init(queue):

    global q

    q = queue

def main():

    print("[父进程]PPID=%d,PID=%d" % (os.getppid(), os.getpid()))

    queue = Queue()

    p = Pool(initializer=init, initargs=(queue, ))

    p.apply_async(pro_test1, error_callback=error_callback)

    p.apply_async(pro_test2, error_callback=error_callback)

    p.close()

    p.join()

if __name__ == '__main__':

    main()
输出:(就是在初始化Pool的时候,传了初始化执行的方法并传了参数:alizer=init, initargs=(queue, )))
[父进程]PPID=13157,PID=24864

[子进程1]PPID=24864,PID=24865

[子进程2]PPID=24864,PID=24866

[子进程1]小明,今晚撸串不?

[子进程2]不去,我今天约了妹子

real    0m6.105s

user    0m0.071s

sys 0m0.042sWin下亦通用(win下没有os.getgid) 
1.7.分布式进程的案例
有了1.6的基础,咱们来个例子练练:
BaseManager的缩略图:
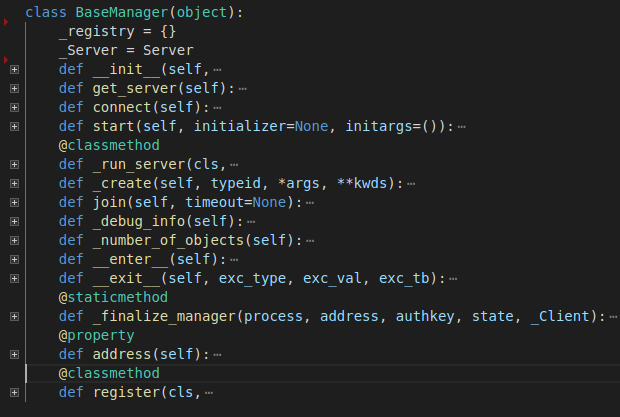
服务器端代码:
from multiprocessing import Queue

from multiprocessing.managers import BaseManager

def main():

    # 用来身份验证的

    key = b"8d969eef6ecad3c29a3a629280e686cf0c3f5d5a86aff3ca12020c923adc6c92"

    get_zhang_queue = Queue()  # 小张消息队列

    get_ming_queue = Queue()  # 小明消息队列

    # 把Queue注册到网络上, callable参数关联了Queue对象

    BaseManager.register("get_zhang_queue", callable=lambda: get_zhang_queue)

    BaseManager.register("get_ming_queue", callable=lambda: get_ming_queue)

    # 实例化一个Manager对象。绑定ip+端口, 设置验证秘钥

    manager = BaseManager(address=("192.168.36.235", 5438), authkey=key)

    # 运行serve

    manager.get_server().serve_forever()

if __name__ == '__main__':

    main()
客户端代码1:
from multiprocessing.managers import BaseManager

def main():

    """客户端1"""

    key = b"8d969eef6ecad3c29a3a629280e686cf0c3f5d5a86aff3ca12020c923adc6c92"

    # 注册对应方法的名字(从网络上获取Queue)

    BaseManager.register("get_ming_queue")

    BaseManager.register("get_zhang_queue")

    # 实例化一个Manager对象。绑定ip+端口, 设置验证秘钥

    m = BaseManager(address=("192.168.36.235", 5438), authkey=key)

    # 连接到服务器

    m.connect()

    q1 = m.get_zhang_queue()  # 在自己队列里面留言

    q1.put("[小张]小明,老大明天是不是去外地办事啊?")

    q2 = m.get_ming_queue()  # 获取小明说的话

    print(q2.get())

if __name__ == '__main__':

    main()
客户端代码2:
from multiprocessing.managers import BaseManager
def main():
"""客户端2"""
key = b"8d969eef6ecad3c29a3a629280e686cf0c3f5d5a86aff3ca12020c923adc6c92"
# 注册对应方法的名字(从网络上获取Queue)
BaseManager.register("get_ming_queue")
BaseManager.register("get_zhang_queue")
# 实例化一个Manager对象。绑定ip+端口, 设置验证秘钥
m = BaseManager(address=("192.168.36.235", 5438), authkey=key)
# 连接到服务器
m.connect()
q1 = m.get_zhang_queue() # 获取小张说的话
print(q1.get())
q2 = m.get_ming_queue() # 在自己队列里面留言
q2.put("[小明]这几天咱们终于可以不加班了(>_<)")
if __name__ == '__main__':
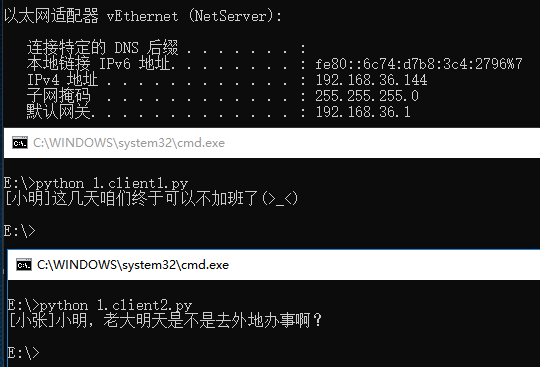
main()输出图示:
服务器运行在Linux的测试:
其实还有一部分内容没说,明天得出去办点事,先到这吧,后面找机会继续带一下
参考文章:
进程共享的探讨:python-sharing-a-lock-between-processes
多进程锁的探讨:trouble-using-a-lock-with-multiprocessing-pool-pickling-error
JoinableQueue扩展:https://www.cnblogs.com/smallmars/p/7093603.html
Python多进程编程:https://www.cnblogs.com/kaituorensheng/p/4445418.html
有深度但需要辩证看的两篇文章:
跨进程对象共享:http://blog.ftofficer.com/2009/12/python-multiprocessing-3-about-queue
关于Queue:http://blog.ftofficer.com/2009/12/python-multiprocessing-2-object-sharing-across-process
NetCore并发编程
Python的线程、并行、协程下次说
示例代码:https://github.com/lotapp/BaseCode/tree/master/netcore/4_Concurrency
先简单说下概念(其实之前也有说,所以简说下):
- 并发:同时做多件事情
- 多线程:并发的一种形式
- 并行处理:多线程的一种(线程池产生的一种并发类型,eg:异步编程)
- 响应式编程:一种编程模式,对事件进行响应(有点类似于JQ的事件)
Net里面很少用进程,在以前基本上都是线程+池+异步+并行+协程
我这边简单引入一下,毕竟主要是写Python的教程,Net只是帮你们回顾一下,如果你发现还没听过这些概念,或者你的项目中还充斥着各种Thread和ThreadPool的话,真的得系统的学习一下了,现在官网的文档已经很完善了,记得早几年啥都没有,也只能挖那些外国开源项目:
https://docs.microsoft.com/zh-cn/dotnet/standard/parallel-processing-and-concurrency
1.异步编程(Task)
Task的目的其实就是为了简化Thread和ThreadPool的代码,下面一起看看吧:
异步用起来比较简单,一般IO,DB,Net用的比较多,很多时候都会采用重试机制,举个简单的例子:
/// <summary>

/// 模拟一个网络操作(别忘了重试机制)

/// </summary>

/// <param name="url">url</param>

/// <returns></returns>

private async static Task<string> DownloadStringAsync(string url)

{

    using (var client = new HttpClient())

    {

        // 设置第一次重试时间

        var nextDelay = TimeSpan.FromSeconds(1);

        for (int i = 0; i < 3; i++)

        {

            try

            {

                return await client.GetStringAsync(url);

            }

            catch { }

            await Task.Delay(nextDelay); // 用异步阻塞的方式防止服务器被太多重试给阻塞了

            nextDelay *= 2; // 3次重试机会,第一次1s,第二次2s,第三次4s

        }

        // 最后一次尝试,错误就抛出

        return await client.GetStringAsync(url);

    }

}
然后补充说下Task异常的问题,当你await的时候如果有异常会抛出,在第一个await处捕获处理即可
如果async和await就是理解不了的可以这样想:async就是为了让await生效(为了向后兼容)
对了,如果返回的是void,你设置成Task就行了,触发是类似于事件之类的方法才使用void,不然没有返回值都是使用Task
项目里经常有这么一个场景:等待一组任务完成后再执行某个操作,看个引入案例:
/// <summary>

/// 1.批量任务

/// </summary>

/// <param name="list"></param>

/// <returns></returns>

private async static Task<string[]> DownloadStringAsync(IEnumerable<string> list)

{

    using (var client = new HttpClient())

    {

        var tasks = list.Select(url => client.GetStringAsync(url)).ToArray();

        return await Task.WhenAll(tasks);

    }

}
再举一个场景:同时调用多个同效果的API,有一个返回就好了,其他的忽略
/// <summary>

/// 2.返回首先完成的Task

/// </summary>

/// <param name="list"></param>

/// <returns></returns>

private static async Task<string> GetIPAsync(IEnumerable<string> list)

{

    using (var client = new HttpClient())

    {

        var tasks = list.Select(url => client.GetStringAsync(url)).ToArray();

        var task = await Task.WhenAny(tasks); // 返回第一个完成的Task

        return await task;

    }

}
一个async方法被await调用后,当它恢复运行时就会回到原来的上下文中运行。
如果你的Task不再需要上下文了可以使用:task.ConfigureAwait(false),eg:写个日记还要啥上下文?
逆天的建议是:在核心代码里面一种使用ConfigureAwait,用户页面相关代码,不需要上下文的加上
其实如果有太多await在上下文里恢复那也是比较卡的,使用ConfigureAwait之后,被暂停后会在线程池里面继续运行
再看一个场景:比如一个耗时操作,我需要指定它的超时时间:
/// <summary>

/// 3.超时取消

/// </summary>

/// <returns></returns>

private static async Task<string> CancellMethod()

{

    //实例化取消任务

    var cts = new CancellationTokenSource();

    cts.CancelAfter(TimeSpan.FromSeconds(3)); // 设置失效时间为3s

    try

    {

        return await DoSomethingAsync(cts.Token);

    }

    // 任务已经取消会引发TaskCanceledException

    catch (TaskCanceledException ex)

    {

        return "false";

    }

}

/// <summary>

/// 模仿一个耗时操作

/// </summary>

/// <returns></returns>

private static async Task<string> DoSomethingAsync(CancellationToken token)

{

    await Task.Delay(TimeSpan.FromSeconds(5), token);

    return "ok";

}
异步这块简单回顾就不说了,留两个扩展,你们自行探讨:
- 进度方面的可以使用
IProgress<T>,就当留个作业自己摸索下吧~ - 使用了异步之后尽量避免使用
task.Waitortask.Result,这样可以避免死锁
Task其他新特征去官网看看吧,引入到此为止了。
2.并行编程(Parallel)
这个其实出来很久了,现在基本上都是用PLinq比较多点,主要就是:
- 数据并行:重点在处理数据(eg:聚合)
- 任务并行:重点在执行任务(每个任务块尽可能独立,越独立效率越高)
数据并行
以前都是Parallel.ForEach这么用,现在和Linq结合之后非常方便.AsParallel()就OK了
说很抽象看个简单案例:
static void Main(string[] args)

{

    IEnumerable<int> list = new List<int>() { 1, 2, 3, 4, 5, 7, 8, 9 };

    foreach (var item in ParallelMethod(list))

    {

        Console.WriteLine(item);

    }

}

/// <summary>

/// 举个例子

/// </summary>

private static IEnumerable<int> ParallelMethod(IEnumerable<int> list)

{

    return list.AsParallel().Select(x => x * x);

}
正常执行的结果应该是:
1

4

9

25

64

16

49

81
并行之后就是这样了(不管顺序了):
25

64

1

9

49

81

4

16当然了,如果你就是对顺序有要求可以使用:.AsOrdered()
/// <summary>

/// 举个例子

/// </summary>

private static IEnumerable<int> ParallelMethod(IEnumerable<int> list)

{

    return list.AsParallel().AsOrdered().Select(x => x * x);

}
其实实际项目中,使用并行的时候:任务时间适中,太长不适合,太短也不适合
记得大家在项目里经常会用到如Sum,Count等聚合函数,其实这时候使用并行就很合适
var list = new List<long>();

for (long i = 0; i < 1000000; i++)

{

    list.Add(i);

}

Console.WriteLine(GetSumParallel(list));
private static long GetSumParallel(IEnumerable<long> list)

{

    return list.AsParallel().Sum();

}
time dotnet PLINQ.dll
499999500000

real    0m0.096s

user    0m0.081s

sys 0m0.025s
不使用并行:(稍微多了点,CPU越密集差距越大)
499999500000

real    0m0.103s

user    0m0.092s

sys 0m0.021s
其实聚合有一个通用方法,可以支持复杂的聚合:(以上面sum为例)
.Aggregate(

            seed:0,

            func:(sum,item)=>sum+item

);稍微扩展一下,PLinq也是支持取消的,.WithCancellation(CancellationToken)
Token的用法和上面一样,就不复述了,如果需要和异步结合,一个Task.Run就可以把并行任务交给线程池了
也可以使用Task的异步方法,设置超时时间,这样PLinq超时了也就终止了
PLinq这么方便,其实也是有一些小弊端的,比如它会直接最大程度的占用系统资源,可能会影响其他的任务,而传统的Parallel则会动态调整
任务并行(并行调用)
这个PLinq好像没有对应的方法,有新语法你可以说下,来举个例子:
await Task.Run(() =>

    Parallel.Invoke(

        () => Task.Delay(TimeSpan.FromSeconds(3)),

        () => Task.Delay(TimeSpan.FromSeconds(2))

    ));
取消也支持:
Parallel.Invoke(new ParallelOptions() { CancellationToken = token }, actions);
扩充说明
其实还有一些比如数据流和响应编程没说,这个之前都是用第三方库,刚才看官网文档,好像已经支持了,所以就不卖弄了,感兴趣的可以去看看,其实项目里面有流数据相关的框架,eg:Spark,都是比较成熟的解决方案了基本上也不太使用这些了。
然后还有一些没说,比如NetCore里面不可变类型(列表、字典、集合、队列、栈、线程安全字典等等)以及限流、任务调度等,这些关键词我提一下,也方便你去搜索自己学习拓展
先到这吧,其他的自己探索一下吧,最后贴一些Nuget库,你可以针对性的使用:
- 数据流:
Microsoft.Tpl.Dataflow - 响应编程(Linq的Rx操作):
Rx-Main - 不可变类型:
Microsoft.Bcl.Immutable
不得不感慨一句,微软妈妈真的花了很多功夫,Net的并发编程比Python省心多了(完)
Python3 与 C# 并发编程之~ 进程篇的更多相关文章
- Python3 与 C# 并发编程之~进程先导篇
在线预览:http://github.lesschina.com/python/base/concurrency/1.并发编程-进程先导篇.html Python3 与 C# 并发编程之- 进程篇 ...
- Python3 与 C# 并发编程之~ 协程篇
3.协程篇¶ 去年微信公众号就陆陆续续发布了,我一直以为博客也汇总同步了,这几天有朋友说一直没找到,遂发现,的确是漏了,所以补上一篇 在线预览:https://github.lesschina.c ...
- [ 高并发]Java高并发编程系列第二篇--线程同步
高并发,听起来高大上的一个词汇,在身处于互联网潮的社会大趋势下,高并发赋予了更多的传奇色彩.首先,我们可以看到很多招聘中,会提到有高并发项目者优先.高并发,意味着,你的前雇主,有很大的业务层面的需求, ...
- python并发编程之进程、线程、协程的调度原理(六)
进程.线程和协程的调度和运行原理总结. 系列文章 python并发编程之threading线程(一) python并发编程之multiprocessing进程(二) python并发编程之asynci ...
- Java并发编程:进程的创建
Java并发编程:进程的创建 */--> code {color: #FF0000} pre.src {background-color: #002b36; color: #839496;} J ...
- Python3 与 C# 并发编程之~ 线程篇
2.线程篇¶ 在线预览:https://github.lesschina.com/python/base/concurrency/3.并发编程-线程篇.html 示例代码:https://gith ...
- Python3 与 C# 并发编程之~ Net篇
NetCore并发编程 示例代码:https://github.com/lotapp/BaseCode/tree/master/netcore/4_Concurrency 先简单说下概念(其实之前也有 ...
- Python 并发编程:PoolExecutor 篇
个人笔记,如有疏漏,还请指正. 使用多线程(threading)和多进程(multiprocessing)完成常规的并发需求,在启动的时候 start.join 等步骤不能省,复杂的需要还要用 1-2 ...
- Java并发编程 | 从进程、线程到并发问题实例解决
计划写几篇文章讲述下Java并发编程,帮助一些初学者成体系的理解并发编程并实际使用,而不只是碎片化的了解一些Synchronized.ReentrantLock等技术点.在讲述的过程中,也想融入一些相 ...
随机推荐
- windows下查看端口被占用及处理
一.通过命令行查找端口被谁占用 1.window+R组合键,调出命令窗口 2.输入命令:netstat -ano,列出所有端口的情况.在列表中我们观察被占用的端口 3.查看被占用端口对应的PID,输入 ...
- MySql 学习之路-Date函数
MySQL中重要的内建函数 函数 描述 NOW() 返回当前的日期和时间 NOW() 返回当前的日期和时间. 语法 NOW() -- 实例 -- 下面是 SELECT 语句: SELECT NOW() ...
- 使用Visual Studio Code进行ABAP开发
长期以来,我们都使用SAP GUI进行ABAP编码工作,事务代码SE38甚至成了ABAP的代名词. SAP GUI的代码编辑能力和一些专业的IDE比较起来难免相形见绌,为了给开发者们更好的体验,SAP ...
- Python开发【前端篇】HTML
1.html概述和基本结构 html概述 HTML是 HyperText Mark-up Language 的首字母简写,意思是超文本标记语言,超文本指的是超链接,标记指的是标签,是一种用来制作网页的 ...
- Java Api Consumer 连接启用Kerberos认证的Kafka
java程序连接到一个需要Kerberos认证的kafka集群上,消费生产者生产的信息,kafka版本是2.10-0.10.0.1: Java程序以maven构建,(怎么构建maven工程,可去问下度 ...
- Node、TS、Koa学习笔记
这样定义可以轻松拿到gender属性 这样定义,函数内显示没有gender 这种方法能得到gender但是函数内部没有gender 这种方式能到gender 但是在函数里施symbel属性,外部不能访 ...
- 【题解】P1171 售货员的难题
Tags 搜索,状压. 裸的旅行商问题 #include <stdio.h> #include <string.h> #define re register #define ...
- day15-面向对象基础(二)
今天整理类的组合以及类的三大特性 1.类的组合 2.类的继承 3.类的封装 4.类的多态 开始今日份整理 1.类的组合 类与类之间,并不是独立的,很多的时候在正常使用的时候都是类与类之间互相调用,所以 ...
- (三)Installation
Elasticsearch requires at least Java 8. Specifically as of this writing, it is recommended that you ...
- Oracle 执行计划(三)-------表连接方式
SQL FOR TESTING: create table qcb_student_test( student_id number, student_name varchar2(20), studen ...