NIO 概述 与 通信实例
NIO
简述:
NIO是在jdk1.4之后加入的一种基于缓冲区(buffer)和通道(channel)的I/O方式,
nio是同步非阻塞的i/o模式,同步是指线程不断地轮询i/o事件,非阻塞是在处理i/o事件的同时,还可以去处理其它的事情。
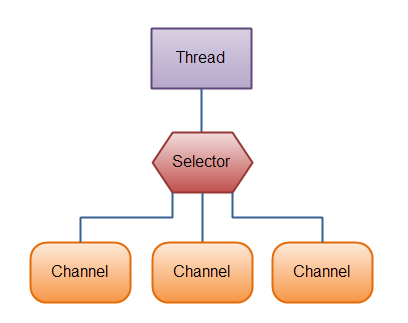
同步的核心是Selector(选择器),代替的线程本身的轮询i/o事件,避免了阻塞同时线程的不必要消耗,
非阻塞的核心就是通道和缓冲区,当有i/o事件就绪时,写入到缓冲区,保证i/o成功。而无需等待。
为什么使用nio?
使用nio是为了java程序员可以实现高速的i/o操作,不用编写自定义的本机代码。nio将最耗时的i/o操作转回到操作系统,因而提交了效率。
NIO 通道 缓冲区:
通道可以被异步读写,通道始终读写缓冲区。
channel ——> buffer
buffer ——> channel
数据可以从通道读取到缓冲区,也可以是冲缓冲区读取到通道。
Channel有很多种实现:
FileChannel 从文件中读取数据
DataGramChannel 通过udp连接在网络中读取数据
SocketChannel 能通过socket连接在网络中读取数据
ServerSocketChannel 可以监听新进来的tcp连接
Buffer 的实现:
byteBuffer charBuffer longBuffer DoubleBuffer ...等
Selector 选择器:
selector 允许单个选择器检测多个通道。

使用selector需要向它注册多个channel,然后调用他的select() 方法,这个方法会一直阻塞到某个通道有事件发生。一旦有返回值,线程就可以处理了。
selector 的创建:
Selector selector = Selector.open() //获取一个选择器
向Selector注册channel:
要想selector 与channel 配合使用,就必须吧channel注册到selector上,并使Channel处于非阻塞状态,这意味著FileChanne不能切换到非阻塞模式,而套接字可以;
Channel.configureBlocking(fasle);// 设置为非阻塞模式
SelectionKey seletctorKey = channel.register(selector,SelectionKey.OP_READ);
SelectionKey 的监听事件有OP_READ OP_WRITE OP_ACCEPT OP_CONNECT
通道触发了一个事件就表示该事件变成就绪状态,所以某个channel成功连接到一个服务器称为‘连接就绪’。
一个server socket channel准备好接收新进入的连接称为“接收就绪”。一个有数据可读的通道可以说是“读就绪”。等待写数据的通道可以说是“写就绪”。
附加对象:
可以将一个对象获更多的信息放到selector上,这样就可以更方便的获取channel信息。使用方法如下:
selectionKey.attach(theObject);
Object attachedObj = selectionKey.attachment();
还可以在注册通道时增加附加对象:
SelectionKey selectkey = SelectionKey.register(channel,SelectionKey.OP_READ,attachedObj);
通过selector选择通道:
select()方法会返回读事件已经就绪的那些通道。
int select()
int select(long timeout)
int selectNow()
select()阻塞到至少有一个通道在你注册的事件上就绪了。
select(long timeout)和select()一样,除了最长会阻塞timeout毫秒(参数)。
selectNow()不会阻塞,不管什么通道就绪都立刻返回。
select()方法返回的int值表示有多少通道已经就绪。
selectedKeys()
一旦调用了select()方法,并且返回值表明有一个或则多个通道处于就绪状态就可以使用selector 的SelectedKeys()方法获取就绪状态的通道。
Set selectedKeys = selector.selectedKeys();
然后可以遍历 集合得到单个的就绪通道:
Set selectedKeys = selector.selectedKeys();

Iterator keyIterator = selectedKeys.iterator();

while(keyIterator.hasNext()) {

    SelectionKey key = keyIterator.next();

    if(key.isAcceptable()) {// 连接被接受

        // a connection was accepted by a ServerSocketChannel.

    } else if (key.isConnectable()) { // 是否连接

        // a connection was established with a remote server.

    } else if (key.isReadable()) { //可读

        // a channel is ready for reading

    } else if (key.isWritable()) { //可写

        // a channel is ready for writing

    }

    keyIterator.remove();

}
注意每次迭代末尾的keyIterator.remove()调用。Selector不会自己从已选择键集中移除SelectionKey实例。必须在处理完通道时自己移除。下次该通道变成就绪时,Selector会再次将其放入已选择键集中。
close()
用完Selector后调用其close()方法会关闭该Selector,且使注册到该Selector上的所有SelectionKey实例无效。通道本身并不会关闭。
Buffer(缓冲区):
缓冲区本质上是一个既可以写入数据也可以读取数据的内存,这部分被包装成了Buffer对象,并提供了一系列的方法使用,访问这部分的空间。
buffer使用一般是以下几个步骤:
ByteBuffer byteBuffer = ByteBuffer.allocate(1024); // 创建缓冲区
写入数据到缓冲区Buffer
使用flip()切换缓冲区状态
读取缓冲区buffer
关闭缓冲区clear清空
这里顺便插入下:
随机流(RandomAccessFile)不属于IO流,支持对文件的读取和写入随机访问。
对象声明:RandomAccessFile raf = newRandomAccessFile(File file, String mode);
其中参数 mode 的值可选 "r":可读,"w" :可写,"rw":可读性;
下面小例子:
        String filePath = "s://io.txt";

        File file = new File(filePath);

        RandomAccessFile raf = new RandomAccessFile(file, "rw");

        FileChannel fc = raf.getChannel(); // 获取文件通道

        ByteBuffer bb = ByteBuffer.allocate(1024);// 创建缓冲区

        byte[] buf = new byte[bb.remaining()];

        int len;

        // 从通道读取一个数据到缓冲区

        while ((len = fc.read(bb)) != -1) {

            bb.flip();// flip方法将Buffer从写模式切换到读模式

            bb.get(buf, 0, len); // 将缓冲区数据读到byte[]中

        }

        System.out.println(new String(buf, Charset.forName("GBK")));
        bb.clear();
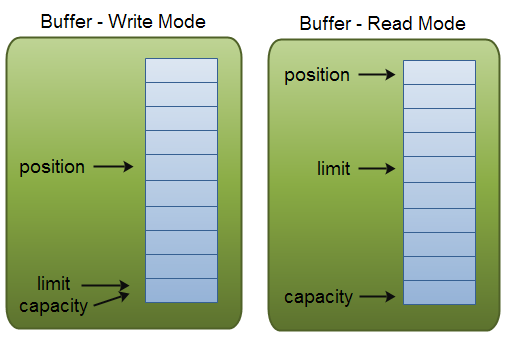
Buffer的capacity,position和limit3个属性:
capacity 不论buffer是在读或者写状态,capacity的含义都不会改变。

模式说明:
position:当你写数据到Buffer中时,position表示当前的位置。初始的position值为0.当一个byte、long等数据写到Buffer后, position会向前移动到下一个可插入数据的Buffer单元。position最大可为capacity – 1.
limit:表示允许写入的数据最大位置。在read模式下表示读取数据的最大限度。
capacity:作为一个内存块,Buffer有一个固定的大小值,也叫“capacity”.你只能往里写capacity个byte、long,char等类型。一旦Buffer满了,需要将其清空(通过读数据或者清除数据)才能继续写数据往
Buffer的分配
要想获得一个Buffer对象首先要进行分配。 每一个Buffer类都有一个allocate方法。下面是一个分配48字节capacity的ByteBuffer的例子。
ByteBuffer buf = ByteBuffer.allocate(48);
这是分配一个可存储1024个字符的CharBuffer:
CharBuffer buf = CharBuffer.allocate(1024);
向Buffer中写数据
写数据到Buffer有两种方式:
从Channel写到Buffer。
通过Buffer的put()方法写到Buffer里。
从Channel写到Buffer的例子
int bytesRead = inChannel.read(buf);
通过put方法写Buffer的例子:
buf.put(127);
put方法有很多版本,允许你以不同的方式把数据写入到Buffer中。
flip()方法
flip方法将Buffer从写模式切换到读模式。调用flip()方法会将position设回0,并将limit设置成之前position的值。
换句话说,position现在用于标记读的位置,limit表示之前写进了多少个byte、char等 —— 现在能读取多少个byte、char等。
从Buffer中读取数据
从Buffer中读取数据有两种方式:
从Buffer读取数据到Channel。
使用get()方法从Buffer中读取数据。
从Buffer读取数据到Channel的例子:
int bytesWritten = inChannel.write(buf);
使用get()方法从Buffer中读取数据的例子
byte aByte = buf.get();
get方法有很多版本,允许你以不同的方式从Buffer中读取数据。
clear()方法
一旦读完Buffer中的数据,需要让Buffer准备好再次被写入。可以通过clear()或compact()方法来完成。
如果调用的是clear()方法,position将被设回0,limit被设置成 capacity的值。换句话说,Buffer 被清空了。Buffer中的数据并未清除,只是这些标记告诉我们可以从哪里开始往Buffer里写数据。
如果Buffer中有一些未读的数据,调用clear()方法,数据将“被遗忘”,意味着不再有任何标记会告诉你哪些数据被读过,哪些还没有。
在Java NIO中,
如果两个通道中有一个是FileChannel,那你可以直接将数据从一个channel传输到另外一个channel。
transferFrom()
FileChannel的transferFrom()方法可以将数据从源通道传输到FileChannel中(译者注:这个方法在JDK文档中的解释为将字节从给定的可读取字节通道传输到此通道的文件中)。下面是一个简单的例子:
        String filePath = "s://io.txt";

        String filePath2 = "s://111.txt";

        File file = new File(filePath);

        File file2 = new File(filePath2);

        RandomAccessFile raf = new RandomAccessFile(file, "rw");

        RandomAccessFile raf2 = new RandomAccessFile(file2, "rw");

        FileChannel fc = raf.getChannel();

        FileChannel fc2 = raf2.getChannel();

        long count =  fc.size();

        int position = 0;

        fc2.transferFrom(fc, position, count);// fc2 目标文件  fc 被复制的文件
        //fc.transferTo(position, count, fc2);
线面来个稍完整点nio通信的例子:
NioServer:
package nio;

import java.io.IOException;

import java.net.InetSocketAddress;

import java.nio.ByteBuffer;

import java.nio.channels.SelectableChannel;

import java.nio.channels.SelectionKey;

import java.nio.channels.Selector;

import java.nio.channels.ServerSocketChannel;

import java.nio.channels.SocketChannel;

import java.util.Iterator;

import java.util.Scanner;

import java.util.Set;

public class NIOServer {

    private ServerSocketChannel serverSocketChannel;

    public String IP = "127.0.0.1";

    private Selector selector;

    static int port = 8989;

    public NIOServer() {

        try {

            selector = Selector.open();

            serverSocketChannel = ServerSocketChannel.open();

            serverSocketChannel.socket().bind(new InetSocketAddress(IP, port));

            serverSocketChannel.configureBlocking(false);

            serverSocketChannel.register(selector, SelectionKey.OP_ACCEPT);

            System.out.println("服务器已启动,端口号:" + port);

        } catch (IOException e) {

            e.printStackTrace();

        }

    }

    void receiceMessage() {

        while (true) {

            try {

                selector.select();

                Set<SelectionKey> selectors = selector.selectedKeys();

                Iterator<SelectionKey> iterator = selectors.iterator();

                while (iterator.hasNext()) {

                    SelectionKey key = iterator.next();

                    try {

                        heandle(key);

                    } catch (IOException e) {

                        e.printStackTrace();

                    }

                    iterator.remove();

                }

            } catch (Exception e) {

                e.printStackTrace();

            }

        }

    }

    void heandle(SelectionKey selectionKey) throws IOException {

        if (selectionKey.isValid() && selectionKey.isAcceptable()) { // 有效的連接

            ServerSocketChannel serverSocketChannel = (ServerSocketChannel) selectionKey.channel();

            // 通过ServerSocketChannel的accept创建SocketChannel实例

            // 完成该操作意味着完成TCP三次握手,TCP物理链路正式建立

            SocketChannel scoketCl = serverSocketChannel.accept();

            // 设置飞阻塞模式

            scoketCl.configureBlocking(false);

            scoketCl.register(selector, SelectionKey.OP_READ); // 注册读 事件

        } else if (selectionKey.isValid() && selectionKey.isReadable()) {// 是否可读

            SocketChannel sc = (SocketChannel) selectionKey.channel();

            String handelResult = null;

            // 创建缓冲区

            ByteBuffer byteBuffer = ByteBuffer.allocate(1024);

            // 通道 read into byteBuffer

            int byteCounts = sc.read(byteBuffer);

            if (byteCounts > 0) {

                // 接受数据 处理数据 返回数据

                byteBuffer.flip(); // 转换为刻度 模式

                byte[] bytes = new byte[byteBuffer.remaining()];

                byteBuffer.get(bytes);

                String result = new String(bytes, "UTF-8");

                System.out.println("服务端接收的数据:" + result);

                // 处理

                handelResult = "处理后的数据是server" + result;

                System.out.println("处理后的数据是:" + handelResult);

                serverSendMessage(sc, handelResult);

            } else if (byteCounts < 0) {

                selectionKey.cancel();

                sc.close();

            }

        }

    }

    static void serverSendMessage(SocketChannel socketChannel, String message) throws IOException {

        System.out.println("message" + message);

        byte[] bytes = message.getBytes();

        ByteBuffer byteBuffer = ByteBuffer.allocate(bytes.length);

        byteBuffer.put(bytes);// 添加数据到缓冲区

        byteBuffer.flip();// 模式转换

        socketChannel.write(byteBuffer); // 写入数据到socket通道

    }

    public static void main(String[] args) {

        NIOServer server = new NIOServer();

        server.receiceMessage();

    }

}
NioClient
import java.io.IOException;

import java.net.InetSocketAddress;

import java.nio.ByteBuffer;

import java.nio.channels.SelectionKey;

import java.nio.channels.Selector;

import java.nio.channels.SocketChannel;

import java.nio.charset.Charset;

import java.util.Iterator;

import java.util.Scanner;

import java.util.Set;

/**

 * channel 注册到selector 上 必须制定关注的事件类型。具体的事件承载于Selectored上。

 */

public class NIOClient {

    public static String IP = "127.0.0.1";

    static Selector selector;

    final static int port = 8989;

    static Charset charset = Charset.forName("UTF-8");

    private static SocketChannel socketChannel;

    NIOClient() throws IOException {

        selector = Selector.open();

        socketChannel = SocketChannel.open();

        socketChannel.connect(new InetSocketAddress(IP, port));

        socketChannel.configureBlocking(false);

        socketChannel.register(selector, SelectionKey.OP_READ);

    }

    private static void receiveRead(SelectionKey selectiontKey) throws IOException {

        try {

            if (selectiontKey.isValid() && selectiontKey.isReadable()) {

                SocketChannel socket = (SocketChannel) selectiontKey.channel();

                ByteBuffer byteBuffer = ByteBuffer.allocate(1024);

                int readByte = socket.read(byteBuffer);// 返回独到的字节数

                System.out.println(readByte + "****");

                if (readByte > 0) {// 读取数据

                    byteBuffer.flip();

                    byte[] bytes = new byte[byteBuffer.remaining()];

                    byteBuffer.get(bytes);// 将缓冲区数据读到byte[]中

                    String result = new String(bytes, "UTF-8");

                    System.out.println("客户端接收到的数据:" + result);

                    byteBuffer.clear();

                } else if (readByte < 0) {

                    selectiontKey.cancel();

                    socketChannel.close();

                }

                selectiontKey.interestOps(SelectionKey.OP_READ);

            }

        } catch (Exception e) {

            System.out.println("服务端连接已关闭");

        }

    }

    static void sendm(String message) throws IOException {

        socketChannel.write(charset.encode(message));

    }

    public static void main(String[] args) throws IOException {

        NIOClient.Th th = new NIOClient().new Th();

        th.start();

        Scanner scan = new Scanner(System.in);// 这里向服务端发送数据,同时启动了一个键盘监听器

        while (scan.hasNextLine()) {

            System.out.println("输入数据:\n");

            // 读取键盘的输入

            String line = scan.nextLine();

            // 将键盘的内容输 到SocketChanenel中

            sendm(line);

        }

        scan.close();

    }

    private class Th extends Thread {

        @Override

        public void run() {

            try {

                while (selector.select() > 0) {

                    Set<SelectionKey> set = selector.selectedKeys();

                    Iterator<SelectionKey> iter = set.iterator();

                    while (iter.hasNext()) {

                        SelectionKey key = iter.next();

                        try {

                            receiveRead(key);

                        } catch (IOException e) {

                            e.printStackTrace();

                        }

                        iter.remove();

                    }

                }

            } catch (IOException e) {

                e.printStackTrace();

            }

        }

    }

}
NIO 概述 与 通信实例的更多相关文章
- 基于NIO的Socket通信
一.NIO模式的基本原理: 服务端: 首先,服务端打开一个通道(ServerSocketChannel),并向通道中注册一个通道调度器(Selector):然后向通道调度器注册感兴趣的事件Select ...
- 【Java TCP/IP Socket】基于NIO的TCP通信(含代码)
NIO主要原理及使用 NIO采取通道(Channel)和缓冲区(Buffer)来传输和保存数据,它是非阻塞式的I/O,即在等待连接.读写数据(这些都是在一线程以客户端的程序中会阻塞线程的操作)的时候, ...
- Java NIO:NIO概述
Java NIO:NIO概述 在上一篇博文中讲述了几种IO模型,现在我们开始进入Java NIO编程主题.NIO是Java 4里面提供的新的API,目的是用来解决传统IO的问题.本文下面分别从Java ...
- Flex通信-与Java实现Socket通信实例
Flex通信-与Java实现Socket通信实例 转自:http://blessht.iteye.com/blog/1136888 博客分类: Flex 环境准备 [服务器端] JDK1.6,“ja ...
- (转载)Java NIO:NIO概述(一)
Java NIO:NIO概述 在上一篇博文中讲述了几种IO模型,现在我们开始进入Java NIO编程主题.NIO是Java 4里面提供的新的API,目的是用来解决传统IO的问题.本文下面分别从Java ...
- Linux下简单的socket通信实例
Linux下简单的socket通信实例 If you spend too much time thinking about a thing, you’ll never get it done. —Br ...
- Java NIO学习笔记一 Java NIO概述
Java NIO概述 Java NIO(新的IO)是Java的替代IO API(来自Java 1.4),这意味着替代标准的 java IO和java Networking API.Java NIO提供 ...
- 【安富莱TCPnet网络教程】HTTP通信实例
第41章 HTTP超文本传输协议基础知识 本章节为大家讲解HTTP(HyperText Transfer Protocol,超文本传输协议),从本章节开始,正式进入嵌入式Web的设计和学习. ...
- Java NIO系列教程(一) Java NIO 概述
<I/O模型之四:Java 浅析I/O模型> 一.阻塞IO与非阻塞IO 阻塞IO: 通常在进行同步I/O操作时,如果读取数据,代码会阻塞直至有 可供读取的数据.同样,写入调用将会阻塞直至数 ...
随机推荐
- 在线批量将gps经纬度坐标转换为百度经纬度坐标
1.首先打开百度api示例页面: 在浏览器地址栏中输入:http://developer.baidu.com/map/jsdemo.htm#a5_3 2.修改代码 如下图,将需要批量转换的坐标,按规则 ...
- Linux系统时间, 硬件BIOS时间的校准与同步
#宿主机系统时间: date #宿主机时间校准方法: yum install -y ntpdate ntpdate -u ntp.api.bz #centos查看设置系统时区:(可能没有) cat / ...
- Pandas Series和DataFrame的基本概念
1,创建Series 1.1,通过iterable创建Series Series接收参数是Iterable,不能是Iterator pd.Series(Iterable) 可以多加一个index参数, ...
- 常见的eclipse和真机出现的问题
1.eclipse和手机连接时间过断导致运行时报错(时间,,,) 2.adk中文件夹中文件遗失错乱: tools下的zipalign丢失(打包时出现提示the zipalign tool was no ...
- XVI Open Cup named after E.V. Pankratiev. GP of Ekaterinburg--I.Iron man
n个服务器,k类任务,每个服务器完成一个任务都有特定的花费$cost_{i,j}$,但是你设置好某台机器去完成某项任务时他只能去完成这类任务,除非你可以花费$C$去更改配置.第$i$天要求去完成$q_ ...
- jemter分布式部署及linux下分布式脚本执行
jmeter进行接口性能测试,占用内存较大,在模拟千万计并发用户时,使用分布式部署进行分压测试. 操作步骤:选择一台机器作为调度机,其他机器作为执行机 一.jmeter分布式部署 前提条件:A.执行机 ...
- EF - Code First 开发方式
概述: 本节介绍通过 Code First 开发建立新数据库. 借助 Code First 可以选择使用类的特性和属性执行配置,或者使用 XML 配置文件来配置,当然也可以使用 Fluent API ...
- JS 超类和子类
此篇由别的大神的博客与<javascript高级程序设计>一书整理而来 原博客地址:https://hyj1254.iteye.com/blog/628555 看到javascript高级 ...
- angular6 aot 预先编译
angular.json文件:(红色加粗部分) { "$schema": "./node_modules/@angular/cli/lib/config/schema.j ...
- 搜索引擎中index、attribute和summary概念
index:倒排索引 attribute: 正排索引 summary:数据集合,用于数据结果展示.
