geoServer 发布geoTiff格式的DEM数据
1/数据下载(首先感谢earthexplorer提供了免费的全球DEM数据)
下载地址 https://lta.cr.usgs.gov/GTOPO30 ,首先要注册才可以下载,登陆网站后点击getData按钮,
再点击Data Set 这个tab,然后在Data Set Search:中输入GTOPO30进行搜索,在最下方点击result按钮。就会进入以下界面:
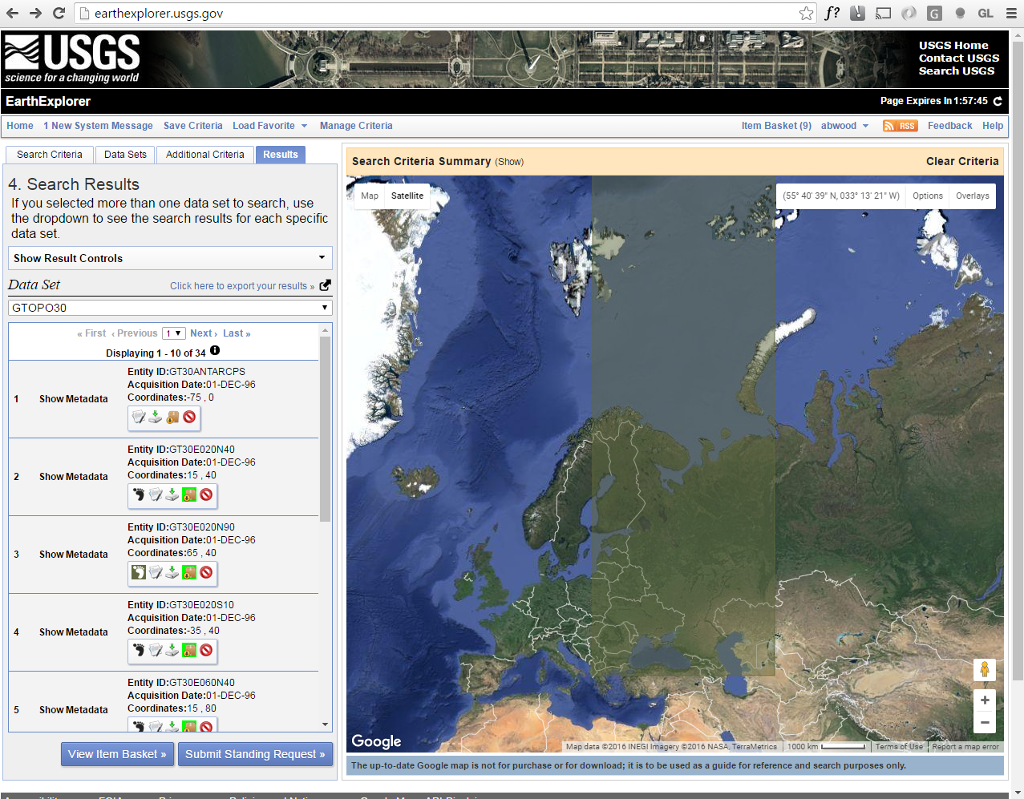
这里就可以下载全球范围的DEM数据。
2、geoserver发布前准备
因为从上面所指示的地址下载的数据类型是16 byte的geoTiff图像,而我们这次使用的geoServer中的 image pyramid plug-in这个插件,此插件需要的geoTiff的格式是
8 or 12 byte类型的geotiff,所以我们需要格式转化。我这里有一个java编写的工具可以把16位的geotiff转化为8位的geotiff。下载地址: https://github.com/kaktus40/Cesium-GeoserverTerrainProvider
此地址下载的zip文件中包含GeotiffTranslate.jar工具,就是我们需要的,(具体使用方法请阅读.me文件)。
3、geoserver发布
以下英文地址( http://docs.geoserver.org/latest/en/user/tutorials/imagepyramid/imagepyramid.html )
For this tutorial we have prepared a sample BlueMarble TNG subset in GeoTIFF form. The image is tiled and JPEG compressed, without overviews. Not exactly what you’d want to use for high performance data serving, but good for redistribution and as a starting point to build a pyramid.
In order to build the pyramid we’ll use the gdal_retile.py utility, part of the GDAL command line utilities and available for various operating systems (if you’re using Microsoft Windows look for FWTools).
The following commands will build a pyramid on disk:
mkdir bmpyramid

gdal_retile.py -v -r bilinear -levels 4 -ps 2048 2048 -co "TILED=YES" -co "COMPRESS=JPEG" -targetDir bmpyramid bmreduced.tiff
The gdal_retile.py user guide provides a detailed explanation for all the possible parameters, here is a description of the ones used in the command line above:
- -v: verbose output, allows the user to see each file creation scroll by, thus knowing progress is being made (a big pyramid construction can take hours)
- -r bilinear: use bilinear interpolation when building the lower resolution levels. This is key to get good image quality without asking GeoServer to perform expensive interpolations in memory
- -levels 4: the number of levels in the pyramid
- -ps 2048 2048: each tile in the pyramid will be a 2048x2048 GeoTIFF
- -co “TILED=YES”: each GeoTIFF tile in the pyramid will be inner tiled
- -co “COMPRESS=JPEG”: each GeoTIFF tile in the pyramid will be JPEG compressed (trades small size for higher performance, try out it without this parameter too)
- -targetDir bmpyramid: build the pyramid in the bmpyramid directory. The target directory must exist and be empty
- bmreduced.tiff: the source file
This will produce a number of TIFF files in bmpyramid along with the sub-directories 1, 2, 3, and 4.
Once that is done, and assuming the GeoServer image pyramid plug-in is already installed, it’s possible to create the coverage store by pointing at the directory containing the pyramid and clicking save:
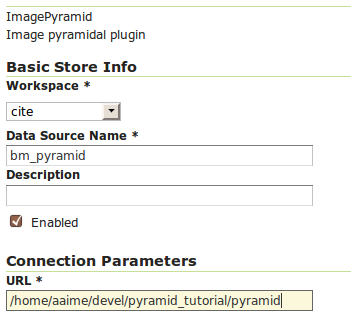
Configuring a image pyramid store
When clicking save the store will look into the directory, recognize a gdal_retile generated structure and perform some background operations:
- move all tiff files in the root to a newly create directory 0
- create an image mosaic in all sub-directories (shapefile index plus property file)
- create the root property file describing the whole pyramid structure
Once that is done the user will be asked to choose a coverage, which will be named after the pyramid root directory:
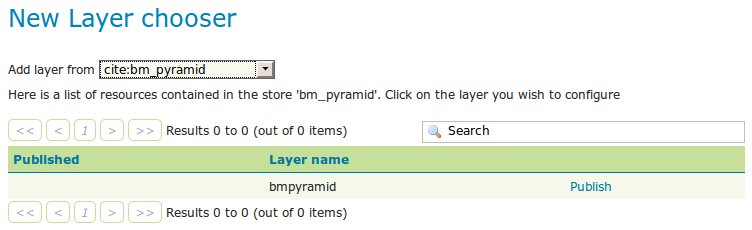
Choosing the coverage for publishing
Publish the layer, and then setup the layer parameter USE_JAI_IMAGEREAD to false to get better scalability:
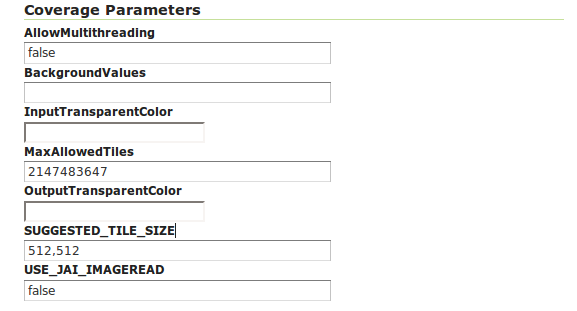
Tuning the pyramid parameters
Submit and go to the preview, the pyramid should be ready to use:
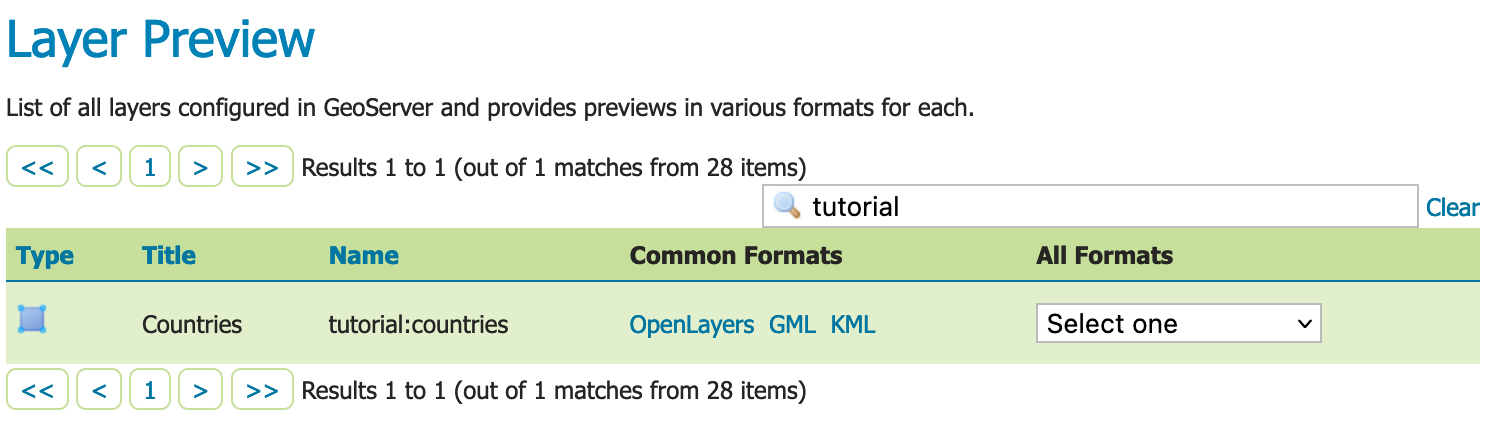
Previewing the pyramid
Notes on big pyramids
The code that is auto-creating the pyramid indexes and metadata files might take time to run, especially if:
- the pyramid zero level is composed of many thousands of files
- the system is busy with the disk already and that results in higher times to move all the files to the 0directory
If the delay is too high the request to create the store will time out and might break the pyramid creation. So, in case of very big pyramids consider loosing some of the comfort and creating the 0 directory and moving the files by hand:
cd bmpyramid

mkdir 0

mv *.tiff 0
geoServer 发布geoTiff格式的DEM数据的更多相关文章
- Geoserver 发布shp格式地图服务
本文实践参考https://blog.csdn.net/zj3172172173/article/details/53336704 第一步: 安装geoserver . 自己去官方下载一个安装包 第二 ...
- 使用GeoServer发布shp数据为WMS服务和WFS服务
使用GeoServer发布shp数据为WMS服务和WFS服务 1安装GeoServer 2使用GeoServer上传数据 3使用GeoServer发布数据为WMS和WFS 看完本教程,你将学会安装Ge ...
- geoserver发布mysql表数据
文章版权由作者李晓晖和博客园共有,若转载请于明显处标明出处:http://www.cnblogs.com/naaoveGIS/ 1.环境部署 Geoserver中并不自带mysql数据发布功能,需要下 ...
- JavaWeb和WebGIS学习笔记(三)——GeoServer 发布shp数据地图
系列链接: Java web与web gis学习笔记(一)--Tomcat环境搭建 Java web与web gis学习笔记(二)--百度地图API调用 JavaWeb和WebGIS学习笔记(三)-- ...
- Geoserver发布Oracle数据
在Geoserver安装包中,默认是不能发布Oracle数据库里的数据的,只能发布postgis.shp等数据,详细如截图: 如果想发布oracle数据,得安装相应版本的关于oracle数据源的插件, ...
- GeoServer发布Shapfile、PostGIS数据
GeoServer发布Shapfile.PostGIS数据 一.GeoServer发布Shapfile数据 1.1 创建工作区 1.1.1 工作区 1.2 在工作区中加入新的数据存储 1.2.1 数据 ...
- Cesium调用Geoserver发布的 WMS、WFS服务
1 GeoServer服务发布 1.1 WMS服务 下载GeoServer安装版安装,同时安装geopackage扩展,以备使用.使用XX地图下载器下载地图,导出成GeoPackage地图文件. (1 ...
- geoserver 发布无坐标png
1.geoserver 安装一些插件的时候,直接去http://docs.geoserver.org/ 官网,选择自己geoserver对应的版本的插件就可以了. 2.geoserver 发布自身带有 ...
- openlayer3 加载geoserver发布的WFS服务
转自原文 openlayer3加载geoserver发布的WFS服务 openlayers3调用GeoServer发布的wfs 1 参考一 1.1 问题 openlayer3加载WFS存在跨域问题,需 ...
随机推荐
- 三剑客之SED
Sed功能说明 Sed是Strem Editor(流编辑器)缩写,是操作.过滤和转换文本内容的强大工具.常用功能有增删改查,过滤,取行. [root@old ~]# sed --versio ...
- jquery高级函数
.get() 将jq对象转成js $('#div1').get(0).innerHTML.text() 给标签添加文本 .detach() 和remove方法一样,但保留删除元素的所有行为$('div ...
- Leetcode4:Median of Two Sorted Arrays@Python
There are two sorted arrays nums1 and nums2 of size m and n respectively. Find the median of the two ...
- 普通图片预览及demo(非分块)
演示地址: http://codeman35.itongyin.com:19003/v2/image.html 功能:通过加载大图预览,这种方式无法和google art 比较.只能应用于简单的图片预 ...
- 【转】Java关键字final、static使用总结
转自:http://lavasoft.blog.51cto.com/62575/18771/ Java关键字final.static使用总结 一.final 根据程序上下文环境, ...
- Find the largest K numbers from array (找出数组中最大的K个值)
Recently i was doing some study on algorithms. A classic problem is to find the K largest(smallest) ...
- ThinkPHP单字母函数(快捷方法)使用总结
在ThinkPHP中有许多使用简便的单字母函数(即快捷方法),可以很方便开发者快速的调用,但是字母函数却不方便记忆,本文将所有的字母函数总结一下,以方便以后查找. 1.U() URL组装 支持不同UR ...
- VMware 虚拟机桥接网络设置
一.桥接的基本原理 配置成桥接网络连接模式的虚拟机就当作主机所在以太网的一部分,虚拟系统和宿主机器的关系,就像连接在同一个Hub上的两台电脑,可以像主机一样可以访问以太网中的所有共享资源和网络连 ...
- Oracle数据库导入导出命令
在建立oracle客户端的前提下,Net Manager中配置了数据库的连接,使用此命令 导出数据 pauseecho 正在备份老数据库...pauseexp user/pwd@配置名称 file=d ...
- awk实现join
awk 有时确实比较省事,做些简单的文本处理,还是很方便的,在这介绍下两个文件的join的操作. 原始文本 bb.txt a 10 b 12 cc.txt a 11 b 13 c 15 awk joi ...