Netty学习(4):NIO网络编程
概述
在 Netty学习(3)中,我们已经学习了 Buffer 和 Channel 的概念, 接下来就让我们通过实现一个 NIO 的多人聊天服务器来深入理解 NIO 的第 3个组件:Selector。
目的
在本文中,我们将通过实现一个网络聊天室程序,来掌握 Selector 的概念以及如何使用 NIO 来完成网络编程。
需求
- 服务器端
- 可以检测用户上线、离线,并告知其他用户;
- 将一个客户端的消息转发给其他在线客户端。
- 客户端:
- 可以发送消息给其他所有在线用户;
- 通过转发,接受到其他用户的消息。
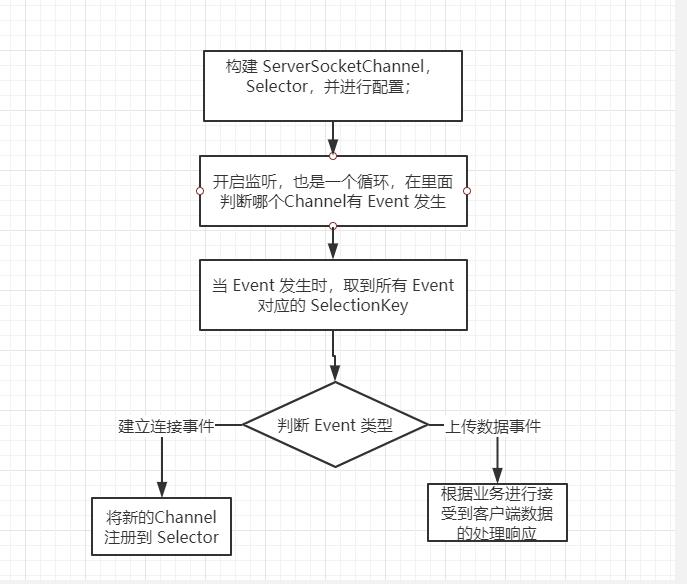
实现逻辑图

代码实现
Server
设置通用属性
public class NioNetworkServer {

    private Logger logger = LoggerFactory.getLogger(NioNetworkServer.class);

    ServerSocketChannel serverSocketChannel;

    Selector selector;

    InetSocketAddress inetSocketAddress;

    public NioNetworkServer() {

        try {

            // 生成一个 ServerSocketChannel 和 Selector,并将 ServerSocketChannel 绑定到指定端口

            serverSocketChannel = ServerSocketChannel.open();

            selector = Selector.open();

            inetSocketAddress = new InetSocketAddress(6666);

            serverSocketChannel.socket().bind(inetSocketAddress);

            serverSocketChannel.configureBlocking(false);

            // 将 serverSocketChannel(一开始的服务器Channel) 注册到指定selector上

            // 后面给每一个连接生成的 SocketChannel,就是通过 ServerSocketChannel 来生成的

            serverSocketChannel.register(selector, SelectionKey.OP_ACCEPT);

        } catch (IOException e) {

            logger.error("建立Server失败,失败原因:{0}", e);

        }

    }

}
设置一些属性,并在构造函数里设置这些属性的值
监听方法
    public void listen() {

        try {

            while (true) {

                // 没有事件发生,就干其他事

                if (selector.select(3000) == 0) {

                    continue;

                }

                // 得到有事件发生的事件集合,然后在后面可以通过其反向获取channel

                Set<SelectionKey> selectionKeys = selector.selectedKeys();

                Iterator<SelectionKey> iterator = selectionKeys.iterator();

                while (iterator.hasNext()) {

                    SelectionKey selectionKey = iterator.next();

                    // 事件:有新的连接

                    if (selectionKey.isAcceptable()) {

                        whenAccept();

                    }

                    // 事件:读从客户端获取的数据

                    if (selectionKey.isReadable()) {

                        readData(selectionKey);

                    }

                    iterator.remove();

                }

            }

        } catch (IOException e) {

            logger.error("读写错误:{0}", e);

        } finally {

        }

    }
连接请求
 private void whenAccept() throws IOException {

        // 因为此时已经有连接事件进入了,因此虽然 accept() 是阻塞的,但是在这里会直接返回

        SocketChannel socketChannel = serverSocketChannel.accept();

        logger.info("connect success,socketChannel : " + socketChannel.toString());

        socketChannel.configureBlocking(false);

        socketChannel.register(selector, SelectionKey.OP_READ, ByteBuffer.allocate(1024));

        //将某人上线的消息进行显示

        logger.info(socketChannel.getRemoteAddress() + "上线");

    }
读写数据
    private void readData(SelectionKey selectionKey) throws IOException {

        SocketChannel socketChannel = (SocketChannel) selectionKey.channel();

        ByteBuffer byteBuffer = ByteBuffer.allocate(1024);

        try {

            socketChannel.read(byteBuffer);

            String message = new String(byteBuffer.array());

            logger.info("{}{}{}", LocalDateTime.now().format(DateTimeFormatter.ofPattern("yyyy-MM-dd HH:mm:ss")), "\n\t\t", message);

            // 向其他的客户端转发消息

            sendInfoToOtherClients(socketChannel, message);

        } catch (Exception e) {

            // 在捕获到异常后,就是有客户端发送了断开连接的请求

            logger.info("{},离线了。。。", socketChannel.getRemoteAddress());

            sendInfoToOtherClients(socketChannel, socketChannel.getRemoteAddress() + " 离线了。。。");

            // 将关闭连接的 channel 关闭

            socketChannel.close();

            // 将该键移除出 set

            selectionKey.cancel();

        }

    }
在这里,我们根据 selectionKey 来反向获取到 channel,通过 channel 将数据读入到 buffer 中,从而读进内存。
接着,将该消息转发给其他客户端。
    private void sendInfoToOtherClients(SocketChannel socketChannel, String message) throws IOException {

        for (SelectionKey key : selector.keys()) {

            SelectableChannel sourceChannel = key.channel();

            if (sourceChannel instanceof SocketChannel && sourceChannel != socketChannel) {

                SocketChannel targetChannel = (SocketChannel) sourceChannel;

                // 根据转发过来的字节长度,直接生成目标大小的 Buffer,然后将数据写入到客户端的 channel 中

                ByteBuffer targetByteBuffer = ByteBuffer.wrap(message.getBytes());

                targetChannel.write(targetByteBuffer);

            }

        }

    }
最后,在 main 函数中启动即可。
    public static void main(String[] args) {

        NioNetworkServer nioNetworkServer = new NioNetworkServer();

        nioNetworkServer.listen();

    }
Client
设置通用属性
public class NioNetworkChatClient {

    private Logger logger = LoggerFactory.getLogger(NioNetworkChatClient.class);

    private Selector selector;

    private SocketChannel socketChannel;

    private String username;

    public NioNetworkChatClient() {

        try {

            selector = Selector.open();

            InetSocketAddress inetSocketAddress = new InetSocketAddress("localhost", 6666);

            socketChannel = SocketChannel.open(inetSocketAddress);

            socketChannel.configureBlocking(false);

            socketChannel.register(selector, SelectionKey.OP_READ);

            username = socketChannel.getLocalAddress().toString().substring(1);

        } catch (Exception e) {

            logger.error("构建客户端错误,错误原因:{0}", e);

        }

    }

}
客户端的构建方法和 Server 基本一致,不同的是,Server 构建的是 ServerSocketChannel,Client 构建的是 SocketChannel,此外 Client 一开始注册的是
SelectionKey.OP_READ事件。其他基本相似。
读取数据
    /**

     * 1. 获取selector上发生的事件

     * 2. 如果是读事件,则将数据通过 Channel 和 Buffer 进行操作

     * 3. 处理完成后,将该key从待处理keys中删除

     */

    public void readInfo() {

        try {

            int readChannel = selector.select();

            if (readChannel > 0) {

                Set<SelectionKey> selectionKeys = selector.selectedKeys();

                Iterator<SelectionKey> iterator = selectionKeys.iterator();

                while (iterator.hasNext()) {

                    SelectionKey selectionKey = iterator.next();

                    if (selectionKey.isReadable()) {

                        SocketChannel handingSocketChannel = (SocketChannel) selectionKey.channel();

                        ByteBuffer byteBuffer = ByteBuffer.allocate(1024);

                        int read = handingSocketChannel.read(byteBuffer);

                        if (read > 0) {

                            String message = new String(byteBuffer.array());

                            logger.info("{},{},{}", LocalDateTime.now().format(DateTimeFormatter.ofPattern("yyyy-MM-dd HH:mm:ss")), "\n\t\t", message);

                        } else {

                            logger.info("client closed");

                            // 将关闭连接的 channel 关闭

                            handingSocketChannel.close();

                            // 将该键移除出 set

                            selectionKey.cancel();

                        }

                    }

                }

                iterator.remove();

            } else {

                logger.info("当前没有 channel 可供使用!");

            }

        } catch (IOException e) {

            e.printStackTrace();

        }

    }
发送数据
    public void sendInfo(String info) {

        info = username + " : " + info;

        try {

            logger.info("{},{},{}", LocalDateTime.now().format(DateTimeFormatter.ofPattern("yyyy-MM-dd HH:mm:ss")), "\n\t\t", info);

            socketChannel.write(ByteBuffer.wrap(info.getBytes()));

        } catch (IOException e) {

            logger.error("发送数据错误,错误原因:{0}", e);

        }

    }
发送数据就很简单了,将数据简单封装一下,直接写入到 socketChannel 即可。
启动
    /**

     * 1. 启动一个线程来定时读取 Server 可能发送的数据,如果没有,就休眠,等待下次读取

     * 2. 启动一个获取控制台输出来进行数据的发送

     *

     * @param args

     */

    public static void main(String[] args) {

        NioNetworkChatClient nioNetworkChatClient = new NioNetworkChatClient();

        // 线程资源必须通过线程池提供,不允许在应用中自行显式创建线程,但跟前面一样,这里因为不是重点,就先这样用着

        new Thread() {

            @Override

            public void run() {

                while (true) {

                    nioNetworkChatClient.readInfo();

                    try {

                        sleep(3000);

                    } catch (Exception e) {

                        e.printStackTrace();

                    }

                }

            }

        }.start();

        Scanner scanner = new Scanner(System.in);

        while (scanner.hasNextLine()) {

            String message = scanner.nextLine();

            nioNetworkChatClient.sendInfo(message);

        }

    }
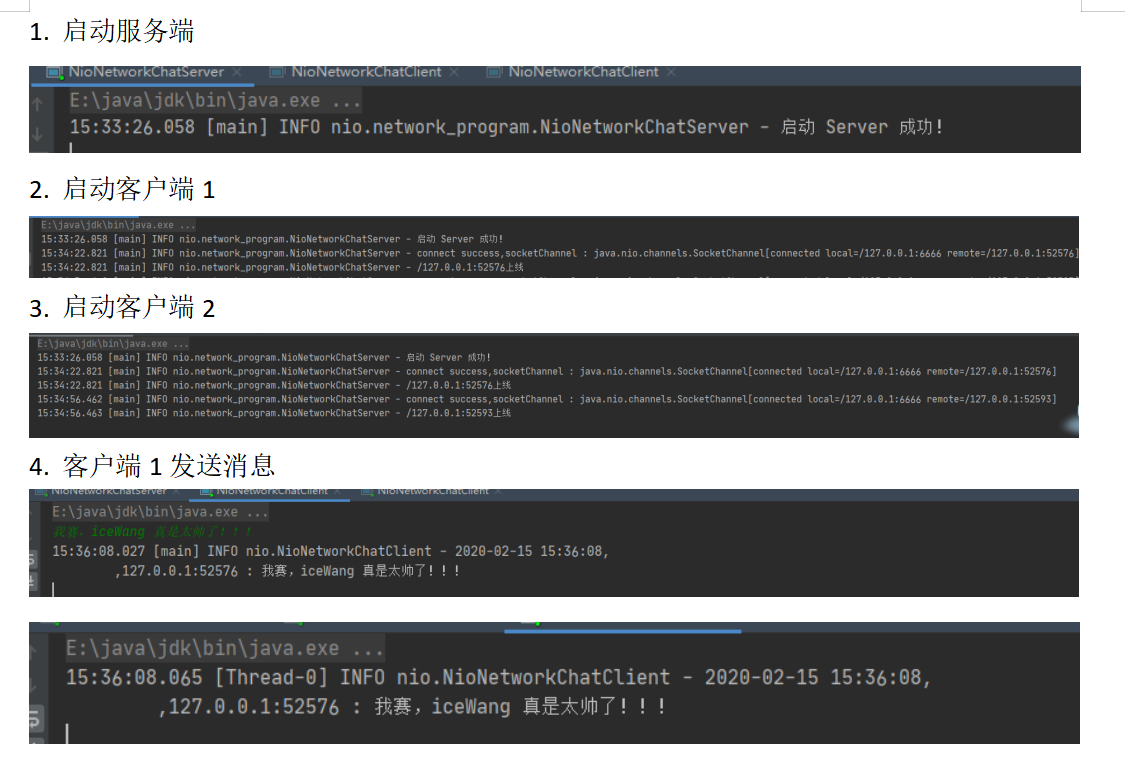
演示结果

后面的结果就不在多演示了,跟这里的相似,这样,我们就完成了一个聊天室的程序,所有人可以在里面进行交流。
总结
本文我们通过一个聊天室的程序,来演示了 Selector,Channel,Buffer 结合使用的效果,通过这 3者,我们实现了一个 NIO 的网络编程程序。
但在编写这个程序的时候,相信朋友们也发现了,其异常的繁琐,中间涉及到 Buffer 的构建,Selector 的 API 使用等等。因此,在日后的使用过程中,我们就要用到 Netty 来实现现在的工作,从而减少开发的工作量了。
ps:讲了那么多,终于要到 Netty 了,不过良好的基础是学习的关键,如果不懂 Java 的 IO 模型以及 NIO 的实现方式和局限性,也不会很好的理解学习 Netty。
本文中代码已上传到 GitHub 上,地址为 https://github.com/wb1069003157/nettyPre-research ,欢迎大家来一起讨论,一起进步。

文章在公众号「iceWang」第一手更新,有兴趣的朋友可以关注公众号,第一时间看到笔者分享的各项知识点,谢谢!笔芯!
Netty学习(4):NIO网络编程的更多相关文章
- 【Netty】netty学习之nio网络编程的模型
[一]NIO服务器编程结构 [二]Netty3.x服务端线程模型
- Netty | 第1章 Java NIO 网络编程《Netty In Action》
目录 前言 1. Java 网络编程 1.1 Javs NIO 基本介绍 1.2 缓冲区 Buffer 1.2 通道 Channel 1.3 选择器 Selector 1.4 NIO 非阻塞网络编程原 ...
- 用Netty开发中间件:网络编程基础
用Netty开发中间件:网络编程基础 <Netty权威指南>在网上的评价不是很高,尤其是第一版,第二版能稍好些?入手后快速翻看了大半本,不免还是想对<Netty权威指南(第二版)&g ...
- 【Netty】netty学习之nio了解
[一]五种IO模型: (1)阻塞IO(2)非阻塞IO(任务提交,工作线程处理,委托线程等待工作线程处理结果的同时,也可以做其他的事情)(3)IO复用模型.(委托线程接收多个任务,将任务提交给工作线程. ...
- python学习之路网络编程篇(第四篇)
python学习之路网络编程篇(第四篇) 内容待补充
- NIO网络编程中重复触发读(写)事件
一.前言 公司最近要基于Netty构建一个TCP通讯框架, 因Netty是基于NIO的,为了更好的学习和使用Netty,特意去翻了之前记录的NIO的资料,以及重新实现了一遍NIO的网络通讯,不试不知道 ...
- nodejs学习笔记之网络编程
了解一下OSI七层模型 OSI层 功能 TCP/IP协议 应用层 文件传输,电子邮件,文件服务,虚拟终端 TFTP,HTTP,SNMP,FTP,SMTP,DNS,Telnet 表示层 数据格式化 ...
- java 基础之--nio 网络编程
在传统的Java 网络编程中,对于客户端的每次连接,对于服务器来说,都要创建一个新的线程与客户端进行通讯,这种频繁的线程的创建,对于服务器来说,是一种巨大的损耗,在Java 1.4 引入Java ni ...
- Java NIO网络编程demo
使用Java NIO进行网络编程,看下服务端的例子 import java.io.IOException; import java.net.InetAddress; import java.net.I ...
随机推荐
- Sam format
reference:https://davetang.org/wiki/tiki-index.php?page=SAM @SQ SN:contig1 LN:9401 (序列ID及长度) 参考序列名,这 ...
- POJ 3617 Best Cow Line 字典序最小
#include<cstdio> #include<iostream> #include<algorithm> #include<queue> #inc ...
- Oracle-PL/SQL语句
1.PL/SQL 2.存储过程,函数 3.java中调用存储过程和函数 4.触发器 1 PL/SQL 1.1什么是PL/SQL? n PL:Process Language n PL/SQL是or ...
- 60)PHP,项目执行过程总结
- 59)PHP,管理员表中所存在的项
用户ID 用户名 用户密码 用户权限(就是他的角色等级,比如是1级 2级, 三级等等) 上次登录的IP 上次登录的时间
- django框架进阶-auth认证系统-长期维护
################## django的认证系统 ####################### 我们在开发一个网站的时候,无可避免的需要设计实现网站的用户系统.此时我们需要 ...
- HUPO|PSI|PeptideAtlas|TPP|Partial submission|Complete submission|proteomeXchange
蛋白质组实验数据提交 需要共享数据,共享要求: 质谱实验数据 HUPO Proteomics Standards Initiative (http://www.psidev.info/overview ...
- MyBatis注解及动态Sql
一.注解实现MyBatis配置 java注解是在jdk1.5版本之后开始加入的,不得不说注解对于我们开发人员来说是个很方便的东西,实现起来也非常的简单,下边我们说一下在MyBatis中使用注解来替换M ...
- 关于angular2跳路由防止页面刷新的做法(Angular2路由重载)
simpleReuseStrategy.ts // 创建重用策略 import { ActivatedRouteSnapshot, DetachedRouteHandle, RouteReuseStr ...
- spring+mybatis+shiro入门实例
sql: 1 /* 2 SQLyog Ultimate v11.33 (64 bit) 3 MySQL - 5.1.49-community : Database - db_shiro 4 ***** ...
