Ansible用于网络设备管理 part 1 Jinja2 YAML初窥
这一次的实验内容依然来自Kirk Byers的博客,源地址在https://pynet.twb-tech.com/blog/python/paramiko-ssh-part1.html
但是,这次实验只是在安装了ansible的服务器的本地做的,做的内容就是 利用Jinja2和YAML生成完整的网络配置,生成完过后,网络配置是在服务器本地的,这篇博客里不会讨论如何把生成的配置自动导入到远端的网络设备上。(其实目前我也不会,走一步看一步)
上一篇博客里已经说到了安装并测试了一个ping的基本功能,这个ping虽然ping的是远端的真机但是还是比较简单的,今天要写下来的全是本地的,但是要比上次的难一些。
简单介绍下这两种类型的文件
对Jinja2和YAML有了解的同志们应该会看着更舒畅一些,如果对Jinjin2和YAML没有了解可以戳下面的连接。
Jinja2: 简单说就是用来写模板的,在这里我们用来写网络配置的模板,因为网络设备之间很多的配置都是相似的嘛,所以要引入一个模板。搞过Django的应该对这个也不陌生,Jinja2文件后缀是 .j2
http://jinja.pocoo.org/docs/dev/ 这个是它的官方文档
YAML: 简单来说有三个用途,一是用来存储变量(后面会提到的vars文件夹),二是用来写任务(后面会提到的tasks文件夹),三是用来写playbook的(被ansible-playbook 执行)。它是一种标记语言,后缀是 .yml。全称是Yet Another Markup Language。
https://en.wikipedia.org/wiki/YAML 维基百科来一发
在应用中的位置
为了更好地编辑这两种文件,我干脆把他们都放到pycharm里面去了,这样用来对比文件,或者查找替换都比较方便,而且对于Linux命令行不是很好的我来说比较方便。我开启了tiger-VNC的远程桌面,所以下面的截图里能很好的体现这两种文件的位置关系
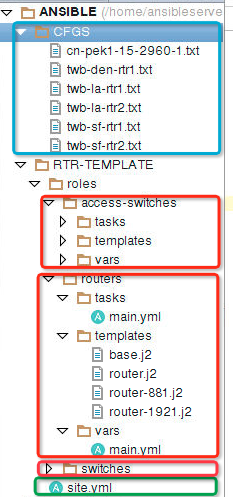
图1
结合上一篇里那个图就能看着更清晰了。绿色框里那个文件是 site.yml 也就是一个playbook。三个红框里的是三个文件夹,也就代表了三个roles。蓝色框里是最终生成的配置。
执行过程
命令是在/home/ansibleserver/ANSIBLE/RTR-TEMPLATE这个目录下,执行命令 ansible-play site.yml
下面分析一下它执行的过程:
1. 调用site.yml,我们看看site.yml里写了什么,如下:
---

- name: Generate configuration files for devices

  hosts: localhost

  roles:

    - routers

    - access-switches
可以看出YAML的格式特点,三个短杠“-”开头,另起一行之后,“-”空格name: 开始一个play,其实一个playbook里是可以直接嵌套task的(就如同Jason Edelman的一个博客http://jedelman.com/home/network-test-automation-with-ansible/),但是我们这里暂时不这么做,因为那样的层级关系就不那么清晰了。所以我们这里的playbook写的很简单,name就是一个描述;hosts标明执行的类型是本地(localhost),区别于其他命名的用于远端的类型;roles这里比较有趣了,这里下面写的routers和access-switches决定了要遍历的文件夹,请看图1里那三个红框,这里roles写了routers和access-switches,所以它即将遍历routers和access-switches这两个文件夹。
2. hosts文件
hosts文件在我们接下来的实验里不会有什么实际的用处,我理解的它的用处就是像上面所说的标明这个play执行的类型,或者说是执行类型,是本地还是远程。hosts文件的内容如下:
[root@localhost ansible]# more hosts

[switch]

cn-pek1-10-a01-ex-vc1.cnet.com   ansible_connection=local    ansible_ssh_host=cn-pek1-10-a01-ex-vc1.cnet.com

[local]

localhost ansible_ssh_user=ansibleserver ansible_connection=local
上面那个[switch]就是上次用到的,上次写的命令是all,而且我又注释掉了local,所以把它包含了,这次我们只用[local],所以没有[switch]啥事儿, 下面的实验也不用管它。
3. roles文件夹内容
我们知道了这个play它要去找哪两个文件夹之后,就该看看这俩文件夹里有什么了:
(1)单一型号
以access-switches这个文件夹为例,这个比较简单易懂,因为就只有一台设备,即使有多台设备也无所谓,因为型号一样,就没什么变换。
第一个main.yml是task,标明要做什么;第二个main.yml是变量,里面装的全是变量;access-switch.j2是模板,模板嘛,就是配置中总是一成不变的那部分。
task下的main.yml如下:
---

- name: Generate access-switch configurations files

  template: src=access-switch.j2 dest=/home/ansibleserver/ANSIBLE/CFGS/{{item.hostname}}.txt

  with_items: switches_2960
第一行的name还是仅仅是一个描述。第二行就决定了它要做啥了,标明了这是一个通过模板生成文件的action,模板是access-switch.j2,生成之后的目的文件是{{item.hostname}}.txt,{{item.hostname}}这种写法很有趣。现在还不知道item是个啥,所以要看第三行with_items: switches_2960,标明item是switches_2960, 这个名字是 switches_2960去哪里找呢,去vars里面去找。
下面是部分模板的代码:
部分的模板.j2
{% for interface in cisco_2960_interfaces%}  //这相当于是个for循环,根据vars里定义的interface的不同,这里会产生N个配置相同的interface

interface {{interface}}

 switchport access vlan 893

 switchport mode access

 switchport port-security maximum 20

 ip arp inspection limit rate 500

 storm-control broadcast level bps 5m 3m

 storm-control action shutdown

 storm-control action trap

 spanning-tree portfast

 spanning-tree bpduguard enable

 ip dhcp snooping limit rate 100

{% endfor%}
以上是一个很典型的适用于Jinja2的for循环。for interface in cisco_2960_interfaces是for循环的开头,cisco_2960_interfaces是要去被遍历的目的地,这个目的地就是变量。这个时候就要去打开vars文件夹下的main.yml来看一下,我目前的感觉是,它会自动的去找vars文件夹,然后自动的去找存了变量的那一行,找到“cisco_2960_interfaces”就开始利用。
部分的vars下的main.yml
cisco_2960_interfaces:

  - FastEthernet0/1

  - FastEthernet0/2

  - FastEthernet0/3

  - FastEthernet0/4

switches_2960:

  - { hostname: cn-pek1-15-2960-1 }
当然可以利用的不止for循环,针对hostname这个变量,可以用下面这种方法
部分的模板.j2
service timestamps debug datetime msec
service timestamps log datetime msec
service password-encryption
!
hostname {{item.hostname}  //要变的就是这一行
!
boot-start-marker
boot-end-marker
当它看到item.hostname它会自己去找vars里的switches_2960这个值,就如同上面的{{item.hostname}}一样
switches_2960:

  - { hostname: cn-pek1-15-2960-1 }
这里就一个hostname,它既会被调用到item.hostname这里,完成对成品配置文件的命名,也会被调用到hostname {{item.hostname}}这里完成配置文件的编写。
下面是生成的成品配置的一部分内容:
service timestamps debug datetime msec

service timestamps log datetime msec

service password-encryption

!

hostname cn-pek1-15-2960-1  //对照上面那段,得知这里是从{{item.hostname}}得来的

!

boot-start-marker

boot-end-marker

<< snip >>

interface FastEthernet0/1                //vars里就定义了四个interface,当然实际的交换机interface哪有那么少,我是懒得写了,我觉得那些就可以通过SNMP来抓了,然后放到vars里
 switchport access vlan 893
 switchport mode access
 switchport port-security maximum 20
 ip arp inspection limit rate 500
 storm-control broadcast level bps 5m 3m
 storm-control action shutdown
 storm-control action trap
 spanning-tree portfast
 spanning-tree bpduguard enable
 ip dhcp snooping limit rate 100
interface FastEthernet0/2
 switchport access vlan 893
 switchport mode access
 switchport port-security maximum 20
 ip arp inspection limit rate 500
 storm-control broadcast level bps 5m 3m
 storm-control action shutdown
 storm-control action trap
 spanning-tree portfast
 spanning-tree bpduguard enable
 ip dhcp snooping limit rate 100
interface FastEthernet0/3
 switchport access vlan 893
 switchport mode access
 switchport port-security maximum 20
 ip arp inspection limit rate 500
 storm-control broadcast level bps 5m 3m
 storm-control action shutdown
 storm-control action trap
 spanning-tree portfast
 spanning-tree bpduguard enable
 ip dhcp snooping limit rate 100
interface FastEthernet0/4
 switchport access vlan 893
 switchport mode access
 switchport port-security maximum 20
 ip arp inspection limit rate 500
 storm-control broadcast level bps 5m 3m
 storm-control action shutdown
 storm-control action trap
 spanning-tree portfast
 spanning-tree bpduguard enable
 ip dhcp snooping limit rate 100
(2)多型号
先看tasks文件夹下的main.yml
---

#- name: Generate configuration files      //#是用来注释掉jinja2的符号

#  template: src=router.j2 dest=/home/ansibleserver/ANSIBLE/CFGS/{{item.hostname}}.txt

#  with_items: test_routers

- name: Generate configurations files

  template: src=router-881.j2 dest=/home/ansibleserver/ANSIBLE/CFGS/{{item.hostname}}.txt

  with_items: routers_881

- name: Generate configurations files

  template: src=router-1921.j2 dest=/home/ansibleserver/ANSIBLE/CFGS/{{item.hostname}}.txt

  with_items: routers_1921
着重需要看的是template这一行,src变成了 router-881.j2和router-1921.j2,with_items分别变成了routers_881和routers_1921,但是我这里并不打算写两个完整的模板,因为他们的型号虽然不同,但是其实配置的内容大同小异,所以就有了下面这个问题:
设想一下,不同型号的设备之间的配置,可能大同小异,那么就可以抽离其中相同的部分作为一个base模板,然后两种型号不同的地方,分别写两个各自的模板,来解决类似“代码复用”的问题。这就有了下面这种构建模板的形式,请看routers这个role下的三个文件夹中的templates文件夹
base.j2就是两个型号的路由器相同的配置了,base.j2如下,这里里面有很多的变量添加进来,还用到了if判断,所以就不放部分代码了,下面是base.j2的全部代码
no service pad

service tcp-keepalives-in

service tcp-keepalives-out

service timestamps debug datetime msec localtime show-timezone

service timestamps log datetime msec localtime show-timezone

service password-encryption

!

hostname {{item.hostname}}

!

boot-start-marker

boot-end-marker

!

logging buffered 32000

no logging console

enable secret 0 {{item.secret}}  //这些地方就类似于之前的{{item.hostname}}了

!

aaa new-model

!

!

aaa authentication login default local-case

aaa authorization exec default local

!

!

!

!

!

aaa session-id common

!

!

!

memory-size iomem 10

clock timezone {{item.timezone}} {{item.timezone_offset}}

clock summer-time {{item.timezone_dst}} recurring

!

no ip source-route

ip options drop

!

!

!

!

ip dhcp bootp ignore

{% if item.DHCP %}                      //嗯。。if循环,这个会先去检查vars里这个值是不是真的,一会儿贴上vars

no ip dhcp conflict logging

ip dhcp excluded-address {{item.dhcp_exclude1_start}} {{item.dhcp_exclude1_end}}

!

ip dhcp pool POOL1

   network {{item.dhcp_network}} {{item.dhcp_netmask}}

   default-router {{item.dhcp_gateway}}

   dns-server 8.8.8.8 8.8.4.4

{% endif %}

!

!

ip cef

no ip domain lookup

ip domain name whatever.com

{% if item.CBAC %}                       //同样是if循环

ip inspect name INTERNET cuseeme

ip inspect name INTERNET dns

ip inspect name INTERNET ftp

ip inspect name INTERNET h323

ip inspect name INTERNET icmp

ip inspect name INTERNET imap

ip inspect name INTERNET pop3

ip inspect name INTERNET netshow

ip inspect name INTERNET rcmd

ip inspect name INTERNET realaudio

ip inspect name INTERNET rtsp

ip inspect name INTERNET sqlnet

ip inspect name INTERNET streamworks

ip inspect name INTERNET tftp

ip inspect name INTERNET vdolive

ip inspect name INTERNET pptp

ip inspect name INTERNET tcp router-traffic

ip inspect name INTERNET udp router-traffic

{% endif %}

no ipv6 cef

!

!

!

!

username admin privilege 15 secret 0 {{item.secret}}

!

!

ip ssh version 2

!

!

!

!

!

!

!

!

!

!

!

!

{% block interfaces %}       //现在来到了第一个block,遇到block的地方就意味着这个地方两种型号的路由器就不一样了。我喜欢把这种地方称为“对节点”

{% endblock %}

!

no ip http server

no ip http secure-server

!

!

{% block nat %}              //第二个block,意味着两种型号的路由器在NAT这块儿也不一样

{% endblock %}

ip route 0.0.0.0 0.0.0.0 {{item.public_gateway}}

!

ip access-list extended INTERNET

 permit icmp any any host {{item.public_ip}}

ip access-list extended NAT

 permit ip {{item.internal_network}} 0.0.0.255 any

!

line vty 0 4

 exec-timeout 20 0

 logging synchronous

 transport input ssh

 transport output ssh

!

ntp update-calendar

ntp server 1.1.1.1

ntp server 2.2.2.2

end
下面是router-881.j2的全部内容,这些内容也就是router-881独有的,凡是它不独有的(重复的配置),它都去call base.j2去找。
!

!

{% extends "base.j2"%}//意味着这个Jinja2文件是要拓展base.j2这个文件的,当然实际上在router-881.j2被task调用的时候,它传递给task的内容实际是router-881的这点儿内容加上base.j2

{% block interfaces %}                    //从这一行到结尾,都是interface这个block

{% for interface in cisco_881_l2_interfaces %}

interface {{interface}}

 switchport access vlan 10

 spanning-tree portfast

 !

!

{% endfor %}

interface FastEthernet4

 ip address {{item.public_ip}} {{item.public_netmask}}

 ip access-group INTERNET in

 no ip redirects

 no ip proxy-arp

 ip nat outside

{% if item.CBAC %} ip inspect INTERNET out

{% endif %}

 ip virtual-reassembly

 duplex auto

 speed auto

 no cdp enable

!

!

interface Vlan1

 no ip address

!

!

interface Vlan10

 description Internal LAN

 ip address {{item.internal_ip}} 255.255.255.0

 ip nat inside

 ip virtual-reassembly

!

{% endblock%}

!

!

{% block nat %}

ip nat inside source list NAT interface FastEthernet4 overload

{% endblock%}

!
下面是router-1921.j2的内容
!

!

{% extends "base.j2"%}

{% block interfaces %}                  //同样是block,但是1921有两个block,下面还有个nat的block

{% for interface in cisco_881_l2_interfaces %}

interface {{interface}}

 switchport access vlan 10

 spanning-tree portfast

{% endfor %}

interface GigabitEthernet0/0

 ip address {{item.public_ip}} {{item.public_netmask}}

 ip access-group INTERNET in

 no ip redirects

 no ip proxy-arp

 ip nat outside

{% if item.CBAC %} ip inspect INTERNET out

{% endif %}

 ip virtual-reassembly

 duplex auto

 speed auto

 no cdp enable

 !

!

interface GigabitEthernet0/1

 description Internal LAN

 ip address {{item.internal_ip}} 255.255.255.0

 no ip redirects

 no ip proxy-arp

 ip nat inside

 ip virtual-reassembly

 duplex auto

 speed auto

{% endblock%}

!

!

{% block nat %}

ip nat inside source list NAT interface GigabitEthernet0/0 overload

{% endblock%}

!
不同的block被调用到他们该被调用的地方,也就是base.j2的“对节点”这里如下:
对接点1
{% block interfaces %}       //现在来到了第一个block,遇到block的地方就意味着这个地方两种型号的路由器就不一样了。我喜欢把这种地方称为“对节点”

{% endblock %}
对接点2
{% block nat %}              //第二个block,意味着两种型号的路由器在NAT这块儿也不一样

{% endblock %}
下面是vars文件夹下的main.yml
---

#test_routers:

#   - { hostname: twb-sf-rtr1, secret: apassword, timezone: PST, timezone_dst: PDT, timezone_offset: -8, DHCP: true, dhcp_exclude1_start: 10.1.1.1, dhcp_exclude1_end: 10.1.1.99, dhcp_network: 10.1.1.0, dhcp_netmask: 255.255.255.0, dhcp_gateway: 10.1.1.1, CBAC: true, public_ip: 6.6.6.6, public_netmask: 255.255.255.0, public_gateway: 6.6.6.1, vlan10_ip: 10.1.1.1, vlan10_network: 10.1.1.0 }

#   - { hostname: twb-sf-rtr2, secret: apassword, timezone: PST, timezone_dst: PDT, timezone_offset: -8, DHCP: true, dhcp_exclude1_start: 10.1.1.1, dhcp_exclude1_end: 10.1.1.99, dhcp_network: 10.1.1.0, dhcp_netmask: 255.255.255.0, dhcp_gateway: 10.1.1.1, CBAC: true, public_ip: 6.6.6.6, public_netmask: 255.255.255.0, public_gateway: 6.6.6.1, vlan10_ip: 10.1.1.1, vlan10_network: 10.1.1.0 }

#   - { hostname: twb-la-rtr1, secret: apassword, timezone: PST, timezone_dst: PDT, timezone_offset: -8, DHCP: false, dhcp_exclude1_start: 10.1.1.1, dhcp_exclude1_end: 10.1.1.99, dhcp_network: 10.1.1.0, dhcp_netmask: 255.255.255.0, dhcp_gateway: 10.1.1.1, CBAC: false, public_ip: 6.6.6.6, public_netmask: 255.255.255.0, public_gateway: 6.6.6.1, vlan10_ip: 10.1.1.1, vlan10_network: 10.1.1.0 }

#   - { hostname: twb-la-rtr2, secret: apassword, timezone: PST, timezone_dst: PDT, timezone_offset: -8, DHCP: false, dhcp_exclude1_start: 10.1.1.1, dhcp_exclude1_end: 10.1.1.99, dhcp_network: 10.1.1.0, dhcp_netmask: 255.255.255.0, dhcp_gateway: 10.1.1.1, CBAC: false, public_ip: 6.6.6.6, public_netmask: 255.255.255.0, public_gateway: 6.6.6.1, vlan10_ip: 10.1.1.1, vlan10_network: 10.1.1.0 }

#   - { hostname: twb-den-rtr1, secret: apassword, timezone: MST, timezone_dst: MDT, timezone_offset: -7, DHCP: true, dhcp_exclude1_start: 10.1.1.1, dhcp_exclude1_end: 10.1.1.99, dhcp_network: 10.1.1.0, dhcp_netmask: 255.255.255.0, dhcp_gateway: 10.1.1.1, CBAC: true, public_ip: 6.6.6.6, public_netmask: 255.255.255.0, public_gateway: 6.6.6.1, vlan10_ip: 10.1.1.1, vlan10_network: 10.1.1.0 }

#

#cisco_881_l2_interfaces:

#  - FastEthernet0

#  - FastEthernet1

#  - FastEthernet2

#  - FastEthernet3

#

routers_881:

   - { hostname: twb-sf-rtr1, secret: apassword, timezone: PST, timezone_dst: PDT, timezone_offset: -8, DHCP: true, dhcp_exclude1_start: 10.1.1.1, dhcp_exclude1_end: 10.1.1.99, dhcp_network: 10.1.1.0, dhcp_netmask: 255.255.255.0, dhcp_gateway: 10.1.1.1, CBAC: true, public_ip: 6.6.6.6, public_netmask: 255.255.255.0, public_gateway: 6.6.6.1, internal_ip: 10.1.1.1, internal_network: 10.1.1.0 }

routers_1921:

   - { hostname: twb-sf-rtr2, secret: apassword, timezone: PST, timezone_dst: PDT, timezone_offset: -8, DHCP: true, dhcp_exclude1_start: 10.1.1.1, dhcp_exclude1_end: 10.1.1.99, dhcp_network: 10.1.1.0, dhcp_netmask: 255.255.255.0, dhcp_gateway: 10.1.1.1, CBAC: true, public_ip: 6.6.6.6, public_netmask: 255.255.255.0, public_gateway: 6.6.6.1, internal_ip: 10.1.1.1, internal_network: 10.1.1.0 }
这次的vars比较丰富。
我们执行的命令依然是 ansible-playbook site.yml
下面是生成的成品配置
第一个配置是twb-sf-rtr1.txt也就是881的
!

!

no service pad

service tcp-keepalives-in

service tcp-keepalives-out

service timestamps debug datetime msec localtime show-timezone

service timestamps log datetime msec localtime show-timezone

service password-encryption

!

hostname twb-sf-rtr1

!

boot-start-marker

boot-end-marker

!

logging buffered 32000

no logging console

enable secret 0 apassword

!

aaa new-model

!

!

aaa authentication login default local-case

aaa authorization exec default local

!

!

!

!

!

aaa session-id common

!

!

!

memory-size iomem 10

clock timezone PST -8

clock summer-time PDT recurring

!

no ip source-route

ip options drop

!

!

!

!

ip dhcp bootp ignore

no ip dhcp conflict logging

ip dhcp excluded-address 10.1.1.1 10.1.1.99

!

ip dhcp pool POOL1

   network 10.1.1.0 255.255.255.0

   default-router 10.1.1.1

   dns-server 8.8.8.8 8.8.4.4

!

!

ip cef

no ip domain lookup

ip domain name whatever.com

ip inspect name INTERNET cuseeme

ip inspect name INTERNET dns

ip inspect name INTERNET ftp

ip inspect name INTERNET h323

ip inspect name INTERNET icmp

ip inspect name INTERNET imap

ip inspect name INTERNET pop3

ip inspect name INTERNET netshow

ip inspect name INTERNET rcmd

ip inspect name INTERNET realaudio

ip inspect name INTERNET rtsp

ip inspect name INTERNET sqlnet

ip inspect name INTERNET streamworks

ip inspect name INTERNET tftp

ip inspect name INTERNET vdolive

ip inspect name INTERNET pptp

ip inspect name INTERNET tcp router-traffic

ip inspect name INTERNET udp router-traffic

no ipv6 cef

!

!

!

!

username admin privilege 15 secret 0 apassword

!

!

ip ssh version 2

!

!

!

!

!

!

!

!

!

!

!

!

interface FastEthernet0

 switchport access vlan 10

 spanning-tree portfast

 !

!

interface FastEthernet1

 switchport access vlan 10

 spanning-tree portfast

 !

!

interface FastEthernet2

 switchport access vlan 10

 spanning-tree portfast

 !

!

interface FastEthernet3

 switchport access vlan 10

 spanning-tree portfast

 !

!

interface FastEthernet4

 ip address 6.6.6.6 255.255.255.0

 ip access-group INTERNET in

 no ip redirects

 no ip proxy-arp

 ip nat outside

 ip inspect INTERNET out

 ip virtual-reassembly

 duplex auto

 speed auto

 no cdp enable

!

!

interface Vlan1

 no ip address

!

!

interface Vlan10

 description Internal LAN

 ip address 10.1.1.1 255.255.255.0

 ip nat inside

 ip virtual-reassembly

!

!

no ip http server

no ip http secure-server

!

!

ip nat inside source list NAT interface FastEthernet4 overload  //可以看到这里和上面的interface那里是881独有的

ip route 0.0.0.0 0.0.0.0 6.6.6.1

!

ip access-list extended INTERNET

 permit icmp any any host 6.6.6.6

ip access-list extended NAT

 permit ip 10.1.1.0 0.0.0.255 any

!

line vty 0 4

 exec-timeout 20 0

 logging synchronous

 transport input ssh

 transport output ssh

!

ntp update-calendar

ntp server 1.1.1.1

ntp server 2.2.2.2

end
第二个配置是twb-sf-rtr2.txt也就是1921的
!

!

no service pad

service tcp-keepalives-in

service tcp-keepalives-out

service timestamps debug datetime msec localtime show-timezone

service timestamps log datetime msec localtime show-timezone

service password-encryption

!

hostname twb-sf-rtr2

!

boot-start-marker

boot-end-marker

!

logging buffered 32000

no logging console

enable secret 0 apassword

!

aaa new-model

!

!

aaa authentication login default local-case

aaa authorization exec default local

!

!

!

!

!

aaa session-id common

!

!

!

memory-size iomem 10

clock timezone PST -8

clock summer-time PDT recurring

!

no ip source-route

ip options drop

!

!

!

!

ip dhcp bootp ignore

no ip dhcp conflict logging

ip dhcp excluded-address 10.1.1.1 10.1.1.99

!

ip dhcp pool POOL1

   network 10.1.1.0 255.255.255.0

   default-router 10.1.1.1

   dns-server 8.8.8.8 8.8.4.4

!

!

ip cef

no ip domain lookup

ip domain name whatever.com

ip inspect name INTERNET cuseeme

ip inspect name INTERNET dns

ip inspect name INTERNET ftp

ip inspect name INTERNET h323

ip inspect name INTERNET icmp

ip inspect name INTERNET imap

ip inspect name INTERNET pop3

ip inspect name INTERNET netshow

ip inspect name INTERNET rcmd

ip inspect name INTERNET realaudio

ip inspect name INTERNET rtsp

ip inspect name INTERNET sqlnet

ip inspect name INTERNET streamworks

ip inspect name INTERNET tftp

ip inspect name INTERNET vdolive

ip inspect name INTERNET pptp

ip inspect name INTERNET tcp router-traffic

ip inspect name INTERNET udp router-traffic

no ipv6 cef

!

!

!

!

username admin privilege 15 secret 0 apassword

!

!

ip ssh version 2

!

!

!

!

!

!

!

!

!

!

!

!

interface FastEthernet0           //

 switchport access vlan 10

 spanning-tree portfast

interface FastEthernet1

 switchport access vlan 10

 spanning-tree portfast

interface FastEthernet2

 switchport access vlan 10

 spanning-tree portfast

interface FastEthernet3

 switchport access vlan 10

 spanning-tree portfast

interface GigabitEthernet0/0

 ip address 6.6.6.6 255.255.255.0

 ip access-group INTERNET in

 no ip redirects

 no ip proxy-arp

 ip nat outside

 ip inspect INTERNET out

 ip virtual-reassembly

 duplex auto

 speed auto

 no cdp enable

 !

!

interface GigabitEthernet0/1

 description Internal LAN

 ip address 10.1.1.1 255.255.255.0

 no ip redirects

 no ip proxy-arp

 ip nat inside

 ip virtual-reassembly

 duplex auto

 speed auto

!

no ip http server

no ip http secure-server

!

!

ip nat inside source list NAT interface GigabitEthernet0/0 overload     //这个NAT这里就看出了1921独有的配置

ip route 0.0.0.0 0.0.0.0 6.6.6.1

!

ip access-list extended INTERNET

 permit icmp any any host 6.6.6.6

ip access-list extended NAT

 permit ip 10.1.1.0 0.0.0.255 any

!

line vty 0 4

 exec-timeout 20 0

 logging synchronous

 transport input ssh

 transport output ssh

!

ntp update-calendar

ntp server 1.1.1.1

ntp server 2.2.2.2

end
这两个生成出来的配置文件存放在 CFGS这个文件夹里。这样就通过YAML和Jinja2生成了配置文件。
目前还需要解决很多问题:
第一个大问题就是如何把成品的配置输入到远端的设备上去,这就产生了两个思路,一个是expect-like模式(有现成的library),一个是API模式(各个厂商不一样,onePK?PyEZ?个个系统也不一样,IOS和NXOS也不一样)。
第二个问题就是如何抓取host。
第三个问题是和Python脚本的配合,这个和第二个问题也是密切相关的。
to be continued...
Ansible用于网络设备管理 part 1 Jinja2 YAML初窥的更多相关文章
- Ansible用于网络设备管理 part 2 对Jinja2 YAML 和 module的理解
虽然很不想用“应该”这个词,但是还是写上了,的确我自己目前就是这么理解的. 那么这个理解就是,Ansible的一个key point 就是总的一个playbook是去依赖很多元素的,就像一开始那个图里 ...
- Ansible用于网络设备管理 part 4 使用NAPALM成品库+Gabriele的方法+循环
上次用NAPALM实现了一个给端口加description的小功能,但是那次仅仅是用于给一个设备的一个端口加description,没有实现一次给多个设备加,也没有实现一个给多个端口加(虽然这次也没实 ...
- Ansible用于网络设备管理 part 3 使用NAPALM成品库
闲话 经过了这俩月的闲暇时间的瞎逛和瞎琢磨,我发现NAPALM是一条路,NAPALM是由帅哥David Barroso和美女Elisa Jasinska创建的一个项目,都是颜值高的技术牛人啊,真是不给 ...
- Ansible用于网络设备管理 part 0 安装和登录网络设备
真实在是累了,但是又怕第二天早上又忘掉,在这先大概写写. 安装: http://www.tecmint.com/install-and-configure-ansible-automation-too ...
- Ansible 小手册系列 十三(Jinja2)
用于playbook中的jinja 2过滤器 更改数据格式,其结果是字符串 {{ some_variable | to_json }} {{ some_variable | to_yaml }} 对于 ...
- rh358 002 fact变量获取 ansible配置网络 service_facts
通过ansible 获取网络信息 1.如何获取fact事实变量 方式1: ansible servera -m servera 方式2: 剧本 [root@workstation ansible]# ...
- 此地址使用了一个通常用于网络浏览以外的端口。出于安全原因,Firefox 取消了该请求
FirFox打开80以外的端口,会弹出以下提示: “此地址使用了一个通常用于网络浏览以外的端口.出于安全原因,Firefox 取消了该请求.”. 解决方法如下: 在Firefox地址栏输入about: ...
- 火狐----此地址使用了一个通常用于网络浏览以外的端口。出于安全原因,Firefox 取消了该请求。
FirFox打开80以外的端口,会弹出以下提示: “此地址使用了一个通常用于网络浏览以外的端口.出于安全原因,Firefox 取消了该请求.”.经网上搜索,解决方法如下: 在Firefox地址栏输入a ...
- Linux-TFTP之用于网络远程安装
TFTP:Trival File Transfer Protocol,简单文件传输协议.是TCP/IP协议族中的一个用来在客户机与服务器之间进行简单文件传输的协议,提供不复杂.开销不大的文件传输服务. ...
随机推荐
- 使用 AFNetworking 进行 XML 和 JSON 数据请求
(1)XML 数据请求 使用 AFNetworking 中的 AFHTTPRequestOperation 和 AFXMLParserResponseSerializer,另外结合第三方框架 XMLD ...
- LevelDB(v1.3) 源码阅读之 Slice
LevelDB(v1.3) 源码阅读系列使用 LevelDB v1.3 版本的代码,可以通过如下方式下载并切换到 v1.3 版本的代码: $ git clone https://github.com/ ...
- C#多线程管理代码
/// <summary> /// 多线程执行 /// </summary> public class MultiThreadingWorker { /// <summa ...
- 未能找到类型或命名空间名称“Coco”(是否缺少 using 指令或程序集引用)
未能找到类型或命名空间名称"Coco"(是否缺少 using 指令或程序集引用),如果你确实引用了,那说明你引用的和你的项目环境版本不一样,.NET framework的问题,修改 ...
- ThinkJS 项目用 WebStorm 来设置断点与调试
1. 前置条件.已按ThinkJS 2.0 文档 之 <创建项目> 建好项目. 说明a: 本示例创建项目名为wagang,使用es6配置: thinkjs new wagang --es6 ...
- rsync安装配置及故障解决完全教程[window, 文件同步]
Rsync是的全称是: remote synchronize, 也就是远程同步数据, 它是一款不错的文件同步软件,而且是免费的, 它在镜像保存整个目录树和文件系统的同时保持原来文件的权限.时间.软硬链 ...
- NVIDIA CuDNN 安装说明
CuDNN是专门针对Deep Learning框架设计的一套GPU计算加速方案,目前支持的DL库包括Caffe,ConvNet, Torch7等. CuDNN可以在官网免费获得,注册帐号后即可下载.官 ...
- swift实现冒泡排序
刚刚坐着没事干,就用swift语言写了写冒泡排序,还望高手指点.拍砖!哈哈! 废话不多说,上代码! import Cocoa var array = [,,,,,,,,,,,,,,,,,] print ...
- 数组、单链表和双链表介绍 以及 双向链表的C/C++/Java实现
概要 线性表是一种线性结构,它是具有相同类型的n(n≥0)个数据元素组成的有限序列.本章先介绍线性表的几个基本组成部分:数组.单向链表.双向链表:随后给出双向链表的C.C++和Java三种语言的实现. ...
- [Bootstrap]7天深入Bootstrap(1)入门准备
由于申请了一个域名,一个云主机,开始弄个人网站. 发现Bootstrap非常方便,和重要,故开始学习与分享关于Bootstrap的技术. 推个广告 个人网站:http://www.neverc.cn ...