Android 布局之TableLayout
Android 布局之TableLayout
1 TableLayout简介
TableLayout是表格布局。TableLayout 可设置的属性包括全局属性及单元格属性。
1.1 全局属性
有以下3个参数:
android:stretchColumns
设置可伸展的列。该列可以向行方向伸展,最多可占据一整行。
android:shrinkColumns
设置可收缩的列。当该列子控件的内容太多,已经挤满所在行,那么该子控件的内容将往列方向显示。
android:collapseColumns
设置要隐藏的列。
示例:
android:stretchColumns="0" ---- 第0列可伸展
android:shrinkColumns="1,2" ---- 第1,2列皆可收缩
android:collapseColumns="*" ---- 隐藏所有行
说明:列可以同时具备stretchColumns及shrinkColumns属性,若此,那么当该列的内容N多时,将“多行”显示其内容。(这里不是真正的多行,而是系统根据需要自动调节该行的layout_height)
1.2 单元格属性
有以下2个参数:
android:layout_column
指定该单元格在第几列显示
android:layout_span
指定该单元格占据的列数(未指定时,为1)
示例:
android:layout_column="1" ---- 该控件显示在第1列
android:layout_span="2" ---- 该控件占据2列
说明:一个控件也可以同时具备这两个特性。
2 TableLayout示例
创建一个activity,包含几组TableLayout;每个TableLayout分别设置不同的属性。
layout文件
<?xml version="1.0" encoding="utf-8"?>

<LinearLayout xmlns:android="http://schemas.android.com/apk/res/android"

    android:orientation="vertical"

    android:layout_width="fill_parent"

    android:layout_height="fill_parent"

    android:padding="3dip"

    >

    <!-- 第1个TableLayout,用于描述表中的列属性。第0列可伸展,第1列可收缩 ,第2列被隐藏-->

    <TextView

        android:text="表1:全局设置:列属性设置"

        android:layout_height="wrap_content"

        android:layout_width="wrap_content"

        android:textSize="15sp"

        android:background="#7f00ffff"/>

    <TableLayout

        android:id="@+id/table1"

        android:layout_width="fill_parent"

        android:layout_height="wrap_content"

        android:stretchColumns="0"

        android:shrinkColumns="1"

        android:collapseColumns="2"

        android:padding="3dip">

        <TableRow>

            <Button android:text="该列可伸展"/>

            <Button android:text="该列可收缩"/>

            <Button android:text="我被隐藏了"/>

        </TableRow>

        <TableRow>

            <TextView android:text="我向行方向伸展,我可以很长"/>

            <TextView android:text="我向列方向收缩,我可以很深; 我向列方向收缩,我可以很深"/>

        </TableRow>

    </TableLayout>

    <!-- 第2个TableLayout,用于描述表中单元格的属性,包括:android:layout_column 及android:layout_span-->

    <TextView

        android:text="表2:单元格设置:指定单元格属性设置"

        android:layout_height="wrap_content"

        android:layout_width="wrap_content"

        android:textSize="15sp"

        android:background="#7f00ffff"/>

    <TableLayout

        android:id="@+id/table2"

        android:layout_width="fill_parent"

        android:layout_height="wrap_content"

        android:padding="3dip">

        <TableRow>

            <Button android:text="第0列"/>

            <Button android:text="第1列"/>

            <Button android:text="第2列"/>

        </TableRow>

        <TableRow>

            <TextView android:text="我被指定在第1列" android:layout_column="1"/>

        </TableRow>

        <TableRow>

            <TextView

                android:text="我跨1到2列,不信你看!"

                android:layout_column="1"

                android:layout_span="2"

                />

        </TableRow>

    </TableLayout>

    <!-- 第3个TableLayout,使用可伸展特性布局-->

    <TextView

        android:text="表3:应用一,非均匀布局"

        android:layout_height="wrap_content"

        android:layout_width="wrap_content"

        android:textSize="15sp"

        android:background="#7f00ffff"/>

    <TableLayout

        android:id="@+id/table3"

        android:layout_width="fill_parent"

        android:layout_height="wrap_content"

        android:stretchColumns="*"

        android:padding="3dip"

        >

        <TableRow>

            <Button android:text="一" ></Button>

            <Button android:text="两字"></Button>

            <Button android:text="三个字" ></Button>

        </TableRow>

    </TableLayout>

    <!-- 第4个TableLayout,使用可伸展特性,并指定每个控件宽度一致,如1dip-->

    <TextView

        android:text="表4:应用二,均匀布局"

        android:layout_height="wrap_content"

        android:layout_width="wrap_content"

        android:textSize="15sp"

        android:background="#7f00ffff"/>

    <TableLayout

        android:id="@+id/table4"

        android:layout_width="fill_parent"

        android:layout_height="wrap_content"

        android:stretchColumns="*"

        android:padding="3dip"

        >

        <TableRow>

            <!--

             -->

            <Button android:text="一" android:layout_width="1dip"></Button>

            <Button android:text="两字" android:layout_width="1dip"></Button>

            <Button android:text="三个字" android:layout_width="1dip"></Button>

        </TableRow>

    </TableLayout>

</LinearLayout>
点击下载:源代码
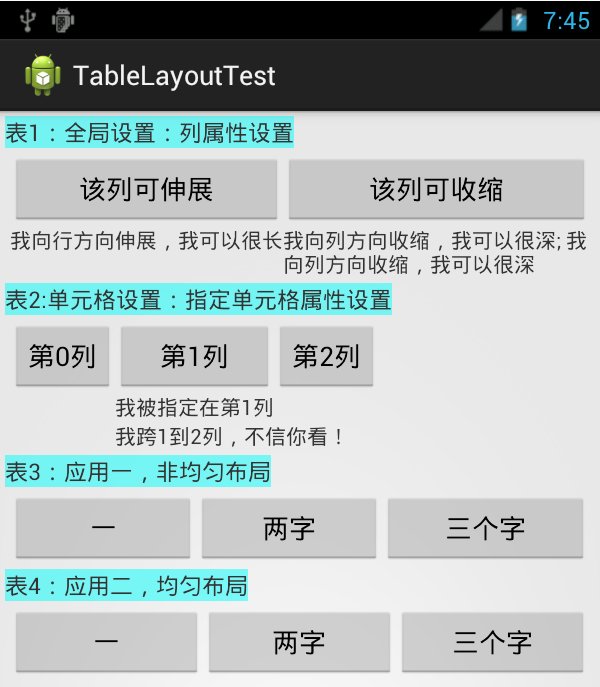
运行效果:如图
参考文档:
1. http://developer.android.com/reference/android/widget/TableLayout.html
2. http://blog.csdn.net/justoneroad/article/details/6835915
Android 布局之TableLayout的更多相关文章
- Android布局及属性归总(查询用)
常见布局 LinearLayout 线性布局 子元素任意,组织成一个单一的水平或垂直行,默认为水平方向TableLayout 表格布局 子元素为<Tabl ...
- android布局##TableLayout和FrameLayout-android学习之旅(十五)
TableLayout 表格布局 tablelayout简介 表格布局有TableLayout代表,但是它的本质定义仍然是线性管理器.表格布局采用行和列来管理UI,但是不需要明确的定义多少行,多少列, ...
- Android精通:TableLayout布局,GridLayout网格布局,FrameLayout帧布局,AbsoluteLayout绝对布局,RelativeLayout相对布局
在Android中提供了几个常用布局: LinearLayout线性布局 RelativeLayout相对布局 FrameLayout帧布局 AbsoluteLayout绝对布局 TableLayou ...
- Android 布局详解 -三表格布局(TableLayout)以及重要属性
TableLayout跟TableRow 是一组搭配应用的布局,TableLayout置底,TableRow在TableLayout的上方,而Button.TextView等控件就 ...
- Android UI布局之TableLayout
从字面上了解TableLayout是一种表格式的布局.这样的布局会把包括的元素以行和列的形式进行排列.表格的列数为每一行的最大列数.当然表格里边的单元格是能够为空的. 实例:LayoutDemo 执行 ...
- Android布局管理器-使用TableLayout表格布局管理器实现简单的用户登录页面
场景 Android布局管理器-使用FrameLayout帧布局管理器显示层叠的正方形以及前景照片: https://blog.csdn.net/BADAO_LIUMANG_QIZHI/article ...
- Android成长日记-Android布局优化
Android常用布局 1. LinearLayout(线性布局) 2. RelativeLayout(相对布局) 3. TableLayout(表格布局) 4. AbsoluteLayou(绝对布局 ...
- 五大Android布局方式浅析
Android布局是应用界面开发的重要一环,在Android中,共有五种布局方式,分别是:FrameLayout(框架布局),LinearLayout (线性布局),AbsoluteLayout(绝对 ...
- Android 布局 中实现适应屏幕大小及组件滚动
要实现如图的布局: 这是在eclipse可视化窗口中的截图,但实际运行在Android设备上可能出现的问题有: (1):当编辑图1中的最后一个EditText时,输入法的编辑界面会把底部的Button ...
随机推荐
- Java 泛型总结
1. 泛型类 class Gen<T> { private T t; public T get(){ return t; } public void set(T argt){ t = ar ...
- “LAMP“或“LNMP”组合
Linux作为操作系统,Apache和 Nginx作为 Web 服务器,MySQL 作为数据库,PHP/Perl/Python作为服务器端脚本解释器. 由于这四个软件都是免费或开放源码软件(FLOSS ...
- 谈一谈PHP的代码重构
随着 PHP 从一种简单的脚本语言转变为一种成熟的编程语言,一个典型的 PHP 应用程序的代码库的复杂性也随之增大.为了控制对这些应用程序的支持和维护,我们可以使用各种测试工具来自动化该流程.其中一种 ...
- Spring 4.3.2+quartz2.2.3单机、集群+websocket集群实现文本或图片推送、接收及显示
相关环境 Nginx,Spring4.x当前(要选择4.0+),tomcat8.x,Quartz 2.x集群 测试面页:http://sms.reyo.cn/socket.html 测试面页是文本和图 ...
- jxl 2.6.12 与 jxl 2.3.0 稳定版性能比较
jxl 2.3.0 org.jxls:jxls:2.3.0 org.jxls:jxls-poi:1.0.9 org.jxls:jxls-jexcel:1.0.6 jxls-reader:2.0.2 j ...
- CDN技术分享
CDN技术分享目录 网络应用服务发展 CDN技术 1.CDN是什么?为什么我们需要它?(简介) 2.CDN能做什么?(作用) 3.CDN是如何工作?(原理) 4.CDN有那些具体应用?(应用) 我们项 ...
- linq to entity 获取项的集合总数
IEnumerable<InspecReportsContextEntity> OnenewDate = lisConAll.Where(p => p.inspectime == t ...
- node中使用domain处理异步异常问题
domain实际上是一个隔离容器,将一个或者多个eventEmiter放入容器中,这样由该event发出的事件,如果出现异常就会最终被该domain捕获. demo代码可参见: var EventEm ...
- First MarkDown Blog
#First MarkDown Blog ##Title1 ##Tiltle2
- 软件包管理 之 RPM 基础 《RPM 的介绍和应用》
RPM 是 Red Hat Package Manager 的缩写,本意是Red Hat 软件包管理,顾名思义是Red Hat 贡献出来的软件包管理:在Fedora .Redhat.Mandriva. ...