Core篇——初探IdentityServer4(OpenID Connect模式)
Core篇——初探IdentityServer4(OpenID Connect客户端验证)
目录
1、Oauth2协议授权码模式介绍
2、IdentityServer4的OpenID Connect客户端验证简单实现
Oauth2协议授权码模式介绍
- 授权码模式是Oauth2协议中最严格的认证模式,它的组成以及运行流程是这样
1、用户访问客户端,客户端将用户导向认证服务器
2、用户在认证服务器输入用户名密码选择授权,认证服务器认证成功后,跳转至一个指定好的"跳转Url",同时携带一个认证码。
3、用户携带认证码请求指定好的"跳转Url"再次请求认证服务器(这一步后台完成,对用户不可见),此时,由认证服务器返回一个Token
4、客户端携带token请求用户资源 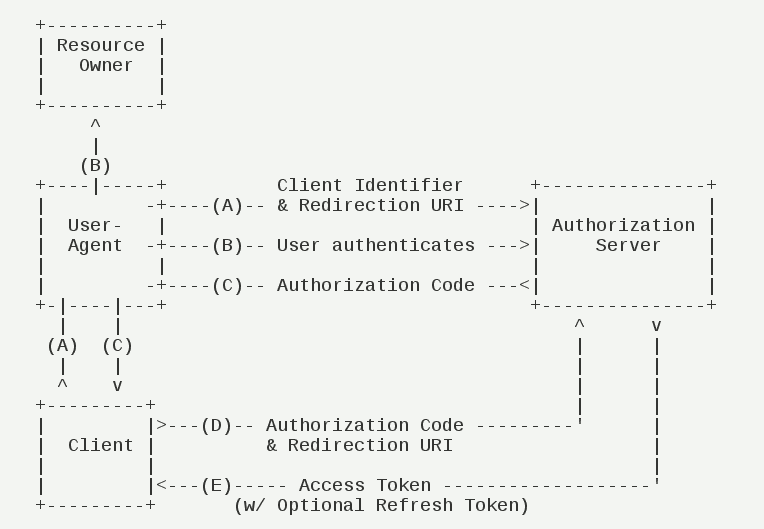
- OpenId Connect运行流程为
1、用户访问客户端,客户端将用户导向认证服务器
2、用户在认证服务器输入用户名密码认证授权
3、认证服务器返回token和资源信息 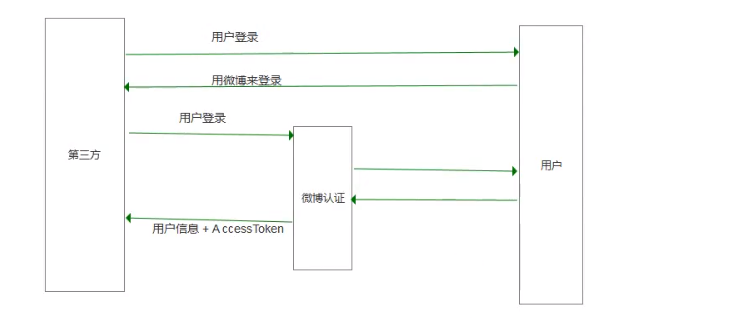
IdentityServer4的OpenID Connect客户端验证简单实现
Server部分
- 添加一个Mvc项目,配置Config.cs文件
   public class Config

     {

         //定义要保护的资源(webapi)

         public static IEnumerable<ApiResource> GetApiResources()

         {

             return new List<ApiResource>

             {

                 new ApiResource("api1", "My API")

             };

         }

         //定义可以访问该API的客户端

         public static IEnumerable<Client> GetClients()

         {

             return new List<Client>

             {

                 new Client

                 {

                     ClientId = "mvc",

                     // no interactive user, use the clientid/secret for authentication

                     AllowedGrantTypes = GrantTypes.Implicit,  //简化模式

                     // secret for authentication

                     ClientSecrets =

                     {

                         new Secret("secret".Sha256())

                     },

                     RequireConsent =true,                                  //用户选择同意认证授权

                     RedirectUris={ "http://localhost:5001/signin-oidc" },  //指定允许的URI返回令牌或授权码(我们的客户端地址)

                     PostLogoutRedirectUris={ "http://localhost:5001/signout-callback-oidc" },//注销后重定向地址 参考https://identityserver4.readthedocs.io/en/release/reference/client.html

                     LogoUri="https://ss1.bdstatic.com/70cFuXSh_Q1YnxGkpoWK1HF6hhy/it/u=3298365745,618961144&fm=27&gp=0.jpg",

                     // scopes that client has access to

                     AllowedScopes = {                       //客户端允许访问个人信息资源的范围

                         IdentityServerConstants.StandardScopes.Profile,

                         IdentityServerConstants.StandardScopes.OpenId,

                         IdentityServerConstants.StandardScopes.Email,

                         IdentityServerConstants.StandardScopes.Address,

                         IdentityServerConstants.StandardScopes.Phone

                     }

                 }

             };

         }

         public static List<TestUser> GeTestUsers()

         {

             return new List<TestUser>

             {

                 new TestUser

                 {

                     SubjectId = "",

                     Username = "alice",

                     Password = "password"

                 },

                 new TestUser

                 {

                     SubjectId = "",

                     Username = "bob",

                     Password = "password"

                 }

             };

         }

         //openid  connect

         public static IEnumerable<IdentityResource> GetIdentityResources()

         {

             return new List<IdentityResource>

             {

                 new IdentityResources.OpenId(),

                 new IdentityResources.Profile(),

                 new IdentityResources.Email()

             };

         }

     }
Config
- 添加几个ViewModel 用来接收解析跳转URL后的参数
     public class InputConsentViewModel

     {

         public string Button { get; set; }

         public IEnumerable<string> ScopesConsented { get; set; }

         public bool RemeberConsent { get; set; }

         public string ReturnUrl { get; set; }

     }

     //解析跳转url后得到的应用权限等信息

     public class ConsentViewModel:InputConsentViewModel

     {

         public string ClientId { get; set; }

         public string ClientName { get; set; }

         public string ClientUrl { get; set; }

         public string ClientLogoUrl { get; set; }

         public IEnumerable<ScopeViewModel> IdentityScopes { get; set; }

         public IEnumerable<ScopeViewModel> ResourceScopes { get; set; }

     }

     //接收Scope

     public class ScopeViewModel

     {

         public string Name { get; set; }

         public string DisplayName { get; set; }

         public string Description { get; set; }

         public bool Emphasize { get; set; }

         public bool Required { get; set; }

         public bool Checked { get; set; }

     }

     public class ProcessConsentResult

     {

         public string RedirectUrl { get; set; }

         public bool IsRedirectUrl => RedirectUrl != null;

         public string ValidationError { get; set; }

         public ConsentViewModel ViewModel { get; set; }

     }
ViewModel
- 配置StartUp,将IdentityServer加入到DI容器,这里有个ConsentService,用来处理解析跳转URL的数据,这个Service在下面实现。
         public void ConfigureServices(IServiceCollection services)

         {

             services.AddIdentityServer()

                 .AddDeveloperSigningCredential()  //添加登录证书

                 .AddInMemoryIdentityResources(Config.GetIdentityResources())  //添加IdentityResources

                 .AddInMemoryApiResources(Config.GetApiResources())

                 .AddInMemoryClients(Config.GetClients())

                 .AddTestUsers(Config.GeTestUsers());

             services.AddScoped<ConsentService>();

             services.AddMvc();

         }

         public void Configure(IApplicationBuilder app, IHostingEnvironment env)

         {

             if (env.IsDevelopment())

             {

                 app.UseDeveloperExceptionPage();

             }

             else

             {

                 app.UseExceptionHandler("/Home/Error");

             }

             app.UseStaticFiles();

             app.UseIdentityServer();//引用IdentityServer中间件

             app.UseMvc(routes =>

             {

                 routes.MapRoute(

                     name: "default",

                     template: "{controller=Home}/{action=Index}/{id?}");

             });

         }
Startup配置IdentityServer
- 添加一个ConsentService,用来根据Store拿到Resource
     public class ConsentService

     {

         private readonly IClientStore _clientStore;

         private readonly IResourceStore _resourceStore;

         private readonly IIdentityServerInteractionService _identityServerInteractionService;

         public ConsentService(IClientStore clientStore,

             IResourceStore resourceStore,

             IIdentityServerInteractionService identityServerInteractionService)

         {

             _clientStore = clientStore;

             _resourceStore = resourceStore;

             _identityServerInteractionService = identityServerInteractionService;

         }

         public async Task<ConsentViewModel> BuildConsentViewModel(string returnUrl)

         {

             //根据return url 拿到ClientId 等信息

             var request = await _identityServerInteractionService.GetAuthorizationContextAsync(returnUrl);

             if (returnUrl == null)

                 return null;

             var client = await _clientStore.FindEnabledClientByIdAsync(request.ClientId);

             var resources = await _resourceStore.FindEnabledResourcesByScopeAsync(request.ScopesRequested);//根据请求的scope 拿到resources

             return CreateConsentViewModel(request, client, resources);

         }

         private ConsentViewModel CreateConsentViewModel(AuthorizationRequest request, Client client, Resources resources)

         {

             var vm = new ConsentViewModel();

             vm.ClientName = client.ClientName;

             vm.ClientLoggoUrl = client.LogoUri;

             vm.ClientUrl = client.ClientUri;

             vm.RemeberConsent = client.AllowRememberConsent;

             vm.IdentityScopes = resources.IdentityResources.Select(i => CreateScopeViewModel(i));

             //api resource

             vm.ResourceScopes = resources.ApiResources.SelectMany(i => i.Scopes).Select(x => CreateScopeViewModel(scope: x));

             return vm;

         }

         //identity 1个scopes

         private ScopeViewModel CreateScopeViewModel(IdentityResource identityResource)

         {

             return new ScopeViewModel

             {

                 Name = identityResource.Name,

                 DisplayName = identityResource.DisplayName,

                 Description = identityResource.Description,

                 Required = identityResource.Required,

                 Checked = identityResource.Required,

                 Emphasize = identityResource.Emphasize

             };

         }

         //apiresource

         private ScopeViewModel CreateScopeViewModel(Scope scope)

         {

             return new ScopeViewModel

             {

                 Name = scope.Name,

                 DisplayName = scope.DisplayName,

                 Description = scope.Description,

                 Required = scope.Required,

                 Checked = scope.Required,

                 Emphasize = scope.Emphasize

             };

         }

     }
ConsentService
- 添加一个ConsentController,用来显示授权登录页面,以及相应的跳转登录逻辑。
 public class ConsentController : Controller

     {

         private readonly ConsentService _consentService;

         public ConsentController(ConsentService consentService)

         {

             _consentService = consentService;

         }

         public async Task<IActionResult> Index(string returnUrl)

         {

             //调用consentService的BuildConsentViewModelAsync方法,将跳转Url作为参数传入,解析得到一个ConsentViewModel

             var model =await _consentService.BuildConsentViewModelAsync(returnUrl);

             if (model == null)

                 return null;

             return View(model);

         }

         [HttpPost]

         public async Task<IActionResult> Index(InputConsentViewModel viewModel)

         {

             //用户选择确认按钮的时候,根据选择按钮确认/取消,以及勾选权限

             var result = await _consentService.PorcessConsent(viewModel);

             if (result.IsRedirectUrl)

             {

                 return Redirect(result.RedirectUrl);

             }

             if (!string.IsNullOrEmpty(result.ValidationError))

             {

                 ModelState.AddModelError("", result.ValidationError);

             }

             return View(result.ViewModel);

         }

     }
ConsentController
- 配置服务端的登录Controller
     public class AccountController : Controller

     {

         private readonly TestUserStore _user;  //放入DI容器中的TestUser(GeTestUsers方法),通过这个对象获取

         public AccountController(TestUserStore user)

         {

             _user = user;

         }        public IActionResult Login(string returnUrl = null)

         {

             ViewData["ReturnUrl"] = returnUrl;

             return View();

         }

         [HttpPost]

         public async Task<IActionResult> Login(LoginViewModel loginViewModel,string returnUrl)

         {

             //用户登录

             if (ModelState.IsValid)

             {

                 ViewData["ReturnUrl"] = returnUrl;

                 var user =  _user.FindByUsername(loginViewModel.Email);

                 if (user == null)

                 {

                     ModelState.AddModelError(nameof(loginViewModel.Email), "Email not exists");

                 }

                 else

                 {

                     var result = _user.ValidateCredentials(loginViewModel.Email, loginViewModel.Password);

                     if(result)

                     {

                         var props = new AuthenticationProperties()

                         {

                             IsPersistent = true,

                             ExpiresUtc = DateTimeOffset.UtcNow.AddMinutes()

                         };

                         await Microsoft.AspNetCore.Http.AuthenticationManagerExtensions.SignInAsync(   //Id4扩展方法和HttpContext扩展方法重名,这里强制使用命名空间方法

                             this.HttpContext,

                             user.SubjectId,

                             user.Username,

                             props);

                         return RedirectToLoacl(returnUrl);

                     }

                     else

                     {

                         ModelState.AddModelError(nameof(loginViewModel.Email), "Wrong password");

                     }

                 }

             }

             return View();

         }
AccountController
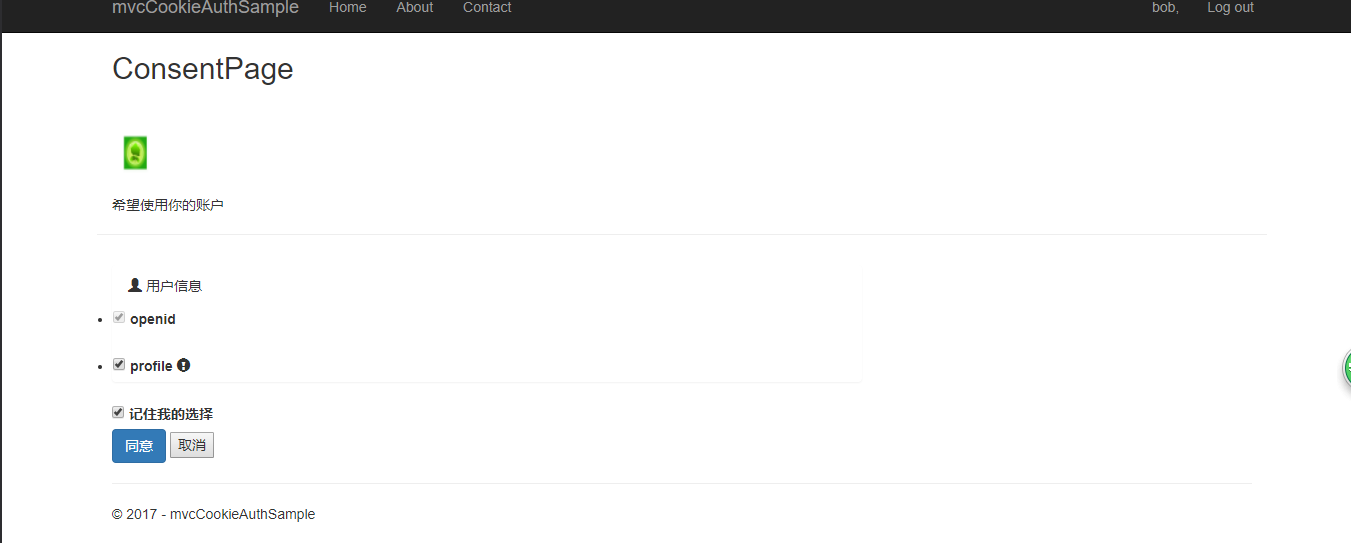
- 接下来给Consent控制器的Index添加视图
 @using mvcCookieAuthSample.ViewModels

 @model  ConsentViewModel

 <h2>ConsentPage</h2>

 @*consent*@

 <div class="row page-header">

     <div class="col-sm-10">

         @if (!string.IsNullOrWhiteSpace(Model.ClientLogoUrl))

         {

             <div>

                 <img src="@Model.ClientLogoUrl" style="width:50px;height:50px" />

             </div>

         }

         <h1>@Model.ClientName</h1>

         <p>希望使用你的账户</p>

     </div>

 </div>

 @*客户端*@

 <div class="row">

     <div class="col-sm-8">

         <div asp-validation-summary="All" class="danger"></div>

         <form asp-action="Index" method="post">

             <input type="hidden" asp-for="ReturnUrl"/>

             @if (Model.IdentityScopes.Any())

             {

                 <div class="panel">

                     <div class="panel-heading">

                         <span class="glyphicon glyphicon-user"></span>

                         用户信息

                     </div>

                     <ul class="list-group">

                         @foreach (var scope in Model.IdentityScopes)

                         {

                             @Html.Partial("_ScopeListitem.cshtml", scope);

                         }

                     </ul>

                 </div>

             }

             @if (Model.ResourceScopes.Any())

             {

                 <ul class="list-group">

                     @foreach (var scope in Model.ResourceScopes)

                     {

                         @Html.Partial("_ScopeListitem.cshtml", scope);

                     }</ul>

             }

             <div>

                 <label>

                     <input type="checkbox" asp-for="RemeberConsent"/>

                     <strong>记住我的选择</strong>

                 </label>

             </div>

             <div>

                 <button name="button" value="yes" class="btn btn-primary"  autofocus>同意</button>

                 <button name="button" value="no">取消</button>

                 @if (!string.IsNullOrEmpty(Model.ClientUrl))

                 {

                     <a href="@Model.ClientUrl" class="pull-right btn btn-default">

                         <span class="glyphicon glyphicon-info-sign" ></span>

                         <strong>@Model.ClientUrl</strong>

                     </a>

                 }

             </div>

         </form>

     </div>

 </div>

 //这里用到了一个分部视图用来显示用户允许授权的身份资源和api资源

 @using mvcCookieAuthSample.ViewModels

 @model ScopeViewModel;

 <li>

     <label>

         <input type="checkbox"

                name="ScopesConsented"

                id="scopes_@Model.Name"

                value="@Model.Name"

                checked=@Model.Checked

                disabled=@Model.Required/>

         @if (Model.Required)

         {

             <input type="hidden" name="ScopesConsented" value="@Model.Name" />

         }

         <strong>@Model.Name</strong>

         @if (Model.Emphasize)

         {

             <span class="glyphicon glyphicon-exclamation-sign"></span>

         }

     </label>

     @if(string.IsNullOrEmpty(Model.Description))

     {

         <div>

             <label for="scopes_@Model.Name">@Model.Description</label>

         </div>

     }

 </li>
Index.cshtml
- 添加客户端,依旧添加一个mvc项目,配置startup,Home/Index action打上Authorize标签。
 public void ConfigureServices(IServiceCollection services)

         {

             services.AddAuthentication(options => {

                 options.DefaultScheme = "Cookies";

                 options.DefaultChallengeScheme = "oidc";//openidconnectservice

             })

             .AddCookie("Cookies")

             .AddOpenIdConnect("oidc",options=> {

                 options.SignInScheme = "Cookies";

                 options.Authority = "http://localhost:5000";    //设置认证服务器

                 options.RequireHttpsMetadata = false;

                 options.ClientId = "mvc";                       //openidconfig的配置信息

                 options.ClientSecret = "secret";

                 options.SaveTokens = true;

             });

             services.AddMvc();

         }

         public void Configure(IApplicationBuilder app, IHostingEnvironment env)

         {

             if (env.IsDevelopment())

             {

                 app.UseDeveloperExceptionPage();

                 app.UseBrowserLink();

             }

             else

             {

                 app.UseExceptionHandler("/Home/Error");

             }

             app.UseStaticFiles();

             app.UseAuthentication();

             app.UseMvc(routes =>

             {

                 routes.MapRoute(

                     name: "default",

                     template: "{controller=Home}/{action=Index}/{id?}");

             });

         }
客户端配置Startup
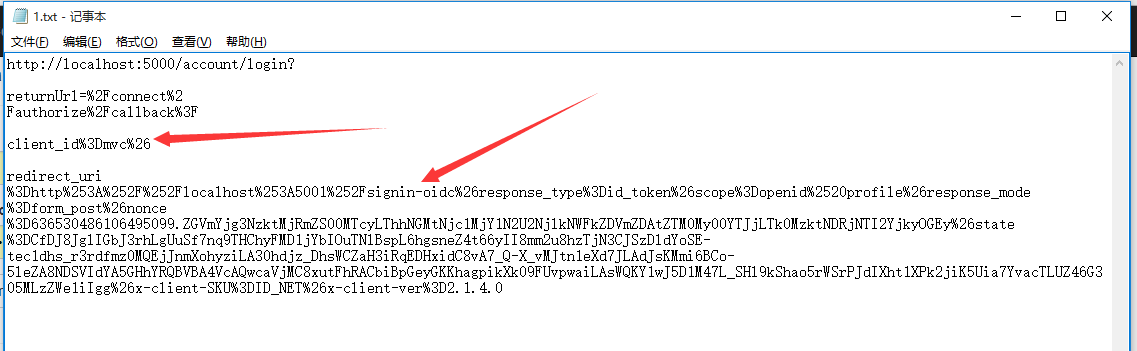
设置服务端端口5000,运行服务器端;设置客户端端口5001,运行客户端。我们可以看到,localhost:5001会跳转至认证服务器

然后看下Url=》
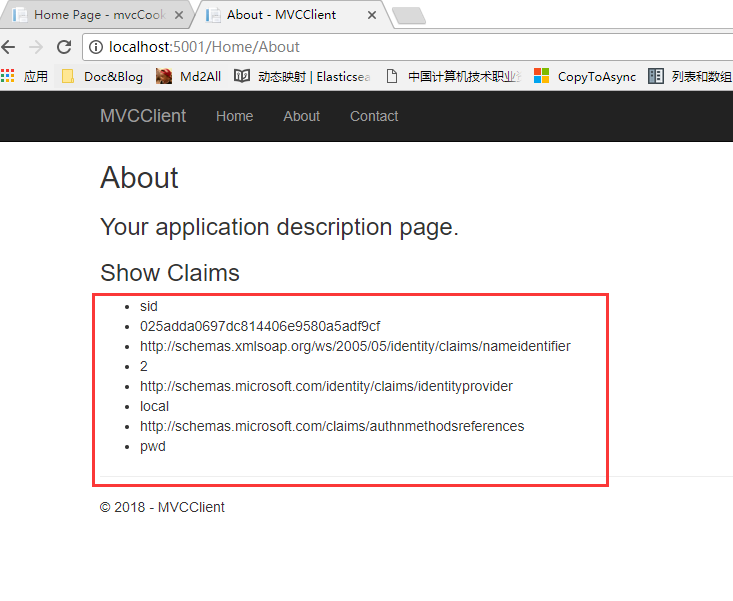
使用config配置的testuser登录系统,选择允许授权的身份权限。登录成功后看到我们的Claims
总结
- 最后来总结一下
用户访问客户端(5001端口程序),客户端将用户导向认证服务器(5000程序),用户选择允许授权的身份资源和api资源后台解析(这两个资源分别由Resources提供,resources 由IResourceStore解析returnurl后的Scopes提供),最后由ProfileService返回数条Claim。(查看ConsentService的各个方法) 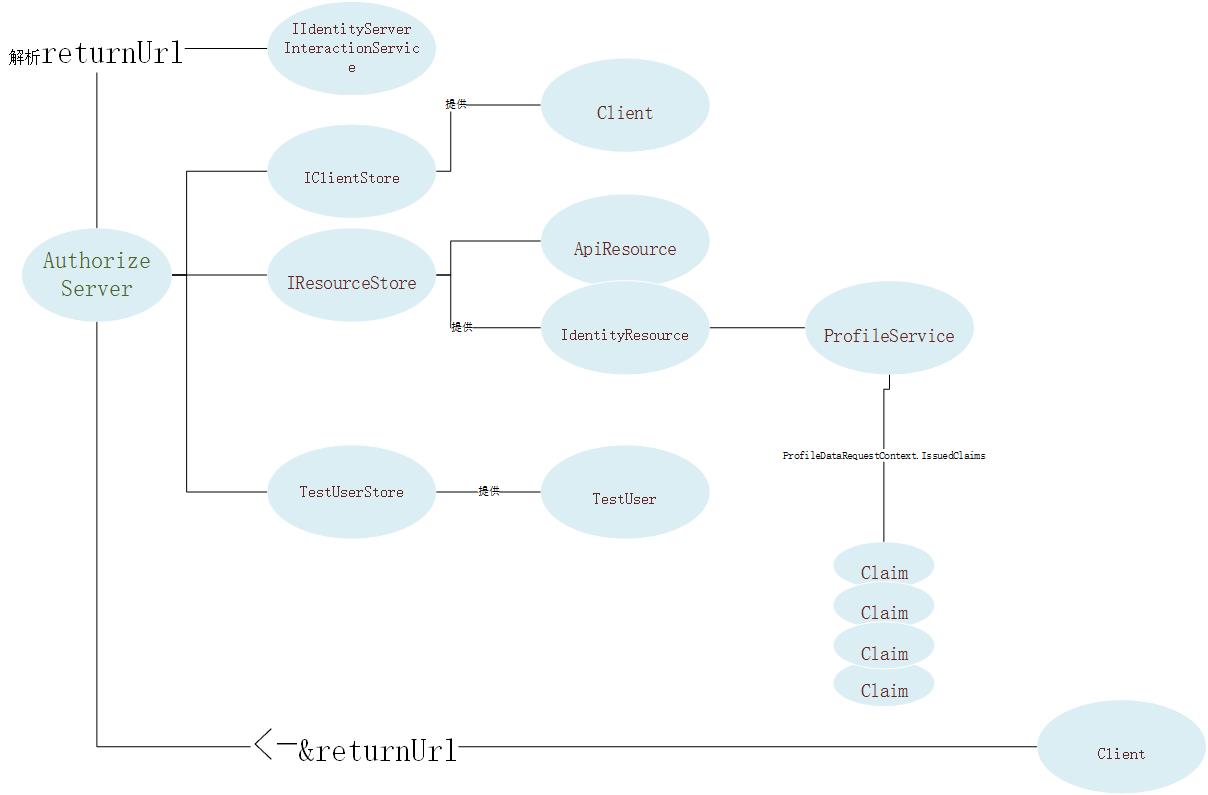
Core篇——初探IdentityServer4(OpenID Connect模式)的更多相关文章
- Core篇——初探IdentityServer4(客户端模式,密码模式)
Core篇——初探IdentityServer4(客户端模式,密码模式) 目录 1.Oatuth2协议的客户端模式介绍2.IdentityServer4客户端模式实现3.Oatuth2协议的密码模式介 ...
- Core篇——初探Core配置管理
文章目录 1.命令行配置 2.Json文件配置 3.配置文件文本至C#对象实例的映射 4.配置文件热更新 5.总结 命令行的配置 我们首先来创建一个.net core 的控制台项目,然后引入.net ...
- Core篇——初探Core的认证,授权机制
目录 1.Cookie-based认证的实现 2.Jwt Token 的认证与授权 3.Identity Authentication + EF 的认证 Cookie-based认证的实现 cooki ...
- Core篇——初探Core的Http请求管道&&Middleware
目录: 1.Core 处理HTTP请求流程 2.中间件(Middleware)&&处理流程 3.创建自定义中间件&&模拟Core的请求管道 Core 处理HTTP请求流 ...
- Core篇——初探依赖注入
目录 1.DI&&IOC简单介绍 2.UML类图中六种关联关系 3..net core 中DI的使用 4..net core DI初始化源码初窥 DI&&IOC简单介绍 ...
- 使用 IdentityServer4 实现 OAuth 2.0 与 OpenID Connect 服务
IdentityServer4 是 ASP.NET Core 的一个包含 OIDC 和 OAuth 2.0 协议的框架.最近的关注点在 ABP 上,默认 ABP 也集成 IdentityServer4 ...
- asp.net core系列 53 IdentityServer4 (IS4)介绍
一.概述 在物理层之间相互通信必须保护资源,需要实现身份验证和授权,通常针对同一个用户存储.对于资源安全设计包括二个部分,一个是认证,一个是API访问. 1 认证 认证是指:应用程序需要知道当前用户的 ...
- IdentityServer4 ASP.NET Core的OpenID Connect OAuth 2.0框架学习保护API
IdentityServer4 ASP.NET Core的OpenID Connect OAuth 2.0框架学习之保护API. 使用IdentityServer4 来实现使用客户端凭据保护ASP.N ...
- ASP.NET Core的身份认证框架IdentityServer4(9)-使用OpenID Connect添加用户认证
OpenID Connect OpenID Connect 1.0是OAuth 2.0协议之上的一个简单的身份层. 它允许客户端基于授权服务器执行的身份验证来验证最终用户的身份,以及以可互操作和类似R ...
随机推荐
- Arduino DS18B20温度检测
一.实物图 注:电阻选取4.7k欧 二.事例代码 注:先下载Onewire库到arduino libraries目录下,然后就有例子 #include <OneWire.h> // One ...
- Python-logging模块的初级使用
这篇文章适合刚接触logging模块,想快速使用 并看到使用效果的童鞋.如果想全面的了解logging模块,请移步~ 直接上代码+注释 #1.导入模块logging import logging #2 ...
- javaee IO流打印一行的方式
package Dayin; import java.io.BufferedReader; import java.io.FileNotFoundException; import java.io.F ...
- 基于日志实现ssh服务防护脚本
grep -n "Failed password" secure | sed -nr 's/.*from(.*)port.*/\1/gp' | sort -n |uniq -c|s ...
- PAT_A1110#Complete Binary Tree
Source: PAT A1110 Complete Binary Tree (25 分) Description: Given a tree, you are supposed to tell if ...
- EasyUI 解决Js动态加载页面样式不显示问题
var strHtml = "<input name='mydate' class='easyui-datebox'>"; 直接使用append把内容加载到页面中,Ea ...
- Qt5.11+opencv3.4的配置安装
系统:Windows 10 64位 前期准备: 1.CMake下载安装 下载地址:https://cmake.org/download/ 选择msi安装文件,按照提示一步一步按照就好 可以参考:htt ...
- svn_精简版【极速安装】
1.进入官网下载:http://tortoisesvn.net/ 2.进行安装. 3.官方下载汉化包 [32 位,64位] 4.安装完汉化包后,右键->Settings 5.选择语言包,确定就o ...
- OSX: 安装打印机的有用命令行
事实上非常easy.就是有用lpadmin命令,以下给出一个样例: printername="YOUR_PRINTER_NAME" location="LOCATION ...
- POJ 1198/HDU 1401
双向广搜... 呃,双向广搜一般都都用了HASH判重,这样可以更快判断两个方向是否重叠了.这道题用了双向的BFS,有效地减少了状态.但代码太长了,不写,贴一个别人的代码.. #include<i ...