Windows客户端的JProfiler远程监控Linux上的Tomcat
服务器:RedHat Linux 3.4.3-9.EL4(内核版本 2.6.9-5.EL),Tomcat5.5.20,Sun
JDK 1.5.0_09,JProfiler 4.3.2 for linux(安装包:jprofiler_linux_4_3_2.sh)
客户端:Windows XP,JProfiler 4.3.2 for windows(安装包:jprofiler_windows_4_3_2.exe)
2.JProfiler软件下载地址 http://www.ej-technologies.com/
3.客户端 JProfiler 安装 略
4.服务器端 JProfiler 安装:
把 jprofiler_linux_4.3.2.sh 上传到到服务器,假设路径为 /opt/jprofiler
# cd /opt/jprofiler
# chmod +x *.sh
# ./jprofiler_linux_4.3.2.sh -c
按照提示来安装,提示都很简单,不在多说。安装路径选择 /opt/jprofiler4
注意,这里的 -c 意思是用字符方式来安装,如果机器上没有 X 则加上该参数.
5.客户端连接配置
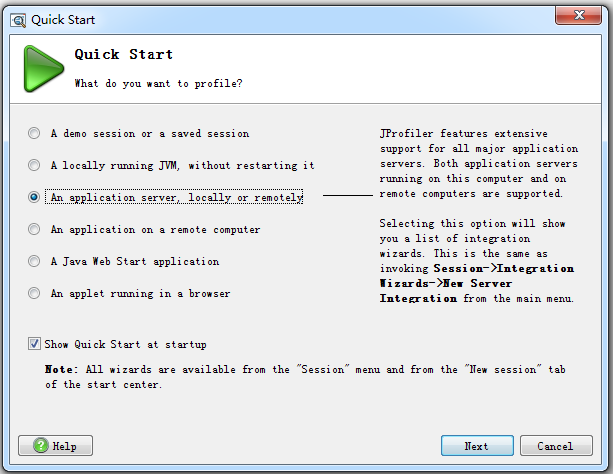
1). 运行 JProfiler 。第一次打开会有向导,忽略它。
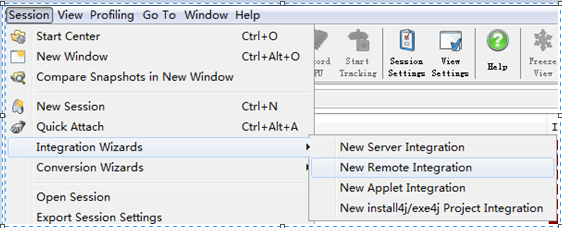
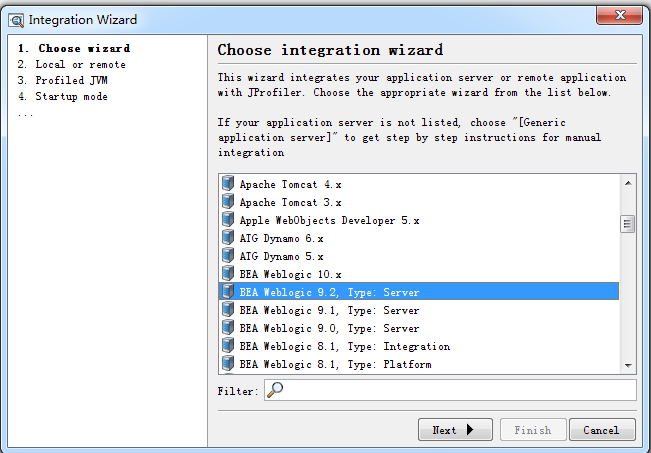
2). 选择 Session->Integration Wizard->New Remote Integratation
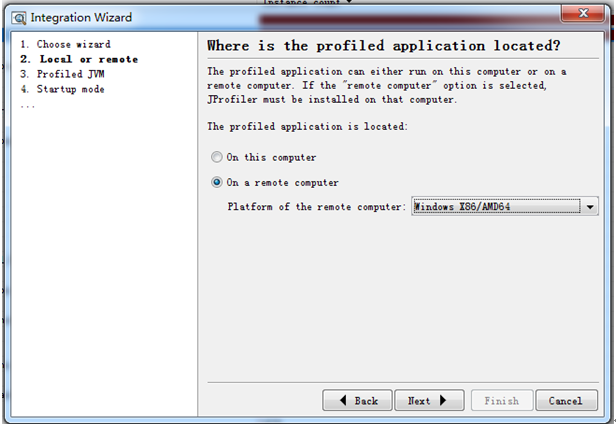
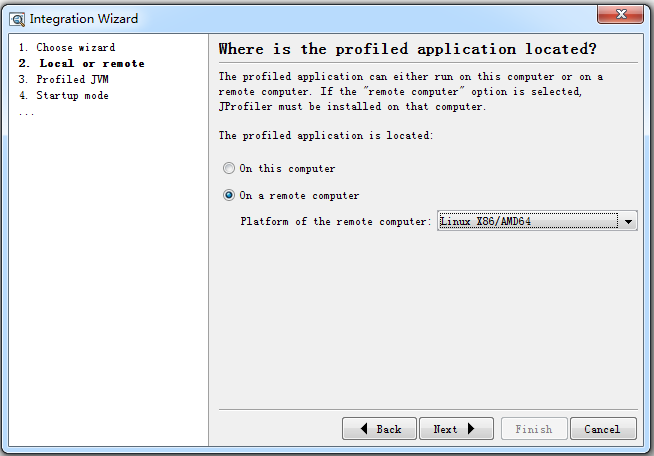
3). 选择 On a remote computer;Platform of remote computer 选择 Linux x86/AMD 64;Next
4). 输入服务器 IP ;Next
5). 输入服务器上的 jprofiler 的安装路径,如 /opt/jprofiler4 ;next
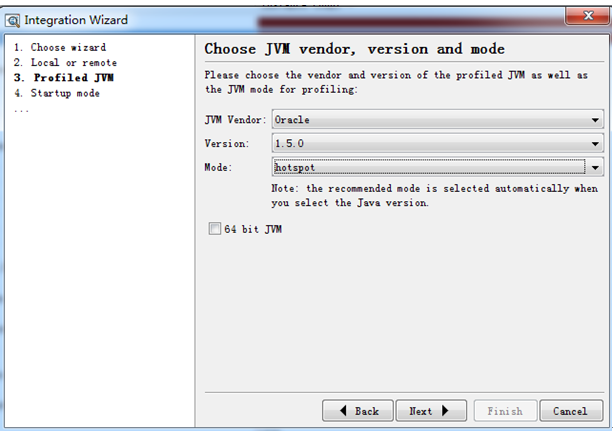
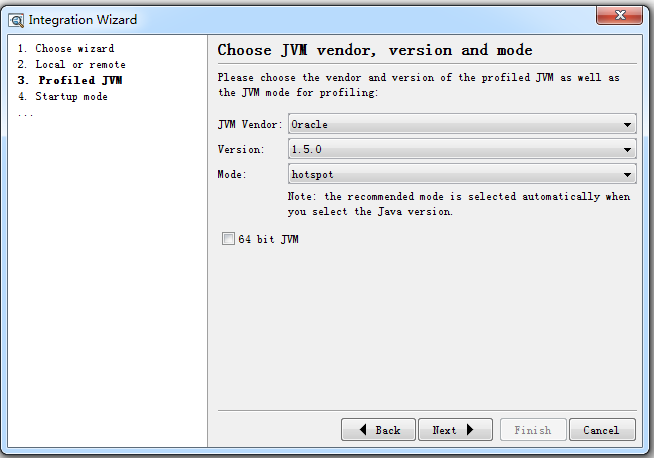
6). 选择服务器的 JDK 环境,这里是:Sun,1.5.0,hotspot;next
7). 输入端口:这里是默认值 8849;next
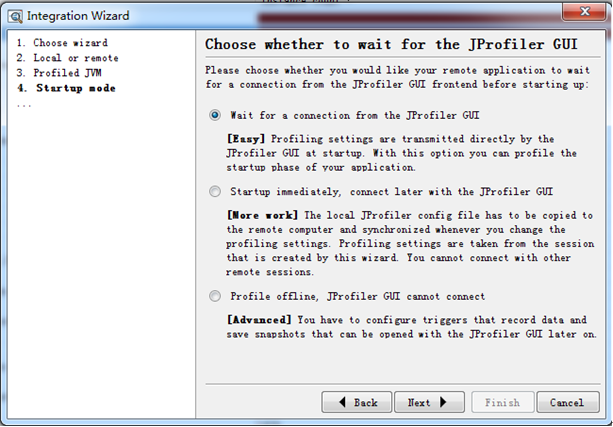
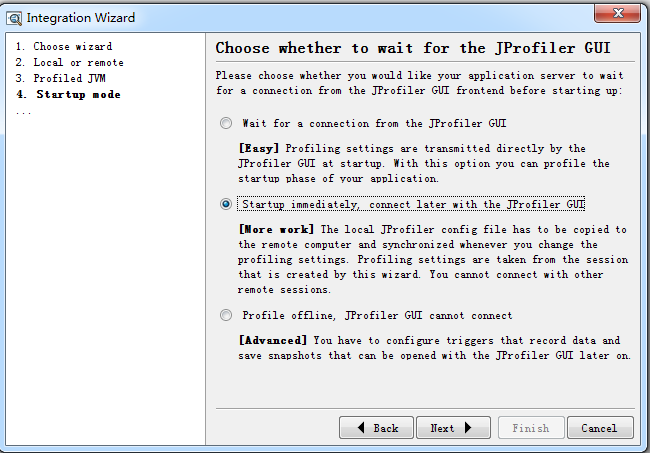
8). 选择启动模式:这里选第一种 wait for a connection from the jprofiler GUI;next
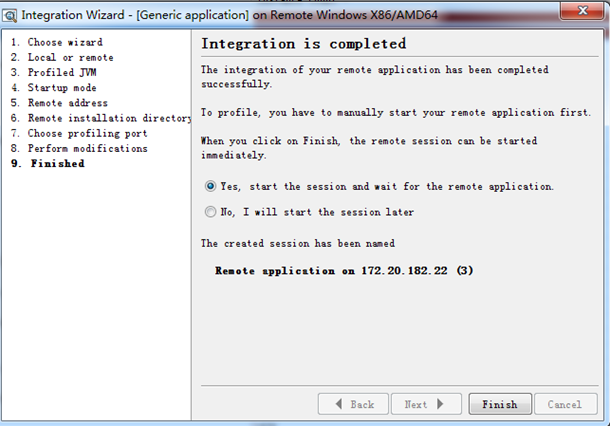
9). 这里会列出需要在服务器端做的配置(very important):
Selected JVM: Sun 1.5.0 (hotspot)
Startup mode: Wait for JProfiler GUI
(1) Please insert
-agentlib:jprofilerti=port=8849 -Xbootclasspath/a:/opt/jprofiler4/bin/agent.jar
into the start command of your remote application right after the java command.
(2) Please add
/opt/jprofiler4/bin/linux-x86
to the environment variable LD_LIBRARY_PATH.
A remote session named Remote application on 192.168.40.15 will be created that connects to a running instance of the remote application that is started with the modified start command.
6.服务器端的配置
(1)修改系统环境配置文件 /etc/profile ,增加
export LD_LIBRARY_PATH=$LD_LIBRARY_PATH:$JPROFILER_HOME
(2)修改TOMCAT启动文件catalina.sh,添加-agentlib:jprofilerti=port=8849 -Xbootclasspath/a:/opt/jprofiler4/bin/agent.jar 内容到CATALINA_OPTS中;
“-agentlib:jprofilerti=port=8849 -Xbootclasspath/a:/opt/jprofiler4/bin/agent.jar ” 此内容由客户端软件生成
7.Reboot Linux and startup Tomcat using startup.sh;
The log of tomcat which is $CATALINA_HOME/logs/catalina.out will show:
JProfiler> Using JVMTI
JProfiler> 32-bit library
JProfiler> Listening on port: 8849.
JProfiler> Native library initialized
JProfiler> Waiting for a connection from the JProfiler GUI

8.启动客户端软件
点击jprofiler菜单 session>start center>Open Session
Available session configurations中列出了刚才配置的连接,选中使用就OK了!!
9.The log of tomcat which is $CATALINA_HOME/logs/catalina.out will show:
JProfiler> Time measurement: elapsed time
JProfiler> CPU profiling enabled
JProfiler> Hotspot compiler enabled
JProfiler> Starting org/apache/catalina/startup/Bootstrap
10.当中断JProfiler连接时
The log of tomcat which is $CATALINA_HOME/logs/catalina.out will show:
JProfiler> Listening on port: 8849.
各中间件配置
1、 服务端安装JProfiler(与客户端版本一致)
2、 客户端配置连接:
A)、session——integration wizards——New remote integration
B)、选择远程监控的平台windows,点击next
C)、选择jdk版本,如果服务器是64位的jdk则勾上64 bit jvm,点击next
D)、选择等待连接,点击next
E)、输入服务端ip地址,点击next
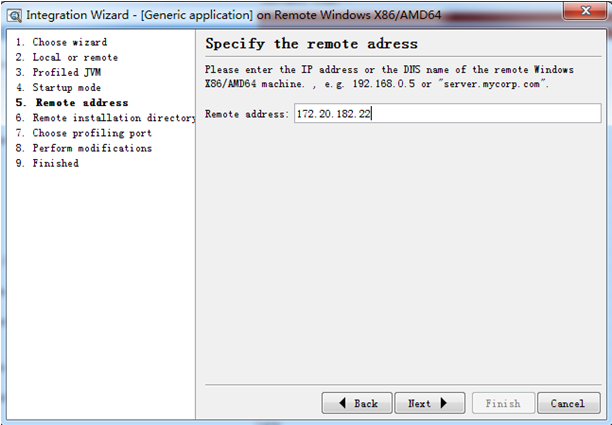
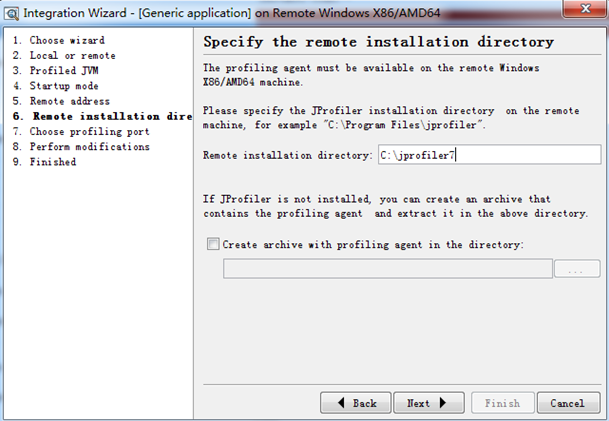
F)、输入服务端机器上的jprofiler的安装路径,点击next
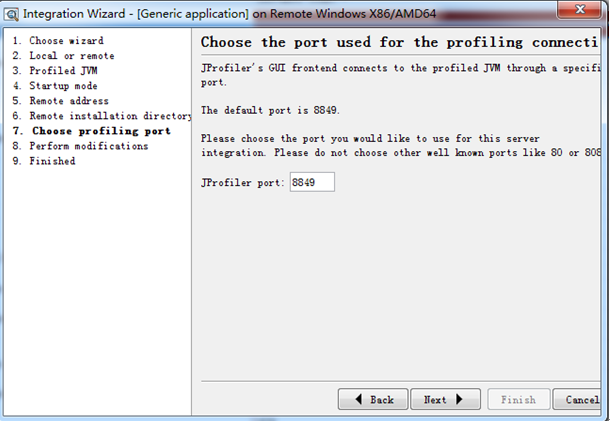
G)、端口默认8849,点击next
H)、提示需要在服务端插入下面的启动命令:-agentpath:C:\jprofiler7\bin\windows\jprofilerti.dll=port=8849
客户端配置完成

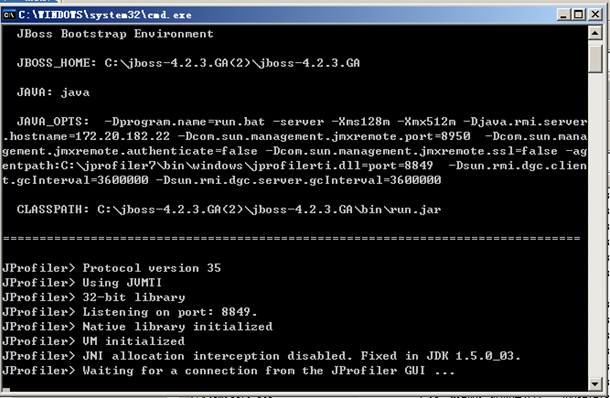
3、 服务端,在C:\jboss-4.2.3.GA(2)\jboss-4.2.3.GA\bin下面编辑run.bat
加入下面的启动项-agentpath:C:\jprofiler7\bin\windows\jprofilerti.dll=port=8849
如set JAVA_OPTS=%JAVA_OPTS% -Xms128m -Xmx512m -agentpath:C:\jprofiler7\bin\windows\jprofilerti.dll=port=8849
启动jboss,看到waiting for a connection from the JProfiler GUI… 就可以了
4、 配置好服务端后,继续点击客户端的next,然后再点击finish,连接即可
注:
A)、如果是tomcat则在编辑C:\my\apache-tomcat-6.0.14\apache-tomcat-6.0.14\bin下面catalina.bat
如set JAVA_OPTS=%JAVA_OPTS% -Djava.util.logging.manager=org.apache.juli.ClassLoaderLogManager -Djava.util.logging.config.file="%CATALINA_BASE%\conf\logging.properties" -agentpath:C:\my\jprofiler_windows_7_1_2\jprofiler7\bin\windows\jprofilerti.dll=port=8849
B)、如果是weblogic则编辑C:\bea\weblogic92\samples\domains\workshop\bin下面的setDomainEnv.cmd
如:
set JAVA_OPTIONS=%JAVA_OPTIONS% %JAVA_PROPERTIES% -Dwlw.iterativeDev=%iterativeDevFlag% -Dwlw.testConsole=%testConsoleFlag% -Dwlw.logErrorsToConsole=%logErrorsToConsoleFlag% -agentpath:C:\jprofiler7\bin\windows\jprofilerti.dll=port=8849
C)、如果是linux中的tomcat,则编辑/usr/local/apache-tomcat-6.0.35/bin下面的catalina.sh文件,在java_opts后面加上
-agentpath:/usr/local/jprofiler7/bin/linux-x86/libjprofilerti.so=port=8849"
(注意-agent参数要加载“之内)
如:
if [ -z "$LOGGING_MANAGER" ]; then
JAVA_OPTS="$JAVA_OPTS -Djava.util.logging.manager=org.apache.juli.ClassLoaderLogManager -agentpath:/usr/local/jprofiler7/bin/linux-x86/libjprofilerti.so=port=8849"
else
JAVA_OPTS="$JAVA_OPTS $LOGGING_MANAGER -agentpath:/usr/local/jprofiler7/bin/linux-x86/libjprofilerti.so=port=8849"
D)、如果是linux中的jboss,则编辑/usr/local/jboss-4.2.3.GA/bin下面的run.sh文件,在java_opts后面加上
-agentpath:/usr/local/jprofiler7/bin/linux-x86/libjprofilerti.so=port=8849
(注意-agent参数要加载“之内)
如:
if [ "$linux" = "true" ]; then
JAVA_OPTS="$JAVA_OPTS -Djava.net.preferIPv4Stack=true -agentpath:/usr/local/jprofiler7/bin/linux-x86/libjprofilerti.so=port=8849"
Fi
E)、如果是linux中的weblogic,则编辑/home/weblogic/user_projects/domains/Test/bin下面的setDomainEnv.sh
如:
JAVA_OPTIONS="${JAVA_OPTIONS} ${JAVA_PROPERTIES} -Dwlw.iterativeDev=${iterativeDevFlag} -Dwlw.testConsole=${testConsoleFlag} -Dwlw.logErrorsToConsole=${logErrorsToConsoleFlag} -agentpath:/usr/local/jprofiler7/bin/linux-x86/libjprofilerti.so=port=8849"
export JAVA_OPTIONS
----------------------------------------------------------------------------------------------------------------------------------------------------------------------------------------------------------------------------------
另一种方式(方便的操作linux+weblogic)
1、 客户端连接配置:
A)、session——new window,选择an application server,locally or remotely,点击next
B)、选择监控的服务器(weblogic9.2),点击next
C)、选择远程监控机器平台
D)、选择jdk版本
E)、选择立即启动,随时可以连接jprofiler,(即手动启动服务后,随时jprofiler可以连接)
F)、输入远程ip地址
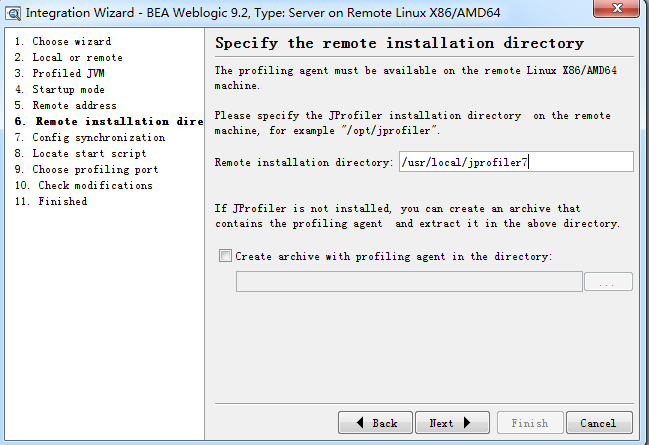
G)、输入远程机器上的jprofiler的路径
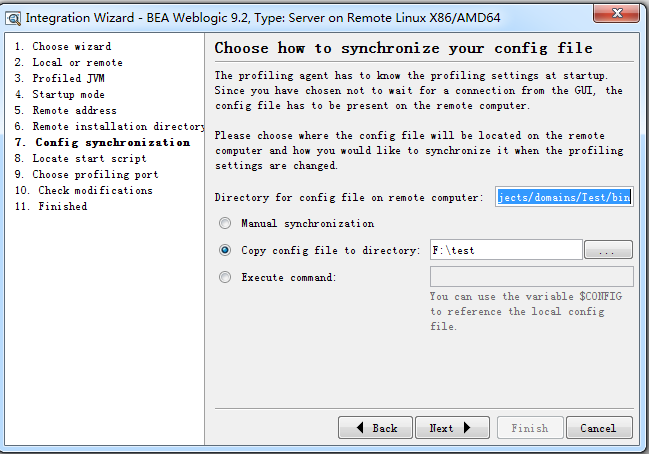
H)、选择远程配置文件的路径(完成后要把本地生成的config.xml拷贝到这)
选择拷贝配置文件到这个路径
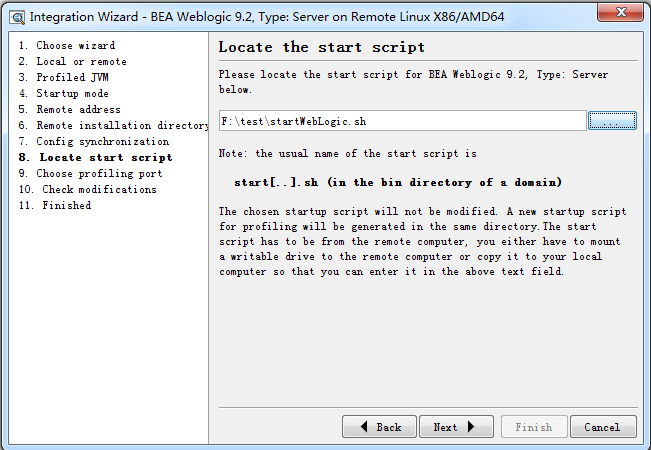
I)、这里选择提前在服务器上拷贝下来的startWebLogic.sh文件
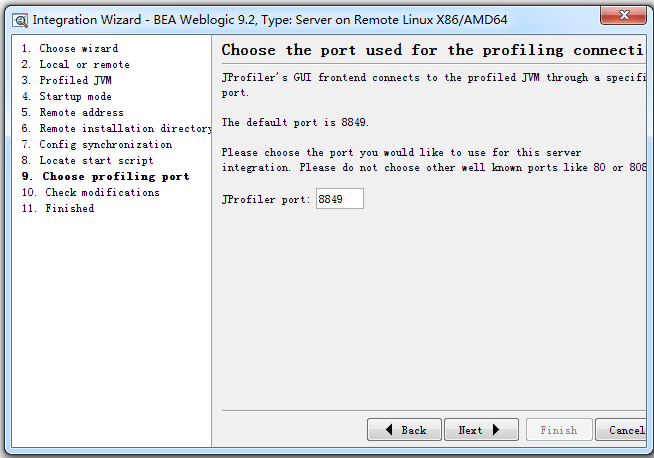
J)、显示端口,点击next
K)、提示要在服务端操作的内容,点击next
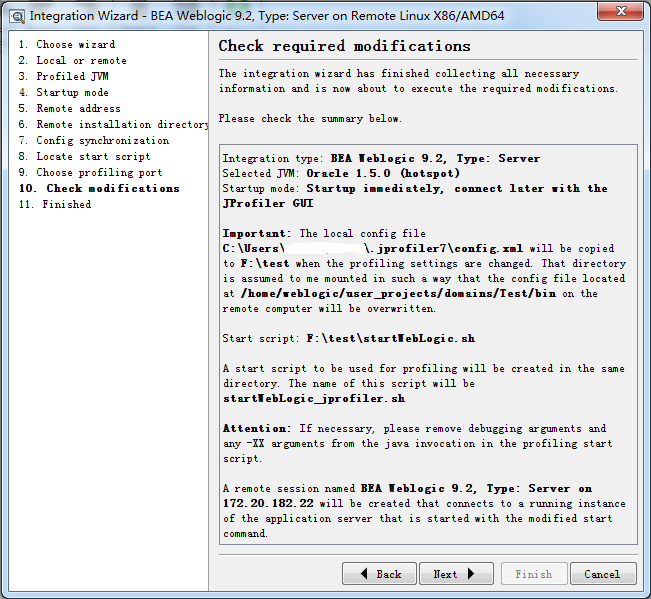
2、 服务端
A)、把C:\Users\xxxxxxx\.jprofiler7\config.xml拷贝到服务器的/home/weblogic/user_projects/domains/Test/bin路径下(要设置下这个文件的可操作权限chmod a+x /home/weblogic/user_projects/domains/Test/bin/config.xml)
B)、把F:\test\startWebLogic_jprofiler.sh拷贝到/home/weblogic/user_projects/domains/Test/bin路径下并授于可操作权
C)、./startWebLogic_jprofiler.sh启动weblogic即可

第一行是连接成功
第二行和第三行是断开
第四行是重新连接
Windows客户端的JProfiler远程监控Linux上的Tomcat的更多相关文章
- 转载:JProfiler远程监控LINUX上的Tomcat过程细讲
来源于xuwanbest的博客 所谓"工欲善其事,必先利其器",好的工具确能起到事半工倍的作用.我用到的最多的就两个JConsole 和JProfiler .JConsole监 ...
- JProfiler远程监控Linux上Tomcat的安装过程细讲(步骤非常详细!!!)
JProfiler远程监控Linux上Tomcat的安装过程细讲(步骤非常详细!!!) 1.文件准备: 服务器:CentOS Linux release 7.3.1611 (Core) Apa ...
- Windows负载机JVM 远程监控Linux服务器下tomcat
基本是跟着网上的操作进行的,除了遇到一个Local host name unknown的问题: 一.Linux服务器操作部分 服务器地址:10.64.111.68 首先配置JMX: 1.找到jdk目录 ...
- JConsole监控Linux上的Tomcat
JConsole监控Linux上的Tomcat 从Java 5开始引入了 JConsole,来监控 Java 应用程序性能和跟踪 Java 中的代码.jconsole是JDK自带监控工具,只需要找到 ...
- jprofile 远程监控linux上的jvm
环境 客户端:win7+jprofiler_windows-x64_10_0_4.exe linux服务器:tomcat7+jdk1.7+jprofiler_linux_10_0_4.sh 一.客户端 ...
- 记一个菜鸟在Linux上部署Tomcat的随笔
以前都只是在园子里找各种资料.文档.各种抱大腿,今天是第一次进园子里来添砖加瓦,实话说,都不知道整些啥东西上来,就把自己在Linux上搭建Tomcat的过程记录下来,人笨,请各位大虾们勿喷. 虽然做开 ...
- 在linux上部署tomcat服务
在linux上部署tomcat 1.安装JDK 2.下载tomcat http://tomcat.apache.org/download-70.cgi 3.上传到服务器,并解压 4.上传war包或者已 ...
- 在Linux上安装tomcat和JDK
1.tomcat的安装 a.#cd download(进入download文件夹) b.#wget http://111.23.5.142:82/mirrors.hust.edu.cn/apache/ ...
- Linux上部署Tomcat+Nginx负载均衡
前提:配置好了JDK. 我这里是vm上的linux虚拟机,可能不适用于所有情况. 一.Linux上配置Tomcat 1.下载地址:https://tomcat.apache.org/download- ...
随机推荐
- C#程序集系列13,如何让CLR选择不同版本的程序集
本篇主要体验,在存在多个版本程序集的情况下,如何让CLR选择哪个版本程序集运行,以及程序集版本的切换. 分别生成非强名称程序集不同版本 □ 生成某个版本的程序集 →清理F盘as文件夹,剩下如下文件 → ...
- C#(静态String类)
[转]http://blog.csdn.net/angelazy/article/details/8501776 C#中提供了比较全面的字符串处理方法,很多函数都进行了封装为我们的编程工作提供了很大的 ...
- Announcing Mobile SDK V2.0
As you might have read over at our PayPal Forward Blog it’s time to celebrate for PayPal | Developer ...
- bochs和硬盘管理
bochs和硬盘管理 实验一 目的:熟悉实验环境,认识Bochs虚拟机 内容: 1.下载并安装Bochs 2.3.7,官方网站 http://bochs.sourceforge.net/ 2.下载DO ...
- 解决“listView点击一个Item,另外几个Item也跟着改变”的问题
如图所看到的: 我点击Item,右边的checkBox就会对应的变化.可是当我第一次做的时候.点击第一个Item,右边的checkBox变为绿色,可是当我listView往下拉的时候,发现以下也有是绿 ...
- JTable常见用法细则
JTable是Swing编程中很常用的控件,这里总结了一些常用方法以备查阅.欢迎补充,转载请注明作者与出处. 一.创建表格控件的各种方式:1) 调用无参构造函数. JTable table = ne ...
- JavaScript 触发click事件 兼容FireFox,IE 和 Chrome
解决了火狐下无法触发click事件的问题 <script language="javascript"> function test2(name) { if(docume ...
- 《深入理解C指针》
<深入理解C指针> 基本信息 原书名:Understanding and using C pointers 作者: (美)Richard Reese 译者: 陈晓亮 丛书名: 图灵程序设计 ...
- Coursera课程python中的一些程序
Index of /code Name Last modified Size Description Parent Directory - BeautifulSoup.py 07-Aug-2015 1 ...
- Android开发之Navigationdrawer导航抽屉功能的实现(源码分享)
导航抽屉(navigationdrawer)是一个从屏幕左边滑入的面板,用于显示应用的主要导航项目.用户能够通过在屏幕左边缘滑入或者触摸操作栏的应用图标打开导航抽屉. 导航抽屉覆盖在内容之上,但不覆盖 ...