Android利用温度传感器实现带动画效果的电子温度计
概述
详细
一、准备工作
需要准备一部带有温度传感器的安卓手机,或者使用有温度传感器的模拟器。
二、程序实现
1、需要截图程序结构
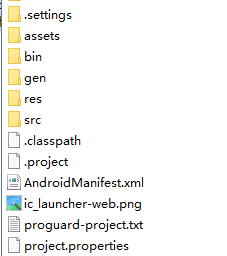
2、实现思路怎样
要想实现带动画效果的电子温度计,需要以下几个知识点:
温度传感器相关知识。
ScaleAnimation动画相关知识,来进行水印刻度的缩放效果。
Android:layout_weight属性的合理运用,关于android:layout_weight属性的讲解,可以参考:《我的Android进阶之旅------>关于android:layout_weight属性的一个面试题》
首先来看看本实例的具体效果,然后再来具体实现功能。
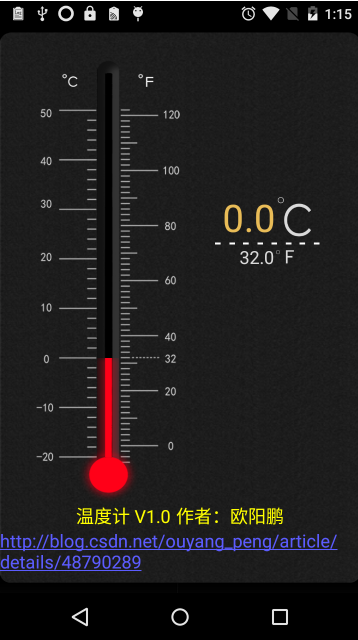
1、将温度强制设置为0度时,画面如下:
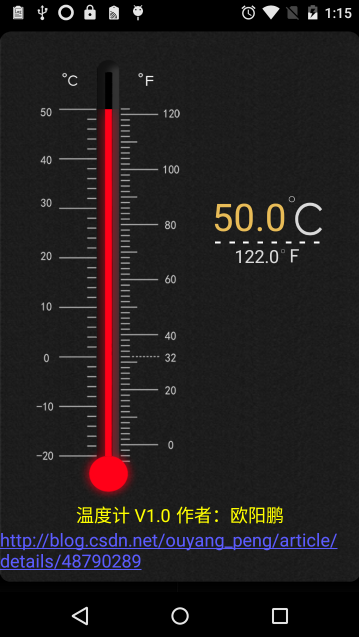
2、将温度强制设置为50度时,画面如下:
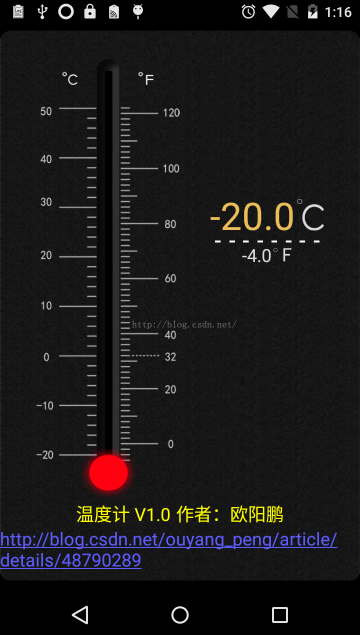
3、将温度强制设置为-20度时,画面如下:
4、从传感器动态得到温度值,并实时更新画面,如下所示:
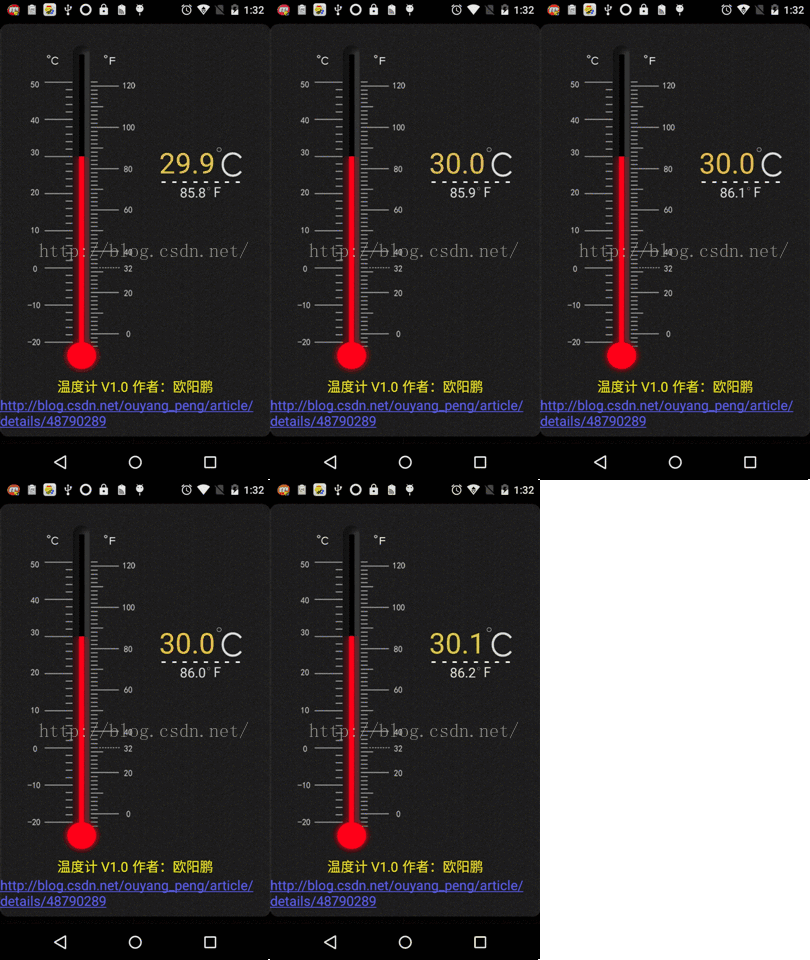
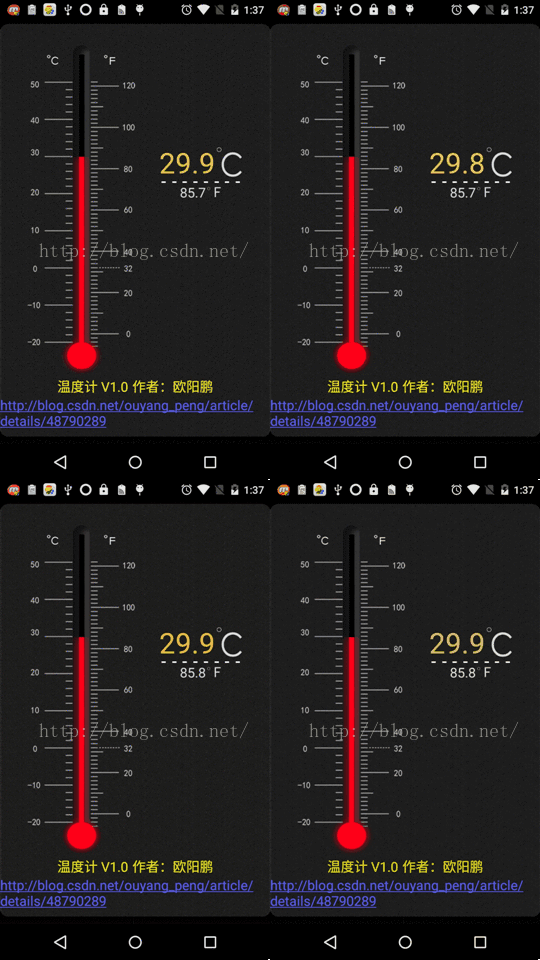
首先来看布局文件的代码:layout_thermometer.xml
<?xml version="1.0" encoding="utf-8"?>

<LinearLayout xmlns:android="http://schemas.android.com/apk/res/android"

    android:id="@+id/Parent"

    android:layout_width="fill_parent"

    android:layout_height="fill_parent"

    android:background="@drawable/background_thermometer"

    android:clipChildren="false"

    android:clipToPadding="false"

    android:gravity="bottom|center"

    android:keepScreenOn="true"

    android:orientation="vertical" >

    <FrameLayout

        android:layout_width="fill_parent"

        android:layout_height="fill_parent"

        android:layout_gravity="bottom|center" >

        <LinearLayout

            android:layout_width="fill_parent"

            android:layout_height="fill_parent"

            android:orientation="vertical" >

            <!-- 顶部图片 -->

            <ImageView

                android:layout_width="fill_parent"

                android:layout_height="wrap_content"

                android:layout_gravity="center"

                android:src="@drawable/background_top" />

            <LinearLayout

                android:layout_width="fill_parent"

                android:layout_height="fill_parent"

                android:layout_weight="100.0"

                android:orientation="horizontal" >

                <!-- 横向空白占1份 -->

                <LinearLayout

                    android:layout_width="0dp"

                    android:layout_height="fill_parent"

                    android:layout_weight="1"

                    android:gravity="bottom|center" >

                </LinearLayout>

                <!-- 横向占4份 -->

                <LinearLayout

                    android:id="@+id/meter"

                    android:layout_width="0dp"

                    android:layout_height="wrap_content"

                    android:layout_marginTop="10dp"

                    android:layout_weight="4"

                    android:animationCache="true"

                    android:background="@drawable/thermometer_dial"

                    android:clipChildren="false"

                    android:clipToPadding="false"

                    android:persistentDrawingCache="all" >

                    <!-- 横向占189份,刻度表左边刻度摄氏温度所占比例 -->

                    <LinearLayout

                        android:layout_width="0dp"

                        android:layout_height="fill_parent"

                        android:layout_weight="189"

                        android:visibility="invisible" />

                    <!-- 横向占69份,刻度表水银柱子所在区域所占比例 -->

                    <LinearLayout

                        android:layout_width="0dp"

                        android:layout_height="fill_parent"

                        android:layout_weight="69"

                        android:orientation="vertical" >

                        <!-- 竖向占131.0份,刻度表50°以上的部分 -->

                        <LinearLayout

                            android:layout_width="fill_parent"

                            android:layout_height="0dp"

                            android:layout_weight="131.0" />

                        <!--

                                竖向占773.0份,水银针正好等于刻度表从-20°到50°

                                因为柱子和圆球直接有点断层,把773变成774

                                默认不显示柱子,当有传感器数据时,才显示出来

                        -->

                        <LinearLayout

                            android:id="@+id/alcohol"

                            android:layout_width="fill_parent"

                            android:layout_height="0dp"

                            android:layout_weight="774.0"

                            android:background="@drawable/alcohol"

                            android:orientation="horizontal"

                            android:visibility="invisible" />

                        <!--

                                竖向占104.0份 ,刻度表-20°以上的部分

                                因为柱子和圆球直接有点断层,把104变成103

                        -->

                        <LinearLayout

                            android:layout_width="fill_parent"

                            android:layout_height="0dp"

                            android:layout_weight="103.0" />

                    </LinearLayout>

                    <!-- 横向占189份,刻度表右边刻度华氏温度所占比例 -->

                    <LinearLayout

                        android:layout_width="0dp"

                        android:layout_height="fill_parent"

                        android:layout_weight="187"

                        android:visibility="invisible" />

                </LinearLayout>

                <!-- 横向占4份 -->

                <LinearLayout

                    android:layout_width="0dp"

                    android:layout_height="wrap_content"

                    android:layout_marginTop="150dp"

                    android:layout_weight="4"

                    android:gravity="center"

                    android:orientation="vertical"

                    android:paddingLeft="30dp" >

                    <LinearLayout

                        android:layout_width="wrap_content"

                        android:layout_height="wrap_content"

                        android:gravity="center"

                        android:orientation="horizontal" >

                        <!-- 摄氏温度 -->

                        <TextView

                            android:id="@+id/thermo_c"

                            android:layout_width="wrap_content"

                            android:layout_height="wrap_content"

                            android:textColor="#e9bc57"

                            android:textSize="38sp" />

                        <!-- 摄氏温度图标 -->

                        <ImageView

                            android:layout_width="wrap_content"

                            android:layout_height="wrap_content"

                            android:layout_gravity="center"

                            android:paddingLeft="2dp"

                            android:src="@drawable/thermo_c" />

                    </LinearLayout>

                    <!-- 分割线 -->

                    <ImageView

                        android:layout_width="fill_parent"

                        android:layout_height="wrap_content"

                        android:layout_gravity="center"

                        android:src="@drawable/divider" />

                    <LinearLayout

                        android:layout_width="wrap_content"

                        android:layout_height="wrap_content"

                        android:gravity="center"

                        android:orientation="horizontal" >

                        <!-- 华氏温度 -->

                        <TextView

                            android:id="@+id/thermo_f"

                            android:layout_width="wrap_content"

                            android:layout_height="wrap_content"

                            android:textColor="#dadada"

                            android:textSize="18sp" />

                        <!-- 华氏温度图标 -->

                        <ImageView

                            android:layout_width="wrap_content"

                            android:layout_height="wrap_content"

                            android:layout_gravity="center"

                            android:paddingLeft="2dp"

                            android:src="@drawable/thermo_f" />

                    </LinearLayout>

                </LinearLayout>

                <!-- 横向空白占1份 -->

                <LinearLayout

                    android:layout_width="0dp"

                    android:layout_height="fill_parent"

                    android:layout_weight="1"

                    android:gravity="bottom|center" >

                </LinearLayout>

            </LinearLayout>

            <LinearLayout

                android:layout_width="wrap_content"

                android:layout_height="wrap_content"

                android:layout_gravity="center"

                android:gravity="center_vertical"

                android:orientation="vertical" >

                <!-- 作者信息-->

                <TextView

                    android:layout_width="wrap_content"

                    android:layout_height="wrap_content"

                    android:textColor="#ffff00"

                    android:textSize="18sp"

                    android:text="@string/author"

                    android:layout_gravity="center"/>

                <!-- 博客地址 -->

                 <TextView

                     android:layout_width="wrap_content"

                     android:layout_height="wrap_content"

                     android:autoLink="web"

                     android:text="@string/blog_address"

                     android:textColor="#ffff00"

                     android:textSize="18sp" />

            </LinearLayout>

            <!-- 尾部图片 -->

            <ImageView

                android:layout_width="fill_parent"

                android:layout_height="wrap_content"

                android:layout_gravity="center"

                android:src="@drawable/background_bottom" />

        </LinearLayout>

    </FrameLayout>

</LinearLayout>
接着看Activity的代码:ThermometerActivity.java
package com.oyp.thermometer;

import android.app.Activity;

import android.content.Context;

import android.hardware.Sensor;

import android.hardware.SensorEvent;

import android.hardware.SensorEventListener;

import android.hardware.SensorManager;

import android.os.Bundle;

import android.view.animation.ScaleAnimation;

import android.widget.LinearLayout;

import android.widget.TextView;

/**

 * @author 欧阳鹏

 * @date 2015年9月14日 <br>

 *       <a href="http://blog.csdn.net/ouyang_peng">欧阳鹏CSDN博客地址</a></n>

 */

public class ThermometerActivity extends Activity implements SensorEventListener {

    private LinearLayout alcohol;

    private LinearLayout meter;

    private SensorManager mSensorManager;

    private Sensor temperatureSensor;

    private TextView thermo_c;

    private TextView thermo_f;

    public float staratemp;

    public float temp;

    private float temperatureC;

    /**

     * 获取华氏温度

     *

     * @author ouyang

     * @date 2015年9月14日

     * @return

     */

    public float getTemperatureF() {

        float temperatureF = (temperatureC * 9 / 5) + 32;

        return getFloatOne(temperatureF);

    }

    /**

     * 保留一位小数点

     *

     * @author ouyang

     * @date 2015年9月14日

     * @param tempFloat

     * @return

     */

    public float getFloatOne(float tempFloat) {

        return (float) (Math.round(tempFloat * 10)) / 10;

    }

    /**

     * 获取摄氏温度

     *

     * @author ouyang

     * @date 2015年9月14日

     * @return

     */

    public float getTemperatureC() {

        return getFloatOne(temperatureC);

    }

    public void setTemperatureC(float temperatureC) {

        this.temperatureC = temperatureC;

    }

    @Override

    protected void onCreate(Bundle savedInstanceState) {

        super.onCreate(savedInstanceState);

        setContentView(R.layout.layout_thermometer);

        meter = ((LinearLayout) findViewById(R.id.meter));

        alcohol = ((LinearLayout) findViewById(R.id.alcohol));

        thermo_c = (TextView) findViewById(R.id.thermo_c);

        thermo_f = (TextView) findViewById(R.id.thermo_f);

    }

    @Override

    protected void onResume() {

        super.onResume();

        mSensorManager = (SensorManager) getSystemService(Context.SENSOR_SERVICE);

        temperatureSensor = mSensorManager.getDefaultSensor(Sensor.TYPE_AMBIENT_TEMPERATURE);

        mSensorManager.registerListener(this, temperatureSensor, SensorManager.SENSOR_DELAY_NORMAL);

    }

    @Override

    public final void onSensorChanged(SensorEvent event) {

        float temperatureValue = event.values[0]; // 得到温度

        setTemperatureC(temperatureValue);// 设置温度

        mUpdateUi();// 更新UI

    }

    @Override

    public void onAccuracyChanged(Sensor sensor, int accuracy) {

    }

    /**

     * 更新刻度上水银柱的长度

     *

     * @author ouyang

     * @date 2015年9月14日

     */

    private void mUpdateUi() {

        ScaleAnimation localScaleAnimation1 = new ScaleAnimation(1.0F, 1.0F, this.staratemp, this.temp, 1, 0.5F, 1,

                1.0F);

        localScaleAnimation1.setDuration(2000L);

        localScaleAnimation1.setFillEnabled(true);

        localScaleAnimation1.setFillAfter(true);

        this.alcohol.startAnimation(localScaleAnimation1);

        this.staratemp = this.temp;

        ScaleAnimation localScaleAnimation2 = new ScaleAnimation(1.0F, 1.0F, 1.0F, 1.0F, 1, 0.5F, 1, 0.5F);

        localScaleAnimation2.setDuration(10L);

        localScaleAnimation2.setFillEnabled(true);

        localScaleAnimation2.setFillAfter(true);

        this.meter.startAnimation(localScaleAnimation2);

        // 把刻度表看出总共700份,如何计算缩放比例。从-20°到50°。

        // 例如,现在温度是30°的话,应该占(30+20)*10=500份 其中20是0到-20°所占有的份

        this.temp = (float) ((20.0F + getTemperatureC()) * 10) / (70.0F * 10);

        thermo_c.setText(getTemperatureC() + "");

        thermo_f.setText(getTemperatureF() + "");

    }

}
三、运行效果
1、运行,右键项目:Run as -》Android Application
2、如上图所示,也就是这样子:


四、其他补充
暂时没
注:本文著作权归作者,由demo大师发表,拒绝转载,转载需要作者授权
Android利用温度传感器实现带动画效果的电子温度计的更多相关文章
- 我的Android进阶之旅------>Android利用温度传感器实现带动画效果的电子温度计
要想实现带动画效果的电子温度计,需要以下几个知识点: 1.温度传感器相关知识. 2.ScaleAnimation动画相关知识,来进行水印刻度的缩放效果. 3.android:layout_weight ...
- android标题栏上面弹出提示框(二) PopupWindow实现,带动画效果
需求:上次用TextView写了一个从标题栏下面弹出的提示框.android标题栏下面弹出提示框(一) TextView实现,带动画效果, 总在找事情做的产品经理又提出了奇葩的需求.之前在通知栏显示 ...
- android标题栏下面弹出提示框(一) TextView实现,带动画效果
产品经理用的是ios手机,于是android就走上了模仿的道路.做这个东西也走了一些弯路,写一篇博客放在这里,以后自己也可用参考,也方便别人学习. 弯路: 1.刚开始本来用PopupWindow去实现 ...
- 纯CSS3带动画效果导航菜单
随着互联网的发展,网页能表现的东西越来越多.由最开始单纯的文字和链接构成的网页,到后来的表格布局,再到div+css模式,现在发展到了html+css3.网页能表达的东西越来越多,css3兴起已经很多 ...
- 收藏一个带动画效果的ScrollViewer以及ScrollBar的模板
这里介绍一个带动画效果的ScrollViewer和ScrollBar,总共分为两个资源字典,直接拿来引用即可: 1 ScrollBarStyle.xaml <ResourceDictionary ...
- /*带动画效果的hover*/
<!DOCTYPE html> /*带动画效果的hover*/ <html lang="en"> <head> <meta charset ...
- 带动画效果的jQuery手风琴
带动画效果的jQuery特效手风琴是一款带动画效果的手风琴作品,非常实用,可以用在新闻列表.FAQ等模块,默认的是打开第一个选项,查看其它的时候直接点击加号按钮就展开. 源码地址:http://www ...
- Android中xml设置Animation动画效果详解
在 Android 中, Animation 动画效果的实现可以通过两种方式进行实现,一种是 tweened animation 渐变动画,另一种是 frame by frame animation ...
- 轻松实现Android,iOS的一个手势动画效果
先来看效果 这是iOS下的效果,android下完全一致.通过do_GestureView组件和do_Animation组件,deviceone能很容易实现复杂的跨平台纯原生动画效果,这个示例就是通过 ...
随机推荐
- andriod 播放mp4
权限 <uses-permission android:name="android.permission.READ_EXTERNAL_STORAGE"/> activi ...
- Google浏览器Chrome安装失败,错误代码0xa0430721解决办法
谷歌浏览器安装失败错误代码0xa0430721 的解决办法 这个是因为我们删除的时候没有删除干净.然后又重装了谷歌浏览器.所以就出现这个问题了. 1.删除旧的配置文件,比如C:\Documents a ...
- android 内存溢出oom错误的一些小见解
转:http://blog.csdn.net/xuhui_7810/article/details/9493681 我们在代码里调用setBackgroundResource(int resid)来设 ...
- CVPR14 图像检索papers
CVPR14年关于图像检索方面的papers,汇总成一个list,方便阅读. 图像检索 Triangulation embedding and democratic aggregation for i ...
- 【HDOJ】【3377】Plan
插头DP sigh……其实思路很简单的= =就多加一种转移:从(0,0)->(0,0),也就是不走这个格子…… 初始状态就是第一格有一个左插头= =结束状态可以让(n,m)这个位置可以走到(n+ ...
- std::tr1::function
转自:https://www.cnblogs.com/qlee/archive/2011/07/04/2097594.html 在C++的TR1中(Technology Report)中包含一个fun ...
- DeDeCMS(织梦)变量覆盖0day getshell
测试方法: @Sebug.net dis本站提供程序(方法)可能带有攻击性,仅供安全研究与教学之用,风险自负! #!usr/bin/php -w <?php error_reporting( ...
- Binary Tree Inorder Traversal leetcode java
题目: Given a binary tree, return the inorder traversal of its nodes' values. For example: Given binar ...
- 2013年度最新最佳CSS网页设计实例
CSS在网页设计中扮演着举足轻重的角色,尤其是CSS3和HTML5的出现,让我们更加相信CSS能给我们带来无限的遐想和强有力的视觉冲击.今天我要给大家推荐几个最新CSS佳作,虽然本人没有设计头脑,但还 ...
- ListView GridViewColumn.CellTemplate
<ListView.View> <GridView> <GridViewColumn Header="Meaningful Use Objectives&quo ...
