C# GDI绘制仪表盘(纯代码实现)
首先来个金属仪表盘图
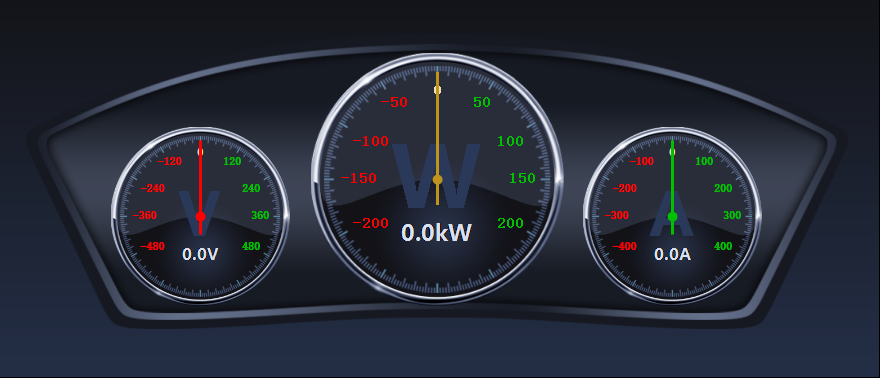
金属仪表盘、车载仪表盘 源代码下载
纯代码实现GDI绘制仪表盘,效果在代码下面。


public partial class HalfDashboardUc : UserControl

    {

        /// <summary>

        /// 仪表盘背景图片

        /// </summary>

        private Image dashboardImage;

        /// <summary>

        /// 定义该仪表盘画布的最大值为371

        /// </summary>

        private int maxSize = ;

        /// <summary>

        /// 仪表盘画布的放大倍数,默认1

        /// </summary>

        private float multiple = ;

        /// <summary>

        /// 定义该仪表盘的直径大小

        /// </summary>

        private float diameter;

        /// <summary>

        /// 每个间隔值

        /// </summary>

        private int intervalValue;

        /// <summary>

        /// 仪表盘显示的最小值,默认为0

        /// </summary>

        private float minValue = ;

        /// <summary>

        /// 仪表盘显示的最小值

        /// </summary>

        [Category("wyl")]

        [Description("仪表盘显示的最小值")]

        public float MinValue

        {

            get

            {

                return minValue;

            }

            set

            {

                if (value >= MaxValue)

                {

                    MessageBox.Show("最小值不能超过最大值!", "警告", MessageBoxButtons.OK, MessageBoxIcon.Warning);

                    minValue = ;

                }

                else

                {

                    minValue = value;

                    //drawBackImage();

                }

            }

        }

        /// <summary>

        /// 仪表盘上显示的最大值,默认123。

        /// </summary>

        private float maxValue = ;

        /// <summary>

        /// 仪表盘上显示的最大值

        /// </summary>

        [Category("wyl")]

        [Description("仪表盘上显示的最大值")]

        public float MaxValue

        {

            get

            {

                return maxValue;

            }

            set

            {

                if (value <= MinValue)

                {

                    MessageBox.Show("最大值不能低于最小值!", "警告", MessageBoxButtons.OK, MessageBoxIcon.Warning);

                    maxValue = ;

                }

                else

                {

                    maxValue = value;

                    //drawBackImage();

                }

            }

        }

        // <summary>

        /// 仪表盘变换的值,默认为0;

        /// </summary>

        private float changeValue = ;

        /// <summary>

        /// 仪表盘变换的值

        /// </summary>

        public float ChangeValue

        {

            get

            {

                return changeValue;

            }

            set

            {

                changeValue = value;

            }

        }

        /// <summary>

        /// 指针颜色

        /// </summary>

        private Color pinColor = Color.FromArgb(, , );

        public Color PinColor

        {

            get

            {

                return pinColor;

            }

            set

            {

                pinColor = value;

            }

        }

        public HalfDashboardUc()

        {

            InitializeComponent();

            //双缓存防止屏幕抖动

            this.SetStyle(ControlStyles.OptimizedDoubleBuffer | ControlStyles.AllPaintingInWmPaint | ControlStyles.DoubleBuffer, true);

            this.SetStyle(ControlStyles.UserPaint, true);

            this.UpdateStyles();

            //设置背景颜色为透明

            this.BackColor = Color.Transparent;

        }

        //private int uintfontsize = 40;

        /// <summary>

        /// 初始化仪表盘画布

        /// </summary>

        private void InitialCanvas()

        {

            //对比控件的长高,以最小值为仪表盘的半径

            if (this.Width >  * this.Height)

            {

                diameter =  * this.Height - ;

            }

            else

            {

                diameter = this.Width - ;

            }

            multiple = (float)diameter / maxSize;//计算仪表盘放大倍数

            //如果半径大于仪表盘的最大值,则设定放大倍数为默认值

            if (multiple > )

            {

                multiple = ;

                diameter = maxSize;

            }

            intervalValue = (int)((MaxValue - minValue) / );//计算每个间隔之间的值

        }

        /// <summary>

        /// 画底图

        /// </summary>

        private void drawBackImage()

        {

            Bitmap bit = new Bitmap(this.Width, this.Height);

            Graphics gp = Graphics.FromImage(bit);

            gp.SmoothingMode = System.Drawing.Drawing2D.SmoothingMode.HighQuality;

            float radius = diameter / ;//半径

            float cerX = this.Width / ;

            float cerY = this.Height /  + radius /  -  * multiple;

            //float cerY = this.Height - 20 ;

            gp.TranslateTransform(cerX, cerY);//以中心点为画布的起始点

            //gp.DrawPie(new Pen(new SolidBrush(Color.FromArgb(19,20,25)),3), -radius, -radius, diameter, diameter, 175, 190);

            gp.DrawArc(new Pen(new SolidBrush(Color.FromArgb(, , )), ), -radius, -radius, diameter, diameter, , );

            float x1 = (float)((radius) * Math.Cos( * Math.PI / ));

            float y1 = (float)((radius) * Math.Sin( * Math.PI / ));

            float x2 = (float)((radius) * Math.Cos( * Math.PI / ));

            float y2 = (float)((radius) * Math.Sin( * Math.PI / ));

            gp.DrawLine(new Pen(new SolidBrush(Color.FromArgb(, , )), ), x1, y1, x2, y2);

            //gp.DrawEllipse(new Pen(Brushes.Red), -5, -5, 10, 10);

            float startRad = ;//起始角度

            float sweepShot = ;//旋转角度

            //gp.DrawLine(new Pen(Brushes.Red), -radius, 0, -(radius - 10), 0);

            for (int i = ; i <= ; i++)

            {

                double rad = (sweepShot + startRad) * Math.PI / ;

                if (i %  == )

                {

                    float px1 = (float)((radius -  ) * Math.Cos(rad));

                    float py1 = (float)((radius -  ) * Math.Sin(rad));

                    float px2 = (float)((radius - ) * Math.Cos(rad));

                    float py2 = (float)((radius - ) * Math.Sin(rad));

                    gp.DrawLine(new Pen(new SolidBrush(Color.FromArgb(, , )), ), px1, py1, px2, py2);

                }

                else

                {

                    float px1 = (float)((radius -  ) * Math.Cos(rad));

                    float py1 = (float)((radius -  ) * Math.Sin(rad));

                    float px2 = (float)((radius -  ) * Math.Cos(rad));

                    float py2 = (float)((radius -  ) * Math.Sin(rad));

                    gp.DrawLine(new Pen(new SolidBrush(Color.FromArgb(, , )), ), px1, py1, px2, py2);

                }

                sweepShot += ;

            }

            //刻度字体

            Font scaleFont = new Font("宋体", , FontStyle.Bold);

            startRad = ;//起始角度

            sweepShot = ;//旋转角度

            Color c1 = Color.FromArgb(, , );

            for (int i = ; i < ; i++)

            {

                int tempValue = i * intervalValue;

                SizeF tempSf = gp.MeasureString(tempValue.ToString(), scaleFont);

                //计算角度值

                double rad = (sweepShot + startRad) * Math.PI / ;

                float px = (float)((radius - ) * Math.Cos(rad));

                float py = (float)((radius - ) * Math.Sin(rad));

                if (sweepShot == )

                {

                    gp.DrawString(tempValue.ToString(), scaleFont, Brushes.Wheat, px - tempSf.Width / , py);

                }

                else if (sweepShot == )

                {

                    gp.DrawString(tempValue.ToString(), scaleFont, new SolidBrush(c1), px - tempSf.Width +  * multiple, py - tempSf.Height /  +  * multiple);

                }

                else if (sweepShot == )

                {

                    gp.DrawString(tempValue.ToString(), scaleFont, new SolidBrush(c1), px - tempSf.Width, py - tempSf.Height /  +  * multiple);

                }

                else if (sweepShot == )

                {

                    gp.DrawString(tempValue.ToString(), scaleFont, new SolidBrush(c1), px - tempSf.Width, py - tempSf.Height / );

                }

                //else if (sweepShot == 120)

                //{

                //    gp.DrawString(tempValue.ToString(), scaleFont, new SolidBrush(c1), px - tempSf.Width, py - tempSf.Height / 2);

                //}

                sweepShot += ;

            }

            startRad = ;//起始角度

            sweepShot = ;//旋转角度

            for (int i = ; i < ; i++)

            {

                int tempValue = -i * intervalValue;

                SizeF tempSf = gp.MeasureString(tempValue.ToString(), scaleFont);

                //计算角度值

                double rad = (sweepShot + startRad) * Math.PI / ;

                float px = (float)((radius -  * multiple) * Math.Cos(rad));

                float py = (float)((radius -  * multiple) * Math.Sin(rad));

                if (sweepShot == -)

                {

                    gp.DrawString(tempValue.ToString(), scaleFont, Brushes.Red, px, py + tempSf.Height / );

                }

                else if (sweepShot == -)

                {

                    gp.DrawString(tempValue.ToString(), scaleFont, Brushes.Red, px + tempSf.Width /  -  * multiple, py + tempSf.Height /  -  * multiple);

                }

                else if (sweepShot == -)

                {

                    gp.DrawString(tempValue.ToString(), scaleFont, Brushes.Red, px + tempSf.Width/  , py - tempSf.Height / );

                }

                sweepShot -= ;

            }

            gp.Dispose();

            this.BackgroundImage = bit;

        }

        /// <summary>

        /// 画图

        /// </summary>

        /// <param name="g"></param>

        private void DrawPin(Graphics g)

        {

            Bitmap bit = new Bitmap(this.Width, this.Height);

            Graphics gp = Graphics.FromImage(bit);

            gp.SmoothingMode = System.Drawing.Drawing2D.SmoothingMode.HighQuality;

            float radius = diameter / ;//半径

            float startRad = ;//起始角度

            float sweepShot = (float)(ChangeValue / MaxValue * );//旋转角度

            float cerX = this.Width / ;

            float cerY = this.Height /  + radius /  -  * multiple;

            gp.TranslateTransform(cerX, cerY);//以中心点为画布的起始点

            //gp.DrawEllipse(new Pen(PinColor, 1), -5, -5, 10, 10);//画中心圆圈

            double rad = (sweepShot + startRad) * Math.PI / ;//计算角度

            float px = (float)((radius - ) * Math.Cos(rad));

            float py = (float)((radius - ) * Math.Sin(rad));

            PointF[] pf = new PointF[] { new PointF(, -radius + ), new PointF(-, ), new PointF(, ) };

            gp.RotateTransform(sweepShot);

            //PointF[] pf = new PointF[] { new PointF(px, py), new PointF(-4, 0), new PointF(4, 0) };

            gp.FillPolygon(new SolidBrush(PinColor), pf);

            //gp.DrawLine(new Pen(new SolidBrush(PinColor), 3f), 0, 0, px, py);

            g.DrawImage(bit, , );

            gp.Dispose();

        }

        private void HalfDashboardUc_Load(object sender, EventArgs e)

        {

            InitialCanvas();

            drawBackImage();

        }

        private void HalfDashboardUc_Paint(object sender, PaintEventArgs e)

        {

            DrawPin(e.Graphics);

        }

        private void HalfDashboardUc_Resize(object sender, EventArgs e)

        {

            InitialCanvas();

            drawBackImage();

        }

    }
效果实现如下:

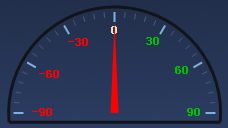
金属仪表盘下载地址 https://pan.baidu.com/s/1xANmSkQYnLGzUJ_X8Dbg0w 提取码:fi96
C# GDI绘制仪表盘(纯代码实现)的更多相关文章
- GDI绘制时钟效果,与系统时间保持同步,基于Winform
2018年工作之余,想起来捡起GDI方面的技术,特意在RichCodeBox项目中做了两个示例程序,其中一个就是时钟效果,纯C#开发.这个CSharpQuartz是今天上午抽出一些时间,编写的,算是偷 ...
- 通过GDI+绘制 验证码
只为了记录下自己的学习历程,方便日后查看 现在开始言归正传,以下为其完整代码附上 using System; using System.Collections.Generic; using Syste ...
- C#利用GDI+绘制旋转文字等效果
C#中利用GDI+绘制旋转文本的文字,网上有很多资料,基本都使用矩阵旋转的方式实现.但基本都只提及按点旋转,若要实现在矩形范围内旋转文本,资料较少.经过琢磨,可以将矩形内旋转转化为按点旋转,不过需要经 ...
- C# 使用GDI+绘制漂亮的MenuStrip和ContextMenuStrip皮肤
通过上面的效果截图可以看到,重绘后的MenuStrip和ContextMenuStrip可以添加自己的LOGO信息,实现了类似OFFICE2007的菜单显示效果. .NET对菜单控件的绘制提供了一个抽 ...
- MFC 用gdi绘制填充多边形区域
MFC 用gdi绘制填充多边形区域 这里的代码是实现一个三角形的绘制,并用刷子填充颜色 在OnPaint()函数里面 运用的是给定的三角形的三个点,很多个点可以绘制多边形 CBrush br(RGB( ...
- 『备注』GDI+ 绘制文本有锯齿,透明背景文本绘制
背景: GDI+ 绘制文本 时,如果 背景是透明的 —— 则会出现 锯齿. //其实,我不用这三个 属性 好多年了 //而且,这三个属性 在关键时刻还有可能 帮倒忙 //关键是:这三个属性,鸟用都没有 ...
- C#GDI+ 绘制线段(实线或虚线)、矩形、字符串、圆、椭圆
C#GDI+ 绘制线段(实线或虚线).矩形.字符串.圆.椭圆 绘制基本线条和图形 比较简单,直接看代码. Graphics graphics = e.Graphics; //绘制实线 )) { pen ...
- Qt自定义控件之仪表盘2--QPaint绘制仪表盘
0.前言 前面一篇文章写道了仪表盘的特点,实现了一个贴图的仪表盘,属于低配版本的仪表盘. 主要是有任何改动时候就需要重新设计图片,不能适配不同控件大小,即使让它自由拉伸,但仪表盘放大缩小时候显示 ...
- Qt5绘制仪表盘dashboard
说明 本文演示Qt版本: Qt5.14. 本文将使用QPainter一步一步绘制仪表盘:刻度.指针.刻度值 注意: 绘制顺序,如果先绘制,则后来绘制的将会覆盖住先前绘制的. 如果需要绘制半透明, 请设 ...
随机推荐
- 每天学一点儿HTML5的新标签
sections部分 (http://www.w3.org/TR/html5/sections.html) 标签:article article标签用来表示页面中一段完整的可以自我包含的片段,具有可重 ...
- 实验1:c++简单程序设计(1)
//文中有格式错误请无视 //这个编辑器一言难尽 实验目的 1. 掌握c++中类c部分的编程知识: 数据类型,常量,变量,运算符,表达式,分支结构,循环结构 2. 掌握C++中数据输入和输出的基本方法 ...
- Spring框架的JDBC模板技术概述
1. Spring框架中提供了很多持久层的模板类来简化编程,使用模板类编写程序会变的简单 2. 提供了JDBC模板,Spring框架提供的 * JdbcTemplate类 3. Spring框架可以整 ...
- How to set an Apache Kafka multi node – multi broker cluster【z】
Set a multi node Apache ZooKeeper cluster On every node of the cluster add the following lines to th ...
- webstorm 2017 激活破解
2017-06-15更新 之前都是使用2017.2.27的方法,版本是2017.1.1,还没提示过期,但是根据评论说这个链接已经失效了,评论也给出了个新地址:http://idea.iteblog.c ...
- Underscore模版引擎的使用-template方法
之前项目里有遇到在DOM中增加大量的html结构的时候,傻乎乎的在js中写一堆模版,然后用replace一个一个做替换.当时就是难看了点,不觉得啥,现在了解了模版引擎之后回头来看真的比较捉急了,以后是 ...
- CreateMutex用法
1. CreateMutex只是创建了一把锁, 这把锁你用来锁门还是锁抽屉还是锁你对象的内裤都由你自己决定. 2. lpName是指定这把锁的名字. 你要不给这把锁取个名字都可以. 只是有了相 ...
- 《JavaScript DOM编程艺术》笔记
1. 把<script>标签放到HTML文档的最后,<body>标签之前能使浏览器更快地加载页面. 2. nodeType的常见取值 元素节点(1) 属性节点(2) 文本节点( ...
- jQuery使用大全
我的程序人生 提供基于Lesktop的IM二次开发,联系QQ:76159179 CnBlogs Home New Post Contact Admin Rss Posts - 476 Article ...
- 2018.08.30 NOIP模拟 kfib(矩阵快速幂+exgcd)
[输入] 一行两个整数 n P [输出] 从小到大输出可能的 k,若不存在,输出 None [样例输入 1] 5 5 [样例输出] 2 [样例解释] f[0] = 2 f[1] = 2 f[2] = ...