Linux LVM使用小记
对于Linux LVM一直不太理解,直到最近使用了简单功能后才稍微明白点。
对于硬盘空间物理上的使用,我们都是先对硬盘进行分区,然后格式化成文件系统支持的类型,最后给操作系统使用。但是这种使用方式很不灵活,分完区之后如果想动态扩大或者缩小容量需要格式化硬盘后重新分区调整。LVM正好可以解决这个问题,提供一种灵活可变的硬盘空间使用方式。
LVM的基本结构如下图:
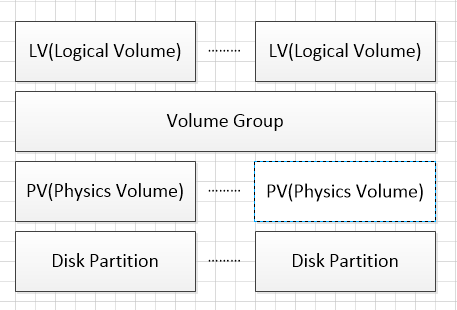
其中Disk Partition是物理硬盘分区,我们需要在每个物理分区上建立对应的PV(物理卷),Disk Partition和PV应该是一一对应的。VG是一个逻辑层,将所有PV的资源进行整合,形成一个存储池。然后可以将VG再细分为LV(逻辑卷),LV是最后提供给操作系统使用的卷。
本文将对一个已建立的LVM进行硬盘的扩容,步骤如下:
1、查看分区情况
# fdisk -l

Disk /dev/sda: 966.4 GB,  bytes

 heads,  sectors/track,  cylinders

Units = cylinders of  *  =  bytes

Sector size (logical/physical):  bytes /  bytes

I/O size (minimum/optimal):  bytes /  bytes

Disk identifier: 0x0003f3bd

   Device Boot      Start         End      Blocks   Id  System

/dev/sda1   *                                Linux

Partition  does not end on cylinder boundary.

/dev/sda2                            8e  Linux LVM

/dev/sda3                     +    Linux

/dev/sda4                         Linux

Disk /dev/mapper/vg_template-lv_root: 875.1 GB,  bytes

 heads,  sectors/track,  cylinders

Units = cylinders of  *  =  bytes

Sector size (logical/physical):  bytes /  bytes

I/O size (minimum/optimal):  bytes /  bytes

Disk identifier: 0x00000000

Disk /dev/mapper/vg_template-lv_swap:  MB,  bytes

 heads,  sectors/track,  cylinders

Units = cylinders of  *  =  bytes

Sector size (logical/physical):  bytes /  bytes

I/O size (minimum/optimal):  bytes /  bytes

Disk identifier: 0x00000000

Disk /dev/mapper/vg_template-lv_home: 23.3 GB,  bytes

 heads,  sectors/track,  cylinders

Units = cylinders of  *  =  bytes

Sector size (logical/physical):  bytes /  bytes

I/O size (minimum/optimal):  bytes /  bytes

Disk identifier: 0x00000000
可以看到硬盘目前966G左右,已经使用900G,我将为LVM再分配30G进去。
2、可以通过命令pvscan和pvdisplay查看目前已有的PV
# pvscan

  PV /dev/sda2   VG vg_template   lvm2 [79.51 GiB /     free]

  PV /dev/sda3   VG vg_template   lvm2 [520.00 GiB /     free]

  PV /dev/sda4   VG vg_template   lvm2 [299.99 GiB / 54.99 GiB free

  Total:  [899.50 GiB] / in use:  [899.50 GiB] / in no VG:  [
# pvdisplay

  --- Physical volume ---

  PV Name               /dev/sda2

  VG Name               vg_template

  PV Size               79.51 GiB / not usable 3.00 MiB

  Allocatable           yes (but full)

  PE Size               4.00 MiB

  Total PE

  Free PE

  Allocated PE

  PV UUID               cf72cq-WGB1-AIdu-dUuN-NhGA-qXtL-2lIPSC

  --- Physical volume ---

  PV Name               /dev/sda3

  VG Name               vg_template

  PV Size               520.00 GiB / not usable 3.96 MiB

  Allocatable           yes (but full)

  PE Size               4.00 MiB

  Total PE

  Free PE

  Allocated PE

  PV UUID               os0owi-lP6g-3QXI-p3SF-OVYN-Dmwq-t4bcgq

  --- Physical volume ---

  PV Name               /dev/sda4

  VG Name               vg_template

  PV Size               300.00 GiB / not usable 4.06 MiB

  Allocatable           yes

  PE Size               4.00 MiB

  Total PE

  Free PE

  Allocated PE

  PV UUID               fSH2ET-c01w-pRdK-FlE1-Rf4l-kem4-Sk5keD
3、也可以通过vgdisplay查看VG中的剩余空间
# vgdisplay

  --- Volume group ---

  VG Name               vg_template

  System ID

  Format                lvm2

  Metadata Areas

  Metadata Sequence No

  VG Access             read/write

  VG Status             resizable

  MAX LV

  Cur LV

  Open LV

  Max PV

  Cur PV

  Act PV

  VG Size               899.50 GiB

  PE Size               4.00 MiB

  Total PE

  Alloc PE / Size        / 844.51 GiB

  Free  PE / Size        / 54.99 GiB

  VG UUID               YjcKe2-688m-1Iar-Zpa6-vbE7-TuXf-A1sgvh
可以看到,VG中海油54G左右的空间
4、查看目前已有的LV
# lvdisplay

  --- Logical volume ---

  LV Path                /dev/vg_template/lv_root

  LV Name                lv_root

  VG Name                vg_template

  LV UUID                QzjkFn-VtVG-ruvw-Mpr4-UpjH-Mjpf-e6TSdK

  LV Write Access        read/write

  LV Creation host, time Template, -- :: +

  LV Status              available

  # open

  LV Size                815.00 GiB

  Current LE

  Segments

  Allocation             inherit

  Read ahead sectors     auto

  - currently set to

  Block device           :

  --- Logical volume ---

  LV Path                /dev/vg_template/lv_home

  LV Name                lv_home

  VG Name                vg_template

  LV UUID                PSnzWl-xeGd-aKP9-EmNL-8vxK-sMIn-z6KMDE

  LV Write Access        read/write

  LV Creation host, time Template, -- :: +

  LV Status              available

  # open

  LV Size                21.68 GiB

  Current LE

  Segments

  Allocation             inherit

  Read ahead sectors     auto

  - currently set to

  Block device           :

  --- Logical volume ---

  LV Path                /dev/vg_template/lv_swap

  LV Name                lv_swap

  VG Name                vg_template

  LV UUID                z4oFd5-IvA9-Y0EY-KcC1-oaOr-QZEF-7IAZSl

  LV Write Access        read/write

  LV Creation host, time Template, -- :: +

  LV Status              available

  # open

  LV Size                7.83 GiB

  Current LE

  Segments

  Allocation             inherit

  Read ahead sectors     auto

  - currently set to

  Block device           :
此次将给lv_root增加容量
5、增加LV容量
# lvextend -L +30G /dev/vg_template/lv_root

  Extending logical volume lv_root to 845.00 GiB

  Logical volume lv_root successfully resized
6、查看增加后的LV容量
# lvdisplay /dev/vg_template/lv_root      --- Logical volume ---

  LV Path                /dev/vg_template/lv_root

  LV Name                lv_root

  VG Name                vg_template

  LV UUID                QzjkFn-VtVG-ruvw-Mpr4-UpjH-Mjpf-e6TSdK

  LV Write Access        read/write

  LV Creation host, time Template, -- :: +

  LV Status              available

  # open

  LV Size                845.00 GiB

  Current LE

  Segments

  Allocation             inherit

  Read ahead sectors     auto

  - currently set to

  Block device           :
可以看到容量从815增加至845G
7、通过df查看磁盘空间
# df -h

Filesystem            Size  Used Avail Use% Mounted on

/dev/mapper/vg_template-lv_root

                      803G  732G   30G  % /

tmpfs                  32G   25G  .7G  % /dev/shm

/dev/sda1             485M   38M  423M   % /boot

/dev/mapper/vg_template-lv_home

                       22G  559M   20G   % /home
发现操作系统层面看,使用空间没有变。
8、通过resize2fs重新扫描使用空间
# resize2fs /dev/vg_template/lv_root

resize2fs 1.41. (-May-)

Filesystem at /dev/vg_template/lv_root is mounted on /; on-line resizing required

old desc_blocks = , new_desc_blocks =

Performing an on-line resize of /dev/vg_template/lv_root to  (4k) blocks.

The filesystem on /dev/vg_template/lv_root is now  blocks long.
9、再通过df查看使用空间,空间已经扩大
]# df -h

Filesystem            Size  Used Avail Use% Mounted on

/dev/mapper/vg_template-lv_root

                      832G  732G   58G  % /

tmpfs                  32G   25G  .7G  % /dev/shm

/dev/sda1             485M   38M  423M   % /boot

/dev/mapper/vg_template-lv_home

                       22G  559M   20G   % /home
以后继续补充如何将新加硬盘如何操作。
==================================================================================================
以上是针对VG有剩余空间直接扩充LV的过程,下面介绍一下对于新加物理硬盘如何加到VG中。
1、查看新建物理磁盘情况
fdisk -l
Disk /dev/sdb: 214.7 GB, 214748364800 bytes
255 heads, 63 sectors/track, 26108 cylinders
Units = cylinders of 16065 * 512 = 8225280 bytes
Sector size (logical/physical): 512 bytes / 512 bytes
I/O size (minimum/optimal): 512 bytes / 512 bytes
Disk identifier: 0x00000000
可以看到有一个200G左右的磁盘—/dev/sdb
2、对/dev/sdb进行分区
fdisk /dev/sdb
]# fdisk /dev/sdb
Device contains neither a valid DOS partition table, nor Sun, SGI or OSF disklabel
Building a new DOS disklabel with disk identifier 0x94b29f79.
Changes will remain in memory only, until you decide to write them.
After that, of course, the previous content won't be recoverable.
Warning: invalid flag 0x0000 of partition table 4 will be corrected by w(rite)
WARNING: DOS-compatible mode is deprecated. It's strongly recommended to
switch off the mode (command 'c') and change display units to
sectors (command 'u').
Command (m for help):
输入n,新建分区,根据实际情况选择主分区或者扩展分区,这里我选择主分区
Command (m for help): n

Command action

   e   extended

   p   primary partition (-)

p

Partition number (-):

First cylinder (-, default ):

Using default value

Last cylinder, +cylinders or +size{K,M,G} (-, default ):

Using default value

Command (m for help):
输入t,确定分区格式,8e代表Linux LVM
Command (m for help): t

Selected partition

Hex code (type L to list codes): 8e

Changed system type of partition  to 8e (Linux LVM)
输入p,查看分区状况,输入w,保存分区配置
Command (m for help): p

Disk /dev/sdb: 214.7 GB,  bytes

 heads,  sectors/track,  cylinders

Units = cylinders of  *  =  bytes

Sector size (logical/physical):  bytes /  bytes

I/O size (minimum/optimal):  bytes /  bytes

Disk identifier: 0x94b29f79

   Device Boot      Start         End      Blocks   Id  System

/dev/sdb1                         +  8e  Linux LVM

Command (m for help): w

The partition table has been altered!

Calling ioctl() to re-read partition table.

Syncing disks.
3、新建PV
# pvcreate /dev/sdb1

  Physical volume "/dev/sdb1" successfully created
4、将新建PV加到VG中
# vgdisplay

  --- Volume group ---

  VG Name               vg_template

  System ID

  Format                lvm2

  Metadata Areas

  Metadata Sequence No

  VG Access             read/write

  VG Status             resizable

  MAX LV

  Cur LV

  Open LV

  Max PV

  Cur PV

  Act PV

  VG Size               899.50 GiB

  PE Size               4.00 MiB

  Total PE

  Alloc PE / Size        / 874.51 GiB

  Free  PE / Size        / 24.99 GiB

  VG UUID               YjcKe2-688m-1Iar-Zpa6-vbE7-TuXf-A1sgvh

[root@SICS-MIGPC-DB ~]# vgextend vg_template /dev/sdb1

  Volume group "vg_template" successfully extended

[root@SICS-MIGPC-DB ~]# vgdisplay

  --- Volume group ---

  VG Name               vg_template

  System ID

  Format                lvm2

  Metadata Areas

  Metadata Sequence No

  VG Access             read/write

  VG Status             resizable

  MAX LV

  Cur LV

  Open LV

  Max PV

  Cur PV

  Act PV

  VG Size               1.07 TiB

  PE Size               4.00 MiB

  Total PE

  Alloc PE / Size        / 874.51 GiB

  Free  PE / Size        / 224.98 GiB

  VG UUID               YjcKe2-688m-1Iar-Zpa6-vbE7-TuXf-A1sgvh
然后根据之前步骤扩展现有LV空间即可。
=======================================================================
其他常用命令:
1、从VG新建LV,并格式化LV为特定文件系统
新建一个100G的新LV,名称为VPS
#lvcreate –L 100G –n vps /dev/vg_template;
格式化为EXT3文件系统格式
#mkfs –t ext3 /dev/vg_template/vps
2、从VG删除PV,删除硬盘上的LVM分区,去掉硬盘
#vgreduce vg_template /dev/sdb1;

#pvremove /dev/sdb1

#fdisk /dev/sdb1

输入P,输入D(删除),输入P查看,输入W,保存配置。
Linux LVM使用小记的更多相关文章
- Linux LVM学习总结——扩展卷组VG
Linux服务器由于应用变更或需求的缘故,有可能出现分区空间不足的情况,此时往往需要进行扩容(要增加分区的空间),而采用LVM的好处就是可以在不需停机的情况下可以方便地调整各个分区大小.如下所示,分区 ...
- Linux LVM学习总结——创建卷组VG
在Linux平台如何创建一个卷组(VG)呢?下面简单介绍一下卷组(VG)的创建步骤.本文实验平台为Red Hat Enterprise Linux Server release 6.6 (Santia ...
- Linux LVM学习总结——删除物理卷
本篇介绍LVM管理中的命令vgreduce, pvremove.其实前面几篇中以及有所涉及. vgreduce:通过删除LVM卷组中的物理卷来减少卷组容量.注意:不能删除LVM卷组中剩余的最后一个物理 ...
- Linux LVM简明教程
逻辑卷管理LVM是一个多才多艺的硬盘系统工具.无论在Linux或者其他类似的系统,都是非常的好用.传统分区使用固定大小分区,重新调整大小十分麻烦.但是,LVM可以创建和管理“逻辑”卷,而不是直接使用物 ...
- [转载]Linux LVM硬盘管理及LVM扩容
最近项目中一直在用Linux,其中涉及到了Linux的LVM,本来想自己写一篇关于LVM的文章,搜了一下,发现了一篇更好的,转载过来,也感谢作者gaojun 原文Linux LVM硬盘管理及LVM扩容 ...
- [转载]expect spawn、linux expect 用法小记
原文地址:expect spawn.linux expect 用法小记作者:悟世 使用expect实现自动登录的脚本,网上有很多,可是都没有一个明白的说明,初学者一般都是照抄.收藏.可是为什么要这么写 ...
- LINUX LVM和快照卷配置和管理
具体参考这个文章把: http://www.cnblogs.com/zhaojiedi1992/p/zhaojiedi_linux_042_lvm.html 1.LVM是什么 逻辑卷管理LVM是一个多 ...
- Linux LVM动态扩容
引用自: https://blog.csdn.net/u012439646/article/details/73380197 xfs_growfs /dev/centos/root 一.首先安 ...
- Linux LVM卷组管理
Linux LVM卷组管理 由于传统的磁盘管理不能对磁盘进行磁盘管理,因此诞生了LVM技术,LVM技术最大的特点就是对磁盘进行动态管理. 由于LVM的逻辑卷的大小更改可以进行动态调整,且不会出现丢失数 ...
随机推荐
- 数组中的stdClass Object如何访问
使用print_r($data)输出结果为 Array ( [0] => stdClass Object ( [color_item_no] => 1 [color_name] => ...
- 近期Freecodecamp问题总结
最近没什么事,刷了freecodecamp的算法题,发现了自己基础的薄弱 1 where are thou 写一个 function,它遍历一个对象数组(第一个参数)并返回一个包含相匹配的属性-值对( ...
- npm使用国内镜像的方法
一.通过命令配置1. 命令 npm config set registry https://registry.npm.taobao.org 2. 验证命令 npm config get registr ...
- numpy最大值和最大值索引
a= np.array([9, 12, 88, 14, 25])list_a = a.tolist() list_a_max_list = max(list_a) #返回最大值max_index = ...
- nrf52832-定时器例程
SDK版本:15.20 代码 #include <stdbool.h> #include <stdint.h> #include "nrf_delay.h" ...
- Spring Boot配置加载顺序
如果加载的配置有重复的,它们的加载顺序是这样的,数字越小的优先级越高,即优先级高的覆盖优先级低的配置. Devtools global settings properties on your home ...
- vscode setting.jsonxx
// Place your settings in this file to overwrite the default settings { "files.autoGuessEncodin ...
- decltype typename
decltype((variable))总是引用类型,但是decltype(variable)只有当variable是引用类型时才是引用类型. #include <iostream> #i ...
- linux svn 多项目设置
cd /svn/repos svnadmin create project_a svnadmin create project_b cd project_a cp -a conf /svn/ cd / ...
- 关于 java 里面的路径
getClass().getResource("/").getPath() 获取当前类编译的文件的 目录 如果该文件已经是jar包中的文件 只能读取到该jar 包的 路径 g ...