mybatis源码解析之环境准备
概述
对于mybatis而言,大家一定都不陌生,我相信很多同学都跟我一样,用起来非常的熟练,但是其内部的实现原理呢,不太清楚,经常面试的时候,面试官问及这方面的知识,都只能尴尬的回答不知道,或者不清楚,接下来的一段时间,我会慢慢的记录一些我读源码的一些过程,和大家一起学习。
sql准备
要操作数据库,当然还得是先建表,sql如下:
CREATE TABLE `news` (

  `id` bigint(100) NOT NULL AUTO_INCREMENT,

  `title` varchar(1000) DEFAULT NULL,

  `url` varchar(1000) DEFAULT NULL,

  `hash` varchar(1000) DEFAULT NULL,

  `publish_time` varchar(50) DEFAULT NULL,

  `news_type` varchar(50) DEFAULT NULL,

  `from_name` varchar(50) DEFAULT NULL,

  PRIMARY KEY (`id`)

) ENGINE=InnoDB AUTO_INCREMENT=538 DEFAULT CHARSET=utf8
当然,这表建的不一定规范,这些不重要。
其他代码准备
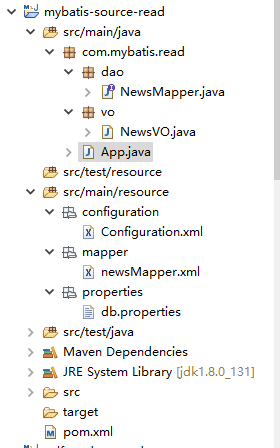
我们新建一个mybatis-source-read的工程,其目录结构如下图:

一次来介绍下:
porm.xml
添加mybatis,mysql驱动依赖
		<dependency>

			<groupId>org.mybatis</groupId>

			<artifactId>mybatis</artifactId>

			<version>3.4.4</version>

		</dependency>

		<!-- MySQL 连接驱动依赖 -->

		<dependency>

			<groupId>mysql</groupId>

			<artifactId>mysql-connector-java</artifactId>

			<version>5.1.39</version>

		</dependency>
实体类NewsVO
package com.mybatis.read.vo;

public class NewsVO {

	private int id;

	private String title;

	private String url;

	private String hash;

	private String publishTime;

	private String newsType;

	private String fromName;

	@Override

	public String toString() {

		return "NewsVO [id=" + id + ", title=" + title + ", url=" + url + ", hash=" + hash + ", publishTime="

				+ publishTime + ", newsType=" + newsType + ", fromName=" + fromName + "]";

	}

	public int getId() {

		return id;

	}

	public void setId(int id) {

		this.id = id;

	}

	public String getTitle() {

		return title;

	}

	public void setTitle(String title) {

		this.title = title;

	}

	public String getUrl() {

		return url;

	}

	public void setUrl(String url) {

		this.url = url;

	}

	public String getHash() {

		return hash;

	}

	public void setHash(String hash) {

		this.hash = hash;

	}

	public String getPublishTime() {

		return publishTime;

	}

	public void setPublishTime(String publishTime) {

		this.publishTime = publishTime;

	}

	public String getNewsType() {

		return newsType;

	}

	public void setNewsType(String newsType) {

		this.newsType = newsType;

	}

	public String getFromName() {

		return fromName;

	}

	public void setFromName(String fromName) {

		this.fromName = fromName;

	}

}
数据库访问层dao:
package com.mybatis.read.dao;

import com.mybatis.read.vo.NewsVO;

public interface NewsMapper {

	public NewsVO getNews(int id);

}
这边只写了一个查询,后续再做补充
mybatis配置文件Configuration.xml
<?xml version="1.0" encoding="UTF-8" ?>

<!DOCTYPE configuration PUBLIC "-//mybatis.org//DTD Config 3.0//EN"

"http://mybatis.org/dtd/mybatis-3-config.dtd">

<configuration>

	<properties resource="properties/db.properties" />

	<settings>

		<setting name="cacheEnabled" value="true" />

		<setting name="lazyLoadingEnabled" value="true" />

		<setting name="useGeneratedKeys" value="true" />

	</settings>

	<typeAliases>

		<typeAlias alias="NewsVO" type="com.mybatis.read.vo.NewsVO" />

	</typeAliases>

	<environments default="development">

		<environment id="development">

			<transactionManager type="JDBC" />

			<dataSource type="POOLED">

				<property name="driver" value="${driveClass}" />

				<property name="url" value="${url}" />

				<property name="username" value="${userName}" />

				<property name="password" value="${password}" />

			</dataSource>

		</environment>

	</environments>

	<mappers>

		<mapper resource="mapper/newsMapper.xml" />

	</mappers>

</configuration>
操作数据库的sql,newsMapper.xml
<?xml version="1.0" encoding="UTF-8"?>

<!DOCTYPE mapper PUBLIC "-//mybatis.org//DTD Mapper 3.0//EN"

"http://mybatis.org/dtd/mybatis-3-mapper.dtd">

<mapper namespace="com.mybatis.read.dao.NewsMapper">

	<resultMap type="com.mybatis.read.vo.NewsVO" id="baseResultMap">

		<id column="id" jdbcType="BIGINT" property="id" />

		<result column="title" jdbcType="VARCHAR" property="title" />

		<result column="url" jdbcType="VARCHAR" property="url" />

		<result column="hash" jdbcType="VARCHAR" property="hash" />

		<result column="publish_time" jdbcType="VARCHAR" property="publishTime" />

		<result column="news_type" jdbcType="VARCHAR" property="newsType" />

		<result column="from_name" jdbcType="VARCHAR" property="fromName" />

	</resultMap>

	<select id="getNews" resultMap="baseResultMap">

		select * from news where id=#{id}

	</select>

</mapper>
启动函数main:
package com.mybatis.read;

import java.io.IOException;

import java.io.InputStream;

import org.apache.ibatis.io.Resources;

import org.apache.ibatis.session.SqlSession;

import org.apache.ibatis.session.SqlSessionFactory;

import org.apache.ibatis.session.SqlSessionFactoryBuilder;

import com.mybatis.read.dao.NewsMapper;

import com.mybatis.read.vo.NewsVO;

public class App {

	public static void main(String[] args) {

		try {

			InputStream inputStream = Resources.getResourceAsStream("configuration/Configuration.xml");

			SqlSessionFactory sqlSessionFactory = new SqlSessionFactoryBuilder().build(inputStream);

			SqlSession session = sqlSessionFactory.openSession();

			//写法一

			//NewsVO newsVo = session.selectOne("com.mybatis.read.dao.NewsMapper.getNews", 40);

			//写法二

			NewsMapper newsMapper = session.getMapper(NewsMapper.class);

			NewsVO newsVo = newsMapper.getNews(40);

			System.out.println(newsVo.toString());

		} catch (IOException e) {

			e.printStackTrace();

		}

	}

}
运行下,结果如下:
Sat Dec 08 21:45:00 CST 2018 WARN: Establishing SSL connection without server's identity verification is not recommended. According to MySQL 5.5.45+, 5.6.26+ and 5.7.6+ requirements SSL connection must be established by default if explicit option isn't set. For compliance with existing applications not using SSL the verifyServerCertificate property is set to 'false'. You need either to explicitly disable SSL by setting useSSL=false, or set useSSL=true and provide truststore for server certificate verification.

NewsVO [id=40, title=利刃出鞘 英超史上最伟大的30位前锋盘点(上篇), url=https://www.fourfourtwo.com/features/ranked-30-best-strikers-premier-league-history, hash=-2589400655418950890, publishTime=2018-12-06 16:44:33, newsType=zuqiu, fromName=fourfourtwo]
那么基本的环境准备就完成了,接下来,要做的就是一步一步的跟进去,探究下它的相关执行流程和原理。
mybatis源码解析之环境准备的更多相关文章
- mybatis源码-解析配置文件(三)之配置文件Configuration解析
目录 1. 简介 1.1 系列内容 1.2 适合对象 1.3 本文内容 2. 配置文件 2.1 mysql.properties 2.2 mybatis-config.xml 3. Configura ...
- Mybatis源码解析,一步一步从浅入深(二):按步骤解析源码
在文章:Mybatis源码解析,一步一步从浅入深(一):创建准备工程,中我们为了解析mybatis源码创建了一个mybatis的简单工程(源码已上传github,链接在文章末尾),并实现了一个查询功能 ...
- Mybatis源码解析,一步一步从浅入深(四):将configuration.xml的解析到Configuration对象实例
在Mybatis源码解析,一步一步从浅入深(二):按步骤解析源码中我们看到了XMLConfigBuilder(xml配置解析器)的实例化.而且这个实例化过程在文章:Mybatis源码解析,一步一步从浅 ...
- Mybatis源码解析(二) —— 加载 Configuration
Mybatis源码解析(二) -- 加载 Configuration 正如上文所看到的 Configuration 对象保存了所有Mybatis的配置信息,也就是说mybatis-config. ...
- 【MyBatis源码解析】MyBatis一二级缓存
MyBatis缓存 我们知道,频繁的数据库操作是非常耗费性能的(主要是因为对于DB而言,数据是持久化在磁盘中的,因此查询操作需要通过IO,IO操作速度相比内存操作速度慢了好几个量级),尤其是对于一些相 ...
- Mybatis源码解析-DynamicSqlSource和RawSqlSource的区别
XMLLanguageDriver是ibatis的默认解析sql节点帮助类,其中的方法其会调用生成DynamicSqlSource和RawSqlSource这两个帮助类,本文将对此作下简单的简析 应用 ...
- mybatis源码-解析配置文件(四-1)之配置文件Mapper解析(cache)
目录 1. 简介 2. 解析 3 StrictMap 3.1 区别HashMap:键必须为String 3.2 区别HashMap:多了成员变量 name 3.3 区别HashMap:key 的处理多 ...
- mybatis源码-解析配置文件(四)之配置文件Mapper解析
在 mybatis源码-解析配置文件(三)之配置文件Configuration解析 中, 讲解了 Configuration 是如何解析的. 其中, mappers作为configuration节点的 ...
- Mybatis源码解析,一步一步从浅入深(一):创建准备工程
Spring SpringMVC Mybatis(简称ssm)是一个很流行的java web框架,而Mybatis作为ORM 持久层框架,因其灵活简单,深受青睐.而且现在的招聘职位中都要求应试者熟悉M ...
随机推荐
- 关于Mysql数据库的学习总结
关于Mysql操作指令: 1.键盘win + R 弹出windows运行输入框,输入cmd命令,进入windows数据库; 2.在windows数据库里输入mysql(数据库) -uroot(用户 ...
- cookie session 讲解
cookie: cookie的定义: cookie 是由web服务器保存在用户浏览器(客户端)上的小文本文件,它可以包含有关用户的信息,并且在每次请求时会携带保存的数据去访问服务器,所以cookie有 ...
- day09 python之函数进阶
楔子 假如有一个函数,实现返回两个数中的较大值: def my_max(x,y): m = x if x>y else y return mbigger = my_max(10,20)print ...
- SLF4J bindings
see: https://www.slf4j.org/manual.html
- AR(I)MA时间序列建模过程——步骤和python代码
https://www.jianshu.com/p/cced6617b423 https://zhuanlan.zhihu.com/p/35282988 https://zhuanlan.zhihu. ...
- JVM探秘1--JVM内存运行时区域划分
Java程序员一般不需要太关注内存,因为操作内存的权力都交给了Java虚拟机,但是Java程序员必须需要了解JVM是如何使用内存的,否则一旦内存出现泄漏或事溢出的话,就会一筹莫展不知道从哪去入手排查问 ...
- dva构建react项目
第一步:安装 dva-cli 1 cnpm install dva-cli -g 第二步:采用dva来创建项目: 1 dva new react_two 2 cd react_two 用webstor ...
- K8S学习笔记之Kubernetes 部署策略详解
0x00 概述 在Kubernetes中有几种不同的方式发布应用,所以为了让应用在升级期间依然平稳提供服务,选择一个正确的发布策略就非常重要了. 选择正确的部署策略是要依赖于我们的业务需求的,下面我们 ...
- Docker 部署 portainer
Docker 部署 portainer 环境: docker 版本 :18.09.1 主机地址:192.168.1.81 一.部署 porttainer 1.修改docker配置文件,开放端口. vi ...
- Android一个工程引用另一个工程的方法
一个工程包含另一个工程.相当于一个jar包的引用.但又不是jar包反而像个package 现在已经有了一个Android工程A.我们想扩展A的功能,但是不想在A的基础上做开发,于是新建了另外一个And ...
