.net core Identity集成IdentityServer4 (1)基本操作
一. 新建asp.net core identity项目
新建项目->asp.net core web应用程序-> web应用程序(模型视图控制器)&更改身份验证为个人.
新建一个空数据库, 然后在appsettings中的连接字符串指向该空库.
"DefaultConnection": "Data Source=.;Initial Catalog=IdentityDBTest;Integrated Security=False;Persist Security Info=False;User ID=sa;Password=sa1234;MultipleActiveResultSets=True;Pooling=True;Min Pool Size=1;Max Pool Size=300;"
cmd进入项目根目录, 然后执行 dotnet ef database update -c ApplicationDbContext
会在指定的空库中创建Identity的相应数据表.
修改launchSettings的Project执行方式的url为 http://localhost:40010
在Startup.cs中添加如下代码, 配置asp.net core identity的用户相关信息
public void ConfigureServices(IServiceCollection services)

        {

            services.AddDbContext<ApplicationDbContext>(options =>

                options.UseSqlServer(Configuration.GetConnectionString("DefaultConnection")));

            services.AddIdentity<ApplicationUser, IdentityRole>()

                .AddEntityFrameworkStores<ApplicationDbContext>()

                .AddDefaultTokenProviders();

            services.Configure<IdentityOptions>(options =>

            {

                // Password settings

                options.Password.RequireDigit = false;

                options.Password.RequiredLength = ;

                options.Password.RequireNonAlphanumeric = false;

                options.Password.RequireUppercase = false;

                options.Password.RequireLowercase = false;

                //options.Password.RequiredUniqueChars = 6;

                // Lockout settings

                //options.Lockout.DefaultLockoutTimeSpan = TimeSpan.FromMinutes(30);

                //options.Lockout.MaxFailedAccessAttempts = 10;

                //options.Lockout.AllowedForNewUsers = true;

                // User settings

                options.User.RequireUniqueEmail = true;

            });

            services.ConfigureApplicationCookie(options =>

            {

                // Cookie settings

                options.Cookie.Name = "identityCookieJJL";

                options.Cookie.HttpOnly = true;

                options.ExpireTimeSpan = TimeSpan.FromMinutes();

                // If the LoginPath isn't set, ASP.NET Core defaults

                // the path to /Account/Login.

                options.LoginPath = "/Account/Login";

                // If the AccessDeniedPath isn't set, ASP.NET Core defaults

                // the path to /Account/AccessDenied.

                options.AccessDeniedPath = "/Account/AccessDenied";

                options.SlidingExpiration = true;

            });

            // Add application services.

            services.AddTransient<IEmailSender, EmailSender>();
启动并运行, 注册一个用户, 并且确保登录成功
二. 集成IdentityServer
添加IdentityServer4.aspnetIdentity的Nuget包, 同时会自动添加IdentityServer4.
在根目录下新建一个AuthorizationConfig.cs类.
添加如下代码
/// <summary>

        ///  哪些API可以使用这个authorization server.

        /// </summary>

        /// <returns></returns>

        public static IEnumerable<ApiResource> ApiResources()

        {

            return new[]

            {

                new ApiResource("ProductApi", "微服务之产品Api")

            };

        }
public static IEnumerable<IdentityResource> GetIdentityResources()

        {

            return new List<IdentityResource> {

                new IdentityResources.OpenId(),

                new IdentityResources.Profile()

            };

        }
public static IEnumerable<Client> Clients()

        {

            return new[]

            {

                new Client

                {

                    ClientId = "WebClientImplicit",

                    ClientSecrets = new [] { new Secret("SecretKey".Sha256()) },

                    AllowedGrantTypes = GrantTypes.Implicit,

                    AllowAccessTokensViaBrowser = true,

                    RedirectUris = { http://localhost:40011/signin-oidc },

                    // where to redirect to after logout

                    PostLogoutRedirectUris = { http://localhost:40011/signout-callback-oidc },

                    AllowedScopes = new List<string>

                    {

                        IdentityServerConstants.StandardScopes.OpenId,

                        IdentityServerConstants.StandardScopes.Profile,

                        "ProductApi",

                        IdentityServerConstants.ClaimValueTypes.Json

                    }

                    ,

                    RequireConsent=false,//不需要确认授权页面,方便直接跳转

                    AlwaysIncludeUserClaimsInIdToken=true

                }

            };

        }
在StartUp.cs中的服务注册方法中添加代码
// configure identity server with in-memory stores, keys, clients and scopes

            //我们在将Asp.Net Identity添加到DI容器中时,一定要把注册IdentityServer放在Asp.Net Identity之后,

            //因为注册IdentityServer会覆盖Asp.Net Identity的一些配置,这个非常重要。

            services.AddIdentityServer()

                .AddDeveloperSigningCredential()

                .AddInMemoryPersistedGrants()

                .AddInMemoryIdentityResources(AuthorizationConfig.GetIdentityResources())

                .AddInMemoryApiResources(AuthorizationConfig.ApiResources())

                .AddInMemoryClients(AuthorizationConfig.Clients())

                .AddAspNetIdentity<ApplicationUser>();

            services.AddMvc();
在选暖宝的Configure使用注册项的方法中添加如下代码
// app.UseAuthentication(); // not needed, since UseIdentityServer adds the authentication middleware

            app.UseIdentityServer();
接下来使用命令dotnet run启动项目
三. 新建地址为http://localhost:40011/的asp.net core mvc项目, 命名为MvcClientImplict
新建项目的方法和上面的.net core identity一样, 只是不需要个人验证. 修改launchSettings的端口是40010, 对应identityserver的配置url
nuget获取 identitymodel
public void ConfigureServices(IServiceCollection services)

        {

            services.AddAuthentication(options =>

            {

                options.DefaultScheme = "Cookies";

                options.DefaultChallengeScheme = "oidc";

            })

           .AddCookie("Cookies")

           .AddOpenIdConnect("oidc", options =>

           {

               options.SignInScheme = "Cookies";

               options.Authority = "http://localhost:40010";

               options.RequireHttpsMetadata = false;

                //options.ResponseType = "id_token code";

                options.ResponseType = "id_token token";

               options.ClientId = "WebClientImplicit";

               options.SaveTokens = true;

               options.ClientSecret = "SecretKey";

                options.Scope.Add("ProductApi");

               //options.Scope.Add("offline_access");

               options.GetClaimsFromUserInfoEndpoint = true;//

            });

            services.AddMvc();

        }
下面也别忘了 app.UseAuthentication()
运行并验证授权成功成功

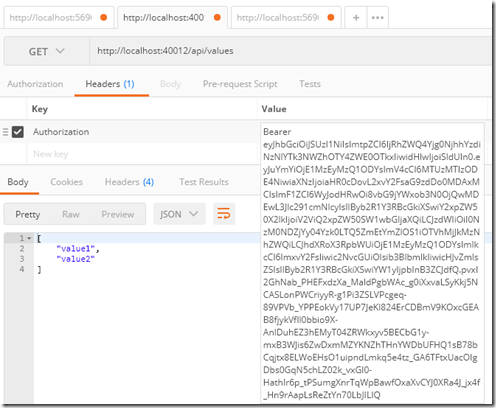
四. 新建一个webApi(端口40012), 配置受到identityserver的保护
nuget :IdentityServer4.AccessTokenValidation
public void ConfigureServices(IServiceCollection services)

        {

            services.AddAuthentication("Bearer")

                .AddIdentityServerAuthentication(option =>

                {

                    option.Authority = "http://localhost:40010";//这里填写/.well-known/openid-configuration里看到的issuer

                    option.RequireHttpsMetadata = false;

                    option.ApiName = "ProductApi";

                    option.ApiSecret = "SecretKey";

                });

            services.AddMvc();

        }
app.UseAuthentication();
在默认的api上添加验证
[Authorize]
[Route("api/[controller]")]
public class ValuesController : Controller
{
在webapi里面新建一个 controller
[Route("api/[controller]")]

    [Authorize]

    public class IdentityController : ControllerBase

    {

        [HttpGet]

        public IActionResult Get()

        {

            return new JsonResult(from c in User.Claims select new { c.Type, c.Value });

        }

    }

.net core Identity集成IdentityServer4 (1)基本操作的更多相关文章
- .net core Identity集成IdentityServer(3) 一键登出
在客户端程序, 我们补充一键登出操作. 使用了idsv之后, 退出的操作需要删除本地cookie, 然后去请求认证服务器, 也删除认证服务器的cookie. 官网给的退出的代码 public asyn ...
- .net core Identity集成IdentityServer(2) 实现IprofileService接口在accesstoken中增加自定义claims
导读 1. 如何添加自定义的claims. 前请提要 目前我们拥有了三个web应用. localhost:40010, 验证服务器 localhost:40011, mvc客户端, 充当webapp请 ...
- .net core identity集成微信授权登录
最快的方式是直接nuget安装AspNetCore.Authentication.WeChat包. 想要知道是如何实现的,可以看下面github上面的源码. 源码在这里:https://github. ...
- 从零搭建一个IdentityServer——集成Asp.net core Identity
前面的文章使用Asp.net core 5.0以及IdentityServer4搭建了一个基础的验证服务器,并实现了基于客户端证书的Oauth2.0授权流程,以及通过access token访问被保护 ...
- IdentityServer(12)- 使用 ASP.NET Core Identity
IdentityServer具有非常好的扩展性,其中用户及其数据(包括密码)部分你可以使用任何想要的数据库进行持久化. 如果需要一个新的用户数据库,那么ASP.NET Core Identity是你的 ...
- IdentityServer4 中文文档 -14- (快速入门)使用 ASP.NET Core Identity
IdentityServer4 中文文档 -14- (快速入门)使用 ASP.NET Core Identity 原文:http://docs.identityserver.io/en/release ...
- IdentityServer4【QuickStart】之使用asp.net core Identity
使用asp.net core Identity IdentityServer灵活的设计中有一部分是可以将你的用户和他们的数据保存到数据库中的.如果你以一个新的用户数据库开始,那么,asp.net co ...
- 第16章 使用ASP.NET Core Identity - Identity Server 4 中文文档(v1.0.0)
注意 对于任何先决条件(例如模板),首先要查看概述. IdentityServer旨在提供灵活性,其中一部分允许您为用户及其数据(包括账户密码)使用所需的任何数据库.如果您从新的用户数据库开始,那么A ...
- asp.net core系列 53 IdentityServer4 (IS4)介绍
一.概述 在物理层之间相互通信必须保护资源,需要实现身份验证和授权,通常针对同一个用户存储.对于资源安全设计包括二个部分,一个是认证,一个是API访问. 1 认证 认证是指:应用程序需要知道当前用户的 ...
随机推荐
- Elasticsearch下安装ik分词器
安装ik分词器(必须安装maven) 上传相应jar包 解压到相应目录 unzip elasticsearch-analysis-ik-master.zip(zip包) cp -r elasticse ...
- C#Dictionary源码
Dictionary Dictionary与hashtable的区别:dictionary支持泛型. 通常处理哈希冲突的方法有:开放地址法,再哈希法,链地址法,建立一个公共栈区等. 在哈希表上进行查 ...
- jvm参数与GC
一.JVM的新生代.老年代.与永久代 JVM中的堆,一般分为三大部分:新生代.老年代.永久代: 1.新生代:主要是用来存放新生的对象,一般占据堆的1/3空间.由于频繁创建对象,所以新生代会频繁触发Mi ...
- [bug]”System.InvalidProgramException:公共语言运行时检测到无效程序“解决方案
Visual Studio 2017版本15.8.x运行某些程序会报这样的错误:“System.InvalidProgramException:公共语言运行时检测到无效程序” 此问题的临时解决方案: ...
- CS231中的python + numpy课程
本课程中所有作业将使用Python来完成.Python本身就是一种很棒的通用编程语言,现在在一些流行的库(numpy,scipy,matplotlib)的帮助下,它为科学计算提供强大的环境. 我们希望 ...
- Java面试集合(一)
前言 大家好,给大家带来Java面试集合(一)的概述,希望你们喜欢 一 1.Java按应用范围可划分几个版本? 答:Java按应用范围有三个版本,分别是JavaSE,JavaEE,JavaME. 2. ...
- JS应用实例1:注册页面表单校验
这里是简单的前端校验,后边还会介绍后台的校验. 多重校验保证获取安全数据 步骤: 1.确定事件onsubmit,并绑定函数 2.编写函数,作用是获取输入数据 3.判断数据是否合法,合法则提交,否则表单 ...
- ElasticSearch权威指南学习(映射和分析)
概念 映射(mapping)机制用于进行字段类型确认,将每个字段匹配为一种确定的数据类型(string, number, booleans, date等).+ 分析(analysis)机制用于进行全文 ...
- kaili 安装中文输入法
kaili 安装中文输入法 更换为国内可用的源: vim /etc/apt/sources.list 添加以下内容: deb http://mirrors.ustc.edu.cn/kali sana ...
- 使用Swagger 搭建高可读性ASP.Net WebApi文档
一.前言 在最近一个商城项目中,使用WebApi搭建API项目.但开发过程中,前后端工程师对于沟通接口的使用,是非常耗时的.之前也有用过Swagger构建WebApi文档,但是API文档的可读性并不高 ...