UIKit 框架之UICollectionViewController
1.自定义单元格
#import <UIKit/UIKit.h>

@interface myCollectionViewCell : UICollectionViewCell
@property(nonatomic,strong) UIImageView *myImageView;
@property(nonatomic,strong) UILabel *nameLabel;
@end
#import "myCollectionViewCell.h"

@implementation myCollectionViewCell
-(void)layoutSubviews
{
    self.myImageView.frame=CGRectMake(, , self.contentView.frame.size.width,);
    [self.contentView addSubview:self.myImageView];

    self.nameLabel.frame = CGRectMake(, , self.contentView.frame.size.width, );
    [self.contentView addSubview:self.nameLabel];
    [self.nameLabel setBackgroundColor:[UIColor cyanColor]];

}
@end
2.设置UICollectionViewFlowLayout
- (BOOL)application:(UIApplication *)application didFinishLaunchingWithOptions:(NSDictionary *)launchOptions {
    UICollectionViewFlowLayout *collectionViewFlowLayout=[[UICollectionViewFlowLayout alloc]init];
    //每行内部cell item的间距
    collectionViewFlowLayout.minimumInteritemSpacing=10.0;
//     每行的间距
    collectionViewFlowLayout.minimumLineSpacing=20.0;
    collectionViewFlowLayout.scrollDirection = UICollectionViewScrollDirectionVertical;
    collectionViewFlowLayout.sectionInset = UIEdgeInsetsMake(, 0.0);
    //它定义了每一个item的大小。通过设定itemSize可以全局地改变所有cell的尺寸,如果想要对某个cell制定尺寸,可以使用-collectionView:layout:sizeForItemAtIndexPath:方法
    collectionViewFlowLayout.itemSize=CGSizeMake(, );
    collectionViewFlowLayout.estimatedItemSize=CGSizeMake(, );
    //由属性scrollDirection确定scroll view的方向,将影响Flow Layout的基本方向和由header及footer确定的section之间的宽度
    collectionViewFlowLayout.scrollDirection=UICollectionViewScrollDirectionVertical;
    //Header和Footer尺寸 同样地分为全局和部分。需要注意根据滚动方向不同,header和footer的高和宽中只有一个会起作用。垂直滚动时section间宽度为该尺寸的高,而水平滚动时为宽度起作用
    collectionViewFlowLayout.headerReferenceSize=CGSizeMake(, );
    collectionViewFlowLayout.footerReferenceSize=CGSizeMake(, );
    CollectionViewController *cvc=[[CollectionViewController alloc]initWithCollectionViewLayout:collectionViewFlowLayout];
    UINavigationController *nvc=[[UINavigationController alloc]initWithRootViewController:cvc];
    self.window.backgroundColor=[UIColor whiteColor];
    self.window.rootViewController=nvc;
    [self.window makeKeyAndVisible];

    return YES;
}
3.实现代理方法
//
//  CollectionViewController.m
//  collectionVC
//
//  Created by City--Online on 15/6/2.
//  Copyright (c) 2015年 CYW. All rights reserved.
//

#import "CollectionViewController.h"
#import "myCollectionViewCell.h"
@interface CollectionViewController ()

@end

@implementation CollectionViewController

static NSString * const reuseIdentifier = @"Cell";

- (void)viewDidLoad {
    [super viewDidLoad];

    [self.collectionView registerClass:[myCollectionViewCell class] forCellWithReuseIdentifier:reuseIdentifier];
    [self.collectionView registerClass:[UICollectionReusableView class] forSupplementaryViewOfKind:UICollectionElementKindSectionHeader withReuseIdentifier:@"Header"];
    [self.collectionView registerClass:[UICollectionReusableView class] forSupplementaryViewOfKind:UICollectionElementKindSectionFooter withReuseIdentifier:@"Footer"];

   }

- (void)didReceiveMemoryWarning {
    [super didReceiveMemoryWarning];

}

- (NSInteger)numberOfSectionsInCollectionView:(UICollectionView *)collectionView {
    ;

}

- (NSInteger)collectionView:(UICollectionView *)collectionView numberOfItemsInSection:(NSInteger)section {
    ) {
        ;
    }
    else
    {
        ;
    }

}

- (UICollectionViewCell *)collectionView:(UICollectionView *)collectionView cellForItemAtIndexPath:(NSIndexPath *)indexPath {

    myCollectionViewCell *cell =[collectionView dequeueReusableCellWithReuseIdentifier:reuseIdentifier  forIndexPath:indexPath];
    cell.backgroundColor = [UIColor colorWithRed:arc4random()%/  /  / ];
    cell.myImageView=[[UIImageView alloc]initWithImage:[UIImage imageNamed:@"1.png"]];
    cell.nameLabel=[[UILabel alloc]init];
    cell.nameLabel.text=[NSString stringWithFormat:@"%ld %ld",indexPath.section,indexPath.row];
    return cell;
}

#pragma mark <UICollectionViewDelegate>

// Uncomment this method to specify if the specified item should be highlighted during tracking
- (BOOL)collectionView:(UICollectionView *)collectionView shouldHighlightItemAtIndexPath:(NSIndexPath *)indexPath {
    return YES;
}

// Uncomment this method to specify if the specified item should be selected
- (BOOL)collectionView:(UICollectionView *)collectionView shouldSelectItemAtIndexPath:(NSIndexPath *)indexPath {
    return YES;
}

// Uncomment these methods to specify if an action menu should be displayed for the specified item, and react to actions performed on the item
- (BOOL)collectionView:(UICollectionView *)collectionView shouldShowMenuForItemAtIndexPath:(NSIndexPath *)indexPath {
    return NO;
}

- (BOOL)collectionView:(UICollectionView *)collectionView canPerformAction:(SEL)action forItemAtIndexPath:(NSIndexPath *)indexPath withSender:(id)sender {
    return NO;
}

- (void)collectionView:(UICollectionView *)collectionView performAction:(SEL)action forItemAtIndexPath:(NSIndexPath *)indexPath withSender:(id)sender {

}
- (UICollectionReusableView *)collectionView:(UICollectionView *)collectionView viewForSupplementaryElementOfKind:(NSString *)kind atIndexPath:(NSIndexPath *)indexPath
{
    if ([kind isEqualToString: UICollectionElementKindSectionFooter]) {
        UICollectionReusableView *footer=[collectionView dequeueReusableSupplementaryViewOfKind:kind withReuseIdentifier:@"Footer" forIndexPath:indexPath];
        footer.backgroundColor=[UIColor yellowColor];
        UILabel *label=[[UILabel alloc]initWithFrame:CGRectMake(, , , )];
        label.text=@"label";
        label.textAlignment=NSTextAlignmentCenter;
        [footer addSubview:label];
        return footer;
    }
    else
    {
        UICollectionReusableView *Header=[collectionView dequeueReusableSupplementaryViewOfKind:kind withReuseIdentifier:@"Header" forIndexPath:indexPath];
        Header.backgroundColor=[UIColor blueColor];
        return Header;

    }
}

@end
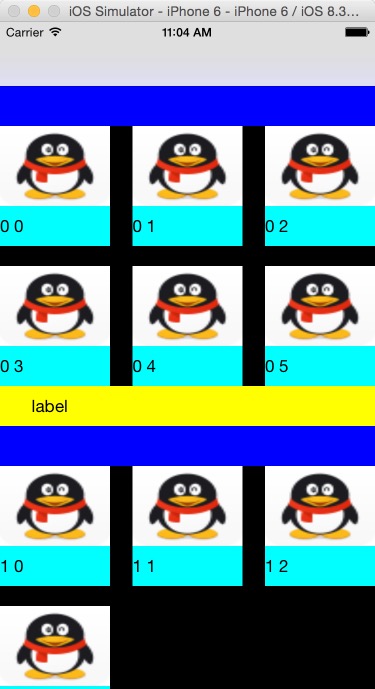
4.运行结果图
UIKit 框架之UICollectionViewController的更多相关文章
- UIKit框架使用总结--看看你掌握了多少
一.经常使用的,基本就是每次项目迭代都需要使用的 UIView.UILabel.UIImage.UIColor.UIFont.UIImageView.UITextField.UIButton. UIS ...
- Swift - 重写UIKit框架类的init初始化方法(以UITabBarController为例)
原来写了篇文章讲UITabBarController的用法,当时是从UIViewController跳转到UITabBarController页面,代码如下: 1 self.presentViewCo ...
- UIKit框架
在今后的应用程序构建中,会陆续使用各式各样的控件,因此UIKit框架的引入是必不可少的! 一.简介 UIKitk框架提供一系列的Class(类)来建立和管理iPhone OS应用程序的用户界面接口.应 ...
- iOS学习32之UIKit框架-可视化编程-XIB
1. Interface Builder 可视化编程 1> 概述 GUI : 图形用户界面(Graphical User Interface, 简称GUI, 又称图形化界面) 是指采用图形方式显 ...
- 基础框架Fundation和UIkit框架的定义和使用
Foundation 框架为所有应用程序提供基本的系统服务 您的应用程序以及 UIKit 和其他框架,都建立在 Foundation 框架的基础结构之上.Foundation 框架提供许多基本的对象类 ...
- iOS开发概述UIkit动力学,讲述UIKit的Dynamic特性,UIkit动力学是UIkit框架中模拟真实世界的一些特性。
转发:http://my.oschina.net/u/1378445/blog/335014 iOS UIKit动力学 Dynamics UIAttachmentBehavior 实现iMessage ...
- iOS开发UIKit框架-可视化编程-XIB
1. Interface Builder 可视化编程 1> 概述 GUI : 图形用户界面(Graphical User Interface, 简称GUI, 又称图形化界面) 是指采用图形方式显 ...
- 79、iOS 的Cocoa框架、Foundation框架以及UIKit框架
Cocoa框架是iOS应用程序的基础 1. Cocoa是什么? Cocoa是 OS X和ios 操作系统的程序的运行环境. 是什么因素使一个程序成为Cocoa程序呢?不是编程语言,因为在Cocoa开发 ...
- UIKit 框架之UIView二
下面这些都是UIView一些基本的东西,具体的可以参考UIKit 框架之UIView一博客 一.自定义一个View // // MyView.m // UIView // // Created by ...
随机推荐
- ubuntu下使用nethogs监控网络流量
NetHogs是一款小巧免费的开源命令行工具,用来按进程或程序实时统计网络带宽使用率. 对于使用类似于“repo tool”.“depot_tools”等工具checkout源码时非常有用,可以查看当 ...
- 将ubuntu12.04中,gcc4.6/g++4.6版本降低到gcc4.4/g++4.4.
降低Ubuntu中gcc和g++的版本 ubuntu 12.04 中带的gcc/g++都是4.6,将其降到4.4. 操作步骤如下: 一.降低gcc版本 1. $sudo apt-get install ...
- [系统]制作老毛桃U盘WinPE
准备工作,1G以上的U盘一个, Winpe 工具一个,个人推荐老毛桃winpe Ghost镜像文件(这个不用说了吧,能想到U盘装系统肯定都知道的) 可以开始了:插入U盘(最好把U盘里的东西清空,自己保 ...
- luigi学习4-构建工作流
luigi提供了两个基本单元来构造一个工作流,这两个基本单元分别是Task和Target.这两个单元都是抽象类,我们实现他们中的某些方法就可以了.除了这两个基本单元,还有一个重要的概念是Pramete ...
- Python在金融,数据分析,和人工智能中的应用
Python在金融,数据分析,和人工智能中的应用 Python最近取得这样的成功,而且未来似乎还会继续下去,这有许多原因.其中包括它的语法.Python开发人员可用的科学生态系统和数据分析库.易于 ...
- MongoDB(1):常用操作命令大全
MongoDB常用操作命令大全(转) http://www.jb51.net/article/48217.htm 成功启动MongoDB后,再打开一个命令行窗口输入mongo,就可以进行数据库的一些操 ...
- 通过URLHttpConnection方式连接网络步骤,获取位图为例
要注意的是:访问网络不能直接放在主线程,要放在另外一个线程里面,如果放在主线程会报android.os.NetworkOnMainThreadException错误1 public Bitmap ge ...
- 【Servlet】—在servlet中常混的请求路径
在页面请求,后台获取相关请求路径是,自己长搞混的几个路径,再次做次标记,不要每次使用想不起来是,都去写一个小的demo来测试. request.getContextPath(); request.ge ...
- 可以获取get post url 传递参数的统一方法
public static string objRequest(string requestName) { object obj = HttpContext.Current.Request[reque ...
- Vmware下Ubuntu无法上网的问题
本来这个挺简单的个问题,但是由于很久没有使用虚拟机并且期间实体机网络环境发生了一些变化,导致了一些麻烦. 一般用NAT就行了,就是Vmware右下角那个图标(左起第4个)设置就行. 我这么设置了还是不 ...