远程通知APNs(Apple Push Notification Server)
推送通知是由应用服务提供商发起的,通过苹果的APNs(Apple Push Notification Server)发送到应用客户端。下面是苹果官方关于推送通知的过程示意图:

推送通知的过程可以分为以下几步:
- 应用服务提供商从服务器端把要发送的消息和设备令牌(device token)发送给苹果的消息推送服务器APNs。
- APNs根据设备令牌在已注册的设备(iPhone、iPad、iTouch、mac等)查找对应的设备,将消息发送给相应的设备。
- 客户端设备接将接收到的消息传递给相应的应用程序,应用程序根据用户设置弹出通知消息。
当然,这只是一个简单的流程,有了这个流程我们还无从下手编写程序,将上面的流程细化可以得到如下流程图(图片来自互联网),在这个过程中会也会提到如何在程序中完成这些步骤:
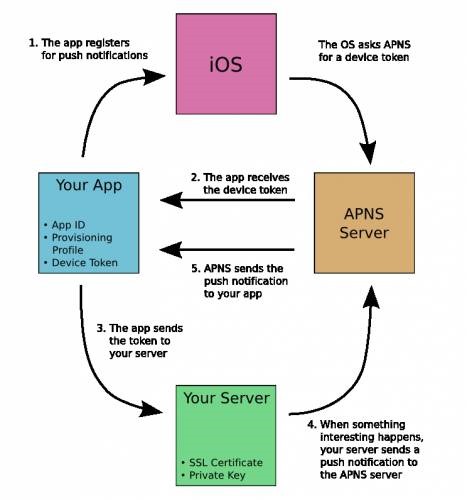
1.应用程序注册APNs推送消息。
说明:
a.只有注册过的应用才有可能接收到消息,程序中通常通过UIApplication的registerUserNotificationSettings:方法注册,iOS8中通知注册的方法发生了改变,如果是iOS7及之前版本的iOS请参考其他代码。
b.注册之前有两个前提条件必须准备好:开发配置文件(provisioning profile,也就是.mobileprovision后缀的文件)的App ID不能使用通配ID必须使用指定APP ID并且生成配置文件中选择Push Notifications服务,一般的开发配置文件无法完成注册;应用程序的Bundle Identifier必须和生成配置文件使用的APP ID完全一致。
2.iOS从APNs接收device token,在应用程序获取device token。
说明:
a.在UIApplication的-(void)application:(UIApplication *)application didRegisterForRemoteNotificationsWithDeviceToken:(NSData *)deviceToken代理方法中获取令牌,此方法发生在注册之后。
b.如果无法正确获得device token可以在UIApplication的-(void)application:(UIApplication *)application didFailToRegisterForRemoteNotificationsWithError:(NSError *)error代理方法中查看详细错误信息,此方法发生在获取device token失败之后。
c.必须真机调试,模拟器无法获取device token。
3.iOS应用将device token发送给应用程序提供商,告诉服务器端当前设备允许接收消息。
说明:
a.device token的生成算法只有Apple掌握,为了确保算法发生变化后仍然能够正常接收服务器端发送的通知,每次应用程序启动都重新获得device token(注意:device token的获取不会造成性能问题,苹果官方已经做过优化)。
b.通常可以创建一个网络连接发送给应用程序提供商的服务器端, 在这个过程中最好将上一次获得的device token存储起来,避免重复发送,一旦发现device token发生了变化最好将原有的device token一块发送给服务器端,服务器端删除原有令牌存储新令牌避免服务器端发送无效消息。
4.应用程序提供商在服务器端根据前面发送过来的device token组织信息发送给APNs。
说明:
a.发送时指定device token和消息内容,并且完全按照苹果官方的消息格式组织消息内容,通常情况下可以借助其他第三方消息推送框架来完成。
5.APNs根据消息中的device token查找已注册的设备推送消息。
说明:
a.正常情况下可以根据device token将消息成功推送到客户端设备中,但是也不排除用户卸载程序的情况,此时推送消息失败,APNs会将这个错误消息通知服务器端以避免资源浪费(服务器端此时可以根据错误删除已经存储的device token,下次不再发送)。
下面将简单演示一下推送通知的简单流程:
首先,看一下iOS客户端代码:
 //

 //  AppDelegate.m

 //  pushnotification

 //

 //  Created by Kenshin Cui on 14/03/27.

 //  Copyright (c) 2014年 Kenshin Cui. All rights reserved.

 //

 #import "AppDelegate.h"

 #import "KCMainViewController.h"

 @interface AppDelegate ()

 @end

 @implementation AppDelegate

 #pragma mark - 应用程序代理方法

 #pragma mark 应用程序启动之后

 - (BOOL)application:(UIApplication *)application didFinishLaunchingWithOptions:(NSDictionary *)launchOptions {

     _window=[[UIWindow alloc]initWithFrame:[UIScreen mainScreen].bounds];

     _window.backgroundColor =[UIColor colorWithRed:/255.0 green:/255.0 blue:/255.0 alpha:];

     //设置全局导航条风格和颜色

     [[UINavigationBar appearance] setBarTintColor:[UIColor colorWithRed:/255.0 green:/255.0 blue:/255.0 alpha:]];

     [[UINavigationBar appearance] setBarStyle:UIBarStyleBlack];

     KCMainViewController *mainController=[[KCMainViewController alloc]init];

     _window.rootViewController=mainController;

     [_window makeKeyAndVisible];

     //注册推送通知(注意iOS8注册方法发生了变化)

     [application registerUserNotificationSettings:[UIUserNotificationSettings settingsForTypes:UIUserNotificationTypeAlert|UIUserNotificationTypeBadge|UIUserNotificationTypeSound categories:nil]];

     [application registerForRemoteNotifications];

     return YES;

 }

 #pragma mark 注册推送通知之后

 //在此接收设备令牌

 -(void)application:(UIApplication *)application didRegisterForRemoteNotificationsWithDeviceToken:(NSData *)deviceToken{

     [self addDeviceToken:deviceToken];

     NSLog(@"device token:%@",deviceToken);

 }

 #pragma mark 获取device token失败后

 -(void)application:(UIApplication *)application didFailToRegisterForRemoteNotificationsWithError:(NSError *)error{

     NSLog(@"didFailToRegisterForRemoteNotificationsWithError:%@",error.localizedDescription);

     [self addDeviceToken:nil];

 }

 #pragma mark 接收到推送通知之后

 -(void)application:(UIApplication *)application didReceiveRemoteNotification:(NSDictionary *)userInfo{

     NSLog(@"receiveRemoteNotification,userInfo is %@",userInfo);

 }

 #pragma mark - 私有方法

 /**

  *  添加设备令牌到服务器端

  *

  *  @param deviceToken 设备令牌

  */

 -(void)addDeviceToken:(NSData *)deviceToken{

     NSString *key=@"DeviceToken";

     NSData *oldToken= [[NSUserDefaults standardUserDefaults]objectForKey:key];

     //如果偏好设置中的已存储设备令牌和新获取的令牌不同则存储新令牌并且发送给服务器端

     if (![oldToken isEqualToData:deviceToken]) {

         [[NSUserDefaults standardUserDefaults] setObject:deviceToken forKey:key];

         [self sendDeviceTokenWidthOldDeviceToken:oldToken newDeviceToken:deviceToken];

     }

 }

 -(void)sendDeviceTokenWidthOldDeviceToken:(NSData *)oldToken newDeviceToken:(NSData *)newToken{

     //注意一定确保真机可以正常访问下面的地址

     NSString *urlStr=@"http://192.168.1.101/RegisterDeviceToken.aspx";

     urlStr=[urlStr stringByAddingPercentEscapesUsingEncoding:NSUTF8StringEncoding];

     NSURL *url=[NSURL URLWithString:urlStr];

     NSMutableURLRequest *requestM=[NSMutableURLRequest requestWithURL:url cachePolicy: timeoutInterval:10.0];

     [requestM setHTTPMethod:@"POST"];

     NSString *bodyStr=[NSString stringWithFormat:@"oldToken=%@&newToken=%@",oldToken,newToken];

     NSData *body=[bodyStr dataUsingEncoding:NSUTF8StringEncoding];

     [requestM setHTTPBody:body];

     NSURLSession *session=[NSURLSession sharedSession];

     NSURLSessionDataTask *dataTask= [session dataTaskWithRequest:requestM completionHandler:^(NSData *data, NSURLResponse *response, NSError *error) {

         if (error) {

             NSLog(@"Send failure,error is :%@",error.localizedDescription);

         }else{

             NSLog(@"Send Success!");

         }

     }];

     [dataTask resume];

 }

 @end
iOS客户端代码的代码比较简单,注册推送通知,获取device token存储到偏好设置中,并且如果新获取的device token不同于偏好设置中存储的数据则发送给服务器端,更新服务器端device token列表。
远程通知APNs(Apple Push Notification Server)的更多相关文章
- (转)Apple Push Notification Services in iOS 6 Tutorial: Part 1/2
转自:http://www.raywenderlich.com/32960/apple-push-notification-services-in-ios-6-tutorial-part-1 Upda ...
- (转)How to build an Apple Push Notification provider server (tutorial)
转自:https://blog.serverdensity.com/how-to-build-an-apple-push-notification-provider-server-tutorial/ ...
- (转)苹果推送通知服务教程 Apple Push Notification Services Tutorial
本文译自http://www.raywenderlich.com/.原文由iOS教程团队 Matthijs Hollemans 撰写,经原网站管理员授权本博翻译. 在iOS系统,考虑到手机电池电量,应 ...
- Provider Communication with Apple Push Notification Service
This chapter describes the interfaces that providers use for communication with Apple Push Notificat ...
- (转)How to renew your Apple Push Notification Push SSL Certificate
转自:https://blog.serverdensity.com/how-to-renew-your-apple-push-notification-push-ssl-certificate/ It ...
- (转)Apple Push Notification Services in iOS 6 Tutorial: Part 2/2
转自:http://www.raywenderlich.com/32963/apple-push-notification-services-in-ios-6-tutorial-part-2 Upda ...
- (转)在SAE使用Apple Push Notification Service服务开发iOS应用, 实现消息推送
在SAE使用Apple Push Notification Service服务开发iOS应用, 实现消息推送 From: http://saeapns.sinaapp.com/doc.html 1,在 ...
- 陌陌架构分享 – Apple Push Notification Service
http://blog.latermoon.com/?p=878 先描述下基本概念,标准的iPhone应用是没有后台运行的,要实现实时推送消息到手机,需要借助Apple提供的APNS服务. iPhon ...
- Emojis support in Apple push notification
I am working on iPhone app named "INTERSTIZIO".In this I have implemented functionality li ...
随机推荐
- Controlling z-order using the ZIndex Property
The Composing a XAML Clip Art Scene posting showed how you could layer multiple drawing objects in ...
- ios 适应屏幕
标准做法:auto layout 其中:也可以用代码判断 1.如果不是hardcode的话,又怎么会不兼容呢.. 2.如果你全写320*480也是兼容吗 3.写320嘛的就是hardcode啊. ...
- 《为ipad而设计 打造畅销APP》读书笔记
(1)应用应该对用户程序持ipad的变化做出响应 (2)要设计出确实出色的触摸屏交互界面需要能够触摸到自己的设计,反复触摸,直到找到感觉 (3)chipmunk physics 2D的物理图形库 (4 ...
- 洛谷 P1009 阶乘之和 Label:高精度
题目描述 用高精度计算出S=1!+2!+3!+…+n!(n≤50) 其中“!”表示阶乘,例如:5!=5*4*3*2*1. 输入输出格式 输入格式: 一个正整数N. 输出格式: 一个正整数S,表示计算结 ...
- COJ968 WZJ的数据结构(负三十二)
WZJ的数据结构(负三十二) 难度级别:D: 运行时间限制:5000ms: 运行空间限制:262144KB: 代码长度限制:2000000B 试题描述 给你一棵N个点的无根树,边上均有权值,每个点上有 ...
- NOIP200003方格取数
NOIP200003方格取数 难度级别: D: 编程语言:不限:运行时间限制:1000ms: 运行空间限制:51200KB: 代码长度限制:2000000B 试题描述 XYZ 是首师大附中信息技术团编 ...
- NHibernate's inverse - what does it really mean?
NHibernate's concept of 'inverse' in relationships is probably the most often discussed and misunder ...
- PHP + Redis 实现一个简单的twitter
原文位于Redis官网http://redis.io/topics/twitter-clone Redis是NoSQL数据库中一个知名数据库,在新浪微博中亦有部署,适合固定数据量的热数据的访问. 作为 ...
- td也可以溢出隐藏显示
或许我这篇文章一取这样的名字,就会有人要问了:你怎么还在关注table啊,那早就过时了…赶紧Xhtml…div好…ul好…ol好…dl好…完了,不知道还有什么好了. table真的过时了么?你真的了解 ...
- 【C语言】04-函数
一.函数的分类 前面已经说过,C语言中的函数就是面向对象中的"方法",C语言的函数可以大概分为3类: 1.主函数,也就是main函数.每个程序中只能有一个.也必须有一个主函数.无论 ...