基于tiny4412的Linux内核移植 -- 设备树的展开
作者信息
作者: 彭东林
QQ:405728433
平台简介
开发板:tiny4412ADK + S700 + 4GB Flash
要移植的内核版本:Linux-4.4.0 (支持device tree)
u-boot版本:友善之臂自带的 U-Boot 2010.12 (为支持uImage启动,做了少许改动)
busybox版本:busybox 1.25
交叉编译工具链: arm-none-linux-gnueabi-gcc
(gcc version 4.8.3 20140320 (prerelease) (Sourcery CodeBench Lite 2014.05-29))
摘要
在Linux引入设备树之后,将原来写在代码中的大量的硬件信息全部移到了设备树中,然后在Linux启动的时候会解析设备树,利用解析到的硬件信息构造device,然后注册到相应的bus上,如果有对应的driver,则会调用driver的probe函数。那么这个过程是怎么进行的?Linux系统有各种device,如对于platform子系统来说有platform_device、对于I2C子系统有i2c_client、对于SPI子系统来说有spi_device,那么这些device是怎么跟设备树关联起来的呢?
在分析的过程中参考了下面的几篇博文:
http://www.wowotech.net/device_model/dt-code-analysis.html
http://www.wowotech.net/comm/i2c_overview.html
http://www.wowotech.net/comm/i2c_provider.html
这几篇博文讲的非常好,下面一篇是之前总结的:
http://www.cnblogs.com/pengdonglin137/p/4495056.html
内核文档:
Documentation/devicetree/booting-without-of.txt
Documentation/devicetree/usage-model.txt
官方文档:
正文
设备树的populate过程大致有如下几个阶段(下文中“节点”与“device node”可以理解为一个意思):
一、根据设备树创建device node链表
start_kernel
---> setup_arch
---> unflatten_device_tree
在u-boot引导内核的时候,会将设备树在物理内存中的物理起始地址(存放在寄存器r2中)传递给Linux内核,然后Linux内核在函数unflatten_device_tree中会解析设备树镜像,并利用扫描到的信息创建由device node构成的链表,全局变量of_root指向链表的根节点,设备树的每个节点都会有一个struct device_node与之对应。
二、遍历device node链表,创建并注册platform_device
start_kernel
---> rest_init
---> kernel_init
---> kernel_init_freeable
---> do_basic_setup
---> do_initcalls
在do_initcalls函数中,kernel会依次执行各个initcall函数,在这个过程中,会调用 customize_machine,具体如下:
static int __init customize_machine(void)
{
/*
* customizes platform devices, or adds new ones
* On DT based machines, we fall back to populating the
* machine from the device tree, if no callback is provided,
* otherwise we would always need an init_machine callback.
*/
of_iommu_init();
if (machine_desc->init_machine)
machine_desc->init_machine();
#ifdef CONFIG_OF
else
of_platform_populate(NULL, of_default_bus_match_table,
NULL, NULL);
#endif
return 0;
}
arch_initcall(customize_machine);
这样就可调用到exynos_dt_machine_init:
static void __init exynos_dt_machine_init(void)
{
......
of_platform_populate(NULL, of_default_bus_match_table, NULL, NULL);
}
在of_platform_populate中会调用of_platform_bus_create ---> of_platform_device_create_pdata,完成platform_device的创建和注册。那么Linux系统是怎么知道哪些device node要注册为platform_device,哪些是用于i2c_client,哪些是用于spi_device?不知道你有没有注意到调用of_platform_populate的时候给它传递了一个参数of_default_bus_match_table,它的定义如下:
const struct of_device_id of_default_bus_match_table[] = {
{ .compatible = "simple-bus", },
{ .compatible = "simple-mfd", },
#ifdef CONFIG_ARM_AMBA
{ .compatible = "arm,amba-bus", },
#endif /* CONFIG_ARM_AMBA */
{} /* Empty terminated list */
};
是这个意思:如果某个device node的compatible属性的值与数组of_default_bus_match_table中的任意一个元素的compatible的值match(但是对于compatible属性的值是arm,primecell的节点有些特殊,它是单独处理的),那么这个device node的child device node(device_node的child成员变量指向的是这个device node的子节点,也是一个链表)仍旧会被注册为platform_device。
of_platform_populate:
1: int of_platform_populate(struct device_node *root,
2: const struct of_device_id *matches,
3: const struct of_dev_auxdata *lookup,
4: struct device *parent)
5: {
6: struct device_node *child;
7: int rc = 0;
8:
9: root = root ? of_node_get(root) : of_find_node_by_path("/"); // 找到root device node
10: if (!root)
11: return -EINVAL;
12:
13: for_each_child_of_node(root, child) { // 遍历root device node的child device node
14: rc = of_platform_bus_create(child, matches, lookup, parent, true);
15: if (rc) {
16: of_node_put(child);
17: break;
18: }
19: }
20: of_node_set_flag(root, OF_POPULATED_BUS);
21:
22: of_node_put(root);
23: return rc;
24: }
of_platform_bus_create :
1: static int of_platform_bus_create(struct device_node *bus,
2: const struct of_device_id *matches,
3: const struct of_dev_auxdata *lookup,
4: struct device *parent, bool strict)
5: {
6: const struct of_dev_auxdata *auxdata;
7: struct device_node *child;
8: struct platform_device *dev;
9: const char *bus_id = NULL;
10: void *platform_data = NULL;
11: int rc = 0;
12:
13: /* Make sure it has a compatible property */
14: if (strict && (!of_get_property(bus, "compatible", NULL))) { // 这样可以把chosen、aliases、memory等没有compatible属性的节点排除在外
15: pr_debug("%s() - skipping %s, no compatible prop\n",
16: __func__, bus->full_name);
17: return 0;
18: }
19:
20: auxdata = of_dev_lookup(lookup, bus); // tiny4412给lookup传递的是NULL
21: if (auxdata) {
22: bus_id = auxdata->name;
23: platform_data = auxdata->platform_data;
24: }
25:
26: if (of_device_is_compatible(bus, "arm,primecell")) {
27: /*
28: * Don't return an error here to keep compatibility with older
29: * device tree files.
30: */
31: of_amba_device_create(bus, bus_id, platform_data, parent);
32: return 0;
33: }
34:
35: dev = of_platform_device_create_pdata(bus, bus_id, platform_data, parent); // 根据device node创建 platform_device并注册
36: if (!dev || !of_match_node(matches, bus)) // 判断是不是需要继续遍历这个device node下的child device node
37: return 0;
38:
39: for_each_child_of_node(bus, child) { // 遍历这个device node下的child device node,将child device node也注册为platform_device
40: pr_debug(" create child: %s\n", child->full_name);
41: rc = of_platform_bus_create(child, matches, lookup, &dev->dev, strict);
42: if (rc) {
43: of_node_put(child);
44: break;
45: }
46: }
47: of_node_set_flag(bus, OF_POPULATED_BUS);
48: return rc;
49: }
三、注册其他设备
I2C设备的注册
下面说一下i2c_client是如何注册的。先看下面一张图(来自蜗窝科技):
下面是从http://www.wowotech.net/comm/i2c_overview.html摘抄的一段话:
1)platform bus(/sys/bus/platform)是驱动工程师常见的bus,用于挂载和CPU通过系统总线连接的各类外设。在I2C framework中,I2C控制器直接从属于platform bus,我们在linux kernel中常说的I2C driver,都是指I2C controller driver,都是以platform driver的形式存在,当然,对应的控制器是platform device。
2)与此同时,kernel抽象出I2C bus(/sys/bus/i2c),用于挂载和I2C controller通过I2C总线连接的各个I2C slave device。
3)比较特殊的地方是,I2C core使用一个虚拟实体----I2C adapter,抽象I2C controller有关的功能(主要是数据的收发),I2C adapter也挂载在I2C bus上。
4)I2C adapter和I2C slave device都挂载在I2C bus上,就可以方便的进行Master(I2C adapter)和Slave之间的匹配操作,并通过I2C core提供的统一接口,访问I2C salve device,进行数据的收发。
我们知道,i2c控制器在i2c驱动模型中被抽象为i2c_adapter,但是i2c控制器驱动实际上是在platform_bus上,所以i2c控制器对应的是platform_device,因此会在上面调用of_platform_populate时注册,然后i2c控制器驱动的probe函数会被调用。以tiny4412开发板为例,在drivers/i2c/busses/i2c-s3c2410.c的probe函数中调用注册adapter的函数接口:i2c_add_numbered_adapter ---> i2c_add_adapter ---> i2c_register_adapter ---> of_i2c_register_devices,在函数of_i2c_register_devices中会遍历这个adapter对应的device node的child device node,这些child device node对应的就是挂载i2c bus上的板级外设的硬件信息(这些板级外设使用I2C接口跟SOC通信),如 MMA7660。然后调用of_i2c_register_device,这个函数根据每个child device node的信息构造i2c_board_info,并调用i2c_new_device,在i2c_new_device中会创建并注册i2c_client,注册i2c_client的时候如果找到了对应的设备驱动程序(如 MMA7660的驱动程序),设备驱动程序的probe函数就会被调动。
SPI设备的注册
由于SPI驱动模型跟I2C类似,spi_device的注册过程也跟i2c_client的很类似。spi控制器在spi子系统中被抽象为spi_master,spi控制器驱动实际上也在platform_bus上,所以spi控制器对应的是platform_device。当调用of_platform_populate注册spi控制器对应的platform_device的时候,spi控制器驱动的probe函数会被执行,在probe函数中会向spi子系统注册spi_master。以tiny4412为例,在drivers/spi/spi-s3c64xx.c的s3c64xx_spi_probe函数中调用devm_spi_register_master ---> spi_register_master ---> of_register_spi_devices,在of_register_spi_devices中会遍历与这个spi_master对应的device node的child device node,这些child device node就是挂在spi bus上的板级外设,如spi接口的存储器等等。然后调用of_register_spi_device,根据每个child device node的信息创建spi_device,并调用spi_add_device完成注册,注册spi_device的时候如果找到了对应的设备驱动程序(如 SPI接口的存储器的驱动程序),设备驱动程序的probe函数就会被调动。
其他platform device的注册
在上面说如果在of_platform_populate的时候如果给matches传递了of_default_bus_match_table,那么跟matches匹配的device_node的直接child device node会也会自动被注册为platform_device。假如跟matches不匹配的话,这个device_node的直接child device node不会被再被处理了。比如像下面的设备树结构:
 / {

     #address-cells = <0x2>;

     #size-cells = <0x2>;

     model = "Qualcomm Technologies";

     compatible = "qcom,msm8996";

     interrupt-parent = <0x1>;

     soc {

         compatible = "simple-bus";

         qcom,msm-dai-mi2s {

             compatible = "qcom,msm-dai-mi2s";

             qcom,msm-dai-q6-mi2s-quat {

                 compatible = "qcom,msm-dai-q6-mi2s";

             };

         };

     };

 };
如上,节点"qcom,msm-dai-mi2s"会被注册为platform_device,而其child device node是"qcom,msm-dai-q6-mi2s-quat",并不会被注册为platform_device。如果此时需要把"qcom,msm-dai-q6-mi2s-quat"也注册为 platform_device的话,也可以在"qcom,msm-dai-mi2s"对应的platform device_driver在被probe的时候重新调用of_platform_populate。如下:
 static int msm_dai_mi2s_q6_probe(struct platform_device *pdev)

 {

     int rc;

     rc = of_platform_populate(pdev->dev.of_node, NULL, NULL, &pdev->dev);

     if (rc) {

         dev_err(&pdev->dev, "%s: failed to add child nodes, rc=%d\n",

             __func__, rc);

     } else

         dev_dbg(&pdev->dev, "%s: added child node\n", __func__);

     return rc;

 }

 static int msm_dai_mi2s_q6_remove(struct platform_device *pdev)

 {

     return ;

 }

 static const struct of_device_id msm_dai_mi2s_dt_match[] = {

     { .compatible = "qcom,msm-dai-mi2s", },

     { }

 };

 MODULE_DEVICE_TABLE(of, msm_dai_mi2s_dt_match);

 static struct platform_driver msm_dai_mi2s_q6 = {

     .probe  = msm_dai_mi2s_q6_probe,

     .remove = msm_dai_mi2s_q6_remove,

     .driver = {

         .name = "msm-dai-mi2s",

         .owner = THIS_MODULE,

         .of_match_table = msm_dai_mi2s_dt_match,

     },

 };
其中,在第4行又重新调用了of_platform_populate,它的第一个参数是"qcom,msm-dai-mi2s"的device node,通过这个就可以遍历其child device node,并将其注册为platform device。
其他
在Linux系统起来后,会将解析完成的设备树导出到用户空间。
一、/proc/device-tree
这个目录下的目录和文件是根据device node的结构组织的,顶层目录是root device node,其他的子目录是root device node 的 child device node,同时子目录又可以再嵌套子目录,以此表示这些device node的父子关系。
[root@tiny4412 root]# cd /proc/device-tree/
[root@tiny4412 base]# ls
#address-cells pinctrl@106E0000
#size-cells pinctrl@11000000
adc@126C0000 pinctrl@11400000
aliases pmu
amba ppmu_acp@10ae0000
backlight ppmu_camif@11ac0000
cam-power-domain@10023C00 ppmu_cpu@106c0000
camera ppmu_dmc0@106a0000
chipid@10000000 ppmu_dmc1@106b0000
chosen ppmu_g3d@12630000
clock-controller@03810000 ppmu_g3d@13220000
clock-controller@10030000 ppmu_image@12aa0000
codec@13400000 ppmu_lcd0@11e40000
compatible ppmu_leftbus0@116a0000
cpus ppmu_mfc_left@13660000
dsi@11C80000 ppmu_mfc_right@13670000
ehci@12580000 ppmu_rightbus@112a0000
exynos-usbphy@125B0000 ppmu_tv@12e40000
fimd@11c00000 pwm@139D0000
fixed-rate-clocks regulators
g2d@10800000 rtc@10070000
g3d-power-domain@10023C60 sdhci@12510000
gps-alive-power-domain@10023D00 sdhci@12520000
gps-power-domain@10023CE0 sdhci@12530000
hdmi@12D00000 sdhci@12540000
hsotg@12480000 serial@13800000
i2c-gpio-0 serial@13810000
i2c@13860000 serial@13820000
i2c@13870000 serial@13830000
i2c@13880000 spi@13920000
......
可以看看上一篇博文中的用软件I2C控制MMA7660的设备树的结构:
[root@tiny4412 base]# cd i2c-gpio-0
[root@tiny4412 i2c-gpio-0]# ls
#address-cells compatible i2c-gpio,delay-us name
#size-cells gpios mma7660@4c status
[root@tiny4412 i2c-gpio-0]# cd mma7660@4c/
[root@tiny4412 mma7660@4c]# ls
compatible interrupt-parent poll_interval
input_flat interrupts reg
input_fuzz name status
[root@tiny4412 mma7660@4c]#
可以看到,mma7660@4c确实是i2c-gpio-0的子目录,而且我们也知道mma7660对应的device node确实是i2c-gpio-0对应的device node的child device node。
可以看看platform device的注册情况:
[root@tiny4412 root]# cd /sys/bus/platform/
[root@tiny4412 platform]# ls
devices drivers_autoprobe uevent
drivers drivers_probe
[root@tiny4412 platform]# cd devices/
[root@tiny4412 devices]# ls
10000000.chipid 12530000.sdhci
10010000.syscon 12550000.mmc
10020000.system-controller 12580000.ehci
10023c00.cam-power-domain 12590000.ohci
10023c20.tv-power-domain 125b0000.exynos-usbphy
10023c40.mfc-power-domain 12a30000.sysmmu
10023c60.g3d-power-domain 12e20000.sysmmu
10023c80.lcd0-power-domain 13620000.sysmmu
10023ca0.isp-power-domain 13630000.sysmmu
10023ce0.gps-power-domain 13800000.serial
10023d00.gps-alive-power-domain 13810000.serial
10030000.clock-controller 13820000.serial
10050000.mct 13830000.serial
10070000.rtc 139d0000.pwm
10440000.interrupt-controller 2020000.sysram
10490000.interrupt-controller 3810000.clock-controller
10502000.l2-cache-controller 3860000.pinctrl
106e0000.pinctrl alarmtimer
10a40000.sysmmu amba
11000000.pinctrl backlight
11400000.pinctrl cpufreq-dt
11840000.jpeg-codec exynos-drm
11a20000.sysmmu i2c-gpio-0
11a30000.sysmmu leds
11a40000.sysmmu opp_table0
11a50000.sysmmu pmu
11a60000.sysmmu reg-dummy
11e20000.sysmmu regulators
12260000.sysmmu regulators:regulator@0
12270000.sysmmu regulatory.0
122a0000.sysmmu serial8250
122b0000.sysmmu snd-soc-dummy
123b0000.sysmmu usb-hub
123c0000.sysmmu video-phy@10020710
12480000.hsotg
可以看到,在设备树中:
regulators {
compatible = "simple-bus";
#address-cells = <0x1>;
#size-cells = <0x0>;
regulator@0 {
compatible = "regulator-fixed";
reg = <0x0>;
regulator-name = "VMEM_VDD_2.8V";
regulator-min-microvolt = <0x2ab980>;
regulator-max-microvolt = <0x2ab980>;
linux,phandle = <0x19>;
phandle = <0x19>;
};
};
regulator@0虽然是regulator的child device node,而在/proc/device-tree(用于呈现device node的父子关系)中却看不到regulator@0对应的目录(其实是放在了regulator目录的下面),但是在/sys/bus/platform/devices/下却可以看得到(说明regulator@0这个device node也被注册为了platform_device)。
二、/sys/firmware
在/sys/firmware下也可以看到devicetree的导出信息:
[root@tiny4412 root]# cd /sys/firmware/
[root@tiny4412 firmware]# ls -F
devicetree/ fdt
其中fdt是一个二进制文件,其中是完整的设备树镜像,也就是bootloader最终传给kernel的设备树镜像文件,如果是在Andriod系统上,可以用adb pull将该文件导出到开发机上,然后使用dtc对导出的文件进行反编译:
adb pull /sys/firmware/fdt ./fdt

dtc -I dtb -O dts -o fdt.dts ./fdt
这样就可以用编辑器查看fdt.dts文件了。
此外,这个文件可以用hexdump查看:
[root@tiny4412 root]# hexdump -C /sys/firmware/fdt | head -n 100
00000000 d0 0d fe ed 00 00 dc 2d 00 00 00 48 00 00 a3 ec |.......-...H....|
00000010 00 00 00 28 00 00 00 11 00 00 00 10 00 00 00 00 |...(............|
00000020 00 00 08 ad 00 00 a3 a4 00 00 00 00 43 a7 f0 00 |............C...|
00000030 00 00 00 00 00 27 bb 09 00 00 00 00 00 00 00 00 |.....'..........|
00000040 00 00 00 00 00 00 00 00 00 00 00 01 00 00 00 00 |................|
00000050 00 00 00 03 00 00 00 04 00 00 00 00 00 00 00 01 |................|
00000060 00 00 00 03 00 00 00 04 00 00 00 0f 00 00 00 01 |................|
00000070 00 00 00 03 00 00 00 04 00 00 00 1b 00 00 00 01 |................|
00000080 00 00 00 03 00 00 00 38 00 00 00 2c 66 72 69 65 |.......8...,frie|
00000090 6e 64 6c 79 61 72 6d 2c 74 69 6e 79 34 34 31 32 |ndlyarm,tiny4412|
000000a0 00 73 61 6d 73 75 6e 67 2c 65 78 79 6e 6f 73 34 |.samsung,exynos4|
000000b0 34 31 32 00 73 61 6d 73 75 6e 67 2c 65 78 79 6e |412.samsung,exyn|
000000c0 6f 73 34 00 00 00 00 03 00 00 00 2f 00 00 00 37 |os4......../...7|
000000d0 46 72 69 65 6e 64 6c 79 41 52 4d 20 54 49 4e 59 |FriendlyARM TINY|
000000e0 34 34 31 32 20 62 6f 61 72 64 20 62 61 73 65 64 |4412 board based|
000000f0 20 6f 6e 20 45 78 79 6e 6f 73 34 34 31 32 00 00 | on Exynos4412..|
00000100 00 00 00 01 63 68 6f 73 65 6e 00 00 00 00 00 03 |....chosen......|
00000110 00 00 00 04 00 00 08 9c 43 cf ab 08 00 00 00 03 |........C.......|
00000120 00 00 00 04 00 00 08 89 43 a7 f0 00 00 00 00 03 |........C.......|
00000130 00 00 00 11 00 00 00 3d 2f 73 65 72 69 61 6c 40 |.......=/serial@|
可以看到开头的四个字节正好是d00dfeed,这个文件跟原始的设备树文件还是有些不同的,如chosen节点和memory节点。因为在用u-boot引导的时候,u-boot根据当前的环境对设备树镜像内容进行修改,下面是不同的地方:
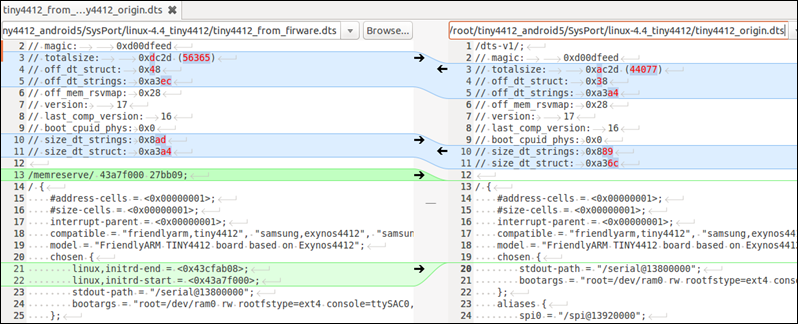
我dump的方法是将fdt的内容用上面的命令重定向到一个文件中(hexdump –C /sys/firmware/fdt > /mnt/fdt.txt),然后通过U盘拷贝到电脑上,复制其中的部分信息,利用winhex文件创建一个二进制文件。再用fdtdump工具(fdtdump dtb文件)将dtb的文件信息导出到一个文本文件中,最后再做比较。
在/sys/firmware/devicetree/base/下也是以device node的父子关系创建的文件和目录,其实会发现,/proc/device-tree是一个软连接,指向的就是/sys/firmware/devicetree/base/:
[root@tiny4412 root]# ls /proc/device-tree -l
lrwxrwxrwx 1 0 0 29 Jan 1 06:11 /proc/device-tree -> /sys/firmware/devicetree/base
[root@tiny4412 root]#
那么/sys/firmware/fdt以及/sys/firmware/devicetree是在什么地方创建的呢?
/sys/firmware/devicetree的创建:
start_kernel
---> rest_init
---> kernel_init
---> kernel_init_freeable
---> do_basic_setup
---> driver_init
---> of_core_init
在of_core_init函数中(drivers/of/base.c):
void __init of_core_init(void)

{

    struct device_node *np;

    /* Create the kset, and register existing nodes */

    mutex_lock(&of_mutex);

    of_kset = kset_create_and_add("devicetree", NULL, firmware_kobj);

    if (!of_kset) {

        mutex_unlock(&of_mutex);

        pr_err("devicetree: failed to register existing nodes\n");

        return;

    }

    for_each_of_allnodes(np)

        __of_attach_node_sysfs(np);

    mutex_unlock(&of_mutex);

    /* Symlink in /proc as required by userspace ABI */

    if (of_root)

        proc_symlink("device-tree", NULL, "/sys/firmware/devicetree/base");

}
/sys/firmware/fdt的创建(drivers/of/fdt.c):
#ifdef CONFIG_SYSFS

static ssize_t of_fdt_raw_read(struct file *filp, struct kobject *kobj,

                   struct bin_attribute *bin_attr,

                   char *buf, loff_t off, size_t count)

{

    memcpy(buf, initial_boot_params + off, count);

    return count;

}

static int __init of_fdt_raw_init(void)

{

    static struct bin_attribute of_fdt_raw_attr =

        __BIN_ATTR(fdt, S_IRUSR, of_fdt_raw_read, NULL, );

    if (!initial_boot_params)

        return ;

    if (of_fdt_crc32 != crc32_be(~, initial_boot_params,

                     fdt_totalsize(initial_boot_params))) {

        pr_warn("fdt: not creating '/sys/firmware/fdt': CRC check failed\n");

        return ;

    }

    of_fdt_raw_attr.size = fdt_totalsize(initial_boot_params);

    return sysfs_create_bin_file(firmware_kobj, &of_fdt_raw_attr);

}

late_initcall(of_fdt_raw_init);
三、测试
下面测试一下根据parent device node的compatible的不同,在populate的时候会把不同的device node注册为不同的device。
修改arch/arm/boot/dts/exynos4412-tiny4412.dts:
1: diff --git a/arch/arm/boot/dts/exynos4412-tiny4412.dts b/arch/arm/boot/dts/exynos4412-tiny4412.dts
2: index 579a507..ae29aa8 100644
3: --- a/arch/arm/boot/dts/exynos4412-tiny4412.dts
4: +++ b/arch/arm/boot/dts/exynos4412-tiny4412.dts
5: @@ -129,6 +129,30 @@
6: };
7: };
8: #endif
9: +
10: + demo_parent0 {
11: + compatible = "simple-bus";
12: +
13: + child0{
14: + compatible = "child0";
15: + };
16: +
17: + child1{
18: + compatible = "child1";
19: + };
20: + };
21: +
22: + demo_parent1 {
23: + compatible = "demo_parent1";
24: +
25: + child3{
26: + compatible = "child3";
27: + };
28: +
29: + child4{
30: + compatible = "child4";
31: + };
32: + };
33: };
34:
35: &rtc {
其中第11行表示demo_parent0对应的device node将来会在of_platform_populate时递归注册它的的child device node为platform_device。其实只要demo_parent1的compatible字段含有字符串"simple-bug"即可(如:compatible = "demo_parent1","simple-bus"),字符串"simple-bus"来自数组of_default_bus_match_table:
1:
2: const struct of_device_id of_default_bus_match_table[] = {
3: { .compatible = "simple-bus", },
4: { .compatible = "simple-mfd", },
5: #ifdef CONFIG_ARM_AMBA
6: { .compatible = "arm,amba-bus", },
7: #endif /* CONFIG_ARM_AMBA */
8: {} /* Empty terminated list */
9: };
重新编译设备树(make dtbs),启动内核可以发现:
在/proc/device-tree/下(仅表示device node之间的父子逻辑关系):
1: [root@tiny4412 root]# cd /proc/device-tree/
2: [root@tiny4412 base]# ls
3: ......
4: demo_parent0 ppmu_mfc_left@13660000
5: demo_parent1 ppmu_mfc_right@13670000
6: ......
7: [root@tiny4412 base]# ls -R demo_parent*
8: demo_parent0:
9: child0 child1 compatible name
10:
11: demo_parent0/child0:
12: compatible name
13:
14: demo_parent0/child1:
15: compatible name
16:
17: demo_parent1:
18: child3 child4 compatible name
19:
20: demo_parent1/child3:
21: compatible name
22:
23: demo_parent1/child4:
24: compatible name
在/sys/bus/platform/devices/下:
1: [root@tiny4412 root]# cd /sys/bus/platform/devices/
2: [root@tiny4412 devices]# ls
3: ......
4: 11000000.pinctrl demo_parent0
5: 11400000.pinctrl demo_parent0:child0
6: 11840000.jpeg-codec demo_parent0:child1
7: 11a20000.sysmmu demo_parent1
8: 11a30000.sysmmu exynos-drm
9: ......
可以看到demo_parent0、child0和child1都被注册为了platform_device,demo_parent1也被注册为了platform_device,而child3和child4却没有。child3和child4的具体被注册为什么设备需要由demo_parent1对应的platform_device的驱动程序决定。
未完待续……
基于tiny4412的Linux内核移植 -- 设备树的展开的更多相关文章
- 基于tiny4412的Linux内核移植 -- 设备树的展开【转】
转自:https://www.cnblogs.com/pengdonglin137/p/5248114.html#_lab2_3_1 阅读目录(Content) 作者信息 平台简介 摘要 正文 一.根 ...
- 基于tiny4412的Linux内核移植 -- MMA7660驱动移植(九-2)
作者信息 作者: 彭东林 邮箱:pengdonglin137@163.com QQ:405728433 平台简介 开发板:tiny4412ADK + S700 + 4GB Flash 要移植的内核版本 ...
- 基于tiny4412的Linux内核移植 -- MMA7660驱动移植(九)
作者信息 作者: 彭东林 邮箱:pengdonglin137@163.com QQ:405728433 平台简介 开发板:tiny4412ADK + S700 + 4GB Flash 要移植的内核版本 ...
- 基于tiny4412的Linux内核移植 -- PWM子系统学习(八)
作者信息 作者: 彭东林 邮箱:pengdonglin137@163.com QQ:405728433 平台简介 开发板:tiny4412ADK + S700 + 4GB Flash 要移植的内核版本 ...
- 基于tiny4412的Linux内核移植 -- SD卡驱动移植(五)
作者信息 作者: 彭东林 邮箱:pengdonglin137@163.com QQ:405728433 平台简介 开发板:tiny4412ADK + S700 + 4GB Flash 要移植的内核版本 ...
- 基于tiny4412的Linux内核移植(支持device tree)(三)
作者信息 作者: 彭东林 邮箱:pengdonglin137@163.com QQ:405728433 平台简介 开发板:tiny4412ADK + S700 + 4GB Flash 要移植的内核版本 ...
- 基于tiny4412的Linux内核移植(支持device tree)(二)
作者信息 作者: 彭东林 邮箱:pengdonglin137@163.com QQ:405728433 平台简介 开发板:tiny4412ADK + S700 + 4GB Flash 要移植的内核版本 ...
- 基于tiny4412的Linux内核移植(支持device tree)(一)
作者信息 作者: 彭东林 邮箱:pengdonglin137@163.com QQ:405728433 平台简介 开发板:tiny4412ADK + S700 + 4GB Flash 要移植的内核版本 ...
- 基于tiny4412的Linux内核移植 -- PWM子系统学习(七)
作者信息 作者: 彭东林 邮箱:pengdonglin137@163.com QQ:405728433 平台简介 开发板:tiny4412ADK + S700 + 4GB Flash 要移植的内核版本 ...
随机推荐
- shell 时间统计脚本
#!/bin/sh #Today=`date +%Y%m%d` YEAR=`echo $|cut -c -` MONTH=`echo $|cut -c -` DAY=`echo $|cut -c -` ...
- javascript坐标:event.x、event.clientX、event.offsetX、event.screenX 用法
clientX 设置或获取鼠标指针位置相对于窗口客户区域的 x 坐标,其中客户区域不包括窗口自身的控件和滚动条. clientY 设置或获取鼠标指针位置相对于窗口客户区域的 y 坐标,其中客户区域不包 ...
- VS2015 Apache Cordova第一个Android和IOS应用
前言 本人个人博客原文链接地址为http://aehyok.com/Blog/Detail/75.html. 个人网站地址:aehyok.com QQ 技术群号:206058845,验证码为:aehy ...
- emoji表情引发的JNI崩溃
今天突然接到客服那边的反馈说,有玩家反馈进游戏后不久就崩溃了,我先是怀疑网络问题,因为一连接聊天成功后就挂了.之后用logcat抓日志,发现挂在jni那里了 JNI DETECTED ERROR IN ...
- LPC43xx SGPIO DMA and Interrupts
The SGPIO output pins SGPIO14 and SGPIO15 can trigger a GPDMA request SGPIO pins SGPIO14 and SGPIO15 ...
- AsyncTask实现多任务多线程断点续传下载
这篇博客是AsyncTask下载系列的最后一篇文章,前面写了关于断点续传的和多线程下载的博客,这篇是在前两篇的基础上面实现的,有兴趣的可以去看下. 一.AsyncTask实现断点续传 二.AsyncT ...
- redis 学习指南
一.介绍 Redis是一个开源的使用ANSI C语言编写.支持网络.可基于内存亦可持久化的日志型.一个高性能的key-value数据库.并提供多种语言的API.说到Key-Value数据库NoSQL数 ...
- nginx 重写 rewrite 基础及实例
nginx rewrite 正则表达式匹配 大小写匹配 ~ 为区分大小写匹配 ~* 为不区分大小写匹配 !~和!~*分别为区分大小写不匹配及不区分大小写不匹配 文件及目录匹配 -f和!-f用来判断是否 ...
- JS 获取自定义标签
<abc-aaa xwe='sdf'>AAAAAAAAAAAAAAAAAAAAAA</abc-aaa> alert($("abc-aaa").attr(&q ...
- 解决微信浏览器无法使用reload()刷新页面
场景是这样子的,页面在初始化时有一个ajax请求,在页面上有一个按钮,点击的时候执行window.location.reload(),正常情况reload()后页面依然会向后台发出请求,但在安卓的微信 ...