【spring】【spring mvc】【spring boot】获取spring cloud项目中所有spring mvc的请求资源
实现的方法:
1.在父级项目中 或者 每个微服务都引用的项目中添加实体类Resource
2.在父级项目中 或者 每个为服务都引用的项目中写一个工具类,作用是用来获取请求资源
3.在每一个微服务的启动类添加注解@RestController ,并且写一个请求方法调用 工具类的请求资源的方法
4.将获取到的JSON字符串 保存在文件中
5.最后,在需要存储这些信息到数据库中的对应微服务 提供一个请求方法,参数就传递这一个一个的JSON字符串,而请求方法做的事情就是解析JSON,并批量保存到对应数据表中
1.先提供一个状态这些结果的实体Resource.java
package com.pisen.cloud.luna.core.utils.beans;

public class Resource {

    public static final Integer GET_RESOURCE = 1;

    public static final Integer OTHER_RESOURCE = 2;

    public static final Integer ENABLE = 1;//启用

    public static final Integer DISENABLE = 0;//禁用

    private String path;//资源URL

    private String name;//资源名

    private String msName;//资源所属微服务

    private Integer type;//资源类型 1代表数据资源 2代表功能资源

    private Integer enable;//是否启用 0 禁用 1 启用

    private String user;//资源被使用对象

    private String remark;//资源备注

    public String getPath() {

        return path;

    }

    public void setPath(String path) {

        this.path = path;

    }

    public String getName() {

        return name;

    }

    public void setName(String name) {

        this.name = name;

    }

    public String getMsName() {

        return msName;

    }

    public void setMsName(String msName) {

        this.msName = msName;

    }

    public Integer getType() {

        return type;

    }

    public void setType(Integer type) {

        this.type = type;

    }

    public String getUser() {

        return user;

    }

    public void setUser(String user) {

        this.user = user;

    }

    public String getRemark() {

        return remark;

    }

    public void setRemark(String remark) {

        this.remark = remark;

    }

    public Resource(String path, String name, String msName, Integer type, String user, String remark,Integer enable) {

        this.path = path;

        this.name = name;

        this.msName = msName;

        this.type = type;

        this.user = user;

        this.remark = remark;

        this.enable = enable;

    }

}
2.同样在 所有微服务都能引用到的 地方 提供一个工具类MappingResourceUtil.java
package com.pisen.cloud.luna.core.utils;

import com.pisen.cloud.luna.core.utils.beans.Resource;

import com.pisen.cloud.luna.core.utils.beans.ResourceConfig;

import org.apache.commons.lang3.StringUtils;

import org.springframework.beans.factory.BeanFactoryUtils;

import org.springframework.web.context.WebApplicationContext;

import org.springframework.web.context.support.WebApplicationContextUtils;

import org.springframework.web.method.HandlerMethod;

import org.springframework.web.servlet.HandlerMapping;

import org.springframework.web.servlet.mvc.condition.PatternsRequestCondition;

import org.springframework.web.servlet.mvc.condition.RequestMethodsRequestCondition;

import org.springframework.web.servlet.mvc.method.RequestMappingInfo;

import org.springframework.web.servlet.mvc.method.annotation.RequestMappingHandlerMapping;

import javax.servlet.ServletContext;

import javax.servlet.http.HttpServletRequest;

import java.util.ArrayList;

import java.util.List;

import java.util.Map;

import java.util.stream.Collectors;

public class MappingResourceUtil {

    /**

     * 获取本服务下 所有RequestMapping标记的资源信息

     * @param request

     * @param msName    需要传入ms-name 微服务别名

     * @return

     */

    public static List<Resource> getMappingList(HttpServletRequest request,String msName){

        ServletContext servletContext = request.getSession().getServletContext();

        if (servletContext == null)

        {

            return null;

        }

        WebApplicationContext appContext = WebApplicationContextUtils.getWebApplicationContext(servletContext);

        //请求url和处理方法的映射

        List<Resource> requestToMethodItemList = new ArrayList<Resource>();

        //获取所有的RequestMapping

        Map<String, HandlerMapping> allRequestMappings = BeanFactoryUtils.beansOfTypeIncludingAncestors(appContext,

                HandlerMapping.class, true, false);

        for (HandlerMapping handlerMapping : allRequestMappings.values())

        {

            //本项目只需要RequestMappingHandlerMapping中的URL映射

            if (handlerMapping instanceof RequestMappingHandlerMapping)

            {

                RequestMappingHandlerMapping requestMappingHandlerMapping = (RequestMappingHandlerMapping) handlerMapping;

                Map<RequestMappingInfo, HandlerMethod> handlerMethods = requestMappingHandlerMapping.getHandlerMethods();

                for (Map.Entry<RequestMappingInfo, HandlerMethod> requestMappingInfoHandlerMethodEntry : handlerMethods.entrySet())

                {

                    RequestMappingInfo requestMappingInfo = requestMappingInfoHandlerMethodEntry.getKey();

                    HandlerMethod mappingInfoValue = requestMappingInfoHandlerMethodEntry.getValue();

                    PatternsRequestCondition patternsCondition = requestMappingInfo.getPatternsCondition();

                    String requestUrl = patternsCondition.getPatterns() != null && patternsCondition.getPatterns().size()>0 ?

                            patternsCondition.getPatterns().stream().collect(Collectors.toList()).get(0).toString() : null;

                    RequestMethodsRequestCondition methodCondition = requestMappingInfo.getMethodsCondition();

                    String requestType = methodCondition.getMethods() != null && methodCondition.getMethods().size()>0 ?

                            methodCondition.getMethods().stream().collect(Collectors.toList()).get(0).toString() : null;

                    if (requestType == null){

                        continue;

                    }

                    String controllerName = mappingInfoValue.getBeanType().toString();

                    String requestMethodName = mappingInfoValue.getMethod().getName();

                    Class<?>[] methodParamTypes = mappingInfoValue.getMethod().getParameterTypes();

                    String name = getResourceName(requestType,requestMethodName);

                    Integer type = getType(requestType);

                    String path = msName+":"+requestUrl;

                    String user = getUser(requestUrl);

                    Integer enable = Resource.ENABLE;

                    Resource resource = new Resource(path,name,msName,type,user,null,enable);

                    requestToMethodItemList.add(resource);

                }

                break;

            }

        }

        return requestToMethodItemList;

    }

    /**

     * GET 代表数据资源 1

     * 其他 代表功能资源 2

     * @param type

     * @return

     */

    public static Integer getType(String type){

        return "GET".equals(type) ? Resource.GET_RESOURCE : Resource.OTHER_RESOURCE;

    }

    /**

     * 按照请求地址和请求方法 获取资源名称

     * @param requestType

     * @param requestMethodName

     * @return

     */

    public static String getResourceName(String requestType,String requestMethodName){

        requestMethodName = requestMethodName.toLowerCase();

        if ("GET".equals(requestType)){

            return ResourceConfig.GET+requestMethodName;

        }else{

            if (requestMethodName.contains("page")){

                return ResourceConfig.PAGE+requestMethodName;

            }

            if(requestMethodName.contains("list")){

                return ResourceConfig.GET+requestMethodName+ResourceConfig.LIST;

            }

            if (requestMethodName.contains("insert")){

                return ResourceConfig.INSERT+requestMethodName;

            }

            if (requestMethodName.contains("delete")){

                return ResourceConfig.DELETE+requestMethodName;

            }

            if (requestMethodName.contains("update")){

                return ResourceConfig.UPDATE+requestMethodName;

            }

            if (requestMethodName.contains("add")){

                return ResourceConfig.ADD+requestMethodName;

            }

            if (requestMethodName.contains("enable")){

                return ResourceConfig.ENABLE+requestMethodName;

            }

            if (requestMethodName.contains("init")){

                return ResourceConfig.INIT+requestMethodName;

            }

            if (requestMethodName.contains("verify")){

                return ResourceConfig.VERIFY+requestMethodName;

            }

            if (requestMethodName.contains("find")){

                return ResourceConfig.FIND+requestMethodName;

            }

            return requestMethodName;

        }

    }

    /**

     * 获取资源使用者身份

     * @param requestUrl

     * @return

     */

    public static String getUser(String requestUrl){

        if (StringUtils.isNotBlank(requestUrl)){

            String[] pathArr = requestUrl.split("/");

            if (pathArr.length > 0 ){

                if ("ten".equals(pathArr[1])){

                    return ResourceConfig.USER_TEN;

                }

                if ("admin".equals(pathArr[1])) {

                    return ResourceConfig.USER_ADMIN;

                }

                if ("member".equals(pathArr[1])){

                    return ResourceConfig.USER_MEMBER;

                }

                if ("free".equals(pathArr[1])){

                    return ResourceConfig.USER_FREE;

                }

                if ("dealer".equals(pathArr[1])){

                    return ResourceConfig.USER_DEALER;

                }

            }

        }

        return "未知使用者";

    }

}
以及一个配置类:ResourceConfig.java
package com.pisen.cloud.luna.core.utils.beans;

public class ResourceConfig {

    //资源名说明关键字

   public final static String GET = "获取";

    public final static String INIT = "初始化操作";

    public final static String VERIFY = "校验";

    public final static String DELETE = "删除操作";

    public final static String PAGE = "分页查询";

    public final static String INSERT = "插入操作";

    public final static String FIND = "查找";

    public final static String UPDATE = "更新操作";

    public final static String ENABLE = "启用判断";

    public final static String ADD = "添加操作";

    public final static String LIST = "集合";

    //各微服务网关别名

    public final static String MS_ACCOUNT = "ms-account";

    public final static String MS_ADMIN = "ms-admin";

    public final static String MS_DEALER = "ms-dealer";

    public final static String MS_EVENT_CENTER = "ms-event-center";

    public final static String MS_GOODS = "ms-goods";

    public final static String MS_INTEGRAL = "ms-integral";

    public final static String MS_MEMBER = "ms-member";

    public final static String MS_CODE = "ms-code";

    public final static String MS_TEN = "ms-ten";

    public final static String MS_ZHONGQI = "ms-zhongqi";

    public final static String MS_PAPER = "ms-paper";

    public final static String MS_TASK_LIST = "ms-task-list";

    //各使用者角色

   public final static String USER_ADMIN = "管理员";

   public final static String USER_TEN = "租户";

   public final static String USER_DEALER = "经销商";

   public final static String USER_FREE = "所有人";

   public final static String USER_MEMBER = "会员";

}
3.然后就可以在每一个微服务的启动类上加注解,加下面这段代码,然后启动这个微服务,访问就能拿到这个微服务下的所有请求资源 为一个JSON字符串了
举个例子,我现在获取这个微服务的所有请求资源:【红色部分就是 任意粘贴到每一个启动类的代码】【紫色部分就是需要更改的每一个不同微服务的不同服务名】
package pisen.cloud.luna.ms.account;

import com.alibaba.fastjson.JSON;

import com.pisen.cloud.luna.core.result.AjaxResult;

import com.pisen.cloud.luna.core.utils.MappingResourceUtil;

import com.pisen.cloud.luna.core.utils.beans.Resource;

import org.springframework.boot.SpringApplication;

import org.springframework.boot.autoconfigure.SpringBootApplication;

import org.springframework.cloud.client.discovery.EnableDiscoveryClient;

import org.springframework.cloud.netflix.feign.EnableFeignClients;

import org.springframework.transaction.annotation.EnableTransactionManagement;

import org.springframework.web.bind.annotation.RequestMapping;

import org.springframework.web.bind.annotation.RestController;

import javax.servlet.http.HttpServletRequest;

import java.util.List;

@EnableDiscoveryClient

@SpringBootApplication

@EnableFeignClients

@EnableTransactionManagement // 启注解事务管理,等同于xml配置方式的

@RestController

public class PisenLunaMSAccountApp {

    public static void main(String[] args) {

//        String str = MappingResourceUtil.getMappingList(PisenLunaMSAccountApp.class);

        SpringApplication.run(PisenLunaMSAccountApp.class, args);

    }

    @RequestMapping("/test/index")

    public AjaxResult<String> getAccout(HttpServletRequest request){

        AjaxResult<String> result = new AjaxResult<>();

        List<Resource> list = MappingResourceUtil.getMappingList(request,"ms-account");

        String account = JSON.toJSONString(list);

        result.initTrue(account);

        return result;

    }

}
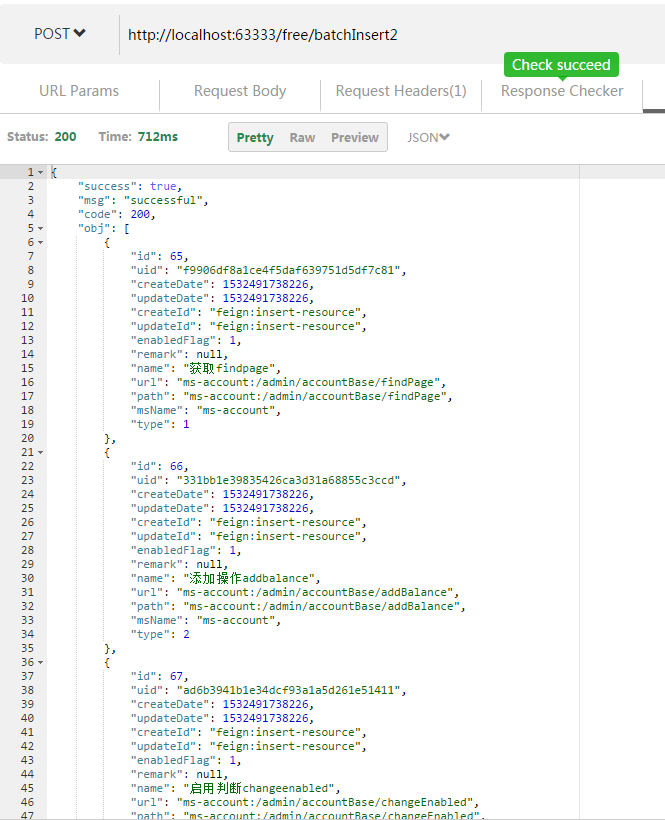
然后启动本微服务后,postman请求即可:

4.将请求到的 JSON字符串,保存下来一会用
使用postman请求下来的字符串 如上 会有\
保存下来如下:

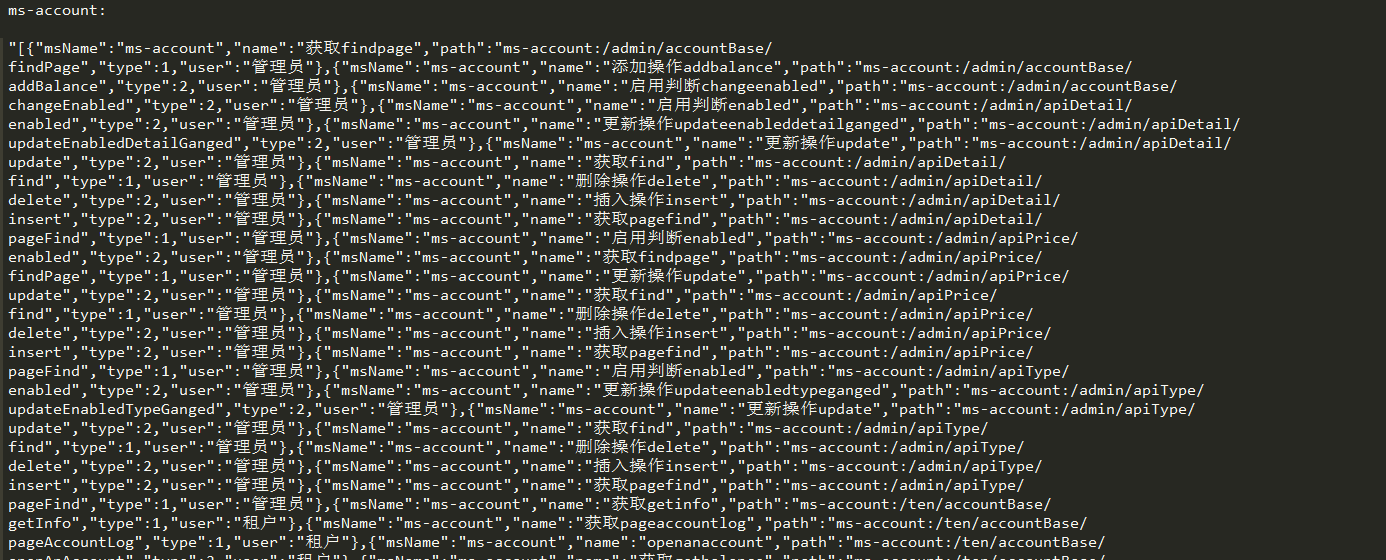
记得最后在编辑器中将\全部替换掉 否则 JSON转化会出问题
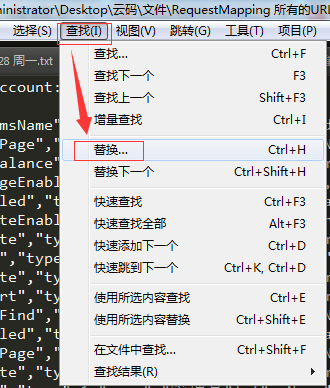
在sublime text中

将所有的\"替换成 "即可

替换完成 内容如下:

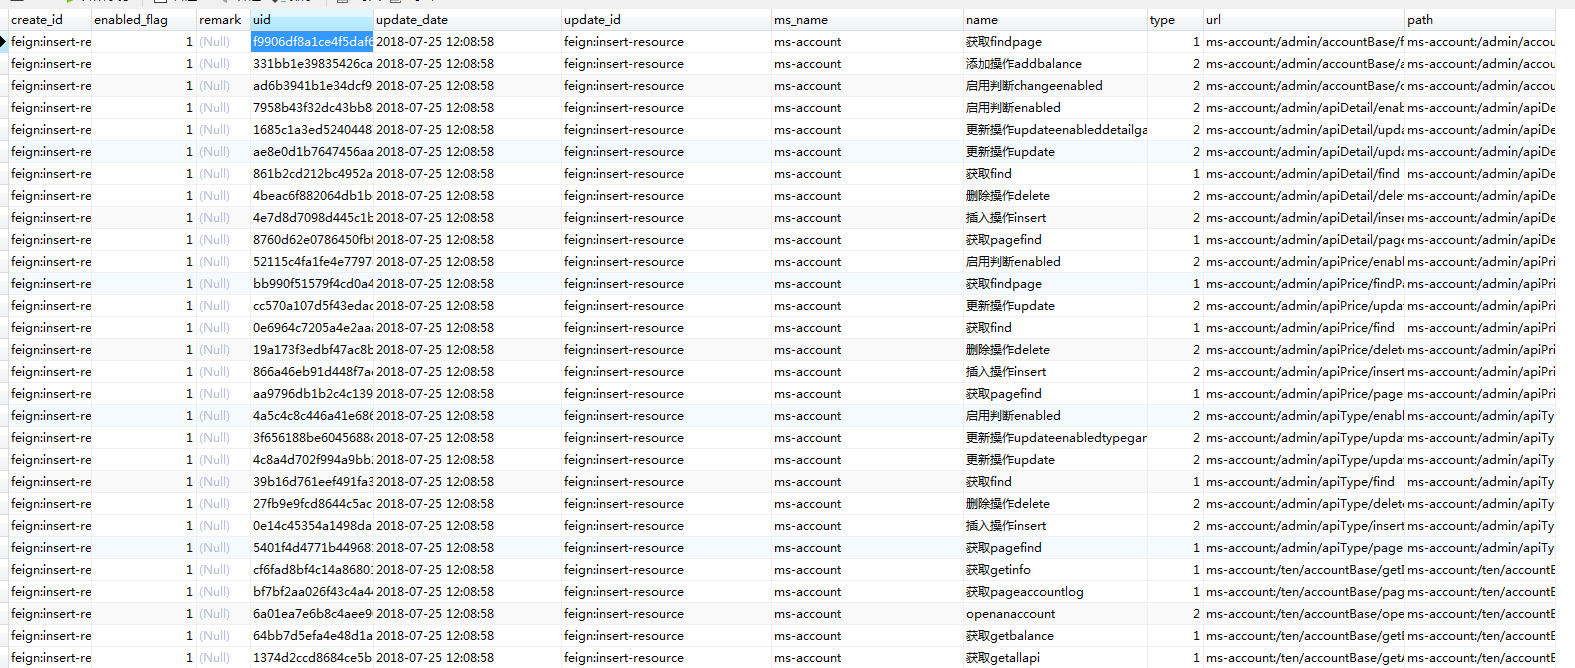
5.最后,在想要将这些JSON字符串转化为数据库数据的微服务中,提供一个批量插入的方法,然后将JSON字符串当作参数传入即可[controller中的请求方法]
@Override

    @RequestMapping("batchInsert2")

    public AjaxResult<List<Resource>> batchInsert2(@RequestBody String  json) {

        AdminUser adminUser = AdminUser.createFeignUser("insert-resource");

        String adminUid = adminUser.getUid();

        AjaxResult<List<Resource>> res = new AjaxResult<>();

        json = JSONObject.parseObject(json).getString("json");

        List<Resource> list = JSONArray.parseArray(json,Resource.class);

        for (Resource resource : list) {

            resource.setEnabledFlag(1);

            resource.setUid(LunaIDUtil.uid());

            resource.setCreateDate(new Date());

            resource.setUpdateDate(new Date());

            resource.setUpdateId(adminUid);

            resource.setCreateId(adminUid);

            resource.setUrl(resource.getPath());

        }

        sysUserService.batchInsert(list);

        res.initTrue(list);

        return res;

    }
Resource如下:
package com.pisen.cloud.luna.ms.tenement.base.domain;

import javax.persistence.*;

import java.util.Date;

@Entity

@Table(uniqueConstraints = {

        @UniqueConstraint(columnNames = "uid")

})

public class Resource {

    @Id

    @GeneratedValue(strategy = GenerationType.IDENTITY)

    private Long id;// 主键 自增

    @Column(nullable = false)

    private String uid; //业务主键

    @Column(nullable = false, updatable = false)

    private Date createDate = new Date();// 创建时间

    @Column(nullable = false)

    private Date updateDate = new Date();// 修改时间

    @Column(nullable = false)

    private String createId;// 创建人id

    @Column(nullable = false)

    private String updateId;// 修改人id

    private Integer enabledFlag;// 是否启用 1启用 0禁用

    private String remark;// 备注

    private String name;//资源名

    private String url;//资源URL

    private String path;// 资源URL

    private String msName;//资源所属微服务

    private Integer type;//资源类型 1代表数据资源 2代表功能资源

    public Long getId() {

        return id;

    }

    public void setId(Long id) {

        this.id = id;

    }

    public String getUid() {

        return uid;

    }

    public String getPath() {

        return path;

    }

    public void setPath(String path) {

        this.path = path;

    }

    public void setUid(String uid) {

        this.uid = uid;

    }

    public Date getCreateDate() {

        return createDate;

    }

    public void setCreateDate(Date createDate) {

        this.createDate = createDate;

    }

    public Date getUpdateDate() {

        return updateDate;

    }

    public void setUpdateDate(Date updateDate) {

        this.updateDate = updateDate;

    }

    public String getCreateId() {

        return createId;

    }

    public void setCreateId(String createId) {

        this.createId = createId;

    }

    public String getUpdateId() {

        return updateId;

    }

    public void setUpdateId(String updateId) {

        this.updateId = updateId;

    }

    public Integer getEnabledFlag() {

        return enabledFlag;

    }

    public void setEnabledFlag(Integer enabledFlag) {

        this.enabledFlag = enabledFlag;

    }

    public String getRemark() {

        return remark;

    }

    public void setRemark(String remark) {

        this.remark = remark;

    }

    public String getName() {

        return name;

    }

    public void setName(String name) {

        this.name = name;

    }

    public String getUrl() {

        return url;

    }

    public void setUrl(String url) {

        this.url = url;

    }

    public String getMsName() {

        return msName;

    }

    public void setMsName(String msName) {

        this.msName = msName;

    }

    public Integer getType() {

        return type;

    }

    public void setType(Integer type) {

        this.type = type;

    }

}
批量插入方法 使用JPA的save()即可,使用mybatis的批量插入也可以

使用postman请求地址如下:【注意请求的格式,post请求,参数格式也需要注意】


完成!!!!!!!
===========================================================================================
收集到另外一种方法,更简单:
直接在controller中加上一个方法,请求即可:
@RequestMapping(value="getUrlMapping")

    public Object getUrlMapping(HttpServletRequest request) {

        WebApplicationContext wc = getWebApplicationContext(request.getSession().getServletContext());

        RequestMappingHandlerMapping rmhp = wc.getBean(RequestMappingHandlerMapping.class);

        Map<RequestMappingInfo, HandlerMethod> map = rmhp.getHandlerMethods();

        for (Iterator<RequestMappingInfo> iterator = map.keySet().iterator(); iterator

                .hasNext();) {

            RequestMappingInfo info = iterator.next();

            System.out.println(info.getConsumesCondition());

            System.out.println(info.getCustomCondition());

            System.out.println(info.getHeadersCondition());

            System.out.println(info.getMethodsCondition());

            System.out.println(info.getParamsCondition());

            System.out.println(info.getPatternsCondition());

            System.out.println(info.getProducesCondition());

            System.out.println("===");

            HandlerMethod method = map.get(info);

            System.out.println(method.getMethod().getName() + "--");

            System.out.println();

        }

        return null;

    }
【spring】【spring mvc】【spring boot】获取spring cloud项目中所有spring mvc的请求资源的更多相关文章
- Spring Cloud项目中通过Feign进行内部服务调用发生401\407错误无返回信息的问题
问题描述 最近在使用Spring Cloud改造现有服务的工作中,在内部服务的调用方式上选择了Feign组件,由于服务与服务之间有权限控制,发现通过Feign来进行调用时如果发生了401.407错误时 ...
- 【spring】在spring cloud项目中使用@ControllerAdvice做自定义异常拦截,无效 解决原因
之前在spring boot服务中使用@ControllerAdvice做自定义异常拦截,完全没有问题!!! GitHub源码地址: 但是现在在spring cloud中使用@ControllerAd ...
- 如何在maven项目中使用spring
今天开始在maven项目下加入spring. 边学习边截图. 在这个过程中我新建了一个hellospring的项目.于是乎从这个项目出发开始研究如何在maven项目中使用spring.鉴于网上的学习资 ...
- web项目中 集合Spring&使用junit4测试Spring
web项目中 集合Spring 问题: 如果将 ApplicationContext applicationContext = new ClassPathXmlApplicationContext(& ...
- 06_在web项目中集成Spring
在web项目中集成Spring 一.使用Servlet进行集成测试 1.直接在Servlet 加载Spring 配置文件 ApplicationContext applicationContext = ...
- 最近项目中使用Spring data jpa 踩过的坑
最近在做一个有关OA项目中使用spring data JPA 操作数据库,结果遇到了补个不可思议的麻烦.困惑了好久. 首先看一下问题吧,这就是当时测试“设置角色时,需要首先删除该用户已经拥有的角色时” ...
- 如何在web项目中配置Spring的Ioc容器
在web项目中配置Spring的Ioc容器其实就是创建web应用的上下文(WebApplicationContext) 自定义要使用的IoC容器而不使用默认的XmlApplicationContext ...
- 如何在一个项目中同时包含mvc建站、webapi接口
项目做得多了..就会发现有些小项目不想建太多的项目..现在思明在这里和大家分享一下如果再一个项目中同时包含mvc建站以及实现webapi接口 1.新建项目 aps.net web 应用程序 2 新建模 ...
- 【IDEA】项目中引入Spring MVC
一.原文说明: IntelliJ idea创建Spring MVC的Maven项目 - winner_0715 - 博客园 https://images2015.cnblogs.com/blog/82 ...
随机推荐
- 【数位dp入门】【HDU2089】62
为了我的点歪的技能树…… 所以开始补一些sb的东西…… #include<bits/stdc++.h> typedef long long ll; using namespace std; ...
- 如何在本地用vs调试微信接口
这段时间在研究微信,看了网上很多都是把项目发布之后在服务器上调试,可以我想可以直接在vs上面设置断点调试 刚开始才用 http://www.cnblogs.com/hanzhaoxin/p/45186 ...
- [Deep dig] ViewController初始化过程调查
代码:https://github.com/xufeng79x/ViewControllerLife 1.简介: 介绍xib方式.storyborad方式以及code方式下ViewController ...
- 3.Python3标准库--数据结构
(一)enum:枚举类型 import enum ''' enum模块定义了一个提供迭代和比较功能的枚举类型.可以用这个为值创建明确定义的符号,而不是使用字面量整数或字符串 ''' 1.创建枚举 im ...
- Memcached内存缓存技术
Memcached是什么,有什么作用? Memcached是一个开源的.高性能的内存缓存软件,从名称上看Mem就是内存的意思,而Cache就是缓存的意思. Memcached通过在事先规划好的内存空间 ...
- Leetcode 之Simplify Path(36)
主要看//之间的内容:如果是仍是/,或者是.,则忽略:如果是..,则弹出:否则压入堆栈.最后根据堆栈的内容进行输出. string simplifyPath(string const& pat ...
- 4:django url
一个干净的,优雅的URL 方案是一个高质量Web 应用程序的重要细节. 这节我们来看看django是如何做到干净优雅的url的 1:Django如何处理一个请求 通过ROOT_URLCONF决定根UR ...
- HDU 3669 Cross the Wall(斜率DP+预处理)
题目链接:http://acm.hdu.edu.cn/showproblem.php?pid=3669 题目大意:有n(n<=50000)个矩形,每个矩形都有高和宽,你可以在墙上最多挖k个洞使得 ...
- Delphi使程序的窗口出现在最前面并激活
procedure setAppFront(); //使程序的窗口出现在最前面并激活 var pt, OldPt, NewPt: TPoint; begin //判断Application是否最小化, ...
- 简单的WSGI server
参考:https://ruslanspivak.com/lsbaws-part1/ 简单的WSGI server server程序 webserver.py # Tested with Python ...
