Android中滑屏初探 ---- scrollTo 以及 scrollBy方法使用说明
今天给大家介绍下Android中滑屏功能的一个基本实现过程以及原理初探,最后给大家重点讲解View视图中scrollTo 与
scrollBy这两个函数的区别 。
首先 ,我们必须明白在Android View视图是没有边界的,Canvas是没有边界的,只不过我们通过绘制特定的View时对
Canvas对象进行了一定的操作,例如 : translate(平移)、clipRect(剪切)等,以便达到我们的对该Canvas对象绘制的要求 ,
我们可以将这种无边界的视图称为“视图坐标”-----它不受物理屏幕限制。通常我们所理解的一个Layout布局文件只是该视
图的显示区域,超过了这个显示区域将不能显示到父视图的区域中 ,对应的,我们可以将这种有边界的视图称为“布局坐标”
------ 父视图给子视图分配的布局(layout)大小。而且, 一个视图的在屏幕的起始坐标位于视图坐标起始处,如下图所示。
这么来说吧 ,世界本是无边无界的,可是我们的眼睛我们的心约束了我们所看到的“世界” 。
如下所示:
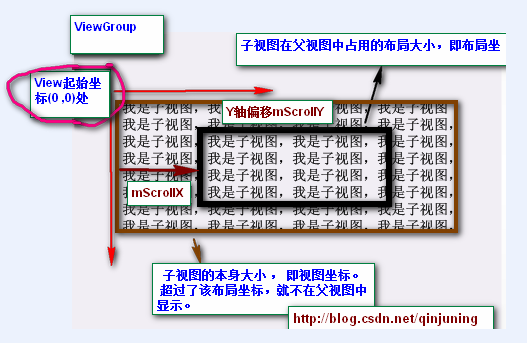
黑色框框表示该子视图的布局坐标, 褐色框框表示该子视图的视图坐标--该坐标是无限的,超过了父视图给子视图
规定的区域后,不再显示该超出内容。
那么下面的问题就是:如何将我们的视图的任意坐标能显示到该视图的中心坐标上呢? 由于该布局位置是只能显示特定的
一块视图内容 ,因此我们需要通过scrollTo()或者scrollBy()方法将我们期望的视图“滚动”至布局坐标上。
在View.java中提供了了如下两个变量以及相应的属性方法去读取滚动值 ,如下: View.java类中
- /**
- * The offset, in pixels, by which the content of this view is scrolled
- * horizontally.
- * {@hide}
- */
- protected int mScrollX; //该视图内容相当于视图起始坐标的偏移量 , X轴 方向
- /**
- * The offset, in pixels, by which the content of this view is scrolled
- * vertically.
- * {@hide}
- */
- protected int mScrollY; //该视图内容相当于视图起始坐标的偏移量 , Y轴方向
- /**
- * Return the scrolled left position of this view. This is the left edge of
- * the displayed part of your view. You do not need to draw any pixels
- * farther left, since those are outside of the frame of your view on
- * screen.
- *
- * @return The left edge of the displayed part of your view, in pixels.
- */
- public final int getScrollX() {
- return mScrollX;
- }
- /**
- * Return the scrolled top position of this view. This is the top edge of
- * the displayed part of your view. You do not need to draw any pixels above
- * it, since those are outside of the frame of your view on screen.
- *
- * @return The top edge of the displayed part of your view, in pixels.
- */
- public final int getScrollY() {
- return mScrollY;
- }
/**

	 * The offset, in pixels, by which the content of this view is scrolled

	 * horizontally.

	 * {@hide}

	 */

	protected int mScrollX;   //该视图内容相当于视图起始坐标的偏移量   , X轴 方向

	/**

	 * The offset, in pixels, by which the content of this view is scrolled

	 * vertically.

	 * {@hide}

	 */

	protected int mScrollY;   //该视图内容相当于视图起始坐标的偏移量   , Y轴方向

	/**

     * Return the scrolled left position of this view. This is the left edge of

     * the displayed part of your view. You do not need to draw any pixels

     * farther left, since those are outside of the frame of your view on

     * screen.

     *

     * @return The left edge of the displayed part of your view, in pixels.

     */

    public final int getScrollX() {

        return mScrollX;

    }

    /**

     * Return the scrolled top position of this view. This is the top edge of

     * the displayed part of your view. You do not need to draw any pixels above

     * it, since those are outside of the frame of your view on screen.

     *

     * @return The top edge of the displayed part of your view, in pixels.

     */

    public final int getScrollY() {

        return mScrollY;

    }
注意,所谓的“by which the content of this view is scrolled”表示该偏移量只针对于该View中onDraw()方法里的
具体内容实现,而不针对绘制背景图片等 。具体原因可参考<Android中View绘制流程以及invalidate()等相关方法分析>
提示:下文中提到的当前视图内容是在绘制在布局坐标处的内容。
public void scrollTo(int x, int y)
说明:在当前视图内容偏移至(x , y)坐标处,即显示(可视)区域位于(x , y)坐标处。
方法原型为: View.java类中
- /**
- * Set the scrolled position of your view. This will cause a call to
- * {@link #onScrollChanged(int, int, int, int)} and the view will be
- * invalidated.
- * @param x the x position to scroll to
- * @param y the y position to scroll to
- */
- public void scrollTo(int x, int y) {
- //偏移位置发生了改变
- if (mScrollX != x || mScrollY != y) {
- int oldX = mScrollX;
- int oldY = mScrollY;
- mScrollX = x; //赋新值,保存当前便宜量
- mScrollY = y;
- //回调onScrollChanged方法
- onScrollChanged(mScrollX, mScrollY, oldX, oldY);
- if (!awakenScrollBars()) {
- invalidate(); //一般都引起重绘
- }
- }
- }
    /**

     * Set the scrolled position of your view. This will cause a call to

     * {@link #onScrollChanged(int, int, int, int)} and the view will be

     * invalidated.

     * @param x the x position to scroll to

     * @param y the y position to scroll to

     */

    public void scrollTo(int x, int y) {

    	//偏移位置发生了改变

        if (mScrollX != x || mScrollY != y) {

            int oldX = mScrollX;

            int oldY = mScrollY;

            mScrollX = x;  //赋新值,保存当前便宜量

            mScrollY = y;

            //回调onScrollChanged方法

            onScrollChanged(mScrollX, mScrollY, oldX, oldY);

            if (!awakenScrollBars()) {

                invalidate();  //一般都引起重绘

            }

        }

    }
public void scrollBy(int x, int y)
说明:在当前视图内容继续偏移(x , y)个单位,显示(可视)区域也跟着偏移(x,y)个单位。
方法原型为: View.java类中
- /**
- * Move the scrolled position of your view. This will cause a call to
- * {@link #onScrollChanged(int, int, int, int)} and the view will be
- * invalidated.
- * @param x the amount of pixels to scroll by horizontally
- * @param y the amount of pixels to scroll by vertically
- */
- // 看出原因了吧 。。 mScrollX 与 mScrollY 代表我们当前偏移的位置 , 在当前位置继续偏移(x ,y)个单位
- public void scrollBy(int x, int y) {
- scrollTo(mScrollX + x, mScrollY + y);
- }
  /**

     * Move the scrolled position of your view. This will cause a call to

     * {@link #onScrollChanged(int, int, int, int)} and the view will be

     * invalidated.

     * @param x the amount of pixels to scroll by horizontally

     * @param y the amount of pixels to scroll by vertically

     */

    // 看出原因了吧 。。 mScrollX 与 mScrollY 代表我们当前偏移的位置 , 在当前位置继续偏移(x ,y)个单位

    public void scrollBy(int x, int y) {

        scrollTo(mScrollX + x, mScrollY + y);

    }
第一个小Demo非常简单 ,大家重点理解与掌握scrollTo() 与 scrollBy()函数的用法和区别。
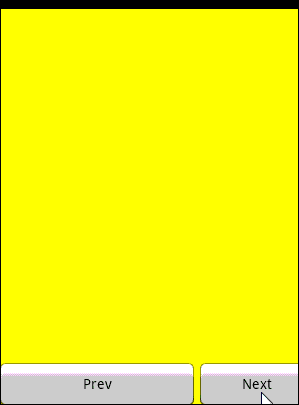
第二个小Demo则有了Launcher的模样,能够左右切换屏幕 。实现功能如下: 采用了一个自定义ViewGroup,该ViewGroup
对象包含了3个LinearLayout子视图,并且以一定的布局坐标(由layout()方法指定)显示在ViewGroup上。 接下来,即可调用该
ViewGroup对象的scrollTo或者scrollBy()方法切换指定视图内容了,即切换屏幕。 呵呵 ,挺好玩的吧 。
如果对View绘制流程不懂的,可以参考我的这篇博客<Android中View绘制流程以及invalidate()等相关方法分析> 。
截图如下:
自定义ViewGroup如下:
- //自定义ViewGroup , 包含了三个LinearLayout控件,存放在不同的布局位置,通过scrollBy或者scrollTo方法切换
- public class MultiViewGroup extends ViewGroup {
- private Context mContext;
- private static String TAG = "MultiViewGroup";
- public MultiViewGroup(Context context) {
- super(context);
- mContext = context;
- init();
- }
- public MultiViewGroup(Context context, AttributeSet attrs) {
- super(context, attrs);
- mContext = context;
- init();
- }
- private void init() {
- // 初始化3个 LinearLayout控件
- LinearLayout oneLL = new LinearLayout(mContext);
- oneLL.setBackgroundColor(Color.RED);
- addView(oneLL);
- LinearLayout twoLL = new LinearLayout(mContext);
- twoLL.setBackgroundColor(Color.YELLOW);
- addView(twoLL);
- LinearLayout threeLL = new LinearLayout(mContext);
- threeLL.setBackgroundColor(Color.BLUE);
- addView(threeLL);
- }
- // measure过程
- @Override
- protected void onMeasure(int widthMeasureSpec, int heightMeasureSpec) {
- Log.i(TAG, "--- start onMeasure --");
- // 设置该ViewGroup的大小
- int width = MeasureSpec.getSize(widthMeasureSpec);
- int height = MeasureSpec.getSize(heightMeasureSpec);
- setMeasuredDimension(width, height);
- int childCount = getChildCount();
- Log.i(TAG, "--- onMeasure childCount is -->" + childCount);
- for (int i = 0; i < childCount; i++) {
- View child = getChildAt(i);
- // 设置每个子视图的大小 , 即全屏
- child.measure(MultiScreenActivity.screenWidth, MultiScreenActivity.scrrenHeight);
- }
- }
- // layout过程
- @Override
- protected void onLayout(boolean changed, int l, int t, int r, int b) {
- // TODO Auto-generated method stub
- Log.i(TAG, "--- start onLayout --");
- int startLeft = 0; // 每个子视图的起始布局坐标
- int startTop = 10; // 间距设置为10px 相当于 android:marginTop= "10px"
- int childCount = getChildCount();
- Log.i(TAG, "--- onLayout childCount is -->" + childCount);
- for (int i = 0; i < childCount; i++) {
- View child = getChildAt(i);
- child.layout(startLeft, startTop,
- startLeft + MultiScreenActivity.screenWidth,
- startTop + MultiScreenActivity.scrrenHeight);
- startLeft = startLeft + MultiScreenActivity.screenWidth ; //校准每个子View的起始布局位置
- //三个子视图的在屏幕中的分布如下 [0 , 320] / [320,640] / [640,960]
- }
- }
- }
//自定义ViewGroup , 包含了三个LinearLayout控件,存放在不同的布局位置,通过scrollBy或者scrollTo方法切换

public class MultiViewGroup extends ViewGroup {

	private Context mContext;

	private static String TAG = "MultiViewGroup";

	public MultiViewGroup(Context context) {

		super(context);

		mContext = context;

		init();

	}

	public MultiViewGroup(Context context, AttributeSet attrs) {

		super(context, attrs);

		mContext = context;

		init();

	}

	private void init() {

		// 初始化3个 LinearLayout控件

		LinearLayout oneLL = new LinearLayout(mContext);

		oneLL.setBackgroundColor(Color.RED);

        addView(oneLL);

		LinearLayout twoLL = new LinearLayout(mContext);

		twoLL.setBackgroundColor(Color.YELLOW);

		addView(twoLL);

		LinearLayout threeLL = new LinearLayout(mContext);

		threeLL.setBackgroundColor(Color.BLUE);

		addView(threeLL);

	}

	// measure过程

	@Override

	protected void onMeasure(int widthMeasureSpec, int heightMeasureSpec) {

		Log.i(TAG, "--- start onMeasure --");

		// 设置该ViewGroup的大小

		int width = MeasureSpec.getSize(widthMeasureSpec);

		int height = MeasureSpec.getSize(heightMeasureSpec);

		setMeasuredDimension(width, height);

		int childCount = getChildCount();

		Log.i(TAG, "--- onMeasure childCount is -->" + childCount);

		for (int i = 0; i < childCount; i++) {

			View child = getChildAt(i);

			// 设置每个子视图的大小 , 即全屏

			child.measure(MultiScreenActivity.screenWidth, MultiScreenActivity.scrrenHeight);

		}

	}

	// layout过程

	@Override

	protected void onLayout(boolean changed, int l, int t, int r, int b) {

		// TODO Auto-generated method stub

		Log.i(TAG, "--- start onLayout --");

		int startLeft = 0; // 每个子视图的起始布局坐标

		int startTop = 10; // 间距设置为10px 相当于 android:marginTop= "10px"

		int childCount = getChildCount();

		Log.i(TAG, "--- onLayout childCount is -->" + childCount);

		for (int i = 0; i < childCount; i++) {

			View child = getChildAt(i);

			child.layout(startLeft, startTop,

					startLeft + MultiScreenActivity.screenWidth,

					startTop + MultiScreenActivity.scrrenHeight);

			startLeft = startLeft + MultiScreenActivity.screenWidth ; //校准每个子View的起始布局位置

			//三个子视图的在屏幕中的分布如下 [0 , 320] / [320,640] / [640,960]

		}

	}

}
PS :大家可以分别给这几个LinearLayout试着添加几个子View,例如TextView, Button等。
至于Launcher上滑屏功能的实现,我尝试着去掌握,可能天资愚钝吧,对Scoller类很是感冒,现今还没有掌握好,不过在此
给大家推荐几个不错的学习资源 。 以后有需要的话,还是采用拿来主义吧。 囧
1、 Scoller类介绍:android 中文 api (64) —— Scroller
2、相关资源汇总:http://blog.csdn.net/dellheng/article/details/7164275
示例源代码位于: http://download.csdn.net/detail/qinjuning/4054840
Android中滑屏初探 ---- scrollTo 以及 scrollBy方法使用说明的更多相关文章
- android 布局之滑动探究 scrollTo 和 scrollBy 方法使用说明
涉及到滑动,就涉及到VIEW,大家都知道,Android的UI界面都是由一个一个的View以及View的派生类组成,View作为基类,而常用的布局里面的各种布局就是它派生出来的ViewGroup的子类 ...
- Android中滑屏实现----手把手教你如何实现触摸滑屏以及Scroller类详解
前言: 虽然本文标题的有点标题党的感觉,但无论如何,通过这篇文章的学习以及你自己的实践认知,写个简单的滑屏小 Demo还是just so so的. 友情提示: 在继续往下面读之前,希望您对以下知识点 ...
- Android中滑屏实现----触摸滑屏以及Scroller类详解 .
转:http://blog.csdn.net/qinjuning/article/details/7419207 知识点一: 关于scrollTo()和scrollBy()以及偏移坐标的设置/取值问 ...
- [学习总结]1、View的scrollTo 和 scrollBy 方法使用说明和区别
参考资料:http://blog.csdn.net/vipzjyno1/article/details/24577023 非常感谢这个兄弟! 先查看这2个方法的源码: scrollTo: 1 /** ...
- 【Android 基础】Android中全屏或者取消标题栏
先介绍去掉标题栏的方法: 第一种:也一般入门的时候经常使用的一种方法 requestWindowFeature(Window.FEATURE_NO_TITLE);//去掉标题栏 注意这句一定要写在se ...
- Android 中Activity生命周期分析:Android中横竖屏切换时的生命周期过程
最近在面试Android,今天出了一个这样的题目,即如题: 我当时以为生命周期是这样的: onCreate --> onStart -- ---> onResume ---> onP ...
- Android中全屏 取消标题栏,TabHost中设置NoTitleBar的三种方法(转)
Android中全屏 取消标题栏,TabHost中设置NoTitleBar的三种方法http://www.cnblogs.com/zdz8207/archive/2013/02/27/android- ...
- Android逆向之旅---Android中锁屏密码算法解析以及破解方案
一.前言 最近玩王者荣耀,下载了一个辅助样本,结果被锁机了,当然破解它很简单,这个后面会详细分析这个样本,但是因为这个样本引发出的欲望就是解析Android中锁屏密码算法,然后用一种高效的方式制作锁机 ...
- android中实现view可以滑动的六种方法
在android开发中,经常会遇到一个view需要它能够支持滑动的需求.今天就来总结实现其滑动的六种方法.其实每一种方法的 思路都是一样的,即:监听手势触摸的坐标来实现view坐标的变化,从而实现vi ...
随机推荐
- Java缓存--JCS
添加外部包: jcs-1.3.jar concurrent-10.3.jar cache.cff # optional region "myCache" specific conf ...
- SPRING IN ACTION 第4版笔记-第七章Advanced Spring MVC-006- 如何保持重定向的request数据(用model、占位符、RedirectAttributes、model.addFlashAttribute("spitter", spitter);)
一.redirect为什么会丢数据? when a handler method completes, any model data specified in the method is copied ...
- JavaScript实现命令行交互
原文地址: http://www.cnblogs.com/liaoyu/p/js-terminal.html 周末闲着想试试用 JavaScript 模拟命令行交互的功能,希望达到的几个功能点如下: ...
- 重温XML
关于什么是XML,以及XML有什么作用,网络上很多,我就在这里不班门弄斧,写博客,是我的一个习惯,究其内容无非个人情感,心得体会,转载,技术相关的,或者一时心血来潮的个人之谈,但是我是一个小心翼翼的人 ...
- 测试ODBC与OLE
using System;using System.Collections.Generic;using System.Linq;using System.Text;using System.Data. ...
- Fedora 17下交叉编译vlc-2.0.6-win32小记
关于编译windows下的vlc网上的教程除了翻译N年前wiki官网的那些蚂蚁文之外,可以说基本没啥参考意义和价值.因为那些都是非常老的版本,0.8.x或者1.x.x,而我这个人有喜欢新鲜事儿,所以就 ...
- Sublime Text修改显示图标
选择喜欢的图片 首先你需要选择一个中意的图片做为新的图标,格式可以是png,jpg,gif的 转为ico格式 我们需要ico格式的图片,所以需要将上述的图片转换一下格式.同样,转ico格式的软件很多, ...
- ☀【JS】eval
避免使用 eval <!doctype html> <html lang="zh-CN"> <head> <meta charset=&q ...
- Web.config配置文件详解(新手必看)
花了点时间整理了一下ASP.NET Web.config配置文件的基本使用方法.很适合新手参看,由于Web.config在使用很灵活,可以自定义一些节点.所以这里只介绍一些比较常用的节点. <? ...
- VS2010如何调试IIS上的网站
通常,我们在Visual Studio里调试ASP.NET网站,都是加个断点,然后按F5,在VS自带的虚拟服务器下调试的.但有时候,VS自带的服务器弱爆了,无法满足一些特定情况的要求,我们必须把网站放 ...