div+css实现导航示意箭头
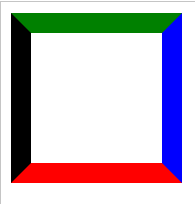
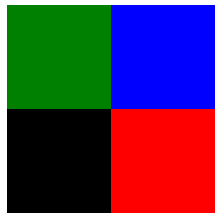
1、Div的宽高为100
 <!DOCTYPE html>

 <html xmlns="http://www.w3.org/1999/xhtml">

 <head>

     <meta http-equiv="Content-Type" content="text/html; charset=utf-8" />

     <title></title>

     <style type="text/css">

         div

         {

             border-color: green blue red black;

             border-style: solid;

             border-width: 16px;

             height: 100px;

             width: 100px;

         }

     </style>

 </head>

 <body>

     <div></div>

 </body>

 </html>
显示效果:
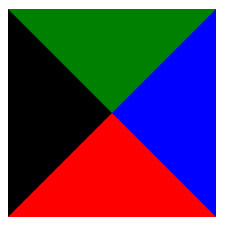
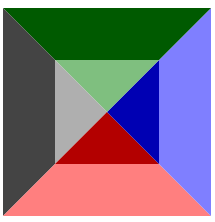
2、将宽高均设置为0
 <!DOCTYPE html>

 <html xmlns="http://www.w3.org/1999/xhtml">

 <head>

     <meta http-equiv="Content-Type" content="text/html; charset=utf-8" />

     <title></title>

     <style type="text/css">

         div

         {

             border-color: green blue red black;

             border-style: solid;

             border-width: 80px;

             height: 0px;

             width: 0px;

         }

     </style>

 </head>

 <body>

     <div></div>

 </body>

 </html>
显示效果:
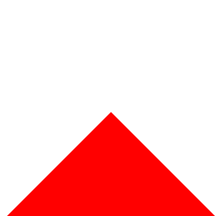
3、只显示下面的▲
半透明示意
 <!DOCTYPE html>

 <html xmlns="http://www.w3.org/1999/xhtml">

 <head>

     <meta http-equiv="Content-Type" content="text/html; charset=utf-8" />

     <title></title>

     <style type="text/css">

         div

         {

             border-color: rgba(0,100,100,0.1) rgba(20,20,20,0.1) red;

             border-style: solid;

             border-width: 80px;

             height: 0px;

             width: 0px;

         }

     </style>

 </head>

 <body>

     <div></div>

 </body>

 </html>
显示效果:

设置为全透明
 <!DOCTYPE html>

 <html xmlns="http://www.w3.org/1999/xhtml">

 <head>

     <meta http-equiv="Content-Type" content="text/html; charset=utf-8" />

     <title></title>

     <style type="text/css">

         div

         {

             border-color: rgba(0,0,0,0) rgba(0,0,0,0) red;

             border-style: solid;

             border-width: 80px;

             height: 0px;

             width: 0px;

         }

     </style>

 </head>

 <body>

     <div></div>

 </body>

 </html>
显示效果:
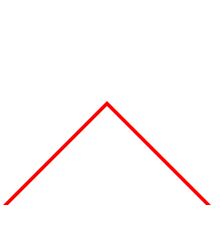
4、通过2个▲的重叠实现导航示意符号Λ
 <!DOCTYPE html>

 <html xmlns="http://www.w3.org/1999/xhtml">

 <head>

     <meta http-equiv="Content-Type" content="text/html; charset=utf-8" />

     <title></title>

     <style type="text/css">

         div.one

         {

             border-color: rgba(0,0,0,0) rgba(0,0,0,0) red;/*这里为导航符号颜色*/

             border-style: solid;

             border-width: 80px;

             height: 0px;

             width: 0px;

             position:absolute;

         }

     div.two

         {

             border-color: rgba(0,0,0,0) rgba(0,0,0,0) white;/*这里为背景色*/

             border-style: solid;

             border-width: 80px;

             height: 0px;

             width: 0px;

             position:absolute;

             margin-top:4px;/*需要一个偏移量*/

         }

     </style>

 </head>

 <body>

     <div class="one"></div>

     <div class="two"></div>

 </body>

 </html>
显示效果:
5、与下方的DIV组合
<!DOCTYPE html>
<html xmlns="http://www.w3.org/1999/xhtml">
<head>
<meta http-equiv="Content-Type" content="text/html; charset=utf-8" />
<title></title>
<style type="text/css">
div.one
{
border-color: rgba(0,0,0,0) rgba(0,0,0,0) red;
border-style: solid;
border-width: 80px;
height: 0px;
width: 0px;
position:absolute;
}
div.two
{
border-color: rgba(0,0,0,0) rgba(0,0,0,0) black;/*black不是背景色,便于观察*/
border-style: solid;
border-width: 80px;
height: 0px;
width: 0px;
position:absolute;
margin-top:2px;
z-index:1;
}
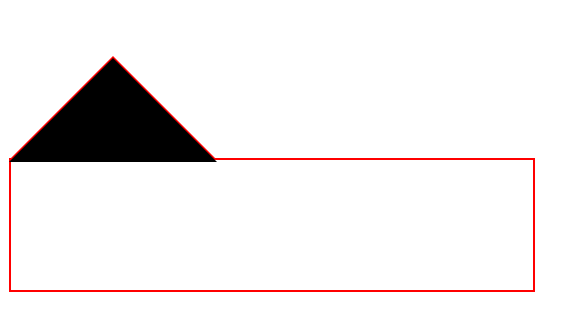
div.three{
position:absolute;
width:400px;
height:100px;
border:2px solid red;/*需要设置边界宽度*/
margin-top:158px
}
</style>
</head>
<body> <div class="one"></div>
<div class="two"></div>
<div class="three"></div> </body>
</html>
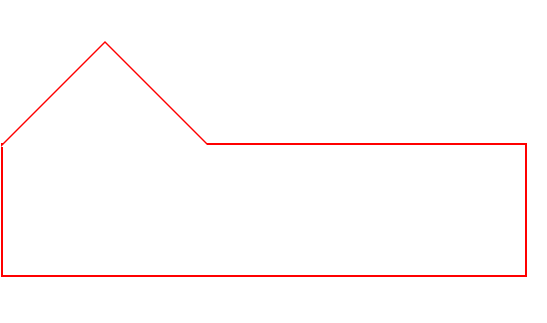
便于观察的黑色背景:
改为背景色"白色"后显示效果:
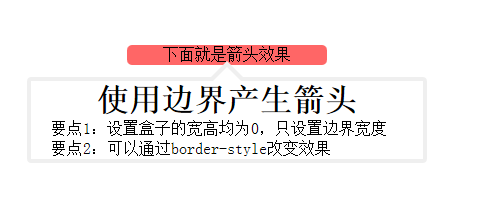
6、完整的小例子
 <!DOCTYPE html>

 <html xmlns="http://www.w3.org/1999/xhtml">

 <head>

     <meta http-equiv="Content-Type" content="text/html; charset=utf-8" />

     <title></title>

     <style>

         *

         {

             margin: 0px;

             padding: 0px;

         }

         #show

         {

             margin: 10px auto;

             position: absolute;

             top: 50px;

             left: 50px;

             text-align: center;

         }

         #some

         {

             width: 200px;

             margin-left: 100px;

             text-align: center;

             position: absolute;

             background-color: rgba(255, 0, 0,0.6);

             border-radius: 5px;

         }

         #info

         {

             width: 400px;

             height: 300px;

             position: absolute;

         }

         #outarrow

         {

             border-color: transparent transparent #efefef;

             border-style: solid;

             border-width: 16px;

             height: 0;

             width: 0;

             position: absolute;

             top: 0px;

             left: 184px;

         }

         #innerarrow

         {

             border-color: transparent transparent white;

             border-style: solid;

             border-width: 16px;

             height: 0;

             width: 0;

             position: absolute;

             top: 0px;

             left: 184px;

             margin-top: 6px;

         }

         #content

         {

             border: 4px solid;

             border-radius: 4px;

             border-color: #efefef;

             width: 400px;

             margin: 32px auto 0px;

             -moz-box-sizing: border-box;

             -webkit-box-sizing: border-box;

             box-sizing: border-box;

         }

             #content p

             {

                 text-align: left;

                 text-indent: 20px;

             }

     </style>

 </head>

 <body>

     <div id="show">

         <div id="some">下面就是箭头效果</div>

         <div id="info">

             <div id="outarrow"></div>

             <div id="innerarrow"></div>

             <div id="content">

                 <h1>使用边界产生箭头</h1>

                 <p>要点1:设置盒子的宽高均为0,只设置边界宽度</p>

                 <p>要点2:可以通过border-style改变效果</p>

             </div>

         </div>

     </div>

 </body>

 </html>
显示效果:
7、改变border-style 有趣的效果
   <!DOCTYPE html>

   <html xmlns="http://www.w3.org/1999/xhtml">

   <head>

       <meta http-equiv="Content-Type" content="text/html; charset=utf-8" />

       <title></title>

       <style type="text/css">

           div

           {

              border-color: green blue red black;

              border-style: dotted;/*除了solid,可以试试dotted,dashed;grooved等*/

              border-width: 80px;

              height: 0px;

              width: 0px;

          }

      </style>

  </head>

  <body>

      <div></div>

  </body>

  </html>
|
dotted |
dashed | groove |
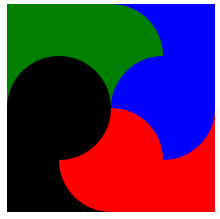 |
 |
 |
|
outset |
inset | ridge |
 |
 |
 |
div+css实现导航示意箭头的更多相关文章
- 十天学会<div+css>横向导航菜单和纵向导航菜单
纵向导航菜单及二级弹出菜单 纵向导航菜单:一级菜单 <head><style type="text/css">body { font-family: Ver ...
- CSS绘制三角形和箭头,不用再用图片了
前言 还在用图片制作箭头,三角形,那就太lou了.css可以轻松搞定这一切,而且颜色大小想怎么变就怎么变,还不用担心失真等问题. 先来看看这段代码: /**css*/.d1{ width: 0; he ...
- HTML5 div+css导航菜单
HTML5 div+css导航菜单 视频 音乐 小说 故事 作品 阅读 联系
- 【转】一个DIV+CSS代码布局的简单导航条
原文地址:http://www.divcss5.com/shili/s731.shtml 简单的DIV CSS代码布局实现导航条 一个蓝色主题的导航条布局案例,本CSS小实例,采用DIV CSS实现. ...
- 使用div+css制作简单导航 以及要注意问题
<!DOCTYPE html PUBLIC "-//W3C//DTD XHTML 1.0 Transitional//EN" "http://www.w3.org/ ...
- 43个实例xHTML+CSS(DIV+CSS)网页及导航布局
在中国,很多前端开发初学者都会把xHTML+CSS页面制作说成DIV+CSS,甚至很多人都还不知道xHTML+CSS是什么意思,只知道盲目的追求DIV+CSS,但在国外,是没有DIV+CSS这个概念的 ...
- DIV+CSS规范命名大全
网页制作中规范使用DIV+CSS命名规则,可以改善优化功效特别是团队合作时候可以提供合作制作效率,具体DIV CSS命名规则CSS命名大全内容篇. 常用DIV+CSS命名大全集合,即CSS命名规则 D ...
- DIV+CSS系统学习:转载
第一部分 HTML 第一章 职业规划和前景 职业方向规划定位: web前端开发工程师 web网站架构师 自己创业 转岗管理或其他 web前端开发的前景展望: 未来IT行业企业需求最多的人才 结合最新的 ...
- DIV+CSS命名规范-转载1
命名规则说明: 1).所有的命名最好都小写 2).属性的值一定要用双引号("")括起来,且一定要有值如class="divcss5",id="divc ...
随机推荐
- Drbd 安装配置
一.Drbd介绍 Distributed Replicated Block Device(DRBD)是基于块设备在不同的高可用服务器之间同步和镜像数据的软件,通过它可以实现在网络中两台服务器这间基于块 ...
- FusionChart 导出图片 功能实现(转载)
FusionChart 导出图片 功能实现(转载) http://www.cnblogs.com/jiagoushi/archive/2013/02/05/2893468.html 题目:精美Fusi ...
- ###学习《Effective C++》
开源中国. #@date: 2014-06-16 #@author: gerui #@email: forgerui@gmail.com 前几天买了好几本书,其中有一本是<Effective C ...
- 转:jQuery对象与dom对象的转换
jQuery对象与dom对象的转换 发布时间:September 20, 2007 分类:JavaScript <新站上线的手记> <Discuz!多附件上传选择框之jQuery版& ...
- (转)解读Flash矩阵
转自: http://hi.baidu.com/cabtw/item/d2dbd212d4ae3e9398ce337f 图片看不到请去原网站看 Matrix: scale(a,d); 比例变换就是将平 ...
- 关于insertBefore
insertBefore,看名字就是在某个元素前插入元素,但是其实它可以再文档任何元素强势插入. insertBefore用法: parent.insertBefore(newChild, refCh ...
- Java中的String类
/*String类用于描述字符串事物的那么它就提供了多个方法对字符串进行操作 方法都会用,字符串这块就结束了常见的操作有哪些?“abcd”它应该具备什么功能,我们才能更好得操作它?1.获取(必须要掌握 ...
- Percona-Server-5.5.33二进制安装
一.删除percona server 1.关闭mysqld service mysqld stop,再删除 rm -rf /etc/my.cnf 2.删除rm -rf /usr/local/Perc ...
- echshop 微信扫码支付 遇到的问题
参考的网站 (转)http://www.ecshop119.com/ecshopjc-937.html(转)http://www.6gdown.com/softedupage/58929.html ...
- zookeeper_笔记
Zookeeper:(没看懂) http://cailin.iteye.com/blog/2014486/ http://agapple.iteye.com/blog/1184023 http://b ...