k8s+crio+podman搭建集群
前言
在传统的k8s集群中,我们都是使用docker engine做为底层的容器管理软件的,而docker engine因为不是k8s亲生的解决方案,所以实际使用中会有更多的分层。之前我们也讲过,k8s为了调用docker engine,专门写了一个dockershim做为CRI,而在1.20版本的时候,k8s就宣布停止更新dockershim了,也就是说再往后的版本就不推荐使用k8s+dockershim+docker engine的方案了。
而k8s官方比较推荐的解决方案中,官方比较推荐的是cri-o或者containerd,前者是基于开放容器计划(OCI)的实现,后者是基于docker的containerd,后脱离出来进行独立开发的组件,现归属于CNCF组织。
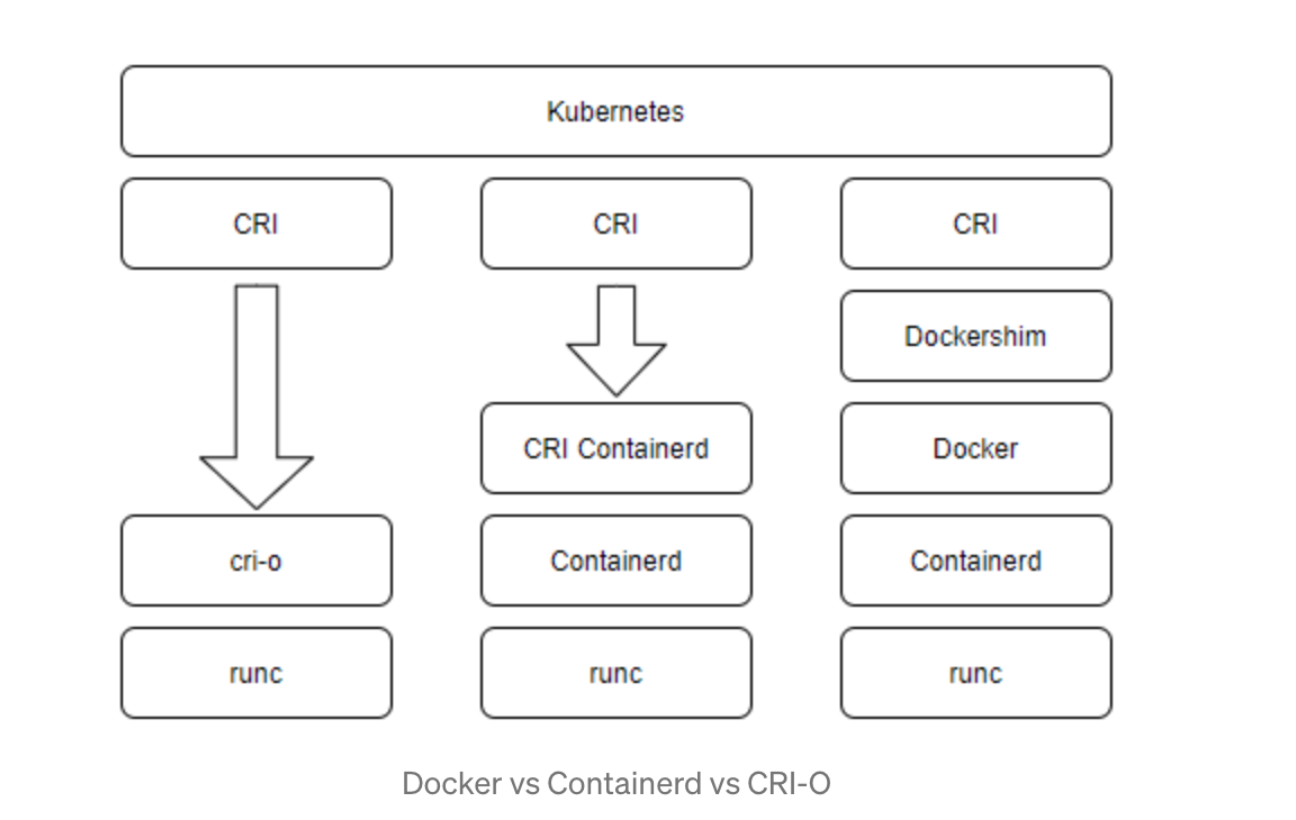
CRI-O vs containerd vs docker daemon
这三者有啥区别呢?
首先,cri-o是cri的实现,可以直接调用底层的runc
其次,containerd是CRI-Containerd的实现,可以调用底层的runc
而docker则需要先调用dockershim,然后调用docker,再调用containerd,最后调用底层的runc
三者区别如图:
k8s+crio+podman实现
podman安装
可参考我前一篇文章
docker的平替--podman - eryoung2 - 博客园
三台机都需要安装podman
k8s的安装
可参考我另一篇文章
kubernetes 搭建集群 - eryoung2 - 博客园
三台机都需要安装kubelet/kubeadm/kubectl,并启动kubelet
cri-o的安装
Ubuntu(18.04)
1 准备
modprobe overlay  # 打开overlay

modprobe br_netfilter  # 打开netfilter

cat > /etc/sysctl.d/99-kubernetes-cri.conf <<EOF #内核处理

net.bridge.bridge-nf-call-iptables  = 1

net.ipv4.ip_forward                 = 1

net.bridge.bridge-nf-call-ip6tables = 1

EOF

sysctl --system

swapoff -a #kube scheduler要求关闭swap
2 安装CRI-O
# 指定版本

OS=xUbuntu_18.04

CRIO_VERSION=1.23

# 加源

echo "deb https://download.opensuse.org/repositories/devel:/kubic:/libcontainers:/stable/$OS/ /"|sudo tee /etc/apt/sources.list.d/devel:kubic:libcontainers:stable.list

echo "deb http://download.opensuse.org/repositories/devel:/kubic:/libcontainers:/stable:/cri-o:/$CRIO_VERSION/$OS/ /"|sudo tee /etc/apt/sources.list.d/devel:kubic:libcontainers:stable:cri-o:$CRIO_VERSION.list

# 加key

curl -L https://download.opensuse.org/repositories/devel:kubic:libcontainers:stable:cri-o:$CRIO_VERSION/$OS/Release.key | sudo apt-key add -

curl -L https://download.opensuse.org/repositories/devel:/kubic:/libcontainers:/stable/$OS/Release.key | sudo apt-key add -

# 安装

sudo apt update -y

sudo apt install cri-o cri-o-runc cri-tools -y
3 检查CRI-O
root@home:~# apt show cri-o

Package: cri-o

Version: 1.23.3~0

Priority: optional

Section: devel

Maintainer: Peter Hunt <haircommander@fedoraproject.org>

Installed-Size: 98.3 MB

Depends: libgpgme11, libseccomp2, conmon, containers-common (>= 0.1.27) | golang-github-containers-common, tzdata

Suggests: cri-o-runc | runc (>= 1.0.0), containernetworking-plugins

Replaces: cri-o-1.19, cri-o-1.20, cri-o-1.21, cri-o-1.22

Homepage: https://github.com/cri-o/cri-o

Download-Size: 19.9 MB

APT-Manual-Installed: yes

APT-Sources: http://download.opensuse.org/repositories/devel:/kubic:/libcontainers:/stable:/cri-o:/1.23/xUbuntu_18.04  Packages

Description: OCI-based implementation of Kubernetes Container Runtime Interface.

N: Ignoring file 'ystemctlqq' in directory '/etc/apt/sources.list.d/' as it has no filename extension
systemctl enable crio.service

systemctl start crio.service
root@home:~# systemctl status crio

● crio.service - Container Runtime Interface for OCI (CRI-O)

   Loaded: loaded (/usr/lib/systemd/system/crio.service; enabled; vendor preset: enabled)

   Active: active (running) since Wed 2022-07-13 01:26:03 CST; 16h ago

     Docs: https://github.com/cri-o/cri-o

 Main PID: 5338 (crio)

    Tasks: 15

   CGroup: /system.slice/crio.service

           └─5338 /usr/bin/crio
4 使用cri-o
查看状态
root@home:~# crictl info

{

  "status": {

    "conditions": [

      {

        "type": "RuntimeReady",

        "status": true,

        "reason": "",

        "message": ""

      },

      {

        "type": "NetworkReady",

        "status": true,

        "reason": "",

        "message": ""

      }

    ]

  }

}
查看镜像
root@home:~# crictl images

IMAGE                                TAG                 IMAGE ID            SIZE

docker.io/calico/cni                 v3.23.2             a87d3f6f1b8fd       263MB

docker.io/calico/node                v3.23.2             a3447b26d32c7       224MB

docker.io/library/nginx              latest              41b0e86104ba6       146MB

k8s.gcr.io/coredns/coredns           v1.8.6              a4ca41631cc7a       47MB

k8s.gcr.io/etcd                      3.5.3-0             aebe758cef4cd       301MB

k8s.gcr.io/kube-apiserver            v1.24.2             d3377ffb7177c       131MB

k8s.gcr.io/kube-controller-manager   v1.24.2             34cdf99b1bb3b       121MB

k8s.gcr.io/kube-proxy                v1.24.2             a634548d10b03       112MB

k8s.gcr.io/kube-scheduler            v1.24.2             5d725196c1f47       52.3MB

k8s.gcr.io/pause                     3.6                 6270bb605e12e       690kB

k8s.gcr.io/pause                     3.7                 221177c6082a8       718kB
Centos(7)
1 准备
VERSION=1.22

sudo curl -L -o /etc/yum.repos.d/devel:kubic:libcontainers:stable.repo https://download.opensuse.org/repositories/devel:kubic:libcontainers:stable/CentOS_7/devel:kubic:libcontainers:stable.repo

sudo curl -L -o /etc/yum.repos.d/devel:kubic:libcontainers:stable:cri-o:${VERSION}.repo https://download.opensuse.org/repositories/devel:kubic:libcontainers:stable:cri-o:${VERSION}/CentOS_7/devel:kubic:libcontainers:stable:cri-o:${VERSION}.repo
2 安装
yum update -y

yum install cri-o cri-tools -y
3 查看cri-o版本
[root@node1 systemd]# rpm -qi cri-o

Name        : cri-o

Epoch       : 0

Version     : 1.22.5

Release     : 2.2.el7

Architecture: x86_64

Install Date: 2022年07月13日 星期三 01时36分47秒

Group       : Unspecified

Size        : 236845729

License     : ASL 2.0

Signature   : RSA/SHA256, 2022年07月10日 星期日 12时53分28秒, Key ID 4d64390375060aa4

Source RPM  : cri-o-1.22.5-2.2.el7.src.rpm

Build Date  : 2022年07月10日 星期日 12时53分00秒

Build Host  : sheep87

Relocations : (not relocatable)

Vendor      : obs://build.opensuse.org/devel:kubic

URL         : https://github.com/cri-o/cri-o

Summary     : Open Container Initiative-based implementation of Kubernetes Container Runtime Interface

Description :

Open Container Initiative-based implementation of Kubernetes Container Runtime

Interface.
4 启动cri-o
systemctl enable --now cri-o
5 查看cri-o状态
[root@node1 systemd]# systemctl status crio

● crio.service - Container Runtime Interface for OCI (CRI-O)

   Loaded: loaded (/usr/lib/systemd/system/crio.service; enabled; vendor preset: disabled)

   Active: active (running) since 三 2022-07-13 01:41:06 CST; 16h ago

     Docs: https://github.com/cri-o/cri-o

 Main PID: 24127 (crio)

    Tasks: 15

   Memory: 13.7M

   CGroup: /system.slice/crio.service

           └─24127 /usr/bin/crio
三台机都安装cri-o并启动。
K8S启动
在master上,跑下列命令:
kubeadm init --apiserver-advertise-address 192.168.1.150 --apiserver-bind-port 6443 --kubernetes-version 1.24.2 --pod-network-cidr 10.244.0.0/16
然后等5分钟,就创建了一个k8s集群的master node。
Your Kubernetes control-plane has initialized successfully!

To start using your cluster, you need to run the following as a regular user:

  mkdir -p $HOME/.kube

  sudo cp -i /etc/kubernetes/admin.conf $HOME/.kube/config

  sudo chown $(id -u):$(id -g) $HOME/.kube/config

Alternatively, if you are the root user, you can run:

  export KUBECONFIG=/etc/kubernetes/admin.conf

You should now deploy a pod network to the cluster.

Run "kubectl apply -f [podnetwork].yaml" with one of the options listed at:

  https://kubernetes.io/docs/concepts/cluster-administration/addons/

Then you can join any number of worker nodes by running the following on each as root:

kubeadm join 192.168.1.150:6443 --token gjxt6y.0wljlhfkjz90v12m --discovery-token-ca-cert-hash sha256:d69fc5929e442210c97ab85c05a8c2906f5819a74d5b0fa3481032d6a8f3fc07
在三台机上跑这三条命令
  mkdir -p $HOME/.kube

  sudo cp -i /etc/kubernetes/admin.conf $HOME/.kube/config

  sudo chown $(id -u):$(id -g) $HOME/.kube/config
否则会报错。
The connection to the server localhost:8080 was refused - did you specify the right host or port?
检查集群
在以上所有内容都完成之后,我们可以看一下nodes或者pods
root@home:~# kubectl get nodes

NAME    STATUS   ROLES           AGE    VERSION

home    Ready    control-plane   179m   v1.24.2

node1   Ready    <none>          179m   v1.24.2

node2   Ready    <none>          179m   v1.24.2

root@home:~# kubectl get pods -A

NAMESPACE     NAME                           READY   STATUS    RESTARTS   AGE

kube-system   coredns-6d4b75cb6d-4wxjh       1/1     Running   0          179m

kube-system   coredns-6d4b75cb6d-7qxpv       1/1     Running   0          179m

kube-system   etcd-home                      1/1     Running   2          3h

kube-system   kube-apiserver-home            1/1     Running   2          3h

kube-system   kube-controller-manager-home   1/1     Running   2          3h

kube-system   kube-proxy-9w7mf               1/1     Running   0          179m

kube-system   kube-proxy-hpw6c               1/1     Running   0          179m

kube-system   kube-proxy-tbpr8               1/1     Running   0          179m

kube-system   kube-scheduler-home            1/1     Running   2          3h
鸣谢
k8s+crio+podman搭建集群的更多相关文章
- ASP.NET Core on K8S深入学习(1)K8S基础知识与集群搭建
在上一个小系列文章<ASP.NET Core on K8S学习初探>中,通过在Windows上通过Docker for Windows搭建了一个单节点的K8S环境,并初步尝试将ASP.NE ...
- k8S 搭建集群
k8S 搭建集群1:修改主机名称hostnamectl --static set-hostname masterhostnamectl --static set-hostname node1hostn ...
- 基于Kubernetes(k8s)的RabbitMQ 集群
目前,有很多种基于Kubernetes搭建RabbitMQ集群的解决方案.今天笔者今天将要讨论我们在Fuel CCP项目当中所采用的方式.这种方式加以转变也适用于搭建RabbitMQ集群的一般方法.所 ...
- ELK——Elasticsearch 搭建集群经验
本文内容 背景 ES集群中第一个master节点 ES slave节点 本文总结 Elasticsearch(以下简称ES)搭建集群的经验.以 Elasticsearch-rtf-2.2.1 版本为例 ...
- redis 一二事 - 搭建集群缓存服务器
在如今并发的环境下,对大数据量的查询采用缓存是最好不过的了,本文使用redis搭建集群 (个人喜欢redis,对memcache不感冒) redis是3.0后增加的集群功能,非常强大 集群中应该至少有 ...
- Hadoop化繁为简-从安装Linux到搭建集群环境
简介与环境准备 hadoop的核心是分布式文件系统HDFS以及批处理计算MapReduce.近年,随着大数据.云计算.物联网的兴起,也极大的吸引了我的兴趣,看了网上很多文章,感觉还是云里雾里,很多不必 ...
- Linux+.NetCore+Nginx搭建集群
本篇和大家分享的是Linux+NetCore+Nginx搭建负载集群,对于netcore2.0发布后,我一直在看官网的文档并学习,关注有哪些新增的东西,我,一个从1.0到2.0的跟随者这里只总结一句话 ...
- Redis 实战篇之搭建集群
Redis 集群简介# Redis Cluster 即 Redis 集群,是 Redis 官方在 3.0 版本推出的一套分布式存储方案.完全去中心化,由多个节点组成,所有节点彼此互联.Redis 客户 ...
- Nginx+Tomcat搭建集群,Spring Session+Redis实现Session共享
小伙伴们好久不见!最近略忙,博客写的有点少,嗯,要加把劲.OK,今天给大家带来一个JavaWeb中常用的架构搭建,即Nginx+Tomcat搭建服务集群,然后通过Spring Session+Redi ...
随机推荐
- 用crash tool观察ARM64 Linux地址转换
初学者学习Linux系统地址转换时,如果只是学习理论,又或者研读代码,那可能感觉比较枯燥.此时如果可以利用某些工具实际观察一下地址转换的过程,那可能会给枯燥的内核学习带来些微的乐趣.crash too ...
- drools的类型声明(Type declarations)
一.背景 在我们编写drl规则的时候,有些时候需要自己声明一些类,用于辅助之后的规则运行,如果需要用到的类还需要在java中预先声明出来,这样就不灵活了,那么是否可以在drl文件中声明一个类呢?可以使 ...
- arts-week10
Algorithm 905. Sort Array By Parity - LeetCode Review Who's Afraid of the Big Bad Preloader? 一文读懂前端缓 ...
- 766. Toeplitz Matrix - LeetCode
Question 766. Toeplitz Matrix Solution 题目大意: 矩阵从每条左上到右下对角线上的数都相等就返回true否则返回false 思路: 遍历每一行[i,j]与[i+1 ...
- 152. Maximum Product Subarray - LeetCode
Question 152. Maximum Product Subarray Solution 题目大意:求数列中连续子序列的最大连乘积 思路:动态规划实现,现在动态规划理解的还不透,照着公式往上套的 ...
- Python汉诺塔求解
1 def hanoi(n,a,b,c): 2 3 if(n>0): 4 5 hanoi(n-1,a,b,c) 6 7 print("Move disc no:%d from pile ...
- FileAPI
FileAPI ```java File类的常见方法 1.创建. boolean createNewFile(); //创建文件 boolean mkdir();创建文件夹 boolean mkdir ...
- 2022Gartner容器预测:2025年85%的企业将使用容器管理服务
近日,国际知名权威分析机构Gartner发布了最新<全球容器管理预测>.预测中指出:在加速的数字化转型驱动下,到2025年全球容器管理领域市场规模将突破14亿美元,预计年复合增长率将达到2 ...
- TornadoFx设置保存功能((config和preference使用))
原文地址:TornadoFx设置保存功能(config和preference使用) 相信大部分的桌面软件都是存在一个设置的界面,允许用户进行设置的修改,此修改之后需要保存的本地,若是让开发者自己实现, ...
- Linux 中递归删除文件
递归删除当前目录下以 .json 结尾的文件 find . -name "*.json" | xargs rm -f find . -name "*.json" ...