Android自定义Dialog及其布局
实际项目开发中默认的Dialog样式无法满足需求,需要自定义Dialog及其布局,并响应布局中控件的事件。
上效果图:
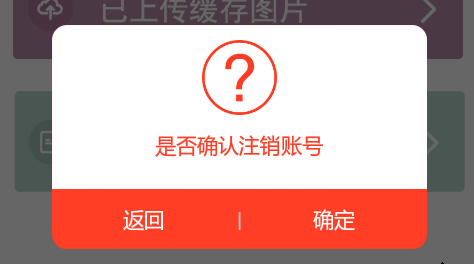
自定义Dialog,LogoutDialog:
要将自定义布局传入构造函数中,才能在Activity中通过 dialog.findviewbyid 获取到控件,否则返回null。
public class LogoutDialog extends Dialog{

  Context context;

  public LogoutDialog(Context context) {

  super(context);

  this.context=context;

  this.setContentView(R.layout.logout_dialog);

  }

  public LogoutDialog(Context context, int theme){

  super(context, theme);

  this.context = context;

  this.setContentView(R.layout.logout_dialog);

  }

  @Override

  protected void onCreate(Bundle savedInstanceState) {

  super.onCreate(savedInstanceState);

  //this.setContentView(R.layout.logout_dialog);

  }

}
自定义布局文件,logout_dialog.xml:
<?xml version="1.0" encoding="utf-8"?>

<LinearLayout xmlns:android="http://schemas.android.com/apk/res/android"

android:layout_width="250dp"

android:layout_height="wrap_content"

android:orientation="vertical"

android:background="@android:color/transparent"

>

  <LinearLayout

  android:layout_width="match_parent"

  android:layout_height="wrap_content"

  android:background="@drawable/dialog_top_bg"

  android:orientation="vertical"

  android:paddingTop="10dp"

  >

    <ImageView

    android:layout_width="50dp"

    android:layout_height="50dp"

    android:src="@drawable/pop_icon1"

    android:layout_gravity="center_horizontal"

    android:layout_marginBottom="10dp"

    />

    <TextView

    android:layout_width="wrap_content"

    android:layout_height="wrap_content"

    android:text="是否确认注销账号"

    android:layout_gravity="center_horizontal"

    android:layout_marginBottom="20dp"

    android:textColor="#FF3C25"

    android:layout_marginLeft="20dp"

    android:layout_marginRight="20dp"

    />

  </LinearLayout>

  <LinearLayout

    android:layout_width="match_parent"

    android:layout_height="40dp"

    android:gravity="center_vertical"

    android:background="@drawable/dialog_buttom_bg"

    >

    <TextView

    android:id="@+id/back_btn_dialog"

    android:layout_width="wrap_content"

    android:layout_height="match_parent"

    android:text="返回"

    android:layout_weight="1"

    android:textColor="#FFFFFF"

    android:gravity="center"

    />

    <TextView

    android:layout_width="wrap_content"

    android:layout_height="match_parent"

    android:text="|"

    android:textColor="#C9CACC"

    android:gravity="center"

    />

    <TextView

    android:id="@+id/submit_btn_dialog"

    android:layout_width="wrap_content"

    android:layout_height="match_parent"

    android:text="确定"

    android:layout_weight="1"

    android:textColor="#FFFFFF"

    android:gravity="center"

    />

  </LinearLayout>

</LinearLayout>
两个Shape的布局,dialog_buttom_bg.xml:
<?xml version="1.0" encoding="utf-8"?>

<shape xmlns:android="http://schemas.android.com/apk/res/android"

>

  <corners

  android:bottomLeftRadius="@dimen/dialog_corners"

  android:bottomRightRadius="@dimen/dialog_corners"

  />

  <gradient

  android:startColor="#FF3E25"

  android:endColor="#FF3E25"

  android:centerColor="#FF3E25"

  android:angle="270"

  />

</shape>
dialog_top_bg.xml:
<?xml version="1.0" encoding="utf-8"?>

<shape xmlns:android="http://schemas.android.com/apk/res/android" >

  <corners

  android:topLeftRadius="@dimen/dialog_corners"

  android:topRightRadius="@dimen/dialog_corners"

  />

  <gradient

  android:startColor="#ffffff"

  android:endColor="#ffffff"

  android:centerColor="#ffffff"

  android:angle="270"

  />

</shape>
自定义样式Style,来改变默认的Dialog样式。在values/styles.xml下新加样式:
<style name="UpdateErrorFinishDialog" parent="@android:style/Theme.Dialog">

  <item name="android:windowFrame">@null</item>

  <item name="android:windowNoTitle">true</item>

  <item name="android:windowBackground">@drawable/dialog_background</item>

  <item name="android:windowIsFloating">true</item>

  <item name="android:windowContentOverlay">@null</item>

</style>
在Activity中调用:
Dialog dialog==new LogoutDialog(TempActivity.this, R.style.UpdateErrorFinishDialog);

dialog.setCanceledOnTouchOutside(false);

dialog.show();

TextView submit_btn_dialog=(TextView) dialog.findViewById(R.id.submit_btn_dialog);

TextView back_btn_dialog=(TextView) dialog.findViewById(R.id.back_btn_dialog);

submit_btn_dialog.setOnClickListener(new View.OnClickListener() {

  @Override

  public void onClick(View v) {

    //Toaster.showLongToast("确定");

    dialog.dismiss();

  }

});

back_btn_dialog.setOnClickListener(new View.OnClickListener() {

  @Override

  public void onClick(View v) {

    //Toaster.showLongToast("返回");

    dialog.dismiss();

  }

});
Android自定义Dialog及其布局的更多相关文章
- Android自定义 Dialog 对话框
Android自定义Dialoghttp://www.cnblogs.com/and_he/archive/2011/09/16/2178716.html Android使用自定义AlertDialo ...
- android自定义dialog布局
dialog使用系统自带的有时候不是很美观,就想要自己来设计一个dialog界面,以下就是可以设计的dialog界面: public class CustomDialog extends Dialog ...
- Android—自定义Dialog
在 Android 日常的开发中,Dialog 使用是比较广泛的.无论是提示一个提示语,还是确认信息,还是有一定交互的(弹出验证码,输入账号密码登录等等)对话框. 而我们去看一下原生的对话框,虽然随着 ...
- Android自定义Dialog(美化界面)
前言:在做项目的时候,发现dialog界面太丑陋,从csdn上下载了一份自定义dialog的源码,在他的基础上对界面进行美化...有需要的朋友可以直接拿走 效果图如下: 主要代码: /** * 自定义 ...
- android 自定义Dialog背景透明及显示位置设置
先贴一下显示效果图,仅作参考: 代码如下: 1.自定义Dialog public class SelectDialog extends AlertDialog{ public SelectDialog ...
- Android自定义Dialog
Android开发过程中,常常会遇到一些需求场景——在界面上弹出一个弹框,对用户进行提醒并让用户进行某些选择性的操作, 如退出登录时的弹窗,让用户选择“退出”还是“取消”等操作. Android系统提 ...
- Android 自定义Dialog类,并在Activity中实现按钮监听。
实际开发中,经常会用到Dialog,比如退出时候会弹出是否退出,或者还有一些编辑框也会用Dialog实现,效果图如下: 开发中遇到的问题无非在于如果在Activity中监听这个Dialog中实现的 ...
- android 自定义Dialog去除黑色边框
在自定义Dialog时显示的界面中老是有黑色的边框,下面就介绍使用style去除黑色边框方法. 首先在values/styles定义自定义样式: <style name="MyDial ...
- Android 自定义Dialog 去除阴影
自定义Dialog中添加下列代码: window.clearFlags( WindowManager.LayoutParams.FLAG_DIM_BEHIND);
随机推荐
- xpath实例 --//span[contains(.,'资讯管理')]
实际例子: 实例一: 不得不说下第一个例子,谢谢selenium论坛的大神门,XPATH还有这种方式的定位,传说是“治疗一切跌打损伤,及text找不到”(Antony群友帮解决的,在此谢谢)
- misc
1.对于给定的二维码图片不能直接扫描出来的可以进行反色在进行扫描,反色可以直接选中图片然后就会进行反色.2.局域网中抓取的数据包的加密方式可能是aes加密.3.凯撒加密可能是变种的凯撒加密,可能奇数偶 ...
- 用canvas制作酷炫射击游戏--part1
好久没写博客了,因为过年后一直在学游戏制作方面的知识.学得差不多后又花了3个月时间做了个作品出来,现在正拿着这个作品找工作. 作品地址:https://betasu.github.io/Crimonl ...
- word-wrap&&word-break,奇偶行、列设置样式
1.word-wrap和word-break区分. 来源场景:机械租赁mvc驾驶员信息查看: 当备注的文字多的时候,第一列的值成这模样: 解决方案:设置table 的td可自动换行.首先table设置 ...
- 开源的EtherCAT Master简介
EtherCAT的主站开发是基于EtherCAT机器人控制系统的开发中非常重要的环节.目前常见开源的主站代码为的RT-LAB开发的SOEM (Simple OpenSource EtherCAT Ma ...
- 如何编译MongoDB?
本文将在Linux环境下编译Mongodb. 您可以选择已经编译好的版本直接使用,也可以尝试自己编译.https://www.mongodb.org/downloads#production 官方 ...
- label正确显示多行数据
label显示多行文字时会遇到文字中包含换行符“\n”,这时需要对字符进行全部替换, if(labelContent.indexOf('\\n')>0){labelContent=labelCo ...
- nodejs安装/运行脚本
本文主要介绍nodejs在windows下安装及运行脚本. 安装nodejs 先从nodejs官网:http://nodejs.org/下载对应的系统的安装包,比如用于64位系统的最新0.10.21的 ...
- WindowsPhone技术和XNA技术
介于公司目前还没有涉及WP(WindowsPhone)项目的开发,而我本身是学习WP开发的,因此在这里稍微入门的介绍一点WP的知识. 一.简介 Windows Phone具有桌面定制.图标拖拽.滑动控 ...
- Javascript图片裁切
最近浏览了不少网站的图片裁切效果,大部分的做法如下图所示(借用一张脚本之家的图片),通过改变裁切框的大小来选取合适的位置. 但本文介绍的是另外一种裁切方式,裁切框由开发者决定,图片大小由用户决定,通过 ...