『TensorFlow × MXNet』SSD项目复现经验
『TensorFlow』SSD源码学习_其一:论文及开源项目文档介绍
『TensorFlow』SSD源码学习_其二:基于VGG的SSD网络前向架构
『TensorFlow』SSD源码学习_其四:数据介绍及TFR文件生成
『TensorFlow』SSD源码学习_其五:TFR数据读取&数据预处理
为了加深理解,我对SSD项目进行了复现,基于原版,有按照自己理解的修改,
项目见github:SSD_Realization_TensorFlow、SSD_Realization_MXNet
构建思路按照训练主函数的步骤顺序,文末贴了出来,下面我们按照这个顺序简要介绍一下各个流程的重点,想要详细了解的建议看一看之前的解读源码的对应篇章(tf),或者看看李沐博士的ssd介绍视频(虽然不太详细,不过结合讲义思路很清晰,参见:『MXNet』第十弹_物体检测SSD)。
一、重点说明
SSD架构主要有四个部分,网络设计、搜索框设计、学习目标处理、损失函数实现。
网络设计
重点在于正常前向网络中挑选出的特征层分别添加两个卷积出口:分类和回归出口,用于对应后面的每个搜索框的各个类别得分、以及4个坐标值。
搜索框设计
对应网络的特征层:每个层有若干搜索框,我们需要搜索框位置形状信息。对于tf版本我们保存了每个框的中心点以及HW信息,而mx版本我们保存的是左上右下两个的4个坐标数值,mx更为直观,但是tf版本节省空间:一组框对应同一个中心点,不过搜索框信息量不大,b无伤大雅。
学习目标处理
个人感觉最为繁琐,我们需要的的信息包含(此时已经获得了):一组搜索框(实际上指的是全部搜索框的n4个坐标值),图片的label、图片的真实框坐标(对应label数目4),我们需要的就是找到搜索框和真是图片的标签联系,
获取:
每个搜索框对应的分类(和哪个真实框的IOU最大就选真实框的类别标注给该搜索,也就是说会出现大量的0 class搜索框)
每个搜索框的坐标的回归目标(同上的寻找方法,空位也为0)
负类掩码,虽然每张图片里面通常只有几个标注的边框,但SSD会生成大量的锚框。可以想象很多锚框都不会框住感兴趣的物体,就是说跟任何对应感兴趣物体的表框的IoU都小于某个阈值。这样就会产生大量的负类锚框,或者说对应标号为0的锚框。对于这类锚框有两点要考虑的:
1、边框预测的损失函数不应该包括负类锚框,因为它们并没有对应的真实边框
2、因为负类锚框数目可能远多于其他,我们可以只保留其中的一些。而且是保留那些目前预测最不确信它是负类的,就是对类0预测值排序,选取数值最小的哪一些困难的负类锚框
所以需要使用掩码,抑制一部分计算出来的loss。
损失函数
可讲的不多,按照公式实现即可,重点也在上一步计算出来的掩码处理损失函数值一步。
二、MXNet训练主函数
if __name__ == '__main__':

    batch_size = 4

    ctx = mx.cpu(0)

    # ctx = mx.gpu(0)

    # box_metric = mx.MAE()

    cls_metric = mx.metric.Accuracy()

    ssd = ssd_mx.SSDNet()

    ssd.initialize(ctx=ctx)  # mx.init.Xavier(magnitude=2)

    cls_loss = util_mx.FocalLoss()

    box_loss = util_mx.SmoothL1Loss()

    trainer = mx.gluon.Trainer(ssd.collect_params(),

                               'sgd', {'learning_rate': 0.01, 'wd': 5e-4})

    data = get_iterators(data_shape=304, batch_size=batch_size)

    for epoch in range(30):

        # reset data iterators and metrics

        data.reset()

        cls_metric.reset()

        # box_metric.reset()

        tic = time.time()

        for i, batch in enumerate(data):

            start_time = time.time()

            x = batch.data[0].as_in_context(ctx)

            y = batch.label[0].as_in_context(ctx)

            # 将-1占位符改为背景标签0,对应坐标框记录为[0,0,0,0]

            y = nd.where(y < 0, nd.zeros_like(y), y)

            with mx.autograd.record():

                # anchors, 检测框坐标,[1,n,4]

                # class_preds, 各图片各检测框分类情况,[bs,n,num_cls + 1]

                # box_preds, 各图片检测框坐标预测情况,[bs, n * 4]

                anchors, class_preds, box_preds = ssd(x, True)

                # box_target, 检测框的收敛目标,[bs, n * 4]

                # box_mask, 隐藏不需要的背景类,[bs, n * 4]

                # cls_target, 记录全检测框的真实类别,[bs,n]

                box_target, box_mask, cls_target = ssd_mx.training_targets(anchors, class_preds, y)

                loss1 = cls_loss(class_preds, cls_target)

                loss2 = box_loss(box_preds, box_target, box_mask)

                loss = loss1 + loss2

            loss.backward()

            trainer.step(batch_size)

            if i % 1 == 0:

                duration = time.time() - start_time

                examples_per_sec = batch_size / duration

                sec_per_batch = float(duration)

                format_str = "[*] step %d,  loss=%.2f (%.1f examples/sec; %.3f sec/batch)"

                print(format_str % (i, nd.sum(loss).asscalar(), examples_per_sec, sec_per_batch))

            if i % 500 == 0:

ssd.model.save_parameters('model_mx_{}.params'.format(epoch))
三、TensorFlow训练主函数
def main():

    max_steps = 1500

    batch_size = 32

    adam_beta1 = 0.9

    adam_beta2 = 0.999

    opt_epsilon = 1.0

    num_epochs_per_decay = 2.0

    num_samples_per_epoch = 17125

    moving_average_decay = None

    tf.logging.set_verbosity(tf.logging.DEBUG)

    with tf.Graph().as_default():

        # Create global_step.

        with tf.device("/device:CPU:0"):

            global_step = tf.train.create_global_step()

        ssd = SSDNet()

        ssd_anchors = ssd.anchors

        # tfr解析操作放在GPU下有加速,效果不稳定

        dataset = \

            tfr_data_process.get_split('./TFR_Data',

                                       'voc2012_*.tfrecord',

                                       num_classes=21,

                                       num_samples=num_samples_per_epoch)

        with tf.device("/device:CPU:0"):  # 仅CPU支持队列操作

            image, glabels, gbboxes = \

                tfr_data_process.tfr_read(dataset)

            image, glabels, gbboxes = \

                preprocess_img_tf.preprocess_image(image, glabels, gbboxes, out_shape=(300, 300))

            gclasses, glocalisations, gscores = \

                ssd.bboxes_encode(glabels, gbboxes, ssd_anchors)

            batch_shape = [1] + [len(ssd_anchors)] * 3  # (1,f层,f层,f层)

            # Training batches and queue.

            r = tf.train.batch(  # 图片,中心点类别,真实框坐标,得分

                util_tf.reshape_list([image, gclasses, glocalisations, gscores]),

                batch_size=batch_size,

                num_threads=4,

                capacity=5 * batch_size)

            batch_queue = slim.prefetch_queue.prefetch_queue(

                r,  # <-----输入格式实际上并不需要调整

                capacity=2 * 1)

        # Dequeue batch.

        b_image, b_gclasses, b_glocalisations, b_gscores = \

            util_tf.reshape_list(batch_queue.dequeue(), batch_shape)  # 重整list

        predictions, localisations, logits, end_points = \

            ssd.net(b_image, is_training=True, weight_decay=0.00004)

        ssd.losses(logits, localisations,

                   b_gclasses, b_glocalisations, b_gscores,

                   match_threshold=.5,

                   negative_ratio=3,

                   alpha=1,

                   label_smoothing=.0)

        update_ops = tf.get_collection(tf.GraphKeys.UPDATE_OPS)

        # =================================================================== #

        # Configure the moving averages.

        # =================================================================== #

        if moving_average_decay:

            moving_average_variables = slim.get_model_variables()

            variable_averages = tf.train.ExponentialMovingAverage(

                moving_average_decay, global_step)

        else:

            moving_average_variables, variable_averages = None, None

        # =================================================================== #

        # Configure the optimization procedure.

        # =================================================================== #

        with tf.device("/device:CPU:0"):  # learning_rate节点使用CPU(不明)

            decay_steps = int(num_samples_per_epoch / batch_size * num_epochs_per_decay)

            learning_rate = tf.train.exponential_decay(0.01,

                                                       global_step,

                                                       decay_steps,

                                                       0.94,  # learning_rate_decay_factor,

                                                       staircase=True,

                                                       name='exponential_decay_learning_rate')

            optimizer = tf.train.AdamOptimizer(

                learning_rate,

                beta1=adam_beta1,

                beta2=adam_beta2,

                epsilon=opt_epsilon)

            tf.summary.scalar('learning_rate', learning_rate)

        if moving_average_decay:

            # Update ops executed locally by trainer.

            update_ops.append(variable_averages.apply(moving_average_variables))

        # Variables to train.

        trainable_scopes = None

        if trainable_scopes is None:

            variables_to_train = tf.trainable_variables()

        else:

            scopes = [scope.strip() for scope in trainable_scopes.split(',')]

            variables_to_train = []

            for scope in scopes:

                variables = tf.get_collection(tf.GraphKeys.TRAINABLE_VARIABLES, scope)

                variables_to_train.extend(variables)

        losses = tf.get_collection(tf.GraphKeys.LOSSES)

        regularization_losses = tf.get_collection(

            tf.GraphKeys.REGULARIZATION_LOSSES)

        regularization_loss = tf.add_n(regularization_losses)

        loss = tf.add_n(losses)

        tf.summary.scalar("loss", loss)

        tf.summary.scalar("regularization_loss", regularization_loss)

        grad = optimizer.compute_gradients(loss, var_list=variables_to_train)

        grad_updates = optimizer.apply_gradients(grad,

                                                 global_step=global_step)

        update_ops.append(grad_updates)

        # update_op = tf.group(*update_ops)

        with tf.control_dependencies(update_ops):

            total_loss = tf.add_n([loss, regularization_loss])

        tf.summary.scalar("total_loss", total_loss)

        # =================================================================== #

        # Kicks off the training.

        # =================================================================== #

        gpu_options = tf.GPUOptions(per_process_gpu_memory_fraction=0.8)

        config = tf.ConfigProto(log_device_placement=False,

                                gpu_options=gpu_options)

        saver = tf.train.Saver(max_to_keep=5,

                               keep_checkpoint_every_n_hours=1.0,

                               write_version=2,

                               pad_step_number=False)

        if True:

            import os

            import time

            print('start......')

            model_path = './logs'

            batch_size = batch_size

            with tf.Session(config=config) as sess:

                summary = tf.summary.merge_all()

                coord = tf.train.Coordinator()

                threads = tf.train.start_queue_runners(sess=sess, coord=coord)

                writer = tf.summary.FileWriter(model_path, sess.graph)

                init_op = tf.group(tf.global_variables_initializer(),

                                   tf.local_variables_initializer())

                init_op.run()

                for step in range(max_steps):

                    start_time = time.time()

                    loss_value = sess.run(total_loss)

                    # loss_value, summary_str = sess.run([train_tensor, summary_op])

                    # writer.add_summary(summary_str, step)

                    duration = time.time() - start_time

                    if step % 10 == 0:

                        summary_str = sess.run(summary)

                        writer.add_summary(summary_str, step)

                        examples_per_sec = batch_size / duration

                        sec_per_batch = float(duration)

                        format_str = "[*] step %d,  loss=%.2f (%.1f examples/sec; %.3f sec/batch)"

                        print(format_str % (step, loss_value, examples_per_sec, sec_per_batch))

                    # if step % 100 == 0:

                    #     accuracy_step = test_cifar10(sess, training=False)

                    #     acc.append('{:.3f}'.format(accuracy_step))

                    #     print(acc)

                    if step % 500 == 0 and step != 0:

                        saver.save(sess, os.path.join(model_path, "ssd_tf.model"), global_step=step)

                coord.request_stop()

coord.join(threads)
TensorFlow版本我训练了5w轮,损失函数如下,

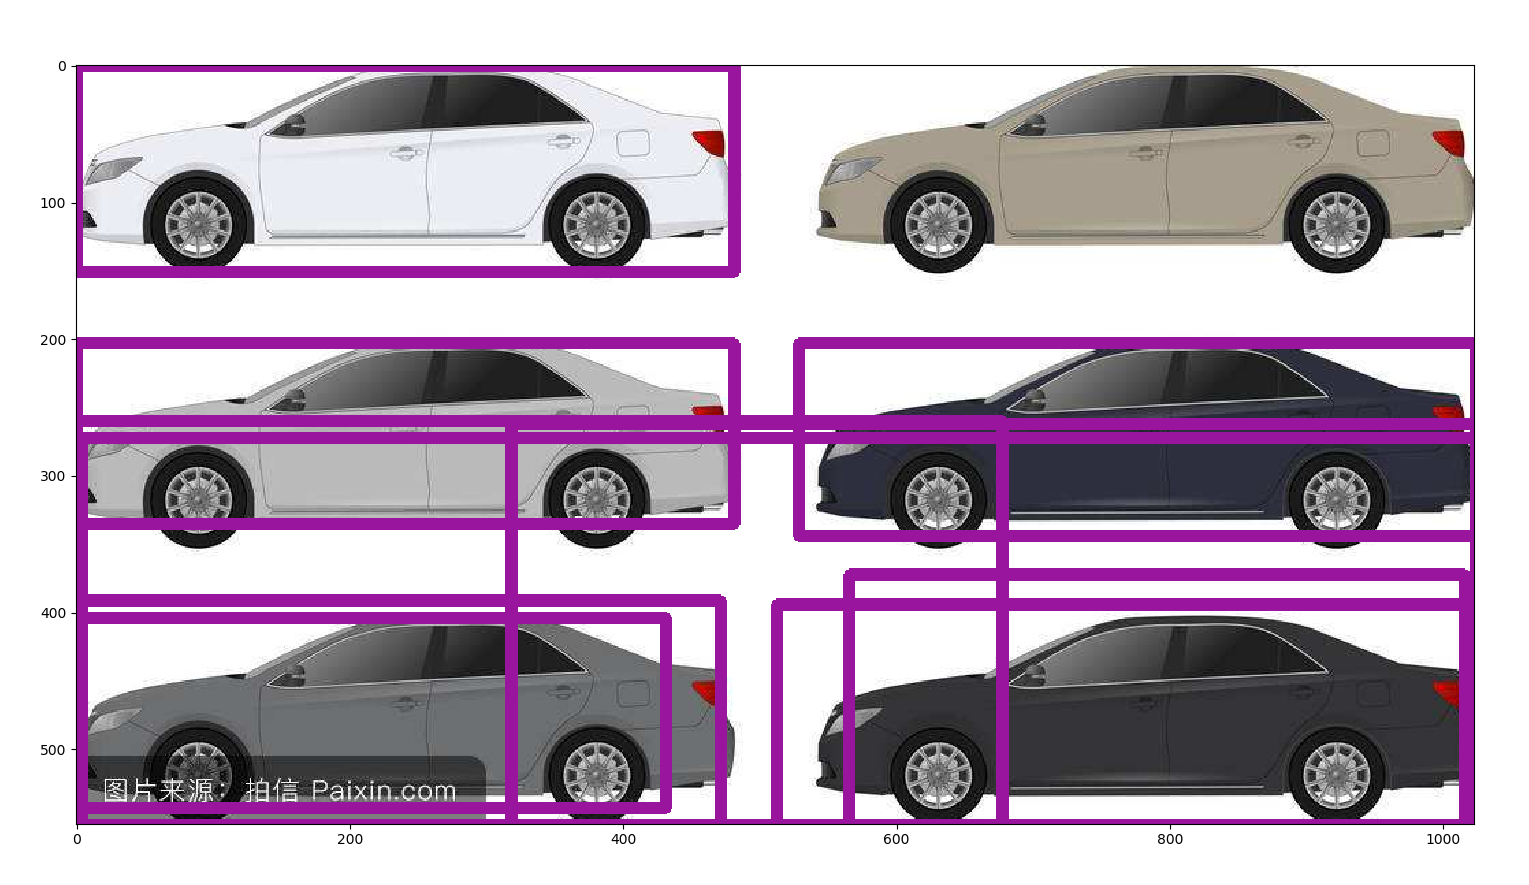
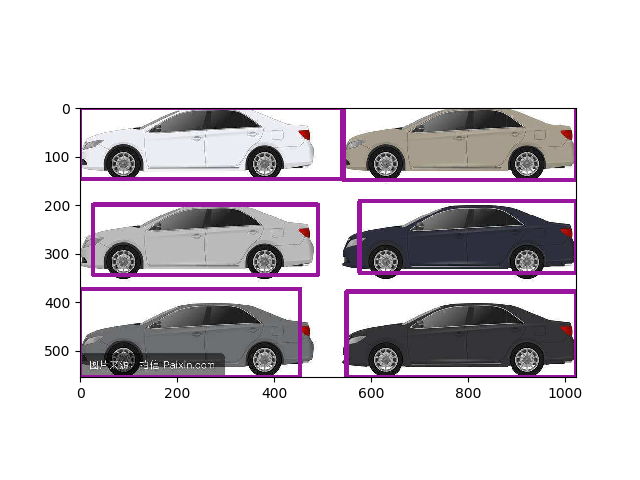
实际上次数不太够,第一幅图是原开源代码放出的训练模型的检测结果,第二幅图是训练5w次的我的版本的结果,可见训练次数仍然不太够(更新,后经分析,图二效果差原因更大是因为非极大值抑制阈值设置过高,改小的话实际上只有一辆车没有检测出来,其他的都很正常)。


实验室的电脑显卡够快(1080Ti),不过散热实在成问题,跑5w次很不容易了,经常重启,所以差不多就这样了,不做更多次数的训练尝试了。
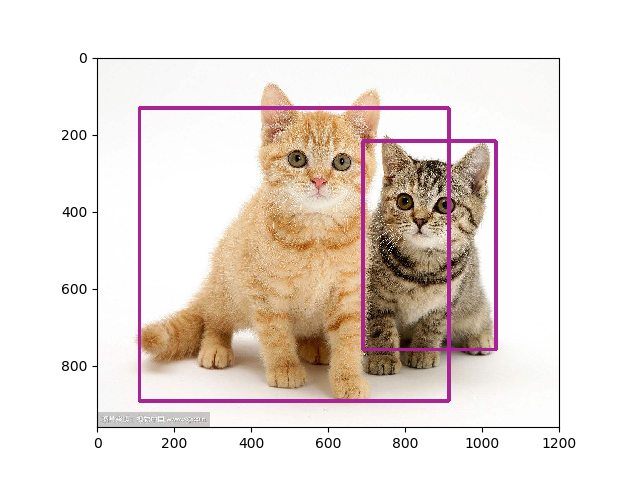
更新,这次设定了20w次训练,实际到17w多次过热重启了,采用最新的模型,并修改了NMS阈值为0.5,检测成功:


『TensorFlow × MXNet』SSD项目复现经验的更多相关文章
- 『TensorFlow Internals』笔记_源码结构
零.资料集合 知乎专栏:Bob学步 知乎提问:如何高效的学习 TensorFlow 代码?. 大佬刘光聪(Github,简书) 开源书:TensorFlow Internals,强烈推荐(本博客参考书 ...
- 『TensorFlow Internals』笔记_系统架构
一.架构概览 TensorFlow 的系统结构以 C API 为界,将整个系统分为前端和后端两个子系统: 前端系统:提供编程模型,负责构造计算图: 后端系统:提供运行时环境,负责执行计算图,后端系统的 ...
- 『TensorFlow』SSD源码学习_其一:论文及开源项目文档介绍
一.论文介绍 读论文系列:Object Detection ECCV2016 SSD 一句话概括:SSD就是关于类别的多尺度RPN网络 基本思路: 基础网络后接多层feature map 多层feat ...
- 『TensorFlow』SSD源码学习_其五:TFR数据读取&数据预处理
Fork版本项目地址:SSD 一.TFR数据读取 创建slim.dataset.Dataset对象 在train_ssd_network.py获取数据操作如下,首先需要slim.dataset.Dat ...
- 『TensorFlow』SSD源码学习_其八:网络训练
Fork版本项目地址:SSD 作者使用了分布式训练的写法,这使得训练部分代码异常臃肿,我给出了部分注释.我对于多机分布式并不很熟,而且不是重点,所以不过多介绍,简单的给出一点训练中作者的优化手段,包含 ...
- 『TensorFlow』专题汇总
TensorFlow:官方文档 TensorFlow:项目地址 本篇列出文章对于全零新手不太合适,可以尝试TensorFlow入门系列博客,搭配其他资料进行学习. Keras使用tf.Session训 ...
- 『TensorFlow』分布式训练_其二_单机多GPU并行&GPU模式设定
建议比对『MXNet』第七弹_多GPU并行程序设计 一.tensorflow GPU设置 GPU指定占用 gpu_options = tf.GPUOptions(per_process_gpu_mem ...
- 『MXNet』专题汇总
MXNet文档 MXNet官方教程 持久化模型 框架介绍 『MXNet』第一弹_基础架构及API 『MXNet』第二弹_Gluon构建模型 『MXNet』第三弹_Gluon模型参数 『MXNet』第四 ...
- 『MXNet』第四弹_Gluon自定义层
一.不含参数层 通过继承Block自定义了一个将输入减掉均值的层:CenteredLayer类,并将层的计算放在forward函数里, from mxnet import nd, gluon from ...
随机推荐
- 【做题】CF285E. Positions in Permutations——dp+容斥
题意:求所有长度为\(n\)的排列\(p\)中,有多少个满足:对于所有\(i \,(1 \leq i \leq n)\),其中恰好有\(k\)个满足\(|p_i - i| = 1\).答案对\(10^ ...
- Excel lastindex of a substring
I think I get what you mean. Let's say for example you want the right-most \ in the following string ...
- AndroidStudio Gradle下载速度慢解决方法
1.在软件里点开工程文件下的 build.gradle 2..在 buildscript 和 allprojects 的 repositories 中分别注释掉 jcenter() 3.在 build ...
- MPI之聚合通信-Scatter,Gather,Allgather
转自:https://blog.csdn.net/sinat_22336563/article/details/70229243 参考:http://mpitutorial.com/tutorials ...
- 【SQL】【Join基础】了解sql中的join用法,看这一篇就够了
转自: https://www.cnblogs.com/reaptomorrow-flydream/p/8145610.html SQL JOIN 子句用于把来自两个或多个表的行结合起来,基于这些表之 ...
- NPOI导入excel文件为DataTable,使用SqlBulkCopy添加到数据库表
public DataTable ExcelToDataTable(Stream stream, string fileName) { DataTable data = new DataTable() ...
- shp与json互转(转载)
转自:http://blog.sina.com.cn/s/blog_673c98be0102v78i.html 对于搞GIS开发的,这2种数据格式太重要了. 一.shp转json 这个要容易些,方法也 ...
- React Native的键盘遮挡问题(input/webview里)
2017-06-15 1:使用keyVoaidView来解决 注意要设置behavio=“absolute”,哎.记性差 好像拼错了 2:使用下面的代码,监听键盘,然后将webView拉高就可以了 i ...
- JaveWeb 公司项目(2)----- 类模态窗口显示DIV并将DIV放置在屏幕正中间
上一篇博客写的是通过隐藏显示进行div的替换,接下来需要在原有的div前添加一个div,进行表单的提交,需要将div放置在正中间,然后类似C#中的模态窗口,在进行完新弹出的div操作之后,才可以进行下 ...
- ros topic 发布一次可能会接收不到数据
rostopic pub - /hdw_update hdw_driver/update_file_msg A B C D 系统提示: publishing and latching message ...
