PyTorch Tutorials 3 Neural Networks
%matplotlib inline
Neural Networks
使用torch.nn包来构建神经网络。
上一讲已经讲过了autograd,nn包依赖autograd包来定义模型并求导。
一个nn.Module包含各个层和一个forward(input)方法,该方法返回output。
例如:
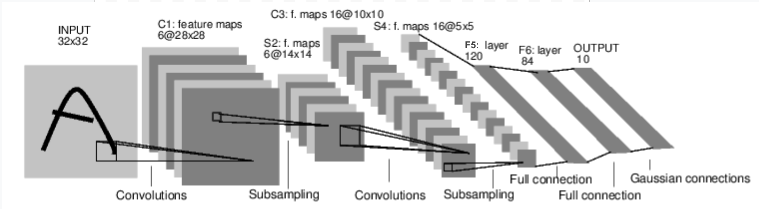
它是一个简单的前馈神经网络,它接受一个输入,然后一层接着一层地传递,最后输出计算的结果。
神经网络的典型训练过程如下:
- 定义包含一些可学习的参数(或者叫权重)神经网络模型;
- 在数据集上迭代;
- 通过神经网络处理输入;
- 计算损失(输出结果和正确值的差值大小);
- 将梯度反向传播会网络的参数;
- 更新网络的参数,主要使用如下简单的更新原则:
weight = weight - learning_rate * gradient
定义网络
开始定义一个网络:
import torch

import torch.nn as nn

import torch.nn.functional as F

class Net(nn.Module):

    def __init__(self):

        super(Net, self).__init__()

        # 1 input image channel, 6 output channels, 5x5 square convolution

        # kernel

        self.conv1 = nn.Conv2d(1, 6, 5)

        self.conv2 = nn.Conv2d(6, 16, 5)

        # an affine operation: y = Wx + b

        self.fc1 = nn.Linear(16 * 5 * 5, 120)

        self.fc2 = nn.Linear(120, 84)

        self.fc3 = nn.Linear(84, 10)

    def forward(self, x):

        # Max pooling over a (2, 2) window

        x = F.max_pool2d(F.relu(self.conv1(x)), (2, 2))

        # If the size is a square you can only specify a single number

        x = F.max_pool2d(F.relu(self.conv2(x)), 2)

        x = x.view(-1, self.num_flat_features(x))

        x = F.relu(self.fc1(x))

        x = F.relu(self.fc2(x))

        x = self.fc3(x)

        return x

    def num_flat_features(self, x):

        size = x.size()[1:]  # all dimensions except the batch dimension

        num_features = 1

        for s in size:

            num_features *= s

        return num_features

net = Net()

print(net)
Net(

  (conv1): Conv2d(1, 6, kernel_size=(5, 5), stride=(1, 1))

  (conv2): Conv2d(6, 16, kernel_size=(5, 5), stride=(1, 1))

  (fc1): Linear(in_features=400, out_features=120, bias=True)

  (fc2): Linear(in_features=120, out_features=84, bias=True)

  (fc3): Linear(in_features=84, out_features=10, bias=True)

)
在模型中必须要定义 forward 函数,backward
函数(用来计算梯度)会被autograd自动创建。
可以在 forward 函数中使用任何针对 Tensor 的操作。
net.parameters()返回可被学习的参数(权重)列表和值
params = list(net.parameters())

print(len(params))

print(params[0].size())  # conv1's .weight
10

torch.Size([6, 1, 5, 5])
测试随机输入32×32。
注:这个网络(LeNet)期望的输入大小是32×32,如果使用MNIST数据集来训练这个网络,请把图片大小重新调整到32×32。
input = torch.randn(1, 1, 32, 32)

out = net(input)

print(out)
tensor([[ 0.1470, -0.0240,  0.0103,  0.0705,  0.0650, -0.0010, -0.0083,  0.0556,

         -0.0686, -0.0675]], grad_fn=<AddmmBackward>)
将所有参数的梯度缓存清零,然后进行随机梯度的的反向传播:
net.zero_grad()

out.backward(torch.randn(1, 10))
Note
``torch.nn`` 只支持小批量输入。整个 ``torch.nn``
包都只支持小批量样本,而不支持单个样本。
例如,``nn.Conv2d`` 接受一个4维的张量,

``每一维分别是sSamples * nChannels * Height * Width(样本数*通道数*高*宽)``。

如果你有单个样本,只需使用 ``input.unsqueeze(0)`` 来添加其它的维数</p></div>
在继续之前,我们回顾一下到目前为止用到的类。
回顾:
torch.Tensor:一个用过自动调用backward()实现支持自动梯度计算的 多维数组 ,
并且保存关于这个向量的梯度 w.r.t.nn.Module:神经网络模块。封装参数、移动到GPU上运行、导出、加载等。nn.Parameter:一种变量,当把它赋值给一个Module时,被 自动 地注册为一个参数。autograd.Function:实现一个自动求导操作的前向和反向定义,每个变量操作至少创建一个函数节点,每一个Tensor的操作都回创建一个接到创建Tensor和 编码其历史 的函数的Function节点。
重点如下:
- 定义一个网络
- 处理输入,调用backword
还剩:
- 计算损失
- 更新网络权重
损失函数
一个损失函数接受一对 (output, target) 作为输入,计算一个值来估计网络的输出和目标值相差多少。
译者注:output为网络的输出,target为实际值
nn包中有很多不同的损失函数。
nn.MSELoss是一个比较简单的损失函数,它计算输出和目标间的均方误差,
例如:
output = net(input)

target = torch.randn(10)  # 随机值作为样例

target = target.view(1, -1)  # 使target和output的shape相同

criterion = nn.MSELoss()

loss = criterion(output, target)

print(loss)
tensor(0.7241, grad_fn=<MseLossBackward>)
现在,如果您使用它的.grad_fn属性沿着loss的方向向后移动,您将看到一个计算图,如下所示:
::
input -> conv2d -> relu -> maxpool2d -> conv2d -> relu -> maxpool2d

      -> view -> linear -> relu -> linear -> relu -> linear

      -> MSELoss

      -> loss
So, when we call loss.backward(), the whole graph is differentiated
w.r.t. the loss, and all Tensors in the graph that has requires_grad=True
will have their .grad Tensor accumulated with the gradient.
For illustration, let us follow a few steps backward:
print(loss.grad_fn)  # MSELoss

print(loss.grad_fn.next_functions[0][0])  # Linear

print(loss.grad_fn.next_functions[0][0].next_functions[0][0])  # ReLU
<MseLossBackward object at 0x0000001FCC3CEEB8>

<AddmmBackward object at 0x0000001FCC3CEBE0>

<AccumulateGrad object at 0x0000001FCC3CEEB8>
反向传播
调用loss.backward()获得反向传播的误差。
但是在调用前需要清除已存在的梯度,否则梯度将被累加到已存在的梯度。
现在,我们将调用loss.backward(),并查看conv1层的偏差(bias)项在反向传播前后的梯度。
net.zero_grad()     # 清除梯度

print('conv1.bias.grad before backward')

print(net.conv1.bias.grad)

loss.backward()

print('conv1.bias.grad after backward')

print(net.conv1.bias.grad)
conv1.bias.grad before backward

tensor([0., 0., 0., 0., 0., 0.])

conv1.bias.grad after backward

tensor([-0.0024,  0.0044, -0.0027,  0.0066, -0.0034,  0.0067])
如何使用损失函数
稍后阅读:
nn包,包含了各种用来构成深度神经网络构建块的模块和损失函数,完整的文档请查看here。
剩下的最后一件事:
- 新网络的权重
更新权重
在实践中最简单的权重更新规则是随机梯度下降(SGD):
``weight = weight - learning_rate * gradient``
我们可以使用简单的Python代码实现这个规则:
    learning_rate = 0.01

    for f in net.parameters():

        f.data.sub_(f.grad.data * learning_rate)
但是当使用神经网络是想要使用各种不同的更新规则时,比如SGD、Nesterov-SGD、Adam、RMSPROP等,PyTorch中构建了一个包torch.optim实现了所有的这些规则。
使用它们非常简单:
import torch.optim as optim

# create your optimizer

optimizer = optim.SGD(net.parameters(), lr=0.01)

# in your training loop:

optimizer.zero_grad()   # zero the gradient buffers

output = net(input)

loss = criterion(output, target)

loss.backward()

optimizer.step()    # Does the update
.. Note::
  Observe how gradient buffers had to be manually set to zero using

  ``optimizer.zero_grad()``. This is because gradients are accumulated

  as explained in `Backprop`_ section.
PyTorch Tutorials 3 Neural Networks的更多相关文章
- PyTorch教程之Neural Networks
我们可以通过torch.nn package构建神经网络. 现在我们已经了解了autograd,nn基于autograd来定义模型并对他们有所区分. 一个 nn.Module模块由如下部分构成:若干层 ...
- pytorch -- CNN 文本分类 -- 《 Convolutional Neural Networks for Sentence Classification》
论文 < Convolutional Neural Networks for Sentence Classification>通过CNN实现了文本分类. 论文地址: 666666 模型图 ...
- Training Deep Neural Networks
http://handong1587.github.io/deep_learning/2015/10/09/training-dnn.html //转载于 Training Deep Neural ...
- Hacker's guide to Neural Networks
Hacker's guide to Neural Networks Hi there, I'm a CS PhD student at Stanford. I've worked on Deep Le ...
- Introduction to Deep Neural Networks
Introduction to Deep Neural Networks Neural networks are a set of algorithms, modeled loosely after ...
- 神经网络指南Hacker's guide to Neural Networks
Hi there, I'm a CS PhD student at Stanford. I've worked on Deep Learning for a few years as part of ...
- 卷积神经网络Convolutional Neural Networks
Convolutional Neural Networks NOTE: This tutorial is intended for advanced users of TensorFlow and a ...
- 第十四章——循环神经网络(Recurrent Neural Networks)(第一部分)
由于本章过长,分为两个部分,这是第一部分. 这几年提到RNN,一般指Recurrent Neural Networks,至于翻译成循环神经网络还是递归神经网络都可以.wiki上面把Recurrent ...
- 3D Graph Neural Networks for RGBD Semantic Segmentation
3D Graph Neural Networks for RGBD Semantic Segmentation 原文章:https://www.yuque.com/lart/papers/wmu47a ...
随机推荐
- Ant环境安装
一:下载安装Ant,配置环境变量 1.进入http://ant.apache.org/bindownload.cgi下载ant 2.配置环境变量 新建ANT_HOME 配置path环境变量 配置cla ...
- 如何使用Feign构造多参数的请求
原文:http://www.itmuch.com/spring-cloud-sum/feign-multiple-params/ 本节来探讨如何使用Feign构造多参数的请求.笔者以GET及POST请 ...
- 用BCB 画 Code128 B模式条码
//--------------------------------------------------------------------------- #include <vcl.h> ...
- centOS7 下 安装mysql8.x
第一部分 CentOS7安装mysql1.1 安装前清理工作:1.1.1 清理原有的mysql数据库:使用以下命令查找出安装的mysql软件包和依赖包: rpm -pa | grep mysql 显示 ...
- DNS工作流程及原理 域名、IP与DNS的关系
转自:http://blog.csdn.net/maminyao/article/details/7390208 一.DNS服务概述 DNS是Domain Name System的缩写,即域名系统.其 ...
- qsort中的函数指针,及函数解释
函数指针有何用 函数指针的应用场景比较多,以库函数qsort排序函数为例,它的原型如下: void qsort(void *base,size_t nmemb,size_t size , int(*c ...
- Vue项目中v-bind动态绑定src路径不成功
问题: 在做Vue项目的时候,由于项目需求,需要动态绑定img的src时,突然发现如果说是直接请求后台接口的图片地址就能显示, 但是直接动态绑定img的src的图片的相对路径或者是绝对路径的时候,图片 ...
- 提高 github.com 项目下载速度
1 注册一个 github.com 账号 2 进入你感兴趣的项目 3 Fork 一个副本到你的账号之下 4 git clone https://github.com/your-name/fork-p ...
- PostgreSQL、Greenplum 日常监控 和 维护任务
背景 Greenplum的日常监控点.评判标准,日常维护任务. 展示图层 由于一台主机可能跑多个实例,建议分层展示. 另外,即使是ON ECS虚拟机(一个虚拟机一个实例一对一的形态)的产品形态,实际上 ...
- Python获取百度浏览记录
Python模拟百度登录实例详解 http://www.jb51.net/article/78406.htm Python实战计划学习作业2-1 http://blog.csdn.net/python ...