axios使用API
背景:请求失败后,因跨域引起的不能传递statusCode问题,通过设置前后台选项解决,这里先总结一下axios的使用
一、安装与配置:
安装:
npm install axios
axios使用API:
1.默认使用的是get请求:
// Send a GET request (default method)

axios('/user/12345');
2.常用2种请求方式:
// GET :获取图片

axios({

  method:'get',

  url:'http://bit.ly/2mTM3nY',

  responseType:'stream'

})

  .then(function (response) {

    response.data.pipe(fs.createWriteStream('ada_lovelace.jpg'))

  });

// Send a POST request

axios({

  method: 'post',

  url: '/user/12345',

  data: {

    firstName: 'Fred',

    lastName: 'Flintstone'

  }

});
3.自定义配置axios:
// 全局more设置

axios.defaults.baseURL = 'https://api.example.com';

axios.defaults.headers.common['Authorization'] = AUTH_TOKEN;

axios.defaults.headers.post['Content-Type'] = 'application/x-www-form-urlencoded';

//自定义设置

const instance = axios.create({

  baseURL: 'https://some-domain.com/api/',

  timeout: 1000,

  headers: {'X-Custom-Header': 'foobar'}

});
// 全局与个别请求设置

instance.defaults.timeout = 2500;

instance.get('/longRequest', {

  timeout: 5000

});
// 设置token

const CancelToken = axios.CancelToken;

const source = CancelToken.source();

axios.get('/user/12345', {

  cancelToken: source.token

}).catch(function (thrown) {

  if (axios.isCancel(thrown)) {

    console.log('Request canceled', thrown.message);

  } else {

    // handle error

  }

});

axios.post('/user/12345', {

  name: 'new name'

}, {

  cancelToken: source.token

})

// cancel the request (the message parameter is optional)

source.cancel('Operation canceled by the user.');
// 自定义取消token

const CancelToken = axios.CancelToken;

let cancel;

axios.get('/user/12345', {

  cancelToken: new CancelToken(function executor(c) {

    // An executor function receives a cancel function as a parameter

    cancel = c;

  })

});

// cancel the request

cancel();
4.请求配置:
{

  url: '/user',

  method: 'get', // default

  baseURL: 'https://some-domain.com/api/',

  transformRequest: [function (data, headers) {

    return data;

  }],

  transformResponse: [function (data) {

    return data;

  }],

  headers: {'X-Requested-With': 'XMLHttpRequest'},

  params: {

    ID: 12345

  },

  paramsSerializer: function (params) {

    return Qs.stringify(params, {arrayFormat: 'brackets'})

  },

  data: {

    firstName: 'Fred'

  },

  // 设置请求超时.

  timeout: 1000, // default is `0` (no timeout)

  // 【是否使用凭证】

  withCredentials: false, // default

  adapter: function (config) {

    /* ... */

  },

  auth: {

    username: 'janedoe',

    password: 's00pers3cret'

  },

  responseType: 'json', // default

  responseEncoding: 'utf8', // default

  xsrfCookieName: 'XSRF-TOKEN', // default

  xsrfHeaderName: 'X-XSRF-TOKEN', // default

  onUploadProgress: function (progressEvent) {

    // Do whatever you want with the native progress event

  },

  onDownloadProgress: function (progressEvent) {

    // Do whatever you want with the native progress event

  },

  maxContentLength: 2000,

  validateStatus: function (status) {

    return status >= 200 && status < 300; // default

  },

  maxRedirects: 5, // default

  socketPath: null, // default

  httpAgent: new http.Agent({ keepAlive: true }),

  httpsAgent: new https.Agent({ keepAlive: true }),

  proxy: {

    host: '127.0.0.1',

    port: 9000,

    auth: {

      username: 'mikeymike',

      password: 'rapunz3l'

    }

  },

  cancelToken: new CancelToken(function (cancel) {

  })

}
5.返回配置:
{

  // `data` is the response that was provided by the server

  data: {},

  // `status` is the HTTP status code from the server response

  status: 200,

  // `statusText` is the HTTP status message from the server response

  statusText: 'OK',

  // `headers` the headers that the server responded with

  // All header names are lower cased

  headers: {},

  // `config` is the config that was provided to `axios` for the request

  config: {},

  // `request` is the request that generated this response

  request: {}

}
6.拦截操作:返回正确后操作,返回错误操作
axios.get('/user/12345')

  .then(function (response) {

    console.log(response.data);

    console.log(response.status);

    console.log(response.statusText);

    console.log(response.headers);

    console.log(response.config);

  });
axios.get('/user/12345')

  .catch(function (error) {

    if (error.response) {

      // The request was made and the server responded with a status code

      // that falls out of the range of 2xx

      console.log(error.response.data);

      console.log(error.response.status);

      console.log(error.response.headers);

    } else if (error.request) {

      // The request was made but no response was received

      // `error.request` is an instance of XMLHttpRequest in the browser and an instance of

      // http.ClientRequest in node.js

      console.log(error.request);

    } else {

      // Something happened in setting up the request that triggered an Error

      console.log('Error', error.message);

    }

    console.log(error.config);

  });
在main.js导入:
// 引入axios,并加到原型链中

import axios from 'axios';

Vue.prototype.$axios = axios;

import QS from 'qs'

Vue.prototype.qs = QS;
设置代理解决跨域:
import axios from 'axios'

import qs from 'qs'

axios.defaults.timeout = 5000;                        //响应时间

axios.defaults.headers.post['Content-Type'] = 'application/x-www-form-urlencoded;charset=UTF-8';        //配置请求头

axios.defaults.baseURL = '';   //配置接口地址

//POST传参序列化(添加请求拦截器)

axios.interceptors.request.use((config) => {

    //在发送请求之前做某件事

    if(config.method  === 'post'){

        config.data = qs.stringify(config.data);

    }

    return config;

},(error) =>{

    console.log('错误的传参')

    return Promise.reject(error);

});

//返回状态判断(添加响应拦截器)

axios.interceptors.response.use((res) =>{

    //对响应数据做些事

    if(!res.data.success){

        return Promise.resolve(res);

    }

    return res;

}, (error) => {

    console.log('网络异常')

    return Promise.reject(error);

});

//返回一个Promise(发送post请求)

export function fetchPost(url, params) {

    return new Promise((resolve, reject) => {

        axios.post(url, params)

            .then(response => {

                resolve(response);

            }, err => {

                reject(err);

            })

            .catch((error) => {

                reject(error)

            })

    })

}

////返回一个Promise(发送get请求)

export function fetchGet(url, param) {

    return new Promise((resolve, reject) => {

        axios.get(url, {params: param})

            .then(response => {

                resolve(response)

            }, err => {

                reject(err)

            })

            .catch((error) => {

                reject(error)

            })

    })

}

export default {

    fetchPost,

    fetchGet,

}
vue-cli 3.0的在 package.json 同级目录新建一个 vue.config.js 文件,加入下面代码,其他版本找到配置文件的devServer加入代码,如下:
module.exports = {

    //axios域代理,解决axios跨域问题

    baseUrl: '/',

    devServer: {

        proxy: {

            '': {

                target: 'http://192.168.0.108:8090',

                changeOrigin: true,

                ws: true,

                pathRewrite: {

                }

            }

        }

    }

}
实例:get/post
const axios = require('axios');

// 1.在url中携带

axios.get('/user?ID=12345') // get

  .then(function (response) {

    // handle success

    console.log(response);

  })

  .catch(function (error) {

    // handle error

    console.log(error);

  })

  .then(function () {

    // always executed

  });

// 2.通过对象params传递

axios.get('/user', {

    params: {

      ID: 12345

    }

  })

  .then(function (response) {

    console.log(response);

  })

  .catch(function (error) {

    console.log(error);

  })

  .then(function () {

    // always executed

  });

// 3.异步请求

async function getUser() {

  try {

    const response = await axios.get('/user?ID=12345');

    console.log(response);

  } catch (error) {

    console.error(error);

  }

}
axios.post('/user', { // post

    firstName: 'Fred',

    lastName: 'Flintstone'

  })

  .then(function (response) {

    console.log(response);

  })

  .catch(function (error) {

    console.log(error);

  });
执行多个并发请求:
function getUserAccount() {

  return axios.get('/user/12345');

}

function getUserPermissions() {

  return axios.get('/user/12345/permissions');

}

axios.all([getUserAccount(), getUserPermissions()])

  .then(axios.spread(function (acct, perms) {

    // Both requests are now complete

  }));
使用封装请求https.js,简化操作:
import https from '../https.js'   // 注意用自己的路径

loginPost: function () {

    let params ={'username': 'admin', 'password': 'admin123'}

    https.fetchPost('/login',params ).then((data) => {

        // console.log('fetchPost',data)

    }).catch(err=>{

            console.log(err)

        }

    )

},

indexPost2:function (date) {

  // ...

},
补:默认情况下,axios将JavaScript对象序列化为JSON。要以application/x-www-form-urlencoded格式
1.Json对象转字符串:用JSON.stringify()将对象a变成了字符串c,那么我就可以用JSON.parse()将字符串c还原成对象a
let arr = [1,2,3];

JSON.stringify(arr);//'[1,2,3]'

typeof JSON.stringify(arr);//string

let string = '[1,2,3]';

console.log(JSON.parse(string))//[1,2,3]

console.log(typeof JSON.parse(string))//object
作用1:判断是否包含、相等、
//判断数组是否包含某对象

let data = [

    {name:'echo'},

    {name:'听风是风'},

    {name:'天子笑'},

    ],

    val = {name:'天子笑'};

JSON.stringify(data).indexOf(JSON.stringify(val)) !== -1;//true

//判断两数组/对象是否相等

let a = [1,2,3],

    b = [1,2,3];

JSON.stringify(a) === JSON.stringify(b);//true
作用2:本地数据缓存
//存
function setLocalStorage(key,val){
window.localStorage.setItem(key,JSON.stringify(val));
};
//取
function getLocalStorage(key){
let val = JSON.parse(window.localStorage.getItem(key));
return val;
};
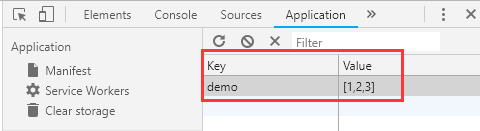
//测试
setLocalStorage('demo',[1,2,3]);
let a = getLocalStorage('demo');//[1,2,3]
作用3:深拷贝
//深拷贝

function deepClone(data) {

    let _data = JSON.stringify(data),

        dataClone = JSON.parse(_data);

    return dataClone;

};

//测试

let arr = [1,2,3],

    _arr = deepClone(arr);

arr[0] = 2;

console.log(arr,_arr)//[2,2,3]  [1,2,3]
区分:toString()虽然可以将数组转为字符串,但并不能对{name:'天子笑'}这类对象实现你想要的操作,它的受众更多是数字。
2.node,js:
const querystring = require('querystring'); // node.js内

axios.post('http://something.com/', querystring.stringify({ foo: 'bar' }));
3.使用“qs”工具转换:
// const qs = require('qs');

import qs from 'qs'; // 推荐使用es6

axios.post('/foo', qs.stringify({ 'bar': 123 })); // 方式1

const data = { 'bar': 123 };

const options = {

  method: 'POST',

  headers: { 'content-type': 'application/x-www-form-urlencoded' },

  data: qs.stringify(data),

  url,

};

axios(options); // 方式2
axios使用API的更多相关文章
- Axios & fetch api & Promise & POST
Axios & fetch api & Promise & POST https://github.com/axios/axios https://appdividend.co ...
- vue中比较完美请求的栗子(使用 axios 访问 API)
vue中比较完美请求的栗子(使用 axios 访问 API) 官网地址:https://vuejs.bootcss.com/v2/cookbook/using-axios-to-consume-api ...
- react封装基于axios的API请求
一.最近做的一个后台管理项目,基于antd-pro做的,需要封装基于axios请求,便于开发,直接上代码. import axios from 'axios'; export const Method ...
- vue项目实践-添加axios封装api请求
安装 axios npm install axios --save 创建实例 (utils/fetch.js) axios 默认提交格式为:application/json 可使用 qs 模块(需要安 ...
- 【axios】API 说明
基于promise用于浏览器和node.js的http客户端 特点 支持浏览器和node.js 支持promise 能拦截请求和响应 能转换请求和响应数据 能取消请求 自动转换JSON数据 浏览器端支 ...
- vue2购物车ch1-(安装依赖、简单配置、 axios获取api的模拟数据)
0--项目说明 说明此项目源自某课网购物车教程,但是在开发过程中,发现在开发过程中用的还是 vue-resource(宣布不更新的类$.ajx()插件),为了以后的发展使用axios.js,详情参考 ...
- vue中Axios的封装和API接口的管理
前端小白的声明: 这篇文章为转载:主要是为了方便自己查阅学习.如果对原博主造成侵犯,我会立即删除. 转载地址:点击查看 如图,面对一团糟代码的你~~~真的想说,What F~U~C~K!!! 回归正题 ...
- Vue.js Cookbook: 添加实例属性; 👍 axios(4万➕✨)访问API; filters过滤器;
add instance properties //加上$,防止和已经定义的data,method, computed的名字重复,导致被覆写.//可以自定义添加其他符号. Vue.prototype. ...
- 使用Vue.js和Axios从第三方API获取数据 — SitePoint
更多的往往不是,建立你的JavaScript应用程序时,你会想把数据从远程源或消耗一个[ API ](https:/ /恩.维基百科.org /维基/ application_programming_ ...
随机推荐
- rf安装对应requests库的方法
先要安装requests,再安装requestsLibrary pip install requests pip install robotframework-requests github地址 ht ...
- 转 zabbix 优化方法 以及数据库查询方法 两则
###########sample 1 https://www.cnblogs.com/hanshanxiaoheshang/p/10304672.html (不错) 如何从zabbix server ...
- LeetCode_202. Happy Number
202. Happy Number Easy Write an algorithm to determine if a number is "happy". A happy num ...
- Vue学习笔记十三:Vue+Bootstrap+vue-resource从接口获取数据库数据
目录 前言 SpringBoot提供后端接口 Entity类 JPA操作接口 配置文件 数据库表自动映射,添加数据 写提供数据的接口 跨域问题 前端修改 效果图 待续 前言 Vue学习笔记九的列表案例 ...
- NETTY option参数
Channel配置参数 (1).通用参数 CONNECT_TIMEOUT_MILLIS : Netty参数,连接超时毫秒数,默认值30000毫秒即30秒. MAX_MESSAGES_PER_REA ...
- 【docker 使用】基本docker命令
查看镜像 docker images 删除镜像 docker rmi [镜像id的前5位]或[镜像name:镜像tag] 如果有两个镜像指向同一个id,则使用镜像id进行删除时会报错,需要使用name ...
- vue-cli3项目中全局引入less sass文件 以及使用本地图片在不同地方规则
第一种直接在main.js中引入,需要声明loader demo: import '!style-loader!css-loader!less-loader!./assets/css/common.l ...
- Sequelize模型定义
定义 定义模型与表之间的映射,使用 define 方法. Sequelize 会自动增加 createdAt 和 updated 属性,这样能知道一个实例的创建时间和最终修改时间.如果不想自动生成,可 ...
- Given a family tree, find out if two people are blood related
Given a family tree for a few generations for the entire population and two people write a routine t ...
- Java基础教程:多线程杂谈——双重检查锁与Volatile
Java基础教程:多线程杂谈——双重检查锁与Volatile 双重检查锁 有时候可能需要推迟一些高开销的对象初始化操作,并且只有在使用这些对象时才进行初始化.此时程序员可能会采用延迟初始化.但要正确实 ...