TensorFlow使用记录 (五): 激活函数和初始化方式
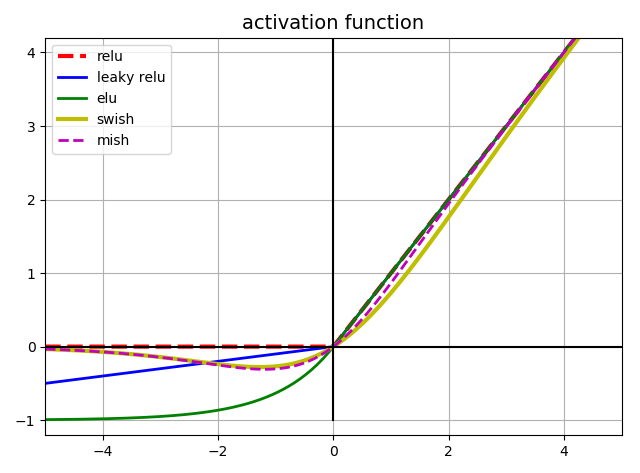
In general ELU > leaky ReLU(and its variants) > ReLU > tanh > logistic. If you care a lot about runtime performance, then you may prefer leaky ReLUs over ELUs. If you don't want to tweak yet another hyperparameter, you may just use the default $\alpha$ value suggested earlier(0.01 for the leaky ReLU, and 1 for ELU). If you have spare time and computing power, you can use cross-validation to evaluate other activation functions, in particular RReLU if your network is overfitting, or PReLU if you have a huge training set.
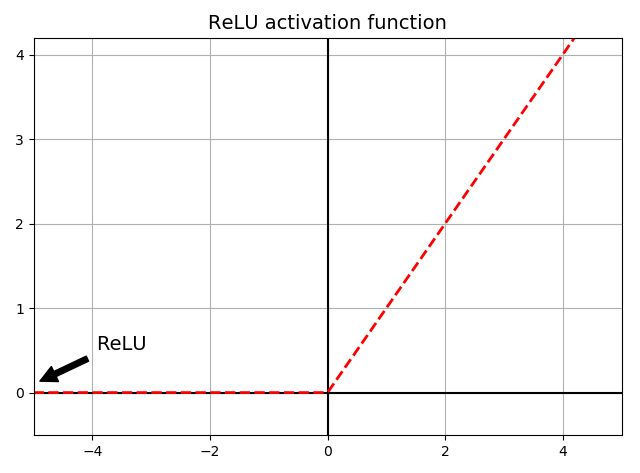
ReLU
\begin{equation}
ReLU(z) = max(0, z)
\end{equation}
tf.nn.relu
import matplotlib.pyplot as plt

import numpy as np

def relu(z):

    return np.maximum(0, z)

z = np.linspace(-5, 5, 200)

plt.plot(z, relu(z), "r--", linewidth=2)

props = dict(facecolor='black', shrink=0.1)

plt.annotate('ReLU', xytext=(-3.5, 0.5), xy=(-5, 0.1), arrowprops=props, fontsize=14, ha="center")

plt.title("ReLU activation function", fontsize=14)

plt.plot([-5, 5], [0, 0], 'k-')

plt.plot([0, 0], [-0.5, 4.2], 'k-')

plt.grid(True)

plt.axis([-5, 5, -0.5, 4.2])

plt.tight_layout()

plt.show()
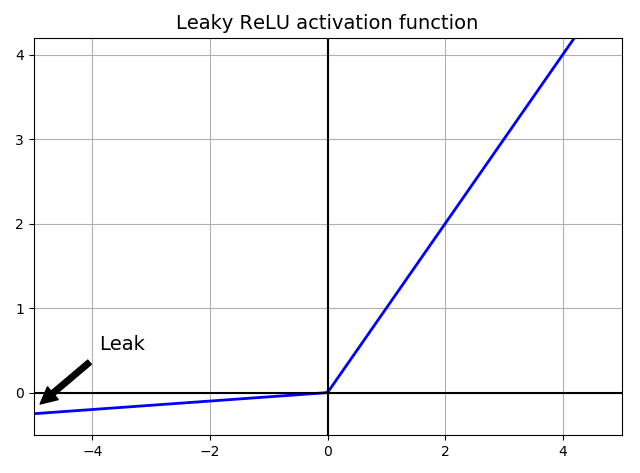
leaky ReLU
\begin{equation}
LeakyReLU_{\alpha}(z) = max(\alpha z, z)
\end{equation}
nn.leaky_relu
import matplotlib.pyplot as plt

import numpy as np

def leaky_relu(z, alpha=0.01):

    return np.maximum(alpha*z, z)

z = np.linspace(-5, 5, 200)

plt.plot(z, leaky_relu(z, 0.05), "b-", linewidth=2)

plt.plot([-5, 5], [0, 0], 'k-')

plt.plot([0, 0], [-0.5, 4.2], 'k-')

plt.grid(True)

props = dict(facecolor='black', shrink=0.1)

plt.annotate('Leak', xytext=(-3.5, 0.5), xy=(-5, -0.2), arrowprops=props, fontsize=14, ha="center")

plt.title("Leaky ReLU activation function", fontsize=14)

plt.axis([-5, 5, -0.5, 4.2])

plt.tight_layout()

plt.show()
ELU
\begin{equation}
\label{b}
ELU(z)=
\begin{cases}
\alpha(e^{z} - 1) & if\ z < 0 \\
z & if\ z\ge 0
\end{cases}
\end{equation}
tf.nn.elu
import matplotlib.pyplot as plt

import numpy as np

def elu(z, alpha=1):

    return np.where(z < 0, alpha * (np.exp(z) - 1), z)

z = np.linspace(-5, 5, 200)

plt.plot(z, elu(z), "g-", linewidth=2)

plt.plot([-5, 5], [0, 0], 'k-')

plt.plot([-5, 5], [-1, -1], 'k--')

plt.plot([0, 0], [-2.2, 3.2], 'k-')

plt.grid(True)

plt.title(r"ELU activation function ($\alpha=1$)", fontsize=14)

plt.axis([-5, 5, -2.2, 3.2])

plt.tight_layout()

plt.show()

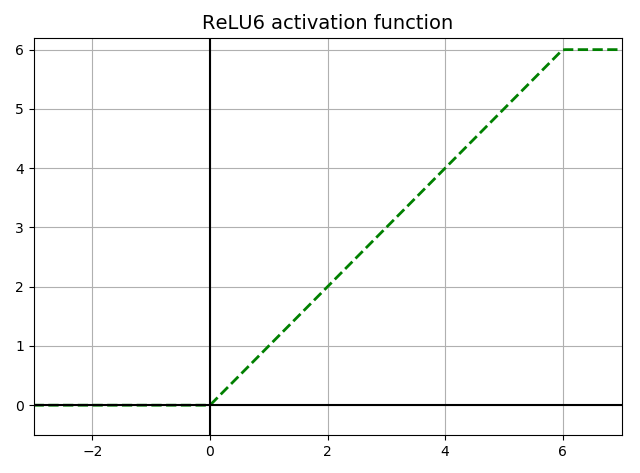
Relu6
\begin{equation}
ReLU6(z) = min(max(z, 0), 6)
\end{equation}
tf.nn.relu6
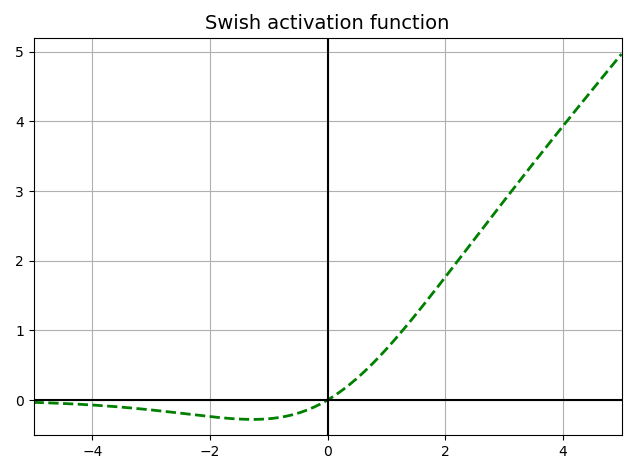
Swish
\begin{equation}
Swish(z) = z*sigmoid(\beta z)
\end{equation}
def swish(x, b = 1):

    return x * tf.nn.sigmoid(b * x)
import matplotlib.pyplot as plt

import numpy as np

def swish(z, b=1):

    return z/(1+np.exp(-b*z))

z = np.linspace(-5, 5, 200)

plt.plot(z, swish(z), "g--", linewidth=2)

plt.plot([-5, 5], [0, 0], 'k-')

plt.plot([0, 0], [-0.5, 5.2], 'k-')

plt.grid(True)

plt.title(r"Swish activation function", fontsize=14)

plt.axis([-5, 5, -0.5, 5.2])

plt.tight_layout()

plt.show()
简单训练 MNIST
import tensorflow as tf

def Swish(features):

    return features*tf.nn.sigmoid(features)

# 1. create data

from tensorflow.examples.tutorials.mnist import input_data

mnist = input_data.read_data_sets('../MNIST_data', one_hot=True)

X = tf.placeholder(tf.float32, shape=(None, 784), name='X')

y = tf.placeholder(tf.int32, shape=(None), name='y')

# 2. define network

with tf.name_scope('dnn'):

    hidden1 = tf.layers.dense(X, 300, activation=Swish, name='hidden1')

    hidden2 = tf.layers.dense(hidden1, 100, activation=Swish, name='hidden2')

    logits = tf.layers.dense(hidden2, 10, name='output')

    # prob = tf.layers.dense(hidden2, 10, tf.nn.softmax, name='prob')

# 3. define loss

with tf.name_scope('loss'):

    # tf.losses.sparse_softmax_cross_entropy() label is not one_hot and dtype is int*

    # xentropy = tf.losses.sparse_softmax_cross_entropy(labels=tf.argmax(y, axis=1), logits=logits)

    # tf.nn.sparse_softmax_cross_entropy_with_logits() label is not one_hot and dtype is int*

    # xentropy = tf.nn.sparse_softmax_cross_entropy_with_logits(labels=tf.argmax(y, axis=1), logits=logits)

    # loss = tf.reduce_mean(xentropy)

    loss = tf.losses.softmax_cross_entropy(onehot_labels=y, logits=logits) # label is one_hot

# 4. define optimizer

learning_rate = 0.01

with tf.name_scope('train'):

    optimizer_op = tf.train.GradientDescentOptimizer(learning_rate).minimize(loss)

with tf.name_scope('eval'):

    correct = tf.nn.in_top_k(logits, tf.argmax(y, axis=1), 1) # 目标是否在前K个预测中, label's dtype is int*

    accuracy = tf.reduce_mean(tf.cast(correct, tf.float32))

# 5. initialize

init_op = tf.group(tf.global_variables_initializer(), tf.local_variables_initializer())

saver = tf.train.Saver()

# 5. train & test

n_epochs = 20

n_batches = 50

batch_size = 50

with tf.Session() as sess:

    sess.run(init_op)

    for epoch in range(n_epochs):

        for iteration in range(mnist.train.num_examples // batch_size):

            X_batch, y_batch = mnist.train.next_batch(batch_size)

            sess.run(optimizer_op, feed_dict={X: X_batch, y: y_batch})

        acc_train = accuracy.eval(feed_dict={X: X_batch, y: y_batch}) # 最后一个 batch 的 accuracy

        acc_test = accuracy.eval(feed_dict={X: mnist.test.images, y: mnist.test.labels})

        loss_test = loss.eval(feed_dict={X: mnist.test.images, y: mnist.test.labels})

        print(epoch, "Train accuracy:", acc_train, "Test accuracy:", acc_test, "Test loss:", loss_test)

    save_path = saver.save(sess, "./my_model_final.ckpt")

# with tf.Session() as sess:

#     sess.run(init_op)

#     saver.restore(sess, "./my_model_final.ckpt")

#     acc_test = accuracy.eval(feed_dict={X: mnist.test.images, y: mnist.test.labels})

#     loss_test = loss.eval(feed_dict={X: mnist.test.images, y: mnist.test.labels})

#     print("Test accuracy:", acc_test, ", Test loss:", loss_test)

"""

tf.sigmoid        0.9062

tf.tanh           0.9611

tf.relu           0.9713

tf.nn.leaky_relu  0.9674

tf.nn.elu         0.9613

Swish             0.9605

"""
初始化方式
tensorflow\python\ops\init_ops.py
zeros_initializer = Zeros

ones_initializer = Ones

constant_initializer = Constant

random_uniform_initializer = RandomUniform

random_normal_initializer = RandomNormal

truncated_normal_initializer = TruncatedNormal

uniform_unit_scaling_initializer = UniformUnitScaling

variance_scaling_initializer = VarianceScaling

glorot_uniform_initializer = GlorotUniform

glorot_normal_initializer = GlorotNormal

orthogonal_initializer = Orthogonal

identity_initializer = Identity

convolutional_delta_orthogonal = ConvolutionDeltaOrthogonal

convolutional_orthogonal_1d = ConvolutionOrthogonal1D

convolutional_orthogonal_2d = ConvolutionOrthogonal2D

convolutional_orthogonal_3d = ConvolutionOrthogonal3D
random_uniform_initializer
生成均匀分布的随机数
__init__(

    minval=0,

    maxval=None,

    seed=None,

    dtype=tf.dtypes.float32

)
random_normal_initializer
生成标准正态分布的随机数
__init__(

    mean=0.0,

    stddev=1.0,

    seed=None,

    dtype=tf.dtypes.float32

)
truncated_normal_initializer
生成截断正态分布的随机数,参数同 random_normal_initializer
uniform_unit_scaling_initializer
和均匀分布差不多,只是这个初始化方法不需要指定最小最大值,是通过计算出来的。参数为(factor=1.0, seed=None, dtype=dtypes.float32)
max_val = math.sqrt(3 / input_size) * self.factor
variance_scaling_initializer
综合体
__init__(self,

         scale=1.0,

         mode="fan_in",

         distribution="truncated_normal",

         seed=None,

         dtype=dtypes.float32)
scale = self.scaleif self.mode == "fan_in":

  scale /= max(1., fan_in)

elif self.mode == "fan_out":

  scale /= max(1., fan_out)

else:

  scale /= max(1., (fan_in + fan_out) / 2.)

if self.distribution == "normal" or self.distribution == "truncated_normal":

  # constant taken from scipy.stats.truncnorm.std(a=-2, b=2, loc=0., scale=1.)

  stddev = math.sqrt(scale) / .87962566103423978

  return random_ops.truncated_normal(

      shape, 0.0, stddev, dtype, seed=self.seed)

elif self.distribution == "untruncated_normal":

  stddev = math.sqrt(scale)

  return random_ops.random_normal(shape, 0.0, stddev, dtype, seed=self.seed)

else:

  limit = math.sqrt(3.0 * scale)

  return random_ops.random_uniform(

      shape, -limit, limit, dtype, seed=self.seed)
glorot_uniform_initializer & glorot_normal_initializer
标准的 Xavier 初始化方式
limit = sqrt(6 / (fan_in + fan_out))
stddev = sqrt(2 / (fan_in + fan_out))
TensorFlow使用记录 (五): 激活函数和初始化方式的更多相关文章
- TensorFlow函数(五)参数初始化方法
1.初始化为常量 tf.constant_initializer(value, dtype) 生成一个初始值为常量value的tensor对象 value:指定的常量 dtype:数据类型 tf.ze ...
- tensorflow笔记(五)之MNIST手写识别系列二
tensorflow笔记(五)之MNIST手写识别系列二 版权声明:本文为博主原创文章,转载请指明转载地址 http://www.cnblogs.com/fydeblog/p/7455233.html ...
- C++的各种初始化方式
C++小实验测试:下面程序中main函数里a.a和b.b的输出值是多少? #include <iostream> struct foo { foo() = default; int a; ...
- C++ vector初始化方式
C++的初始化方法很多,各种初始化方法有一些不同. (1): vector<int> ilist1; 默认初始化,vector为空, size为0,表明容器中没有元素,而且 capacit ...
- TensorFlow使用记录 (七): BN 层及 Dropout 层的使用
参考:tensorflow中的batch_norm以及tf.control_dependencies和tf.GraphKeys.UPDATE_OPS的探究 1. Batch Normalization ...
- TensorFlow使用记录 (六): 优化器
0. tf.train.Optimizer tensorflow 里提供了丰富的优化器,这些优化器都继承与 Optimizer 这个类.class Optimizer 有一些方法,这里简单介绍下: 0 ...
- TensorFlow使用记录 (一): 基本概念
基本使用 使用graph来表示计算任务 在被称之为Session的上下文中执行graph 使用tensor表示数据 通过Variable维护状态 使用feed和fetch可以为任意的操作(op)赋值或 ...
- 源码详解openfire保存消息记录_修改服务端方式
实现openfire消息记录通常有两种方式,修改服务端和添加消息记录插件. 今天,简单的说明一下修改服务端方式实现消息记录保存功能. 实现思路 修改前: 默认的,openfire只提供保存离线记录至o ...
- C基础--结构体成员初始化方式
之前在linux内核代码中看到结构体成员成员初始化使用类似于.owner = THIS_MODULE, 不太见过,于是搜了个博客,分享下: 转自:http://www.cnblogs.com/Anke ...
随机推荐
- Pytest+allure安装和框架搭建
接口自动化框架搭建 -- 公司系统自测使用,只跑核心业务流程 编辑中...... 1.安装Pytest pip install -U pytest 1.1Pycharm测试脚本运行 创建project ...
- go install
go get使用时的附加参数 使用 go get 时可以配合附加参数显示更多的信息及实现特殊的下载和安装操作,详见下表所示. go get 使用时的附加参数 附加参数 备 注 -v 显示操作流程的日志 ...
- singleWsdl和wsdl区别,Axis2和CXF对比
WebService是一个SOA(面向服务的编程)的架构,它是不依赖于语言,不依赖于平台,可以实现不同的语言间的相互调用,通过Internet进行基于Http协议的网络应用间的交互. 其实WebSer ...
- 03docker镜像
docker的镜像操作 Union文件系统是Docker镜像的基础. UnionFS(联合文件系统):Union文件系统是一种分层,轻量级并且高性能的文件系统.它支持对文件系统的修改作为一次提交来一层 ...
- 爬虫中什么是requests
print(response.text) #响应的信息 print(response.headers) #获取响应头 print(response.status_code) #响应状态码 print( ...
- java实现spark常用算子之Take
import org.apache.spark.SparkConf;import org.apache.spark.api.java.JavaRDD;import org.apache.spark.a ...
- C# 中使用反射的优缺点
本文摘至于:http://blog.csdn.net/springfileld/article/details/17720537 ----------------------------------- ...
- TVM使用问题记录
1.numpy提示repeat错误 错误信息为 One method of fixing this is to repeatedly uninstall numpy until none is fou ...
- 解决IDEA报错Could not autowire. There is more than one bean of 'xxx' type
更新项目之后IDEA突然出现了这样的报错信息.显示Could not autowire. There is more than one bean of 'xxx' type.这个错误的意思是xxx类型 ...
- go语言json转map
package util import ( "encoding/json" "fmt" ) // json转map函数,通用 func JSONToMap(st ...
