Java-NIO 之 Buffer 与 Channel
NIO:一种同步非阻塞的 I/O 模型,也是 I/O 多路复用的基础。
同步与异步
- 同步:发起一个调用后,被调用者未处理完请求之前,调用不返回。
- 异步:发起一个调用后,立刻得到被调用者的回应表示已接收到请求,但是被调用者并没有返回结果,此时我们可以处理其他的请求,被调用者通常依靠事件,回调等机制来通知调用者其返回结果。
同步和异步的区别最大在于异步的话调用者不需要等待处理结果,被调用者会通过回调等机制来通知调用者其返回结果。
阻塞和非阻塞
- 阻塞:发起一个请求,调用者一直等待请求结果返回,也就是当前线程会被挂起,无法从事其他任务,只有当条件就绪才能继续。
- 非阻塞:发起一个请求,调用者不用一直等着结果返回,可以先去干其他事情。
举个生活中简单的例子,你妈妈让你烧水,小时候你比较笨啊,在那里傻等着水开(同步阻塞)。
等你稍微再长大一点,你知道每次烧水的空隙可以去干点其他事,然后只需要时不时来看看水开了没有(同步非阻塞)。
后来,你们家用上了水开了会发出声音的壶,这样你就只需要听到响声后就知道水开了,在这期间你可以随便干自己的事情,你需要去倒水了(异步非阻塞)。
一、Buffer(缓冲区)
在 Java NIO 中负责数据的存取。缓冲区就是数组。用于存储不同数据类型的数据。
/*

 * 根据数据类型不同(boolean 除外),提供了相应类型的缓冲区:

 * ByteBuffer

 * CharBuffer

 * ShortBuffer

 * IntBuffer

 * LongBuffer

 * FloatBuffer

 * DoubleBuffer

 *

 * 上述缓冲区的管理方式几乎一致,通过 allocate() 获取缓冲区

 */
1.基本属性
- 容量(capacity) :表示 Buffer 最大数据容量,缓冲区容量不能为负,并且创建后不能更改。
- 界限(limit):第一个不应该读取或写入的数据的索引,即位于 limit 后的数据不可读写。缓冲区的限制不能为负,并且不能大于其容量。
- 位置(position):下一个要读取或写入的数据的索引。缓冲区的位置不能为负,并且不能大于 limit。
- 标记(mark)与重置(reset):标记是一个索引,通过 Buffer 中的 mark() 方法指定 Buffer 中一个特定的 position,之后可以通过调用 reset() 方法恢复到这个 position。
- 标记、位置、限制、容量遵守以下不变式:0 <= mark <= position <= limit <= capacity

2.常用方法
Buffer 所有子类提供了两个用于数据操作的方法:get() 与 put()
获取 Buffer 中的数据
- get() :读取单个字节
- get(byte[] dst):批量读取多个字节到 dst 中
- get(int index):读取指定索引位置的字节(不会移动 position)
放入数据到 Buffer 中
- put(byte b):将给定单个字节写入缓冲区的当前位置
- put(byte[] src):将 src 中的字节写入缓冲区的当前位置
- put(int index, byte b):将指定字节写入缓冲区的索引位置(不会移动 position)
其它方法
- Buffer clear():清空缓冲区并返回对缓冲区的引用,不会真正的删除掉 buffer 中的数据,只是把 position 移动到 0,同时把 limit 调整为 capacity,marks 置为 -1。
- Buffer flip():将缓冲区的 limit 设置为 position,并将 position 置为 0,marks 置为 -1。
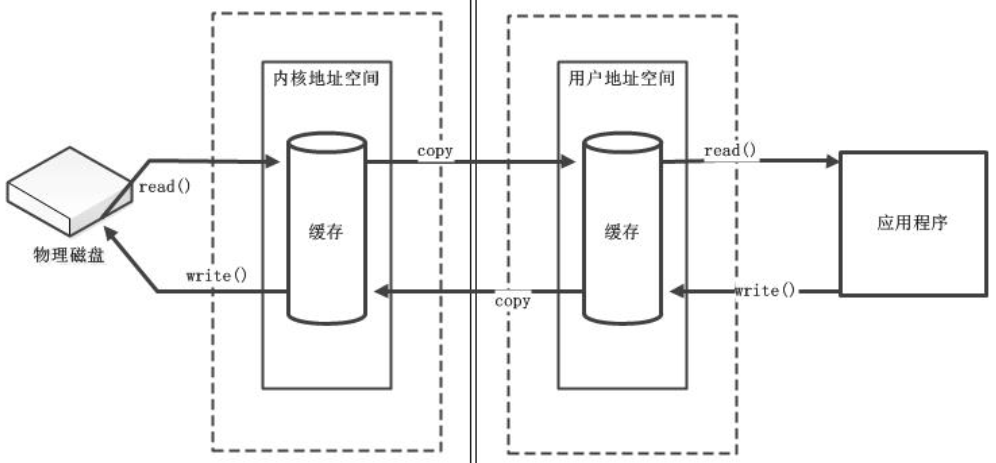
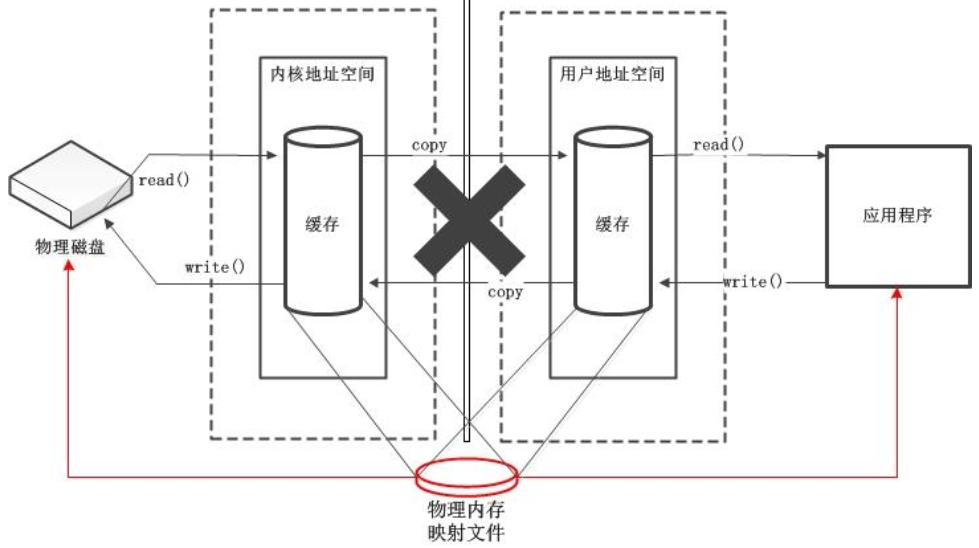
3.直接缓冲区与非直接缓冲区
// 分配缓冲区:JVM 内存中

ByteBuffer buf = ByteBuffer.allocate(1024);

// 分配直接缓冲区:本地内存中

ByteBuffer bufDirect = ByteBuffer.allocateDirect(1024);

// 是否为直接缓冲区

System.out.println(buf.isDirect());

// 直接字节缓冲区还可以通过 FileChannel 的 map() 方法将文件区域直接映射到内存中来创建。该方法返回 MappedByteBuffer。
非直接缓冲区

直接缓冲区

4.简单使用
import org.junit.Test;

import java.nio.ByteBuffer;

public class TestBuffer {

    @Test

    public void markAndReset() {

        String str = "abcde14693090";

        // 分配直接缓冲区

        ByteBuffer buf = ByteBuffer.allocateDirect(1024);

        // 存入数据

        buf.put(str.getBytes());

        // 切换到读取模式

        buf.flip();

        byte[] dst = new byte[buf.limit()];

        buf.get(dst, 0, 2);

        System.out.println(new String(dst, 0, 2));

        System.out.println(buf.position());

        // mark() : 标记

        buf.mark();

        buf.get(dst, 2, 2);

        System.out.println(new String(dst, 2, 2));

        System.out.println(buf.position());

        // reset() : 恢复到 mark 的位置

        buf.reset();

        System.out.println(buf.position());

        // 判断缓冲区中是否还有剩余数据

        if (buf.hasRemaining()) {

            // 获取缓冲区中可以操作的数量

            System.out.println(buf.remaining());

        }

    }

    @Test

    public void getAndPut() {

        String str = "abcde";

        //1. 分配一个指定大小的缓冲区

        ByteBuffer buf = ByteBuffer.allocate(1024);

        System.out.println("allocate():" + buf.position() + "\t" + buf.limit() + "\t" + buf.capacity());

        //2. 利用 put() 存入数据到缓冲区中

        buf.put(str.getBytes());

        System.out.println("put():" + buf.position() + "\t" + buf.limit() + "\t" + buf.capacity());

        //3. 切换读取数据模式

        buf.flip();

        System.out.println("flip():" + buf.position() + "\t" + buf.limit() + "\t" + buf.capacity());

        //4. 利用 get() 读取缓冲区中的数据

        byte[] dst = new byte[buf.limit()];

        buf.get(dst);

        System.out.println(new String(dst, 0, dst.length));

        System.out.println("get():" + buf.position() + "\t" + buf.limit() + "\t" + buf.capacity());

        //5. rewind() : 可重复读

        buf.rewind();

        System.out.println("rewind():" + buf.position() + "\t" + buf.limit() + "\t" + buf.capacity());

        //6. clear() : 清空缓冲区. 但是缓冲区中的数据依然存在,只是处于“被遗忘”状态

        buf.clear();

        System.out.println("clear():" + buf.position() + "\t" + buf.limit() + "\t" + buf.capacity());

        // 获取单个字符

        System.out.println((char) buf.get());

    }

}
二、通道(Channel)
表示 IO 源与目标节点打开的连接,在 Java NIO 中负责缓冲区中数据的传输,类似于传统的“流”。只不过 Channel 本身不能直接访问数据,只能与 Buffer 进行交互。
/*

 * java.nio.channels.Channel 接口的主要实现类:

 *         |--FileChannel:用于读取、写入、映射和操作文件的通道。

 *         |--SocketChannel:通过 TCP 读写网络中的数据。

 *         |--DatagramChannel:通过 UDP 读写网络中的数据通道。

 *         |--ServerSocketChannel:可以监听新进来的 TCP 连接,对每一个新进来的连接都会创建一个 SocketChannel。

 */
1.获取通道
/*

 * 获取通道的一种方式是对支持通道的对象调用 getChannel() 方法。

 * 支持通道的类如下:

 * 本地 IO:

 * |--FileInputStream

 * |--FileOutputStream

 * |--RandomAccessFile

 * 网络 IO:

 * |--Socket

 * |--ServerSocket

 * |--DatagramSocket

 *

 * 在 JDK 1.7 中, NIO.2 针对各个通道的实现类提供了静态方法 open() 来获取通道。

 * 在 JDK 1.7 中, NIO.2 的 Files 工具类的静态方法 newByteChannel() 也可以获取通道。

 */
2.通道数据传输
/*

 * 将 Buffer 中数据写入 Channel

 * int bytesWritten = inChannel,write(buf)

 * 从 Channel 读取数据到 Buffer

 * int bytesRead = inChannel.read(buf)

 *

 * Channel 之间的数据传输(将数据从源通道传输到其他 Channel 中)

 * transferFrom()

 * transferTo()

 */
复制文件的几种方式
// 通道之间的数据传输(直接缓冲区)

@Test

public void channelCopy() throws IOException {

    FileChannel inChannel = FileChannel.open(Paths.get("D:/123.txt"), StandardOpenOption.READ);

    FileChannel outChannel = FileChannel.open(Paths.get("D:/456.txt"), StandardOpenOption.WRITE, StandardOpenOption.READ, StandardOpenOption.CREATE);

    // inChannel.transferTo(0, inChannel.size(), outChannel);

    outChannel.transferFrom(inChannel, 0, inChannel.size());

    inChannel.close();

    outChannel.close();

}

// 使用直接缓冲区完成文件的复制(内存映射文件)

@Test

public void byteBuffCopy() {

    long start = System.currentTimeMillis();

    try (FileChannel inChannel = FileChannel.open(Paths.get("D:/123.txt"), StandardOpenOption.READ);

         FileChannel outChannel = FileChannel.open(Paths.get("D:/456.txt"), StandardOpenOption.WRITE, StandardOpenOption.READ, StandardOpenOption.CREATE)) {

        // 内存映射文件

        MappedByteBuffer inMappedBuf = inChannel.map(MapMode.READ_ONLY, 0, inChannel.size());

        MappedByteBuffer outMappedBuf = outChannel.map(MapMode.READ_WRITE, 0, inChannel.size());

        // 直接对缓冲区进行数据的读写操作

        byte[] dst = new byte[inMappedBuf.limit()];

        inMappedBuf.get(dst);

        outMappedBuf.put(dst);

    } catch (IOException e) {

        e.printStackTrace();

    }

    long end = System.currentTimeMillis();

    System.out.println("耗费时间为:" + (end - start));

}

// 利用通道完成文件的复制(非直接缓冲区)

@Test

public void fileCopy() {

    long start = System.currentTimeMillis();

    try (FileInputStream fis = new FileInputStream("D:/123.txt");

         FileOutputStream fos = new FileOutputStream("D:/456.txt");

         // 获取通道

         FileChannel inChannel = fis.getChannel();

         FileChannel outChannel = fos.getChannel()) {

        // 分配指定大小的缓冲区

        ByteBuffer buf = ByteBuffer.allocate(1024);

        // 将通道中的数据存入缓冲区中

        while (inChannel.read(buf) != -1) {

            // 切换读取数据的模式

            buf.flip();

            // 将缓冲区中的数据写入通道中

            outChannel.write(buf);

            // 清空缓冲区

            buf.clear();

        }

    } catch (IOException e) {

        e.printStackTrace();

    }

    long end = System.currentTimeMillis();

    System.out.println("Time:" + (end - start));

}
3.分散(Scatter)与聚集(Gather)
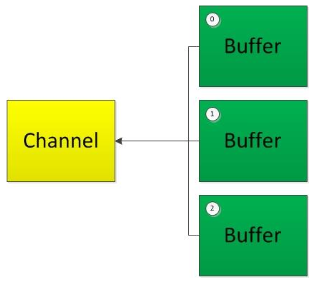
分散读取(Scattering Reads):从 Channel 中读取的数据“分散”到多个 Buffer 中。(按照缓冲区的顺序,从 Channel 中读取的数据依次将 Buffer 填满。)

聚集写入(Gathering Writes):将多个 Buffer 中的数据“聚集”到 Channel。(按照缓冲区的顺序,写入 position 和 limit 之间的数据到 Channel 。)

使用分散和聚集来复制文件部分内容
// 分散和聚集

@Test

public void scatterAndGather() throws IOException {

    RandomAccessFile raf1 = new RandomAccessFile("D:/123.txt", "rw");

    // 获取通道

    FileChannel channel1 = raf1.getChannel();

    // 分配指定大小的缓冲区

    ByteBuffer buf1 = ByteBuffer.allocate(100);

    ByteBuffer buf2 = ByteBuffer.allocate(1024);

    // 分散读取

    ByteBuffer[] bufs = {buf1, buf2};

    channel1.read(bufs);

    // 转换模式

    for (ByteBuffer byteBuffer : bufs) {

        byteBuffer.flip();

    }

    System.out.println(new String(bufs[0].array(), 0, bufs[0].limit()));

    System.out.println("-----------------");

    System.out.println(new String(bufs[1].array(), 0, bufs[1].limit()));

    // 聚集写入

    RandomAccessFile raf2 = new RandomAccessFile("D:/456.txt", "rw");

    FileChannel channel2 = raf2.getChannel();

    channel2.write(bufs);

}
4.字符集
/*

 * 字符集:Charset

 * 编码:字符串 -> 字节数组

 * 解码:字节数组  -> 字符串

 */

@Test

public void testCharset() throws IOException {

    // 指定字符集

    Charset cs1 = Charset.forName("GBK");

    CharBuffer cBuf = CharBuffer.allocate(1024);

    cBuf.put("字符集");

    cBuf.flip();

    //获取编码器

    CharsetEncoder ce = cs1.newEncoder();

    //编码

    ByteBuffer bBuf = ce.encode(cBuf);

    System.out.println(Arrays.toString(bBuf.array()));

    bBuf.flip();

    //获取解码器

    CharsetDecoder cd = cs1.newDecoder();

    //解码

    cBuf = cd.decode(bBuf);

    System.out.println(cBuf.toString());

}

// Java 支持的字符集

@Test

public void getCharset() {

    Map<String, Charset> map = Charset.availableCharsets();

    for (Entry<String, Charset> entry : map.entrySet()) {

        System.out.println(entry.getKey() + "=" + entry.getValue());

    }

}
https://snailclimb.gitee.io/javaguide/#/java/BIO-NIO-AIO
https://snailclimb.gitee.io/javaguide/#/java/Java%20IO%E4%B8%8ENIO
https://cyc2018.github.io/CS-Notes/#/notes/Java%20IO?id=%e4%b8%83%e3%80%81nio
https://www.cnblogs.com/dolphin0520/p/3919162.html
https://ifeve.com/java-nio-all/
Java-NIO 之 Buffer 与 Channel的更多相关文章
- JAVA NIO简介-- Buffer、Channel、Charset 、直接缓冲区、分散和聚集、文件锁
IO 是主存和外部设备 ( 硬盘.终端和网络等 ) 拷贝数据的过程. IO 是操作系统的底层功能实现,底层通过 I/O 指令进行完成. Java标准io回顾 在Java1.4之前的I/O系统中,提供 ...
- Java NIO:Buffer、Channel 和 Selector
Buffer 一个 Buffer 本质上是内存中的一块,我们可以将数据写入这块内存,之后从这块内存获取数据. java.nio 定义了以下几个 Buffer 的实现,这个图读者应该也在不少地方见过了吧 ...
- Java NIO 之 Buffer
Java NIO 之 Buffer Java NIO (Non Blocking IO 或者 New IO)是一种非阻塞IO的实现.NIO通过Channel.Buffer.Selector几个组件的协 ...
- java nio之Buffer
一.JAVA NIO 是在和channel交互的时候使用的.Channel将数据读入缓冲区,然后我们又从缓冲区访问数据.写数据时,首先将要发送的数据按顺序填入缓冲区.基本上,缓冲区只是一个列表,它的所 ...
- Java NIO之Buffer(缓冲区)
Java NIO中的缓存区(Buffer)用于和通道(Channel)进行交互.数据是从通道读入缓冲区,从缓冲区写入到通道中的. 缓冲区本质上是一块可以写入数据,然后可以从中读取数据的内存.这 ...
- 转:Java NIO系列教程(二) Channel
Java NIO的通道类似流,但又有些不同: 既可以从通道中读取数据,又可以写数据到通道.但流的读写通常是单向的. 通道可以异步地读写. 通道中的数据总是要先读到一个Buffer,或者总是要从一个Bu ...
- Java NIO中的通道Channel(二)分散/聚集 Scatter/Gather
什么是Scatter/Gather scatter/gather指的在多个缓冲区上实现一个简单的I/O操作,比如从通道中读取数据到多个缓冲区,或从多个缓冲区中写入数据到通道: scatter(分散): ...
- Java NIO中的通道Channel(一)通道基础
什么是通道Channel 这个说实话挺难定义的,有点抽象,不过我们可以根据它的用途来理解: 通道主要用于传输数据,从缓冲区的一侧传到另一侧的实体(如文件.套接字...),反之亦然: 通道是访问IO服务 ...
- Java NIO 之 Buffer(缓冲区)
一 Buffer(缓冲区)介绍 Java NIO Buffers用于和NIO Channel交互. 我们从Channel中读取数据到buffers里,从Buffer把数据写入到Channels. Bu ...
- Java NIO(二) Channel
Java NIO的通道类似流,但又有些不同: 既可以从通道中读取数据,又可以写数据到通道.但流的读写通常是单向的. 通道可以异步地读写. 通道中的数据总是要先读到一个Buffer,或者总是要从一个Bu ...
随机推荐
- 把app(apk和ipa文件)安装包放在服务器上供用户下方法
怎么把app(apk和ipa文件)安装包放在服务器上供用户下载? IIS服务器网站不能下载.apk文件的原因:IIS的默认MIME类型中没有.apk文件,所以无法下载.解决办法:给.apk格式文件添加 ...
- Spring OAuth2 Could not decode JSON for additional information: BaseClientDetails
错误消息: 2019-10-08 14:48:16.703 WARN o.s.s.o.p.c.JdbcClientDetailsService : Could not decode JSON for ...
- ES bulk 批量操作
bulk允许在一个请求中进行多个操作(create.index.update.delete),也就是可以在一次请求裡做很多事情 也由于这个关系,因此bulk的请求体和其他请求的格式会有点不同 bulk ...
- python爬取豆瓣电影信息数据
题外话+ 大家好啊,最近自己在做一个属于自己的博客网站(准备辞职回家养老了,明年再战)在家里 琐事也很多, 加上自己 一回到家就懒了(主要是家里冷啊! 广东十几度,老家几度,躲在被窝瑟瑟发抖,) 由于 ...
- Javascript节点选择
jQuery.parent(expr) 找父亲节点,可以传入expr进行过滤,比如$("span").parent()或者$("span").parent(&q ...
- docker HealthCheck健康检查
需求 最近遇到的问题:线上跑的一个 Node 镜像是在运行的,状态为 up ,但是访问报 502 ,重启镜像无效,重新拉了个镜像运行才恢复正常.于是想研究下如何从应用层面去检查容器的状态 为什么 do ...
- List、Set、Map 之间的区别是什么?(未完成)
List.Set.Map 之间的区别是什么?(未完成)
- 从后台数据库查询的List数据怎么在前台combobox显示
后台直接从数据库,通过jdbcTemplate查询数据,得到List数据集,里面是Map List<Map<String, Object>> list = jdbcTempl ...
- wkhtmltopdf 自定义字体未生效或中文乱码
使用wkhtmltopdf控件将网页保存成pdf的过程中出现网页中有些字体,在PDF中未生效.通过网上查询结果有一种处理方式: 在网页头部的style标签中,手工指定宋体字体的本地存放位置,wkhtm ...
- WPF DevExpress ChartControl使用之PieChart
饼状图要比XYDiagram要简单一点,大体上也是那些东西,没有了X.Y坐标轴,也就没有了第二坐标,要简单一点.PieChartControl.xaml <UserControl x:Class ...
