mybatis详解(三)
一,动态sql,where,trim,set和foreach
parameterType的属性可以不用写
xml文件sql的书写
 <select id="queryByParams"  parameterType="string" resultMap="usermap" resultType="user">

        select id,

        <choose>

            <when test="realname!=null and realname!='' ">

                username

            </when>

            <otherwise>

                password

            </otherwise>

        </choose>

        from user

    </select>

    <delete id="deleteUser" parameterType="int" >

        delete from user where id=#{id}

    </delete>

    <insert id="insertUser" parameterType="user" >

        insert into user (username,realname,password) values (#{user_name},#{realname},#{password})

    </insert>

    <select id="selectByNameAndPassword" resultType="user" resultMap="usermap">

        select * from user

        <where>

            <if test="username!=null and username!=''">

                username=#{username}

            </if>

            <if test="password!=null and password!=''">

                and password=#{password}

            </if>

        </where>

    </select>

    <select id="selectByNameAndPassword02"  resultMap="usermap">

        select * from user

      <trim prefix="where" prefixOverrides="and | or">

          <if test="username!=null and username!=''">

              username=#{username}

          </if>

          <if test="password!=null and password!='' ">

            and  password=#{password}

          </if>

      </trim>

    </select>

    <select id="selectByNameAndPassword03" resultMap="usermap">

        select * from user

        <trim prefix="where" suffixOverrides="and | or">

            <if test="@Ognl@isNotEmpty('username')">

                username=#{username}

            </if>

            <if test="@Ognl@isNotEmpty('password')">

             and   password=#{password}

            </if>

        </trim>

    </select>

    <update id="updateUser" >

        update user

        <set>

            <if test="username!=null and username!=''">

                username=#{username} ,

            </if>

            <if test="password!=null and password!=''">

                password=#{password} ,

            </if>

        </set>

        where id=#{id}

    </update>

    <update id="updateUser02" >

        update user

        <trim prefix="set" suffixOverrides=",">

            <if test="username!=null and username!=''">

                username=#{username} ,

            </if>

            <if test="password!=null and password!=''">

                password=#{password} ,

            </if>

        </trim>

        where id=#{id}

    </update>
接口代码的书写
  public List<User> selectByNameAndPassword(@Param("username") String username,@Param("password") String password);

    public List<User> selectByNameAndPassword02(@Param("username") String username,@Param("password") String password);

    public List<User> selectByNameAndPassword03(@Param("username") String username,@Param("password") String password);

    public Integer updateUser(@Param("username") String username,@Param("password") String password,@Param("id") Integer id);

    public Integer updateUser02(@Param("username") String username,@Param("password") String password,@Param("id") Integer id);
二,映射关系
1)1对1关系.两张表之间存在一对一的关系
查询数据的时候需要多个表中的字段数据,一个实体类很明显存放不了那么多字段,于是需要dto来存储数据,dto是只是单纯的存储数据,和业务没有丝毫关系
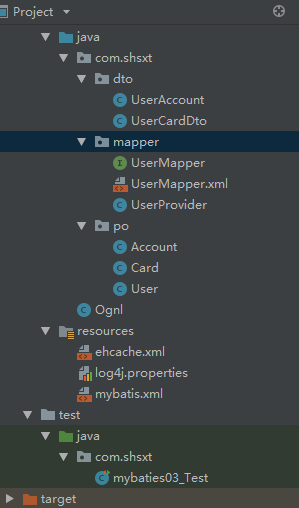
目录结构
useraccount的内容代码(一对多)
package com.shsxt.dto;

import com.shsxt.po.Account;

import com.shsxt.po.User;

import java.util.List;

public class UserAccount {

    private Integer Id;

    private String username;

    private String realname;

    private String password;

    private List<Account> list;

    public Integer getId() {

        return Id;

    }

    public void setId(Integer id) {

        Id = id;

    }

    public String getUsername() {

        return username;

    }

    public void setUsername(String username) {

        this.username = username;

    }

    public String getRealname() {

        return realname;

    }

    public void setRealname(String realname) {

        this.realname = realname;

    }

    public String getPassword() {

        return password;

    }

    public void setPassword(String password) {

        this.password = password;

    }

    public List<Account> getList() {

        return list;

    }

    public void setList(List<Account> list) {

        this.list = list;

    }

    @Override

    public String toString() {

        return "UserAccount{" +

                "Id=" + Id +

                ", username='" + username + '\'' +

                ", realname='" + realname + '\'' +

                ", password='" + password + '\'' +

                ", list=" + list +

                '}';

    }

}
usercardDao的代码内容 (一对一)
package com.shsxt.dto;

import com.shsxt.po.Card;

public class UserCardDto {

    private Integer Id;

    private String username;

    private String realname;

    private String password;

    private Card card;

    public Integer getId() {

        return Id;

    }

    public void setId(Integer id) {

        Id = id;

    }

    public String getUsername() {

        return username;

    }

    public void setUsername(String username) {

        this.username = username;

    }

    public String getRealname() {

        return realname;

    }

    public void setRealname(String realname) {

        this.realname = realname;

    }

    public String getPassword() {

        return password;

    }

    public void setPassword(String password) {

        this.password = password;

    }

    public Card getCard() {

        return card;

    }

    public void setCard(Card card) {

        this.card = card;

    }

    @Override

    public String toString() {

        return "UserCardDto{" +

                "Id=" + Id +

                ", username='" + username + '\'' +

                ", realname='" + realname + '\'' +

                ", password='" + password + '\'' +

                ", card=" + card +

                '}';

    }

}
xml配置
!--一对一的xml配置-->

    <resultMap id="usercard" type="userCardDto">

        <id column="id" property="id"/>

        <result column="username" property="username"/>

        <result column="realname" property="realname"/>

        <result column="password" property="password"/>

        <association property="card" javaType="Card">

            <id column="id" property="cid"/>

            <result column="cardnum" property="cardnum"/>

        </association>

    </resultMap>

    <select id="queryCardUserById" parameterType="int" resultMap="usercard" >

    select u.username,u.password,u.realname,c.cardnum from user u left join card c on u.cardid=c.id where u.id=#{id}

    </select>
接口配置
public UserCardDto queryCardUserById(@Param("id")Integer id);
测试
import com.shsxt.dto.UserAccount;

import com.shsxt.dto.UserCardDto;

import com.shsxt.mapper.UserMapper;

import com.shsxt.po.Account;

import com.shsxt.po.User;

import org.apache.ibatis.io.Resources;

import org.apache.ibatis.reflection.SystemMetaObject;

import org.apache.ibatis.session.SqlSession;

import org.apache.ibatis.session.SqlSessionFactory;

import org.apache.ibatis.session.SqlSessionFactoryBuilder;

import org.junit.Before;

import org.junit.Test;

import java.io.InputStream;

import java.util.List;

public class mybaties03_Test {

    private UserMapper userMapper;

    SqlSessionFactory sqlSessionFactory;

    private SqlSession sqlSession;

    @Before

    public void before() throws Exception {

        InputStream inputStream = Resources.getResourceAsStream("mybatis.xml");

        sqlSessionFactory = new SqlSessionFactoryBuilder().build(inputStream);

        sqlSession= sqlSessionFactory.openSession(true);

        userMapper = sqlSession.getMapper(UserMapper.class);

    }

   @Test

    public void test11(){

        UserCardDto u =userMapper.queryCardUserById(1);

        System.out.println(u);

    }

}
2)一对多关系映射
xml配置
    <resultMap id="useraccount" type="userAccount">

        <id column="id" property="id"/>

        <result column="username" property="username"/>

        <result column="realname" property="realname"/>

        <result column="password" property="password"/>

        <collection property="list" ofType="Account">

            <id column="id" property="id"/>

            <result column="accoutname" property="accountname"/>

            <result column="money" property="money"/>

            <result column="userid" property="userid"/>

        </collection>

    </resultMap>

    <select id="queryUseraccountById" parameterType="int" resultMap="useraccount">

        select u.username,u.realname,u.password,a.money,a.accoutname,a.userid from user u left join account a on a.userid=u.id where u.id=#{id}

    </select>
接口配置
public List<UserAccount> queryUseraccountById(Integer id);
测试
import com.shsxt.dto.UserAccount;

import com.shsxt.dto.UserCardDto;

import com.shsxt.mapper.UserMapper;

import com.shsxt.po.Account;

import com.shsxt.po.User;

import org.apache.ibatis.io.Resources;

import org.apache.ibatis.reflection.SystemMetaObject;

import org.apache.ibatis.session.SqlSession;

import org.apache.ibatis.session.SqlSessionFactory;

import org.apache.ibatis.session.SqlSessionFactoryBuilder;

import org.junit.Before;

import org.junit.Test;

import java.io.InputStream;

import java.util.List;

public class mybaties03_Test {

    private UserMapper userMapper;

    SqlSessionFactory sqlSessionFactory;

    private SqlSession sqlSession;

    @Before

    public void before() throws Exception {

        InputStream inputStream = Resources.getResourceAsStream("mybatis.xml");

        sqlSessionFactory = new SqlSessionFactoryBuilder().build(inputStream);

        sqlSession= sqlSessionFactory.openSession(true);

        userMapper = sqlSession.getMapper(UserMapper.class);

    }

@Test

    public void test12(){

        List<UserAccount>  list=userMapper.queryUseraccountById(1);

        for (UserAccount userAccount:list) {

            System.out.println(userAccount);

        }
三.mybatis缓存
正如大多数持久层框架一样,MyBatis 同样提供了一级缓存和二级缓存的支持;
一级缓存
基于 PerpetualCache 的 HashMap 本地缓存(mybatis 内部实现 cache 接口),其存储作用域为 Session,当 Session flush 或 close 之后,该 Session 中的所有 Cache就将清空;
二级缓存
与一级缓存其机制相同,默认也是采用 PerpetualCache 的 HashMap 存储,不同在于其存储作用域为 Mapper(Namespace),并且可自定义存储源,如 Ehcache;
对于缓存数据更新机制,当某一个作用域(一级缓存 Session/二级缓存Namespaces)的进行了 C/U/D 操作后,默认该作用域下所有 select 中的缓存将被 clear。如果二缓存开启,首先从二级缓存查询数据,如果二级缓存有则从二级缓存中获取数据,如果二级缓存没有,从一级缓存找是否有缓存数据,如果一级缓存没有,查询数据库。
二级缓存局限性
mybatis 二级缓存对细粒度的数据级别的缓存实现不好,对同时缓存较多条数据的缓存,比如如下需求:对商品信息进行缓存,由于商品信息查询访问量大,但是要求用户每次都能查询最新的商品信息,此时如果使用 mybatis 的二级缓存就无法实现当一个商品变化时只刷新该商品的缓存信息而不刷新其它商品的信息,因为 mybaits 的二级缓存区域以 mapper 为单位划分,当一个商品信息变化会将所有商品信息的缓存数据全部清空
1.一级缓存
Mybatis 默认提供一级缓存,缓存范围是一个 sqlSession。在同一个 SqlSession中,两次执行相同的 sql 查询,第二次不再从数据库查询。
原理:一级缓存采用 Hashmap 存储,mybatis 执行查询时,从缓存中查询,如果缓存中没有从数据库查询。如果该 SqlSession 执行 clearCache()提交 或者增加 删除 修改操作,
清除缓存。默认开启了
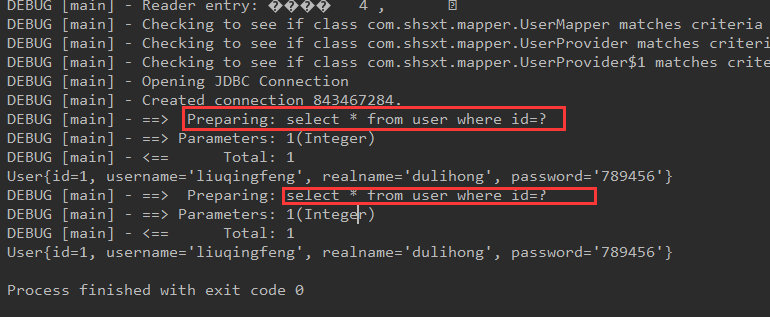
下面的查询了两次sql请求,查看打印日志,却执行了一次sql,因为第一次执行sql后,将查询到的结果存到缓存中了,下次再次查询相同
    @Test

    public void test01() {

        User user = userMapper.queryById(1);

        System.out.println(user);

        user = userMapper.queryById(1);

        System.out.println(user);

我们将缓存重新刷新一下,sqlSession.clearCache();再看一下结果,发现执行了两次
  @Test

    public void test01() {

        User user = userMapper.queryById(1);

        System.out.println(user);

        sqlSession.clearCache();

        user = userMapper.queryById(1);

        System.out.println(user);
2)二级缓存
二级缓存是在同一个 sqlSession 中,二级缓存是在同一个 namespace 中,因此相
同的 namespace 不同的 sqlsession 可以使用二级缓存。
使用场景
1、 对查询频率高,变化频率低的数据建议使用二级缓存。
2、 对于访问多的查询请求且用户对查询结果实时性要求不高,此时可采用
mybatis 二级缓存技术降低数据库访问量,提高访问速度,业务场景比
如:耗时较高的统计分析 sql、电话账单查询 sql 等。
需要在全局配置,也就是mybatis的配置文件中添加<setting name="cacheEnabled" value="true"/>
还需要在mapper的配置文件中开启二级缓存
<!-- 开启该 mapper 的二级缓存 -->
<cache/>
cache 标签常用属性
<cache
eviction="FIFO" <!--回收策略为先进先出-->
flushInterval="60000" <!--自动刷新时间 60s-->
size="512" <!--最多缓存 512 个引用对象-->
readOnly="true"/> <!--只读-->
PO 对象必须支持序列化
public class User implements Serializable {
}
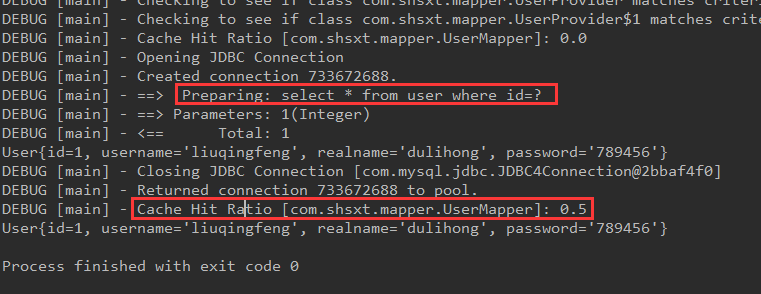
二级缓存测试,此处必须写sqlsession.close(),不能写sqlsession.clearCache(),因为二级缓存是在同一个 sqlSession 中,二级缓存是在同一个 namespace 中,因此相
同的 namespace 不同的 sqlsession 可以使用二级缓存
如下可以看到两次sql查询,sql代码执行了一次,Cache Hit命中了,
    @Test

    public void test01() {

        User user = userMapper.queryById(1);

        System.out.println(user);

        sqlSession.close();

        sqlSession= sqlSessionFactory.openSession(true);

        userMapper = sqlSession.getMapper(UserMapper.class);

        user = userMapper.queryById(1);

        System.out.println(user);

    }
3)分布式缓存
如果有多条服务器 ,不使用分布缓存,缓存的数据在各个服务器单独存储,不方便系统 开发。所以要使用分布式缓存对缓存数据进行集中管理。因此可是使用 ehcache
memcached redis mybatis 本身来说是无法实现分布式缓存的,所以要与分布式缓存框架进行整合。EhCache 是一个纯 Java 的进程内缓存框架,具有快速、精干等特点;Ehcache 是一种广泛使用的开源 Java 分布式缓存。主要面向通用缓存,Java EE 和轻量级容器。它具有内存和磁盘存储,缓存加载器,缓存扩展,缓存异常处理程序,一个 gzip 缓存 servlet 过滤器,支持REST 和 SOAP api 等特点。
1,先导入依赖的坐标
<dependency>

<groupId>org.slf4j</groupId>

<artifactId>slf4j-log4j12</artifactId>

<version>1.7.12</version>

</dependency>

<dependency>

<groupId>net.sf.ehcache</groupId>

<artifactId>ehcache-core</artifactId>

<version>2.4.4</version>

</dependency>

<dependency>

<groupId>org.mybatis.caches</groupId>

<artifactId>mybatis-ehcache</artifactId>

<version>1.0.3</version>

</dependency>
2,在mapper.xml中缓存接口配置
<cache type="org.mybatis.caches.ehcache.EhcacheCache"/>
3,在resources下配置ehcache.xml,具体内容如下
<?xml version="1.0" encoding="UTF-8"?>

<ehcache xmlns:xsi="http://www.w3.org/2001/XMLSchema-instance"

         xsi:noNamespaceSchemaLocation="../bin/ehcache.xsd">

    <!--

    name:Cache的唯一标识

    maxElementsInMemory:内存中最大缓存对象数

    maxElementsOnDisk:磁盘中最大缓存对象数,若是0表示无穷大

    eternal:Element是否永远不过期,如果为true,则缓存的数据始终有效,如果为false那么还要根据timeToIdleSeconds,timeToLiveSeconds判断

    overflowToDisk:配置此属性,当内存中Element数量达到maxElementsInMemory时,Ehcache将会Element写到磁盘中

    timeToIdleSeconds:设置Element在失效前的允许闲置时间。仅当element不是永久有效时使用,可选属性,默认值是0,也就是可闲置时间无穷大

    timeToLiveSeconds:设置Element在失效前允许存活时间。最大时间介于创建时间和失效时间之间。仅当element不是永久有效时使用,默认是0.,也就是element存活时间无穷大

    diskPersistent:是否缓存虚拟机重启期数据

    diskExpiryThreadIntervalSeconds:磁盘失效线程运行时间间隔,默认是120秒

    diskSpoolBufferSizeMB:这个参数设置DiskStore(磁盘缓存)的缓存区大小。默认是30MB。每个Cache都应该有自己的一个缓冲区

     memoryStoreEvictionPolicy:当达到maxElementsInMemory限制时,Ehcache将会根据指定的策略去清理内存。默认策略是LRU(最近最少使用)。你可以设置为FIFO(先进先出)或是LFU(较少使用)

    -->

    <defaultCache overflowToDisk="true" eternal="false"/>

    <diskStore path="D:/cache" />

    <!--

        <cache name="sxtcache" overflowToDisk="true" eternal="false"

        timeToIdleSeconds="300" timeToLiveSeconds="600" maxElementsInMemory="1000"

        maxElementsOnDisk="10" diskPersistent="true" diskExpiryThreadIntervalSeconds="300"

        diskSpoolBufferSizeMB="100" memoryStoreEvictionPolicy="LRU" />

    -->

</ehcache>
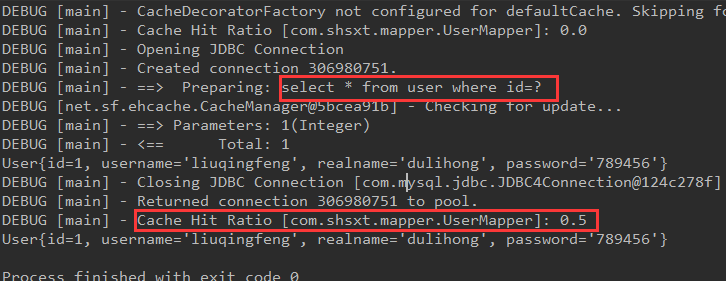
测试结果如下,命中了
测试代码
    @Test

    public void test01() {

        User user = userMapper.queryById(1);

        System.out.println(user);

        sqlSession.close();

        sqlSession= sqlSessionFactory.openSession(true);

        userMapper = sqlSession.getMapper(UserMapper.class);

        user = userMapper.queryById(1);

        System.out.println(user);

    }
四,spring与mybatis的集成
1,新建maven的quickstart项目
2,导入需要的坐标,pom.xml
<?xml version="1.0" encoding="UTF-8"?>

<project xmlns="http://maven.apache.org/POM/4.0.0" xmlns:xsi="http://www.w3.org/2001/XMLSchema-instance"

  xsi:schemaLocation="http://maven.apache.org/POM/4.0.0 http://maven.apache.org/xsd/maven-4.0.0.xsd">

  <modelVersion>4.0.0</modelVersion>

  <groupId>com.shsxt</groupId>

  <artifactId>spring_mybatis</artifactId>

  <version>1.0-SNAPSHOT</version>

  <name>spring_mybatis</name>

  <!-- FIXME change it to the project's website -->

  <url>http://www.example.com</url>

  <properties>

    <project.build.sourceEncoding>UTF-8</project.build.sourceEncoding>

    <maven.compiler.source>1.8</maven.compiler.source>

    <maven.compiler.target>1.8</maven.compiler.target>

  </properties>

  <dependencies>

    <dependency>

      <groupId>junit</groupId>

      <artifactId>junit</artifactId>

      <version>4.12</version>

      <scope>test</scope>

    </dependency>

    <!-- spring 核心 jar -->

    <dependency>

      <groupId>org.springframework</groupId>

      <artifactId>spring-context</artifactId>

      <version>4.3.2.RELEASE</version>

    </dependency>

    <!-- spring 测试 jar -->

    <dependency>

      <groupId>org.springframework</groupId>

      <artifactId>spring-test</artifactId>

      <version>4.3.2.RELEASE</version>

    </dependency>

    <!-- spring jdbc -->

    <dependency>

    <groupId>org.springframework</groupId>

    <artifactId>spring-jdbc</artifactId>

      <version>4.3.2.RELEASE</version>

    </dependency>

    <!-- spring 事物 -->

    <dependency>

      <groupId>org.springframework</groupId>

      <artifactId>spring-tx</artifactId>

      <version>4.3.2.RELEASE</version>

    </dependency>

    <!-- aspectj 切面编程的 jar -->

    <dependency>

      <groupId>org.aspectj</groupId>

      <artifactId>aspectjweaver</artifactId>

      <version>1.8.9</version>

    </dependency>

    <!-- c3p0 连接池 -->

    <dependency>

      <groupId>c3p0</groupId>

      <artifactId>c3p0</artifactId>

      <version>0.9.1.2</version>

    </dependency>

    <!-- mybatis -->

    <dependency>

      <groupId>org.mybatis</groupId>

      <artifactId>mybatis</artifactId>

      <version>3.4.1</version>

    </dependency>

    <dependency>

      <groupId>org.mybatis</groupId>

      <artifactId>mybatis-spring</artifactId>

      <version>1.3.0</version>

    </dependency>

    <!-- mysql 驱动包 -->

    <dependency>

      <groupId>mysql</groupId>

      <artifactId>mysql-connector-java</artifactId>

      <version>5.1.39</version>

    </dependency>

    <dependency>

      <groupId>org.slf4j</groupId>

      <artifactId>slf4j-log4j12</artifactId>

      <version>1.7.2</version>

    </dependency>

    <dependency>

      <groupId>org.slf4j</groupId>

      <artifactId>slf4j-api</artifactId>

      <version>1.7.2</version>

    </dependency>

    <dependency>

      <groupId>com.github.pagehelper</groupId>

      <artifactId>pagehelper</artifactId>

      <version>4.1.0</version>

    </dependency>

  </dependencies>

  <build>

      <plugins>

          <plugin>

          <groupId>org.mybatis.generator</groupId>

          <artifactId>mybatis-generator-maven-plugin</artifactId>

          <version>1.3.2</version>

          <configuration>

          <configurationFile>src/main/resources/generatorConfig.xml</configurationFile>

              <verbose>true</verbose>

              <overwrite>true</overwrite>

          </configuration>

          </plugin>

      </plugins>

    <finalName>spring_mybatis</finalName>

    <resources>

      <resource>

        <directory>src/main/resources</directory>

      </resource>

      <resource>

        <directory>src/main/java</directory>

        <includes>

          <include>**/*.properties</include>

          <include>**/*.xml</include>

          <include>**/*.tld</include>

        </includes>

        <filtering>false</filtering>

      </resource>

    </resources>

  </build>

</project>
3,创建resources文件夹,在该文件下创建log4j.properties和db.properties,mybatis.xml,spring.xml
log4j.properties
# Global logging configuration

log4j.rootLogger=DEBUG, stdout

# Console output...

log4j.appender.stdout=org.apache.log4j.ConsoleAppender

log4j.appender.stdout.layout=org.apache.log4j.PatternLayout

log4j.appender.stdout.layout.ConversionPattern=%5p [%t] - %m%n
db.properties
driver=com.mysql.jdbc.Driver

url=jdbc:mysql://localhost:3306/mybatis?useUnicode=true&characterEncoding=utf8&useSSL=false

name=root

password=123456
mybatis.xml
<?xml version="1.0" encoding="utf-8" ?>

<!DOCTYPE configuration PUBLIC "-//mybatis.org//DTD Config 3.0//EN" "http://mybatis.org/dtd/mybatis-3-config.dtd">

<configuration>

    <typeAliases>

        <package name="com.shsxt.po"></package>

    </typeAliases>

    <!--分页的插件,不需要的话,该plugins可以写-->

    <plugins>

        <!-- com.github.pagehelper 为 PageHelper 类所在包名 -->

        <plugin interceptor="com.github.pagehelper.PageHelper">

        <property name="dialect" value="mysql" />

        <!-- 该参数默认为 false -->

        <!-- 设置为 true 时,会将 RowBounds 第一个参数 offset 当成 pageNum 页码使

        用 -->

        <!-- 和 startPage 中的 pageNum 效果一样 -->

        <property name="offsetAsPageNum" value="true" />

        <!-- 该参数默认为 false -->

        <!-- 设置为 true 时,使用 RowBounds 分页会进行 count 查询 -->

        <property name="rowBoundsWithCount" value="true" />

            <!-- 设置为 true 时,如果 pageSize=0 或者 RowBounds.limit = 0 就会查询出

    全部的结果 -->

            <!-- (相当于没有执行分页查询,但是返回结果仍然是 Page 类型) -->

            <property name="pageSizeZero" value="true" />

            <!-- 3.3.0 版本可用 - 分页参数合理化,默认 false 禁用 -->

            <!-- 启用合理化时,如果 pageNum<1 会查询第一页,如果 pageNum>pages 会

            查询最后一页 -->

            <!-- 禁用合理化时,如果 pageNum<1 或 pageNum>pages 会返回空数据 -->

            <property name="reasonable" value="true" />

            <!-- 3.5.0 版本可用 - 为了支持 startPage(Object params)方法 -->

            <!-- 增加了一个`params`参数来配置参数映射,用于从 Map 或

            ServletRequest 中取值 -->

            <!-- 可以配置 pageNum,pageSize,count,pageSizeZero,reasonable,不配置映

            射的用默认值 -->

            <property name="params"

                      value="pageNum=start;pageSize=limit;pageSizeZero=zero;reasonable=heli;count=

countsql" />

        </plugin>

    </plugins>

</configuration>
spring.xml
<?xml version="1.0" encoding="UTF-8"?>

<beans xmlns="http://www.springframework.org/schema/beans"

       xmlns:xsi="http://www.w3.org/2001/XMLSchema-instance"

       xmlns:context="http://www.springframework.org/schema/context"

       xmlns:aop="http://www.springframework.org/schema/aop"

       xmlns:tx="http://www.springframework.org/schema/tx"

       xsi:schemaLocation="http://www.springframework.org/schema/beans

        http://www.springframework.org/schema/beans/spring-beans.xsd

        http://www.springframework.org/schema/context

        http://www.springframework.org/schema/context/spring-context.xsd

        http://www.springframework.org/schema/aop

        http://www.springframework.org/schema/aop/spring-aop.xsd

        http://www.springframework.org/schema/tx

        http://www.springframework.org/schema/tx/spring-tx-3.0.xsd">

    <!-- 扫描 com.shsxt 及其所有子包下类 -->

    <context:component-scan base-package="com.shsxt" />

    <!-- 加载 properties 配置文件 -->

    <context:property-placeholder location="classpath:db.properties" />

    <aop:aspectj-autoproxy /><!-- aop -->

    <!-- 配置数据源 -->

    <!-- 配置 c3p0 数据源 -->

    <bean id="dataSource" class="com.mchange.v2.c3p0.ComboPooledDataSource">

        <property name="driverClass" value="${driver}"></property>

        <property name="jdbcUrl" value="${url}"></property>

        <property name="user" value="${name}"></property>

        <property name="password" value="${password}"></property>

    </bean>

    <!-- 配置事务管理器 -->

    <bean id="txManager"

          class="org.springframework.jdbc.datasource.DataSourceTransactionManager">

        <property name="dataSource" ref="dataSource"></property>

    </bean>

    <!-- 设置事物增强 -->

    <tx:advice id="txAdvice" transaction-manager="txManager">

        <tx:attributes>

            <tx:method name="get*" read-only="true" />

            <tx:method name="find*" read-only="true" />

            <tx:method name="query*" read-only="true" />

            <tx:method name="load*" read-only="true" />

            <tx:method name="add*" propagation="REQUIRED" />

            <tx:method name="insert*" propagation="REQUIRED" />

            <tx:method name="update*" propagation="REQUIRED"/>

            <tx:method name="delete*" propagation="REQUIRED" />

        </tx:attributes>

    </tx:advice>

    <!-- aop 切面配置 -->

    <aop:config>

        <aop:pointcut id="servicePointcut" expression="execution(* com.shsxt.services..*.*(..))" />

        <aop:advisor advice-ref="txAdvice" pointcut-ref="servicePointcut"/>

    </aop:config>

    <!-- 配置 sqlSessionFactory-->

    <bean id="sqlSessionFactory"

          class="org.mybatis.spring.SqlSessionFactoryBean">

        <property name="dataSource" ref="dataSource"></property>

        <property name="configLocation" value="classpath:mybatis.xml" />

        <!--

        自动扫描 com/shsxt/crm/mapper 目录下的所有 SQL 映射的 xml 文

        件, 省掉 mybatis.xml 里的手工配置

        value="classpath:com/shsxt/crm/mapper/*.xml"指的是 classpath(类路径)

        下 com.shsxt.crm.mapper 包中的所有 xml 文件

        UserMapper.xml 位于 com.shsxt.crm.mapper 包下,这样 UserMapper.xml 就可

        以被自动扫描

        -->

        <property name="mapperLocations"

                  value="classpath:com/shsxt/mapper/*.xml" />

    </bean>

    <!-- 配置扫描器 -->

    <bean id="mapperScanner"

          class="org.mybatis.spring.mapper.MapperScannerConfigurer">

        <!-- 扫描 com.shsxt.dao 这个包以及它的子包下的所有映射接口类 -->

        <property name="basePackage" value="com.shsxt.dao" />

        <property name="sqlSessionFactoryBeanName" value="sqlSessionFactory"

        />

    </bean>

</beans>
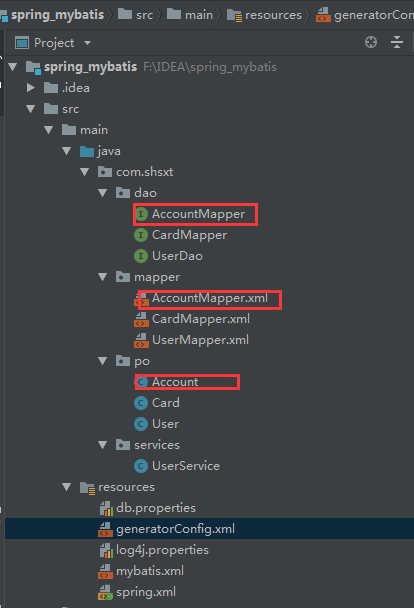
4,创建包,目录结构如下,暂且不需要创建包下的文件,后面会自动生成,

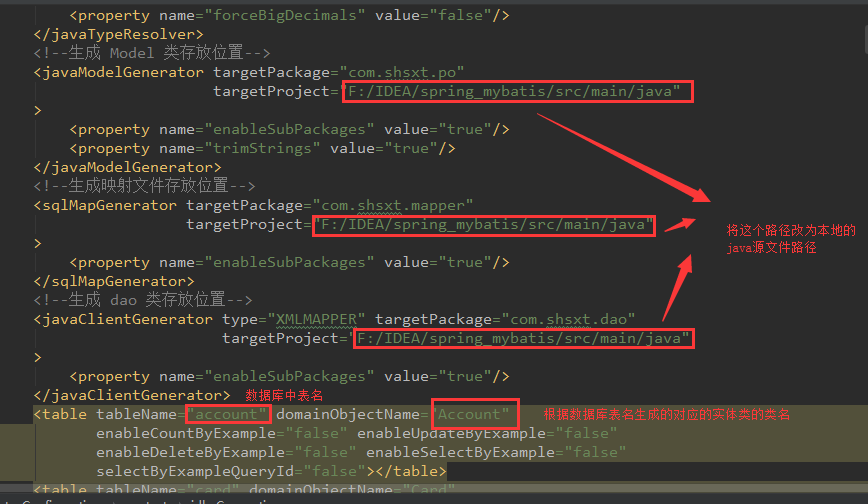
因为我们在pom.xml中导入了代码自动生成的插件,现在需要在resources下添加generatorConfig.xml
<?xml version="1.0" encoding="UTF-8"?>

<!DOCTYPE generatorConfiguration

        PUBLIC "-//mybatis.org//DTD MyBatis Generator Configuration 1.0//EN"

        "http://mybatis.org/dtd/mybatis-generator-config_1_0.dtd">

<generatorConfiguration>

    <!--数据库驱动-->

    <classPathEntry location="C:/Users/liuqingfeng/.m2/repository/mysql/mysql-connector-java/5.1.39/mysql-connector-java-5.1.39.jar"/>

    <context id="DB2Tables" targetRuntime="MyBatis3">

        <commentGenerator>

            <property name="suppressDate" value="true"/>

            <property name="suppressAllComments" value="true"/>

        </commentGenerator>

        <!--数据库链接地址账号密码-->

        <jdbcConnection driverClass="com.mysql.jdbc.Driver"

                        connectionURL="jdbc:mysql://127.0.0.1:3306/mybatis" userId="root"

                        password="123456">

        </jdbcConnection>

        <javaTypeResolver>

            <property name="forceBigDecimals" value="false"/>

        </javaTypeResolver>

        <!--生成 Model 类存放位置-->

        <javaModelGenerator targetPackage="com.shsxt.po"

                            targetProject="F:/IDEA/spring_mybatis/src/main/java"

        >

            <property name="enableSubPackages" value="true"/>

            <property name="trimStrings" value="true"/>

        </javaModelGenerator>

        <!--生成映射文件存放位置-->

        <sqlMapGenerator targetPackage="com.shsxt.mapper"

                         targetProject="F:/IDEA/spring_mybatis/src/main/java"

        >

            <property name="enableSubPackages" value="true"/>

        </sqlMapGenerator>

        <!--生成 dao 类存放位置-->

        <javaClientGenerator type="XMLMAPPER" targetPackage="com.shsxt.dao"

                             targetProject="F:/IDEA/spring_mybatis/src/main/java"

        >

            <property name="enableSubPackages" value="true"/>

        </javaClientGenerator>

        <table tableName="account" domainObjectName="Account"

               enableCountByExample="false" enableUpdateByExample="false"

               enableDeleteByExample="false" enableSelectByExample="false"

               selectByExampleQueryId="false"></table>

        <table tableName="card" domainObjectName="Card"

               enableCountByExample="false" enableUpdateByExample="false"

               enableDeleteByExample="false" enableSelectByExample="false"

               selectByExampleQueryId="false"></table>

    </context>

</generatorConfiguration>
需要修改几个地方即可,包名需要也需要事先创建好,如果需要同时生成多个实体类可以有多个table标签

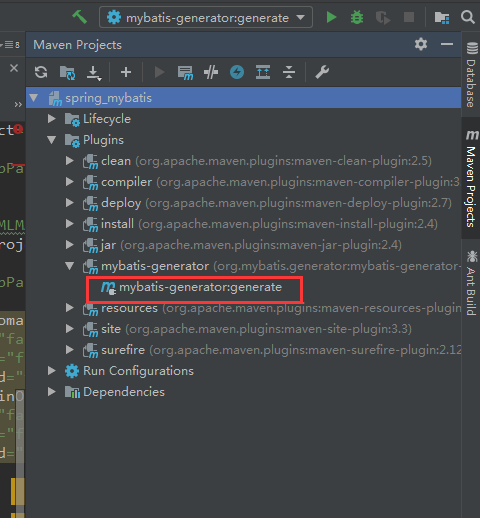
双击如下图所示的位置,即可生成文件
会自动生成如下文件
创建Userservice类
package com.shsxt.services;

import com.github.pagehelper.PageHelper;

import com.github.pagehelper.PageInfo;

import com.shsxt.dao.UserDao;

import com.shsxt.po.User;

import org.springframework.beans.factory.annotation.Autowired;

import org.springframework.stereotype.Repository;

import java.util.List;

@Repository

    public class UserService {

        @Autowired

        private UserDao userDao;

        public User queryById(Integer id){

            return userDao.queryUserById(id);

        }

        public PageInfo<User> queryUserByparams(Integer pageNum, Integer pageSize, String username){

            PageHelper.startPage(pageNum, pageSize);

            List<User> list=userDao.queryUserByparams(username);

            PageInfo<User> pageInfo=new PageInfo<User>(list);

            return pageInfo;

        }

}
测试
import com.github.pagehelper.PageInfo;

import com.shsxt.po.User;

import com.shsxt.services.UserService;

import org.apache.ibatis.reflection.SystemMetaObject;

import org.junit.runner.RunWith;

import org.springframework.beans.factory.annotation.Autowired;

import org.springframework.test.context.ContextConfiguration;

import org.springframework.test.context.junit4.SpringJUnit4ClassRunner;

@RunWith(SpringJUnit4ClassRunner.class)

@ContextConfiguration(locations = {"classpath:spring.xml"} )

public class Test {

    @Autowired

    private UserService userService;

    @org.junit.Test

    public void test01(){

        System.out.println(userService.queryById(1));

    }

}
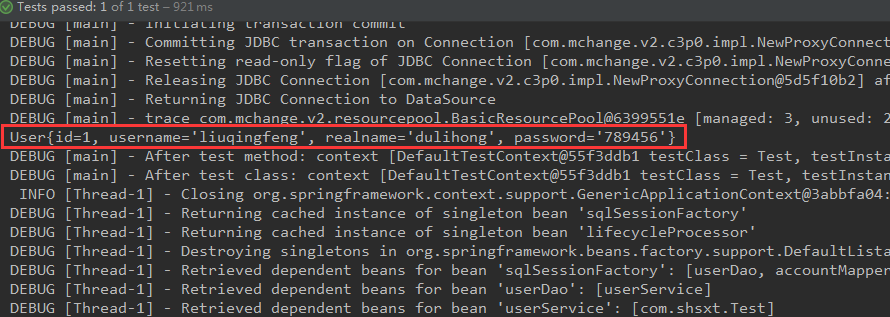
测试结果成功
五,分页插件
1)添加分页插件的jar包依赖
<dependency>

<groupId>com.github.pagehelper</groupId>

<artifactId>pagehelper</artifactId>

<version>4.1.0</version>

</dependency>
UserServices需要添加如下代码
        public PageInfo<User> queryUserByparams(Integer pageNum, Integer pageSize, String username){

            PageHelper.startPage(pageNum, pageSize);

            List<User> list=userDao.queryUserByparams(username);

            PageInfo<User> pageInfo=new PageInfo<User>(list);

            return pageInfo;

        }
测试
 @org.junit.Test

    public void test02(){

        PageInfo<User> pageInfo=userService.queryUserByparams(2,2,null);

        System.out.println(pageInfo.getTotal()+" and "+pageInfo.getPages() );

        for (User user:pageInfo.getList()) {

            System.out.println(user);

        }

    }
mybatis详解(三)的更多相关文章
- mybatis 详解(三)------入门实例(基于注解)
1.创建MySQL数据库:mybatisDemo和表:user 详情参考:mybatis 详解(二)------入门实例(基于XML) 一致 2.建立一个Java工程,并导入相应的jar包,具体目录如 ...
- mybatis 详解------动态SQL
mybatis 详解------动态SQL 目录 1.动态SQL:if 语句 2.动态SQL:if+where 语句 3.动态SQL:if+set 语句 4.动态SQL:choose(when,o ...
- [原创]mybatis详解说明
mybatis详解 2017-01-05MyBatis之代理开发模式1 mybatis-Dao的代理开发模式 Dao:数据访问对象 原来:定义dao接口,在定义dao的实现类 dao的代理开发模式 只 ...
- .NET DLL 保护措施详解(三)最终效果
针对.NET DLL 保护措施详解所述思路完成最终的实现,以下为程序包下载地址 下载 注意: 运行环境为.net4.0,需要安装VS2015 C++可发行组件包vc_redist.x86.exe.然后 ...
- Android 之窗口小部件详解(三) 部分转载
原文地址:http://blog.csdn.net/iefreer/article/details/4626274. (一) 应用程序窗口小部件App Widgets 应用程序窗口小部件(Widget ...
- WebSocket安卓客户端实现详解(三)–服务端主动通知
WebSocket安卓客户端实现详解(三)–服务端主动通知 本篇依旧是接着上一篇继续扩展,还没看过之前博客的小伙伴,这里附上前几篇地址 WebSocket安卓客户端实现详解(一)–连接建立与重连 We ...
- logback -- 配置详解 -- 三 -- <encoder>
附: logback.xml实例 logback -- 配置详解 -- 一 -- <configuration>及子节点 logback -- 配置详解 -- 二 -- <appen ...
- python设计模式之装饰器详解(三)
python的装饰器使用是python语言一个非常重要的部分,装饰器是程序设计模式中装饰模式的具体化,python提供了特殊的语法糖可以非常方便的实现装饰模式. 系列文章 python设计模式之单例模 ...
- Python操作redis字符串(String)详解 (三)
# -*- coding: utf-8 -*- import redis #这个redis不能用,请根据自己的需要修改 r =redis.Redis(host=") 1.SET 命令用于设置 ...
随机推荐
- 如何下载spring sts
1.打开https://spring.io/ 2.翻到页面最底部点击tools 3.页面下滑点击Download STS4 Windows 64-bit
- c语言深度解剖(笔记)
1.1最宽恒大量的关键字----auto 函数内部变量,限制作用域为这个 1.2.1最快的关键字---- register函数. 关键字请求编译器尽可能的将变量存在 CPU 内部寄存器中 1.2.2使 ...
- bootstrap导航栏PC端移动端之不同样式
在此之前,我先说我之所以要改变网站PC移动双端不同样式的原因. 首先我的网站用到了bootstrap响应式布局,这是我网站的PC端导航栏: 这是我网站的移动端导航栏,看着就难受: 我用谷歌浏览器F12 ...
- DS博客大作业--树(李天明组)
DS博客大作业--树 大作业博客要求 (10分) 1.树的存储结构说明 .树采用的是链式存储结构. .这段代码中定义了两个结构体.第一个是自定义为Name类型的结构体,里面的成员有字符串str和类型为 ...
- 《你必须知道的495个C语言问题》读书笔记之第15-20章:浮点数、风格、杂项
一.可变参数列表 1. Q:为什么调用printf前必须要包含<stdio.h>? A:为了把printf的正确原型说明引入作用域.例如,如果可变参数的调用比固定参数的调用效率低,编译器就 ...
- Oracle的查询-多表查询中的一些概念
--笛卡尔积 select * from emp e,dept d; --等值连接 select * from emp e,dept d where e.deptno=d.deptno --内连接 s ...
- jsp页面报错,各种错误码意思
基本原则: 2xx = Success(成功) 3xx = Redirect(重定向) 4xx = User error(客户端错误) 5xx = Server error(服务器端错误) 状态码 ( ...
- AOP的应用与基本概念(源自别人的博文)
什么是AOP AOP(Aspect-OrientedProgramming,面向方面编程),可以说是OOP(Object-Oriented Programing,面向对象编程)的补充和完善.OOP引入 ...
- MySQL 并发事务问题以及事务的隔离级别
一.并发事务处理带来的问题 相对于串行处理,并发事务(InnoDB)处理能大大增加数据库资源的利用率,提高数据库系统的事务吞吐量,从而可以支持更多用户. 但并发事务处理也会带来一些问题,主要有一下几种 ...
- 3-MySQL DBA笔记-开发基础
第二部分 开发篇 本篇首先讲述数据库开发的一些基础知识,如关系数据模型.常用的SQL语法.范式.索引.事务等,然后介绍编程开发将会涉及的数据库的一些技巧,最后结合生产实际,提供一份开发规范供大家参考. ...
