MyBatis 源码篇-插件模块
本章主要描述 MyBatis 插件模块的原理,从以下两点出发:
- MyBatis 是如何加载插件配置的?
- MyBatis 是如何实现用户使用自定义拦截器对 SQL 语句执行过程中的某一点进行拦截的?
示例准备
首先准备两个拦截器示例,代码如下。
@Intercepts({

        @Signature(type = Executor.class, method = "query",

                args = {MappedStatement.class, Object.class, RowBounds.class, ResultHandler.class}),

        @Signature(type = Executor.class, method = "query", args = {MappedStatement.class, Object.class, RowBounds.class,

                ResultHandler.class, CacheKey.class, BoundSql.class})})

public class AInterceptor implements Interceptor {

    private static final Logger LOGGER = LoggerFactory.getLogger(AInterceptor.class);

    /**

     * 执行拦截逻辑的方法

     *

     * @param invocation

     * @return

     * @throws Throwable

     */

    @Override

    public Object intercept(Invocation invocation) throws Throwable {

        LOGGER.info("--------------执行拦截器A前--------------");

        Object obj = invocation.proceed();

        LOGGER.info("--------------执行拦截器A后--------------");

        return obj;

    }

    /**

     * 决定是否触发intercept()方法

     *

     * @param target

     * @return

     */

    @Override

    public Object plugin(Object target) {

        return Plugin.wrap(target, this);

    }

    /**

     * 根据配置初始化Interceptor对象

     *

     * @param properties

     */

    @Override

    public void setProperties(Properties properties) {

    }

}
@Intercepts({

        @Signature(type = Executor.class, method = "query",

                args = {MappedStatement.class, Object.class, RowBounds.class, ResultHandler.class}),

        @Signature(type = Executor.class, method = "query", args = {MappedStatement.class, Object.class, RowBounds.class,

                ResultHandler.class, CacheKey.class, BoundSql.class})})

public class BInterceptor implements Interceptor {

    private static final Logger LOGGER = LoggerFactory.getLogger(BInterceptor.class);

    /**

     * 执行拦截逻辑的方法

     *

     * @param invocation

     * @return

     * @throws Throwable

     */

    @Override

    public Object intercept(Invocation invocation) throws Throwable {

        LOGGER.info("--------------执行拦截器B前--------------");

        Object obj = invocation.proceed();

        LOGGER.info("--------------执行拦截器B后--------------");

        return obj;

    }

    /**

     * 决定是否触发intercept()方法

     *

     * @param target

     * @return

     */

    @Override

    public Object plugin(Object target) {

        return Plugin.wrap(target, this);

    }

    /**

     * 根据配置初始化Interceptor对象

     *

     * @param properties

     */

    @Override

    public void setProperties(Properties properties) {

    }

}
MyBatis 配置文件 mybatis-config.xml 增加 plugin 配置。
<plugins>

    <plugin interceptor="com.yjw.mybatis.test.mybatis.plugin.AInterceptor"/>

    <plugin interceptor="com.yjw.mybatis.test.mybatis.plugin.BInterceptor"/>

</plugins>
加载插件配置
在 MyBatis 初始化时,会通过 XMLConfigBuilder#pluginElement 方法解析 mybatis-config.xml 配置文件中定义的 <plugin> 节点,得到相应的 Interceptor 对象,最后将 Interceptor 对象添加到 Configuration.interceptorChain 字段中保存。源码如下所示。
private void pluginElement(XNode parent) throws Exception {

  if (parent != null) {

    for (XNode child : parent.getChildren()) {

      String interceptor = child.getStringAttribute("interceptor");

      Properties properties = child.getChildrenAsProperties();

      // 创建Interceptor对象

      Interceptor interceptorInstance = (Interceptor) resolveClass(interceptor).newInstance();

      interceptorInstance.setProperties(properties);

      // 保存到Configuration.interceptorChain字段中

      configuration.addInterceptor(interceptorInstance);

    }

  }

}

public void addInterceptor(Interceptor interceptor) {

  interceptorChain.addInterceptor(interceptor);

}
拦截过程
继续介绍 MyBatis 的拦截器如何对 Exector、StatementHandler、ParameterHandler、ResultSetHandler 进行拦截。
在 MyBatis 中使用的这四类对象,都是通过 Configuration 创建的,方法如下图所示。如果配置了自定义拦截器,则会在该系列方法中,通过 InterceptorChain.pluginAll() 方法为目标对象创建代理对象,所以通过 Configuration.new*() 系列方法得到的对象实际是一个代理对象。

以 newExecutor() 方法为例进行分析,其他方法原理类似,newExecutor() 方法的具体实现如下所示。
public Executor newExecutor(Transaction transaction, ExecutorType executorType) {

  executorType = executorType == null ? defaultExecutorType : executorType;

  executorType = executorType == null ? ExecutorType.SIMPLE : executorType;

  Executor executor;

  // 默认是SIMPLE

  if (ExecutorType.BATCH == executorType) {

    executor = new BatchExecutor(this, transaction);

  } else if (ExecutorType.REUSE == executorType) {

    executor = new ReuseExecutor(this, transaction);

  } else {

    executor = new SimpleExecutor(this, transaction);

  }

  if (cacheEnabled) {

    executor = new CachingExecutor(executor);

  }

  // 通过InterceptorChain.pluginAll()方法创建Exector代理对象

  executor = (Executor) interceptorChain.pluginAll(executor);

  return executor;

}
在 InterceptorChain.pluginAll() 方法会遍历 interceptors 集合,并调用每个 interceptor 的 plugin() 方法创建代理对象,具体实现如下所示。
public Object pluginAll(Object target) {

  for (Interceptor interceptor : interceptors) {

    target = interceptor.plugin(target);

  }

  return target;

}
一般我们自定义拦截器的 plugin 方法,会使用 MyBatis 提供的 Plugin 工具类,它实现了 InvocationHandler 接口,并提供了 wrap() 静态方法用于创建代理对象,Plugin.wrap() 方法的具体实现如下所示。
public static Object wrap(Object target, Interceptor interceptor) {

  // 获取用户自定义Interceptor中@Signature注解的信息

  // getSignatureMap()方法负责处理@Signature注解

  Map<Class<?>, Set<Method>> signatureMap = getSignatureMap(interceptor);

  // 获取目标类型

  Class<?> type = target.getClass();

  // 获取目标类型实现的接口

  Class<?>[] interfaces = getAllInterfaces(type, signatureMap);

  if (interfaces.length > 0) {

    // 使用JDK动态代理的方式创建代理对象

    return Proxy.newProxyInstance(

        type.getClassLoader(),

        interfaces,

        new Plugin(target, interceptor, signatureMap));

  }

  return target;

}

private static Class<?>[] getAllInterfaces(Class<?> type, Map<Class<?>, Set<Method>> signatureMap) {

  Set<Class<?>> interfaces = new HashSet<Class<?>>();

  while (type != null) {

    for (Class<?> c : type.getInterfaces()) {

      if (signatureMap.containsKey(c)) {

        interfaces.add(c);

      }

    }

    type = type.getSuperclass();

  }

  return interfaces.toArray(new Class<?>[interfaces.size()]);

}
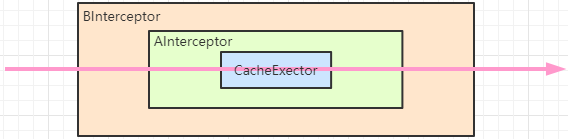
示例中 Exector 存在两个拦截器 AInterceptor 和 BInterceptor,在执行 InterceptorChain.pluginAll() 方法的时候,传给 getAllInterfaces() 方法的 type 字段第一次是 CacheExector 对象,第二次是 CacheExector 的代理对象,因为生成的代理对象也继承 Exector 接口,signatureMap.containsKey(c) 可以获得值,继续生成代理的代理对象,结构如下图所示。
在 Plugin.invoke() 方法中,会将当前调用方法与 signatureMap 集合中记录的方法信息进行比较,如果当前调用的方法是需要被拦截的方法,则调用其 intercept() 方法进行处理,如果不能被拦截则直接调用 target 的相应方法。Plugin.invoke() 方法的具体实现如下所示。
@Override

public Object invoke(Object proxy, Method method, Object[] args) throws Throwable {

  try {

    // 获取当前方法所在类或接口中,可被当前 Interceptor拦截的方法

    Set<Method> methods = signatureMap.get(method.getDeclaringClass());

    // 如果当前调用的方法需要被拦截,则调用interceptor.intercept()方法进行拦截处理

    if (methods != null && methods.contains(method)) {

      return interceptor.intercept(new Invocation(target, method, args));

    }

    // 如果当前调用的方法不能被拦截,则调用target对象的相应方法

    return method.invoke(target, args);

  } catch (Exception e) {

    throw ExceptionUtil.unwrapThrowable(e);

  }

}
Interceptor.intercept() 方法的参数是 Invocation 对象,其中封装了目标对象、目标方法以及调用目标方法的参数,并提供了 process() 方法调用目标方法,如下所示。
public Object proceed() throws InvocationTargetException, IllegalAccessException {

  return method.invoke(target, args);

}
需要注意的是,在 Interceptor.intercept() 方法中执行完拦截处理之后,如果需要调用目标方法,则通过 Invocation.process() 方法实现。
根据上面的分析,就不难理解示例的如下输出日志了,同时配置文件中插件的执行顺序也清楚了。
[main] DEBUG org.apache.ibatis.logging.LogFactory - Logging initialized using 'class org.apache.ibatis.logging.slf4j.Slf4jImpl' adapter.

[main] DEBUG org.apache.ibatis.datasource.pooled.PooledDataSource - PooledDataSource forcefully closed/removed all connections.

[main] DEBUG org.apache.ibatis.datasource.pooled.PooledDataSource - PooledDataSource forcefully closed/removed all connections.

[main] DEBUG org.apache.ibatis.datasource.pooled.PooledDataSource - PooledDataSource forcefully closed/removed all connections.

[main] DEBUG org.apache.ibatis.datasource.pooled.PooledDataSource - PooledDataSource forcefully closed/removed all connections.

[main] INFO com.yjw.mybatis.test.mybatis.plugin.BInterceptor - --------------执行拦截器B前--------------

[main] INFO com.yjw.mybatis.test.mybatis.plugin.AInterceptor - --------------执行拦截器A前--------------

[main] DEBUG org.apache.ibatis.transaction.jdbc.JdbcTransaction - Opening JDBC Connection

[main] DEBUG org.apache.ibatis.datasource.pooled.PooledDataSource - Created connection 360067785.

[main] DEBUG com.yjw.mybatis.dao.StudentMapper.selectByPrimaryKey - ==>  Preparing: select id, name, sex, selfcard_no, note from t_student where id = ?

[main] DEBUG com.yjw.mybatis.dao.StudentMapper.selectByPrimaryKey - ==> Parameters: 1(Long)

[main] DEBUG com.yjw.mybatis.dao.StudentMapper.selectByPrimaryKey - <==      Total: 1

[main] INFO com.yjw.mybatis.test.mybatis.plugin.AInterceptor - --------------执行拦截器A后--------------

[main] INFO com.yjw.mybatis.test.mybatis.plugin.BInterceptor - --------------执行拦截器B后--------------

Student [Hash = 550752602, id=1, name=张三, sex=1, selfcardNo=111, note=zhangsan]
MyBatis 源码篇
MyBatis 源码篇-插件模块的更多相关文章
- MyBatis 源码篇-日志模块2
上一章的案例,配置日志级别为 debug,执行一个简单的查询操作,会将 JDBC 操作打印出来.本章通过 MyBatis 日志部分源码分析它是如何实现日志打印的. 在 MyBatis 的日志模块中有一 ...
- MyBatis 源码篇-日志模块1
在 Java 开发中常用的日志框架有 Log4j.Log4j2.Apache Common Log.java.util.logging.slf4j 等,这些日志框架对外提供的接口各不相同.本章详细描述 ...
- MyBatis 源码篇-MyBatis-Spring 剖析
本章通过分析 mybatis-spring-x.x.x.jar Jar 包中的源码,了解 MyBatis 是如何与 Spring 进行集成的. Spring 配置文件 MyBatis 与 Spring ...
- MyBatis 源码篇-Transaction
本章简单介绍一下 MyBatis 的事务模块,这块内容比较简单,主要为后面介绍 mybatis-spring-1.**.jar(MyBatis 与 Spring 集成)中的事务模块做准备. 类图结构 ...
- MyBatis 源码篇-DataSource
本章介绍 MyBatis 提供的数据源模块,为后面与 Spring 集成做铺垫,从以下三点出发: 描述 MyBatis 数据源模块的类图结构: MyBatis 是如何集成第三方数据源组件的: Pool ...
- MyBatis 源码篇-资源加载
本章主要描述 MyBatis 资源加载模块中的 ClassLoaderWrapper 类和 Java 加载配置文件的三种方式. ClassLoaderWrapper 上一章的案例,使用 org.apa ...
- MyBatis 源码篇-SQL 执行的流程
本章通过一个简单的例子,来了解 MyBatis 执行一条 SQL 语句的大致过程是怎样的. 案例代码如下所示: public class MybatisTest { @Test public void ...
- MyBatis 源码篇-整体架构
MyBatis 的整体架构分为三层, 分别是基础支持层.核心处理层和接口层,如下图所示. 基础支持层 反射模块 该模块对 Java 原生的反射进行了良好的封装,提供了更加简洁易用的 API ,方便上层 ...
- MyBatis 源码分析 - 插件机制
1.简介 一般情况下,开源框架都会提供插件或其他形式的拓展点,供开发者自行拓展.这样的好处是显而易见的,一是增加了框架的灵活性.二是开发者可以结合实际需求,对框架进行拓展,使其能够更好的工作.以 My ...
随机推荐
- geth 新建账户
使用geth的account命令管理账户,例如创建新账户.更新账户密码.查询账户等: geth account <command> [options...] [arguments...] ...
- 模糊C均值聚类-FCM算法
FCM(fuzzy c-means) 模糊c均值聚类融合了模糊理论的精髓.相较于k-means的硬聚类,模糊c提供了更加灵活的聚类结果.因为大部分情况下,数据集中的对象不能划分成为明显分离的簇,指派一 ...
- create-react-app 工程,如何修改react端口号?
概要: 3000端口是webpack配置里面写的,可以通过传递一个PORT全局变量,来修改这个端口.当然,您还可以在node_modules/react-scripts/目录下面,批量搜索替换3000 ...
- Eclipse部署时项目中依赖的jar包不能部署到服务器WEB-IN下lib目录
转: Eclipse部署时项目lib下jar包不能部署到服务器WEB-IN下lib目录及Eclipse下tomcat服务器配置修改 2018年04月07日 11:04:19 拾悦酒吧 阅读数 1046 ...
- Qt自定义类添加qvector报错
PtsData& PtsData::operator=(const PtsData& obj){ return *this;} PtsData::~PtsData(){ }
- Flutter打包release版本安卓apk包真机安装无法请求网络的解决方法
今天flutter build apk打包了一个release.apk包,在真机上安装后网络数据都不显示,但是在模拟器上没问题,然后又连接真机开debug各种测试,一切都正常!那这会是什么问题呢? 查 ...
- shell脚本中set -e作用
最近学习shell脚本想到一个问题,如果脚本中出现了一条异常语句,甚至可以影响整个脚本的使用,那么是否有一旦出现问题就可以及时停止的方法呢?在shell脚本中set命令就可以轻松实现.set命令的-e ...
- Windows下获取CPU频率
一直想在Windows下取得CPU的时钟速度,找了好久终于找到了函数CallNtPowerInformation,要想使用它,首先必须包含powrprof.h头文件和链接库powerprof.lib. ...
- VC.VS版本&VC版本&OpenCV版本
1.VS版本 与 VC版本 的对应关系,以及opencv 对 VC版本 的支持情况 - 魔法学徒 - CSDN博客.html(https://blog.csdn.net/yefcion/article ...
- Vue父子组件传值$parent , ref,$refs,props大总结
子组件: <template> <div class="child"> <slot name='meiyong'></slot> & ...