JavaWeb_(Spring框架)xml配置文件
系列博文
JavaWeb_(Spring框架)xml配置文件 传送门
JavaWeb_(Spring框架)注解配置 传送门
Xml配置
a)Bean元素:交由Spring管理的对象都要配置在bean标签中;
i.Bean标签介绍和创建方式:空参构造、静态工厂、动态工厂;
ii.Scope属性介绍:singleton、protoptype、request、session;
iii.初始化方法Init-method和 销毁方法destroy-method介绍;
b)属性注入:
i.Set方法注入;
ii.构造函数注入;
iii.复杂类型注入:Array、List、Set、Map、Properties
1、xml配置-bean标签-配置及创建方式
ApplicationContext 配置的所有bean都会在容器创建的时候被创建出来,
如果配置的bean较多,那么在创建容的时候,会产生内存过大的问题;这种情况在机器硬件性能较为落后的时候体现的比较明显;
延迟加载(懒加载) true就是创建容器时不加载配置的bean对象,在获取的时候才创建;
<!-- name 是起一个名字,我们可以通过这个name来利用容器获取对象

       name 可以使用特殊字符

       name 可以重复

       我们在实际开发中不推荐将多个对象名字命名为重复的-->

       <!-- id与name作用基本相同,单不推荐使用 不支持特殊字符,不能重复 -->

<!-- class:是被管理对象的全包名,spring会通过这个包名来创建对象 -->

    <bean name="user" class="com.Gary.bean.User" lazy-init ="true">

        <!-- 为u_id注入了一个id为2的值 -->

        <property name="u_id" value="2"></property>

    </bean>
<?xml version="1.0" encoding="UTF-8"?>

<beans xmlns:xsi="http://www.w3.org/2001/XMLSchema-instance"

            xmlns="http://www.springframework.org/schema/beans"

            xsi:schemaLocation="http://www.springframework.org/schema/beans http://www.springframework.org/schema/beans/spring-beans.xsd ">

<!-- name 是起一个名字,我们可以通过这个name来利用容器获取对象

       name 可以使用特殊字符

       name 可以重复

       我们在实际开发中不推荐将多个对象名字命名为重复的-->

       <!-- id与name作用基本相同,单不推荐使用 不支持特殊字符,不能重复 -->

<!-- class:是被管理对象的全包名,spring会通过这个包名来创建对象 -->

<!-- request 在web环境下,如果scope属性为request 那么这个对象被创建出来 他的生命周期会与request请求一致-->

<!-- session 同理 ,生命周期与session一致 -->

    <bean name="user" class="com.Gary.bean.User" lazy-init ="true">

        <!-- 为u_id注入了一个id为2的值 -->

        <property name="u_id" value="2"></property>

    </bean>

</beans>
applicationContext.xml
2、xml配置-bean标签-scope属性
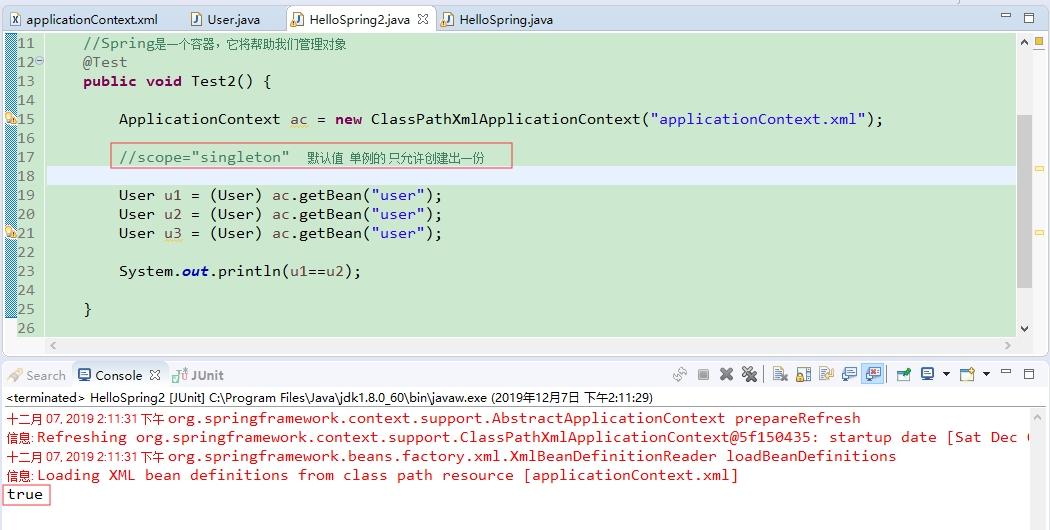
scope="singleton" 表示<bean>是单例的
  <bean name="user" class="com.Gary.bean.User" lazy-init ="true" scope="singleton">

    <!-- 为u_id注入了一个id为2的值 -->

    <property name="u_id" value="2"></property>

  </bean>
package com.Gary.test;

import org.junit.Test;

import org.springframework.context.ApplicationContext;

import org.springframework.context.support.ClassPathXmlApplicationContext;

import com.Gary.bean.User;

public class HelloSpring2 {

    //Spring是一个容器,它将帮助我们管理对象

    @Test

    public void Test2() {

        ApplicationContext ac = new ClassPathXmlApplicationContext("applicationContext.xml");

        //scope="singleton"  默认值  单例的 只允许创建出一份

        User u1 = (User) ac.getBean("user");

        User u2 = (User) ac.getBean("user");

        User u3 = (User) ac.getBean("user");

        System.out.println(u1==u2);

    }

}
HelloSpring2.java
<?xml version="1.0" encoding="UTF-8"?>

<beans xmlns:xsi="http://www.w3.org/2001/XMLSchema-instance"

            xmlns="http://www.springframework.org/schema/beans"

            xsi:schemaLocation="http://www.springframework.org/schema/beans http://www.springframework.org/schema/beans/spring-beans.xsd ">

<!-- name 是起一个名字,我们可以通过这个name来利用容器获取对象

       name 可以使用特殊字符

       name 可以重复

       我们在实际开发中不推荐将多个对象名字命名为重复的-->

       <!-- id与name作用基本相同,单不推荐使用 不支持特殊字符,不能重复 -->

<!-- class:是被管理对象的全包名,spring会通过这个包名来创建对象 -->

<!-- request 在web环境下,如果scope属性为request 那么这个对象被创建出来 他的生命周期会与request请求一致-->

<!-- session 同理 ,生命周期与session一致 -->

    <bean name="user" class="com.Gary.bean.User" lazy-init ="true" scope="singleton">

        <!-- 为u_id注入了一个id为2的值 -->

        <property name="u_id" value="2"></property>

    </bean>

</beans>
applicationContext.xml
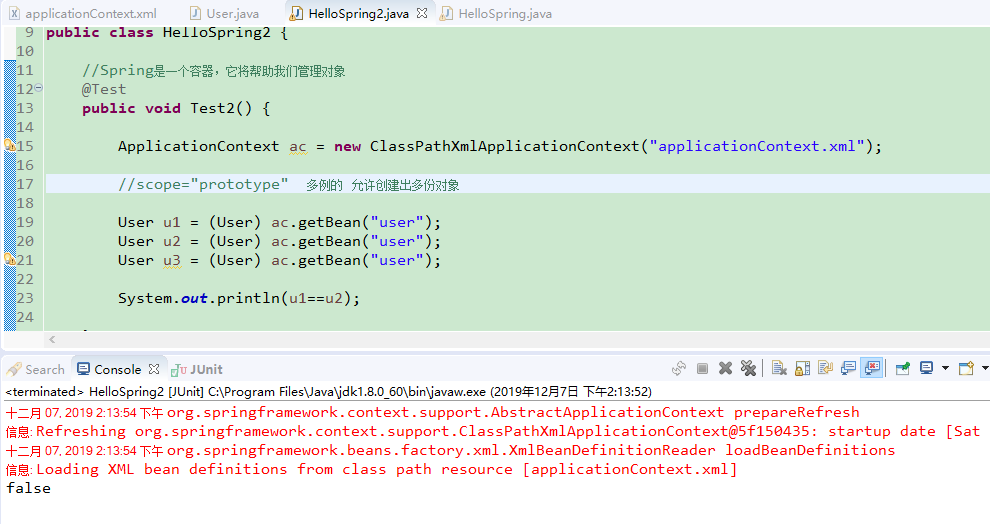
scope="prototype" 表示<bean>是多例的
  <bean name="user" class="com.Gary.bean.User" lazy-init ="true" scope="prototype">

    <!-- 为u_id注入了一个id为2的值 -->

    <property name="u_id" value="2"></property>

  </bean>
package com.Gary.test;

import org.junit.Test;

import org.springframework.context.ApplicationContext;

import org.springframework.context.support.ClassPathXmlApplicationContext;

import com.Gary.bean.User;

public class HelloSpring2 {

    //Spring是一个容器,它将帮助我们管理对象

    @Test

    public void Test2() {

        ApplicationContext ac = new ClassPathXmlApplicationContext("applicationContext.xml");

        //scope="prototype"  多例的   允许创建出多份对象

        User u1 = (User) ac.getBean("user");

        User u2 = (User) ac.getBean("user");

        User u3 = (User) ac.getBean("user");

        System.out.println(u1==u2);

    }

}
HelloSpring2.java
<?xml version="1.0" encoding="UTF-8"?>

<beans xmlns:xsi="http://www.w3.org/2001/XMLSchema-instance"

            xmlns="http://www.springframework.org/schema/beans"

            xsi:schemaLocation="http://www.springframework.org/schema/beans http://www.springframework.org/schema/beans/spring-beans.xsd ">

<!-- name 是起一个名字,我们可以通过这个name来利用容器获取对象

       name 可以使用特殊字符

       name 可以重复

       我们在实际开发中不推荐将多个对象名字命名为重复的-->

       <!-- id与name作用基本相同,单不推荐使用 不支持特殊字符,不能重复 -->

<!-- class:是被管理对象的全包名,spring会通过这个包名来创建对象 -->

<!-- request 在web环境下,如果scope属性为request 那么这个对象被创建出来 他的生命周期会与request请求一致-->

<!-- session 同理 ,生命周期与session一致 -->

    <bean name="user" class="com.Gary.bean.User" lazy-init ="true" scope="prototype">

        <!-- 为u_id注入了一个id为2的值 -->

        <property name="u_id" value="2"></property>

    </bean>

</beans>
applicationContext.xml
scrope的其它两个属性request、session(基本用不到这两个属性)
一般情况下使用singleton单例的,特殊情况下使用prototype多例的(使用struts时,它创建的action是多例的)
<!-- request 在web环境下,如果scope属性为request 那么这个对象被创建出来 他的生命周期会与request请求一致-->

<!-- session 同理 ,生命周期与session一致 -->

    <bean name="user" class="com.Gary.bean.User" lazy-init ="true" scope="prototype">

        <!-- 为u_id注入了一个id为2的值 -->

        <property name="u_id" value="2"></property>

    </bean>
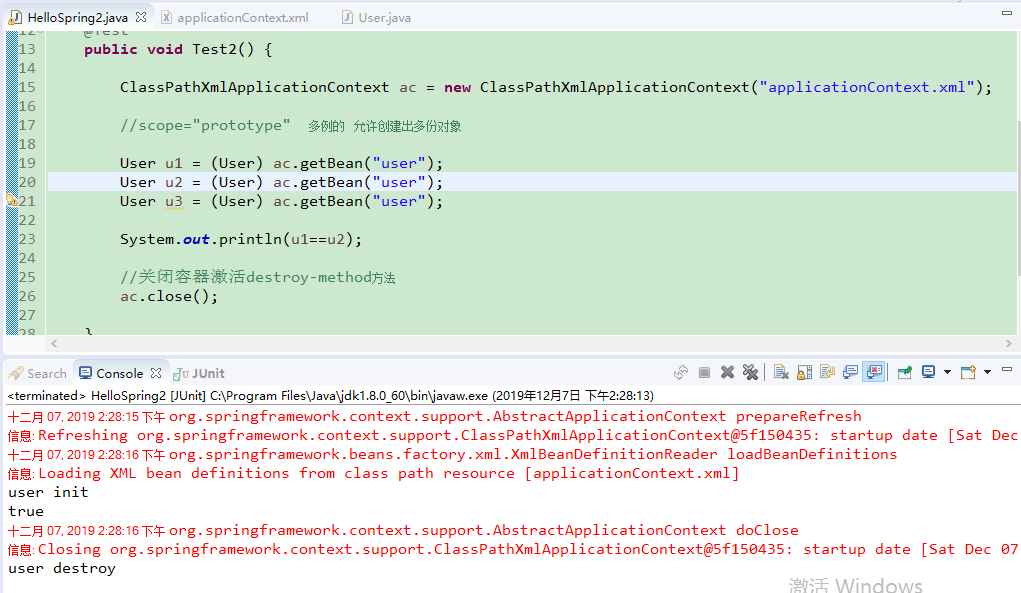
3、xml配置-bean标签-init-method与destroy-method的使用
在User.java中添加一个userInit()初始化方法与userDestroy()销毁容器时的方法
    public void userInit() {

        System.out.println("user init");

    }

    public void userDestroy() {

        System.out.println("user destroy");

    }
    <bean name="user" class="com.Gary.bean.User" lazy-init ="true"  init-method="userInit" destroy-method="userDestroy">

        <!-- 为u_id注入了一个id为2的值 -->

        <property name="u_id" value="2"></property>

    </bean>
package com.Gary.bean;

public class User {

    private Integer u_id;

    private String u_username;

    private String u_password;

    /*public User() {

        System.out.println("默认使用 User 对象空参构造方法");

    }*/

    public Integer getU_id() {

        return u_id;

    }

    public void setU_id(Integer u_id) {

        this.u_id = u_id;

    }

    public String getU_username() {

        return u_username;

    }

    public void setU_username(String u_username) {

        this.u_username = u_username;

    }

    public String getU_password() {

        return u_password;

    }

    public void setU_password(String u_password) {

        this.u_password = u_password;

    }

    @Override

    public String toString() {

        return "User [u_id=" + u_id + ", u_username=" + u_username + ", u_password=" + u_password + "]";

    }

    public void userInit() {

        System.out.println("user init");

    }

    public void userDestroy() {

        System.out.println("user destroy");

    }

}
User.java
package com.Gary.test;

import org.junit.Test;

import org.springframework.context.ApplicationContext;

import org.springframework.context.support.ClassPathXmlApplicationContext;

import com.Gary.bean.User;

public class HelloSpring2 {

    //Spring是一个容器,它将帮助我们管理对象

    @Test

    public void Test2() {

        ClassPathXmlApplicationContext ac = new ClassPathXmlApplicationContext("applicationContext.xml");

        //scope="prototype"  多例的   允许创建出多份对象

        User u1 = (User) ac.getBean("user");

        User u2 = (User) ac.getBean("user");

        User u3 = (User) ac.getBean("user");

        System.out.println(u1==u2);

        //关闭容器激活destroy-method方法

        ac.close();

    }

}
HelloSpring2.java
<?xml version="1.0" encoding="UTF-8"?>

<beans xmlns:xsi="http://www.w3.org/2001/XMLSchema-instance"

            xmlns="http://www.springframework.org/schema/beans"

            xsi:schemaLocation="http://www.springframework.org/schema/beans http://www.springframework.org/schema/beans/spring-beans.xsd ">

<!-- name 是起一个名字,我们可以通过这个name来利用容器获取对象

       name 可以使用特殊字符

       name 可以重复

       我们在实际开发中不推荐将多个对象名字命名为重复的-->

       <!-- id与name作用基本相同,单不推荐使用 不支持特殊字符,不能重复 -->

<!-- class:是被管理对象的全包名,spring会通过这个包名来创建对象 -->

<!-- request 在web环境下,如果scope属性为request 那么这个对象被创建出来 他的生命周期会与request请求一致-->

<!-- session 同理 ,生命周期与session一致 -->

    <bean name="user" class="com.Gary.bean.User" lazy-init ="true"  init-method="userInit" destroy-method="userDestroy">

        <!-- 为u_id注入了一个id为2的值 -->

        <property name="u_id" value="2"></property>

    </bean>

</beans>
applicationContext.xml
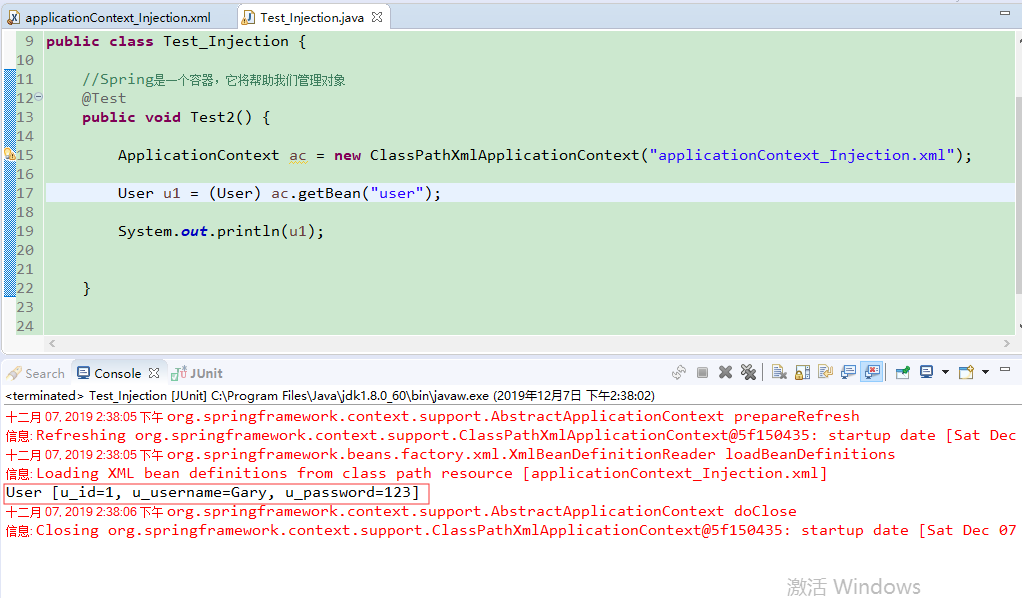
4、xml配置-属性注入-Set方式注入
注入一个基本类型
创建一个applicationContext_Injection.xml和Test_Injection.java
    <!-- 将user对象交给Spring管理,并注入类型 -->

    <bean name="user" class="com.Gary.bean.User">

        <property name="u_id" value="1"/>

        <property name="u_username" value="Gary"/>

        <property name="u_password" value="123"/>

    </bean>
<?xml version="1.0" encoding="UTF-8"?>

<beans xmlns:xsi="http://www.w3.org/2001/XMLSchema-instance"

            xmlns="http://www.springframework.org/schema/beans"

            xsi:schemaLocation="http://www.springframework.org/schema/beans http://www.springframework.org/schema/beans/spring-beans.xsd ">

    <!-- 将user对象交给Spring管理,并注入类型 -->

    <bean name="user" class="com.Gary.bean.User">

        <property name="u_id" value="1"/>

        <property name="u_username" value="Gary"/>

        <property name="u_password" value="123"/>

    </bean>

</beans>
applicationContext_Injection.xml
package com.Gary.test; import org.junit.Test;
import org.springframework.context.ApplicationContext;
import org.springframework.context.support.ClassPathXmlApplicationContext; import com.Gary.bean.User; public class Test_Injection { //Spring是一个容器,它将帮助我们管理对象
@Test
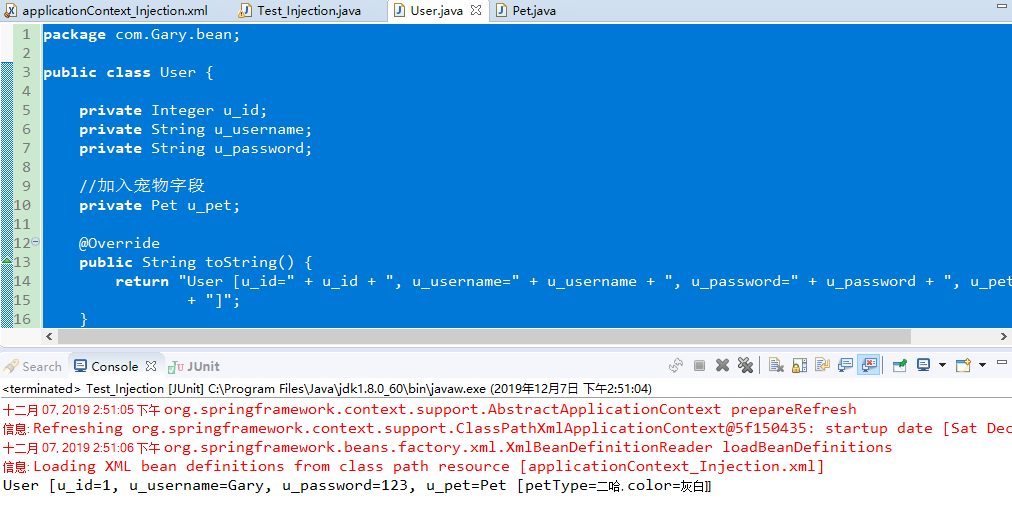
public void Test2() { ApplicationContext ac = new ClassPathXmlApplicationContext("applicationContext_Injection.xml"); User u1 = (User) ac.getBean("user"); System.out.println(u1); } }
Test_Injection.java
package com.Gary.bean;

public class User {

    private Integer u_id;

    private String u_username;

    private String u_password;

    /*public User() {

        System.out.println("默认使用 User 对象空参构造方法");

    }*/

    public Integer getU_id() {

        return u_id;

    }

    public void setU_id(Integer u_id) {

        this.u_id = u_id;

    }

    public String getU_username() {

        return u_username;

    }

    public void setU_username(String u_username) {

        this.u_username = u_username;

    }

    public String getU_password() {

        return u_password;

    }

    public void setU_password(String u_password) {

        this.u_password = u_password;

    }

    @Override

    public String toString() {

        return "User [u_id=" + u_id + ", u_username=" + u_username + ", u_password=" + u_password + "]";

    }

    public void userInit() {

        System.out.println("user init");

    }

    public void userDestroy() {

        System.out.println("user destroy");

    }

}
User.java
注入引用类型
创建一个Pet.java宠物类
package com.Gary.bean;

public class Pet {

    //宠物类型  猫  狗

    private String petType;

    //宠物颜色

    private String color;

    @Override

    public String toString() {

        return "Pet [petType=" + petType + ", color=" + color + "]";

    }

    public String getPetType() {

        return petType;

    }

    public void setPetType(String petType) {

        this.petType = petType;

    }

    public String getColor() {

        return color;

    }

    public void setColor(String color) {

        this.color = color;

    }

}
Pet.java
在User.java中加入宠物字段
    private Integer u_id;

    private String u_username;

    private String u_password;

    //加入宠物字段

    private Pet u_pet;
package com.Gary.bean;

public class User {

    private Integer u_id;

    private String u_username;

    private String u_password;

    //加入宠物字段

    private Pet u_pet;

    @Override

    public String toString() {

        return "User [u_id=" + u_id + ", u_username=" + u_username + ", u_password=" + u_password + ", u_pet=" + u_pet

                + "]";

    }

    public Pet getU_pet() {

        return u_pet;

    }

    public void setU_pet(Pet u_pet) {

        this.u_pet = u_pet;

    }

    /*public User() {

        System.out.println("默认使用 User 对象空参构造方法");

    }*/

    public Integer getU_id() {

        return u_id;

    }

    public void setU_id(Integer u_id) {

        this.u_id = u_id;

    }

    public String getU_username() {

        return u_username;

    }

    public void setU_username(String u_username) {

        this.u_username = u_username;

    }

    public String getU_password() {

        return u_password;

    }

    public void setU_password(String u_password) {

        this.u_password = u_password;

    }

    public void userInit() {

        System.out.println("user init");

    }

    public void userDestroy() {

        System.out.println("user destroy");

    }

}
User.java
  <!-- 将user对象交给Spring管理,并注入类型 -->

    <bean name="user" class="com.Gary.bean.User">

        <property name="u_id" value="1"/>

        <property name="u_username" value="Gary"/>

        <property name="u_password" value="123"/>

        <!-- 引用类型的注入 -->

        <property name="u_pet" ref="dog"/>

    </bean>

    <!-- 注入引用类型 -->

    <bean name="dog" class="com.Gary.bean.Pet">

        <property name="petType" value="二哈"/>

        <property name="color" value="灰白"/>

    </bean>
package com.Gary.bean;

public class User {

    private Integer u_id;

    private String u_username;

    private String u_password;

    //加入宠物字段

    private Pet u_pet;

    @Override

    public String toString() {

        return "User [u_id=" + u_id + ", u_username=" + u_username + ", u_password=" + u_password + ", u_pet=" + u_pet

                + "]";

    }

    public Pet getU_pet() {

        return u_pet;

    }

    public void setU_pet(Pet u_pet) {

        this.u_pet = u_pet;

    }

    /*public User() {

        System.out.println("默认使用 User 对象空参构造方法");

    }*/

    public Integer getU_id() {

        return u_id;

    }

    public void setU_id(Integer u_id) {

        this.u_id = u_id;

    }

    public String getU_username() {

        return u_username;

    }

    public void setU_username(String u_username) {

        this.u_username = u_username;

    }

    public String getU_password() {

        return u_password;

    }

    public void setU_password(String u_password) {

        this.u_password = u_password;

    }

    public void userInit() {

        System.out.println("user init");

    }

    public void userDestroy() {

        System.out.println("user destroy");

    }

}
User.java
package com.Gary.bean;

public class Pet {

    //宠物类型  猫  狗

    private String petType;

    //宠物颜色

    private String color;

    @Override

    public String toString() {

        return "Pet [petType=" + petType + ", color=" + color + "]";

    }

    public String getPetType() {

        return petType;

    }

    public void setPetType(String petType) {

        this.petType = petType;

    }

    public String getColor() {

        return color;

    }

    public void setColor(String color) {

        this.color = color;

    }

}
Pet.java
package com.Gary.test;

import org.junit.Test;

import org.springframework.context.ApplicationContext;

import org.springframework.context.support.ClassPathXmlApplicationContext;

import com.Gary.bean.User;

public class Test_Injection {

    //Spring是一个容器,它将帮助我们管理对象

    @Test

    public void Test2() {

        ApplicationContext ac = new ClassPathXmlApplicationContext("applicationContext_Injection.xml");

        User u1 = (User) ac.getBean("user");

        System.out.println(u1);

    }

}
Test_Injection.java
<?xml version="1.0" encoding="UTF-8"?>

<beans xmlns:xsi="http://www.w3.org/2001/XMLSchema-instance"

            xmlns="http://www.springframework.org/schema/beans"

            xsi:schemaLocation="http://www.springframework.org/schema/beans http://www.springframework.org/schema/beans/spring-beans.xsd ">

    <!-- 将user对象交给Spring管理,并注入类型 -->

    <bean name="user" class="com.Gary.bean.User">

        <property name="u_id" value="1"/>

        <property name="u_username" value="Gary"/>

        <property name="u_password" value="123"/>

        <!-- 引用类型的注入 -->

        <property name="u_pet" ref="dog"/>

    </bean>

    <!-- 注入引用类型 -->

    <bean name="dog" class="com.Gary.bean.Pet">

        <property name="petType" value="二哈"/>

        <property name="color" value="灰白"/>

    </bean>

</beans>
applicationContext.xml
5、xml配置-属性注入-构造函数注入
在User.java中创建构造函数(一定要带空参构造方法)
    public User(String u_username, Pet u_pet) {

        System.out.println("方法1  String,Pet");

        this.u_username = u_username;

        this.u_pet = u_pet;

    }
package com.Gary.bean;

public class User {

    private Integer u_id;

    private String u_username;

    private String u_password;

    public User(String u_username, Pet u_pet) {

        System.out.println("方法1  String,Pet");

        this.u_username = u_username;

        this.u_pet = u_pet;

    }

    //加入宠物字段

    private Pet u_pet;

    @Override

    public String toString() {

        return "User [u_id=" + u_id + ", u_username=" + u_username + ", u_password=" + u_password + ", u_pet=" + u_pet

                + "]";

    }

    public Pet getU_pet() {

        return u_pet;

    }

    public void setU_pet(Pet u_pet) {

        this.u_pet = u_pet;

    }

    /*public User() {

        System.out.println("默认使用 User 对象空参构造方法");

    }*/

    public Integer getU_id() {

        return u_id;

    }

    public void setU_id(Integer u_id) {

        this.u_id = u_id;

    }

    public String getU_username() {

        return u_username;

    }

    public void setU_username(String u_username) {

        this.u_username = u_username;

    }

    public String getU_password() {

        return u_password;

    }

    public void setU_password(String u_password) {

        this.u_password = u_password;

    }

    public void userInit() {

        System.out.println("user init");

    }

    public void userDestroy() {

        System.out.println("user destroy");

    }

}
User.java
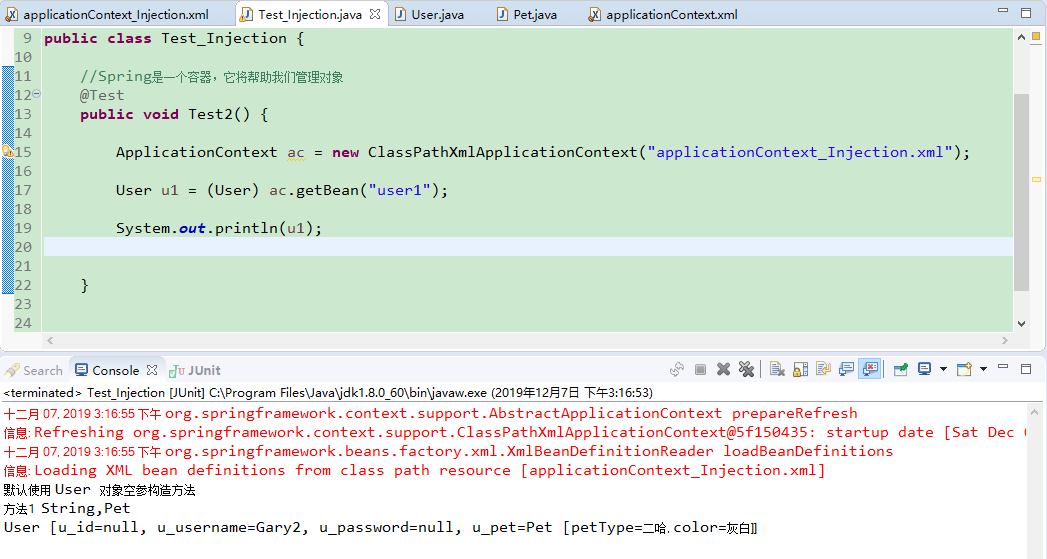
在applicationContext_Injection.xml中使用构造方法注入配置<bean>元素
    <!-- 构造方法注入 -->

    <bean name="user1" class="com.Gary.bean.User">

        <constructor-arg name="u_username" value="Gary2"/>

        <constructor-arg name="u_pet" ref="dog"/>

    </bean>

package com.Gary.bean;

public class User {

    private Integer u_id;

    private String u_username;

    private String u_password;

    public User(String u_username, Pet u_pet) {

        System.out.println("方法1  String,Pet");

        this.u_username = u_username;

        this.u_pet = u_pet;

    }

    //加入宠物字段

    private Pet u_pet;

    @Override

    public String toString() {

        return "User [u_id=" + u_id + ", u_username=" + u_username + ", u_password=" + u_password + ", u_pet=" + u_pet

                + "]";

    }

    public Pet getU_pet() {

        return u_pet;

    }

    public void setU_pet(Pet u_pet) {

        this.u_pet = u_pet;

    }

    public User() {

        System.out.println("默认使用 User 对象空参构造方法");

    }

    public Integer getU_id() {

        return u_id;

    }

    public void setU_id(Integer u_id) {

        this.u_id = u_id;

    }

    public String getU_username() {

        return u_username;

    }

    public void setU_username(String u_username) {

        this.u_username = u_username;

    }

    public String getU_password() {

        return u_password;

    }

    public void setU_password(String u_password) {

        this.u_password = u_password;

    }

}
User.java
package com.Gary.test;

import org.junit.Test;

import org.springframework.context.ApplicationContext;

import org.springframework.context.support.ClassPathXmlApplicationContext;

import com.Gary.bean.User;

public class Test_Injection {

    //Spring是一个容器,它将帮助我们管理对象

    @Test

    public void Test2() {

        ApplicationContext ac = new ClassPathXmlApplicationContext("applicationContext_Injection.xml");

        User u1 = (User) ac.getBean("user1");

        System.out.println(u1);

    }

}
Test_Injection.java
<?xml version="1.0" encoding="UTF-8"?>

<beans xmlns:xsi="http://www.w3.org/2001/XMLSchema-instance"

            xmlns="http://www.springframework.org/schema/beans"

            xsi:schemaLocation="http://www.springframework.org/schema/beans http://www.springframework.org/schema/beans/spring-beans.xsd ">

    <!-- 将user对象交给Spring管理,并注入类型 -->

    <bean name="user" class="com.Gary.bean.User">

        <property name="u_id" value="1"/>

        <property name="u_username" value="Gary"/>

        <property name="u_password" value="123"/>

        <!-- 引用类型的注入 -->

        <property name="u_pet" ref="dog"/>

    </bean>

    <!-- 注入引用类型 -->

    <bean name="dog" class="com.Gary.bean.Pet">

        <property name="petType" value="二哈"/>

        <property name="color" value="灰白"/>

    </bean>

    <!-- 构造方法注入 -->

    <bean name="user1" class="com.Gary.bean.User">

        <constructor-arg name="u_username" value="Gary2"/>

        <constructor-arg name="u_pet" ref="dog"/>

    </bean>

</beans>
applicationContext_Injection.xml
如果有多个构造方法,可以使用type:指定参数的类型,index :指定参数
6、xml配置-属性注入-复杂类型注入Array、List、Set、Map、Properties
在MyCollection.java中定义几个复杂类型变量
    //数组

    private Object[] array;

    //list

    private List list;

    //set

    private Set set;

    //map

    private Map map;

    //properties

    private Properties properties;
  <!-- 复杂类型注入 -->

  <bean name="collection" class="com.Gary.bean.MyCollection">

        <!-- array -->

        <property name="array">

            <array>

                <value>123</value>

                <value>abc</value>

            </array>

        </property>

  </bean>
package com.Gary.bean;

import java.util.Arrays;

import java.util.List;

import java.util.Map;

import java.util.Properties;

import java.util.Set;

public class MyCollection {

    //数组

    private Object[] array;

    //list

    private List list;

    //set

    private Set set;

    //map

    private Map map;

    //properties

    private Properties properties;

    public Object[] getArray() {

        return array;

    }

    public void setArray(Object[] array) {

        this.array = array;

    }

    public List getList() {

        return list;

    }

    public void setList(List list) {

        this.list = list;

    }

    public Set getSet() {

        return set;

    }

    public void setSet(Set set) {

        this.set = set;

    }

    public Map getMap() {

        return map;

    }

    public void setMap(Map map) {

        this.map = map;

    }

    public Properties getProperties() {

        return properties;

    }

    public void setProperties(Properties properties) {

        this.properties = properties;

    }

    @Override

    public String toString() {

        return "MyCollection [array=" + Arrays.toString(array) + ", list=" + list + ", set=" + set + "]";

    }

}
MyCollection.java
package com.Gary.test;

import org.junit.Test;

import org.springframework.context.ApplicationContext;

import org.springframework.context.support.ClassPathXmlApplicationContext;

import com.Gary.bean.MyCollection;

import com.Gary.bean.User;

public class Test_Injection {

    //Spring是一个容器,它将帮助我们管理对象

    @Test

    public void Test2() {

        ApplicationContext ac = new ClassPathXmlApplicationContext("applicationContext_Injection.xml");

        MyCollection mc = (MyCollection) ac.getBean("collection");

        System.out.println(mc);

    }

}
Test_Injection.java
<?xml version="1.0" encoding="UTF-8"?>

<beans xmlns:xsi="http://www.w3.org/2001/XMLSchema-instance"

            xmlns="http://www.springframework.org/schema/beans"

            xsi:schemaLocation="http://www.springframework.org/schema/beans http://www.springframework.org/schema/beans/spring-beans.xsd ">

    <!-- 将user对象交给Spring管理,并注入类型 -->

    <bean name="user" class="com.Gary.bean.User">

        <property name="u_id" value="1"/>

        <property name="u_username" value="Gary" />

        <property name="u_password" value="123"/>

        <!-- 引用类型的注入 -->

        <property name="u_pet" ref="dog"/>

    </bean>

    <!-- 注入引用类型 -->

    <bean name="dog" class="com.Gary.bean.Pet">

        <property name="petType" value="二哈"/>

        <property name="color" value="灰白"/>

    </bean>

    <!-- 构造方法注入 -->

    <bean name="user1" class="com.Gary.bean.User">

        <constructor-arg name="u_username" value="Gary2" type=""/>

        <constructor-arg name="u_pet" ref="dog"/>

    </bean>

    <!-- 复杂类型注入 -->

    <bean name="collection" class="com.Gary.bean.MyCollection">

        <!-- array -->

        <property name="array">

            <array>

                <value>123</value>

                <value>abc</value>

            </array>

        </property>

    </bean>

</beans>
applicationContext_Injection.xml
同理剩下几个复杂类型配置
    <!-- 复杂类型注入 -->

    <bean name="collection" class="com.Gary.bean.MyCollection">

        <!-- array -->

        <property name="array">

            <array>

                <value>123</value>

                <value>abc</value>

                <ref bean="dog"/>

            </array>

        </property>

    <!-- list -->

     <property name="list">

         <list>

             <value>456</value>

             <value>cba</value>

             <ref bean="user1"/>

         </list>

     </property>

     <!--set -->

     <property name="set">

         <set>

             <value>111</value>

             <value>aaa</value>

             <ref bean="user1"/>

         </set>

     </property>

    <!-- map -->

    <property name="map">

        <map>

            <entry key="username" value="root"/>

            <entry key="password" value="123"/>

            <entry key-ref="user1" value-ref="dog"/>

        </map>

    </property>

    <!-- properties -->

    <property name="prop">

        <props>

            <prop key="name">老李</prop>

            <prop key="age">25</prop>

        </props>

    </property>

    </bean>
<?xml version="1.0" encoding="UTF-8"?>

<beans xmlns:xsi="http://www.w3.org/2001/XMLSchema-instance"

            xmlns="http://www.springframework.org/schema/beans"

            xsi:schemaLocation="http://www.springframework.org/schema/beans http://www.springframework.org/schema/beans/spring-beans.xsd ">

    <!-- 将user对象交给Spring管理,并注入类型 -->

    <bean name="user" class="com.Gary.bean.User">

        <property name="u_id" value="1"/>

        <property name="u_username" value="Gary" />

        <property name="u_password" value="123"/>

        <!-- 引用类型的注入 -->

        <property name="u_pet" ref="dog"/>

    </bean>

    <!-- 注入引用类型 -->

    <bean name="dog" class="com.Gary.bean.Pet">

        <property name="petType" value="二哈"/>

        <property name="color" value="灰白"/>

    </bean>

    <!-- 构造方法注入 -->

    <bean name="user1" class="com.Gary.bean.User">

        <constructor-arg name="u_username" value="Gary2" type=""/>

        <constructor-arg name="u_pet" ref="dog"/>

    </bean>

    <!-- 复杂类型注入 -->

    <bean name="collection" class="com.Gary.bean.MyCollection">

        <!-- array -->

        <property name="array">

            <array>

                <value>123</value>

                <value>abc</value>

                <ref bean="dog"/>

            </array>

        </property>

    <!-- list -->

     <property name="list">

         <list>

             <value>456</value>

             <value>cba</value>

             <ref bean="user1"/>

         </list>

    </property>

    <!--set -->

    <property name="set">

         <set>

             <value>111</value>

             <value>aaa</value>

             <ref bean="user1"/>

         </set>

    </property>

    <!-- map -->

    <property name="map">

        <map>

            <entry key="username" value="root"/>

            <entry key="password" value="123"/>

            <entry key-ref="user1" value-ref="dog"/>

        </map>

    </property>

    <!-- properties -->

    <property name="prop">

        <props>

            <prop key="name">老李</prop>

            <prop key="age">25</prop>

        </props>

    </property>

    </bean>

</beans>
applicationContext_Injection.xml
JavaWeb_(Spring框架)xml配置文件的更多相关文章
- Spring框架xml配置文件 复杂类型属性注入——数组 list map properties DI dependency injection 依赖注入——属性值的注入依赖于建立的对象(堆空间)
Person类中的各种属性写法如下: package com.swift.person; import java.util.Arrays; import java.util.List; import ...
- JavaWeb_(Spring框架)注解配置
系列博文 JavaWeb_(Spring框架)xml配置文件 传送门 JavaWeb_(Spring框架)注解配置 传送门 Spring注解配置 a)导包和约束:基本包.aop包+context约束 ...
- JavaWeb_(Mybatis框架)主配置文件介绍_四
系列博文: JavaWeb_(Mybatis框架)JDBC操作数据库和Mybatis框架操作数据库区别_一 传送门 JavaWeb_(Mybatis框架)使用Mybatis对表进行增.删.改.查操作_ ...
- JavaWeb_(Spring框架)Spring整合Hibernate
Dao层类要继承HibernateDaoSupport.java父类 原先使用Hibernate框架hibernate.cfg.xml配置数据库 <hibernate-configuration ...
- Spring 通过XML配置文件以及通过注解形式来AOP 来实现前置,环绕,异常通知,返回后通知,后通知
本节主要内容: 一.Spring 通过XML配置文件形式来AOP 来实现前置,环绕,异常通知 1. Spring AOP 前置通知 XML配置使用案例 2. Spring AOP ...
- (转)在编写Spring框架的配置文件时,标签无提示符的解决办法
http://blog.csdn.net/yerenyuan_pku/article/details/52831618 问题描述 初学者在学习Spring框架的过程中,大概会碰到这样一个问题:在编写S ...
- Spring框架的配置文件
Spring框架的配置文件 (2014-12-18 20:43:42) 转载▼ 标签: 配置文件 例子 构造函数 成员 spring 分类: 专业知识 (注:文中的"<"均需 ...
- [error] eclipse编写spring等xml配置文件时只有部分提示,tx无提示
eclipse编写spring等xml配置文件时只有<bean>.<context>等有提示,其他标签都没有提示 这时就需要做以下两步操作(下面以事务管理标签为例) 1,添加命 ...
- Spring根据XML配置文件注入对象类型属性
这里有dao.service和Servlet三个地方 通过配过文件xml生成对象,并注入对象类型的属性,降低耦合 dao文件代码: package com.swift; public class Da ...
随机推荐
- (三十一)web 开发基础项目
1. 编写index.jsp <%@ page language="java" contentType="text/html; charset=UTF-8" ...
- (五)lucene之特定项搜索和查询表达式
需求:模糊搜索. 前提: 本例中使用lucene 5.3.0 package com.shyroke.lucene; import java.io.File; import java.io.File ...
- (三)Redis之数据结构概念以及数据结构之字符串
一.数据结构 五种数据类型: 字符串(String) 字符串列表(list) 有序字符串集合(sorted set) 哈希(hash) 字符串集合(set) 二.数据结构之字符串 二进制安全的,存入和 ...
- 前端开发 Vue -3axios
Axios是什么? 应该念“阿克希奥斯”……但是太长太拗口,我一般念“阿笑斯”…… Axios 是一个基于 promise 的 HTTP 库,简单的讲就是可以发送get.post请求.说到get.po ...
- regarding-hsts-in-netscaler
regarding-hsts-in-netscaler 参考: Strict Transport Security (STS or HSTS) with Citrix NetScaler and Ac ...
- springload热更新的优缺点
java开发web应用没有.net的方便快捷, 原因是传统开发模式下新增修改代码后要查看效果, 一般要重启应用, 导致浪费了许多无谓的时间,没有.net的高效, 任意更新文件实时生效. 但是有个叫sp ...
- 【Hibernate】Hibernate关联关系的映射
一.实体之间的关系 二.一对多的配置 2.1 第一步创建两个实体 2.2 第二步:配置映射文件 2.3 第三步:将映射放到核心配置文件中 三.级联 3.1 Hibernate中级联保存的效果 3.2 ...
- IDEA部署项目到远程服务器
一.idea安装阿里插件Alibaba Cloud Toolkit 二.添加Host 三.应用部署 四.修改源程序重新部署 五.查看实时日志 欲买桂花同载酒,终不似,少年游
- win10关闭防火墙和其通知
Win10电脑在关闭防火墙后,防火墙的通知会不定期提醒,如果误点后,防火墙就悄悄的开启了,导致好多功能就用不了了,所以比较有效的方法是:关闭防火墙,并关闭防火墙通知 1.关闭防火墙 在控制面板中,选择 ...
- idou老师教你学istio 21:基于角色的访问控制
istio的授权功能,也称为基于角色的访问控制(RBAC),它为istio服务网格中的服务提供命名空间级别.服务级别和方法级别的访问控制.基于角色的访问控制具有简单易用.灵活和高性能等特性.本文介绍如 ...