SpringBoot缓存管理(二) 整合Redis缓存实现
SpringBoot支持的缓存组件
在SpringBoot中,数据的缓存管理存储依赖于Spring框架中cache相关的org.springframework.cache.Cache和org.springframework.cache.CacheManager缓存管理器接口。
如果程序中没有定义类型为CacheManager的Bean组件或者是名为cacheResolver的CacheResolver缓存解析器,SpringBoot将尝试选择启用以下缓存组件(按照指定的顺序):
(1)Generic
(2)JCache (JSR-107) (EhCache 3、Hazelcast、Infinispan等)
(3)EhCache 2.x
(4)Hazelcast
(5)Infinispan
(6)Couchbase
(7)Redis
(8)Caffeine
(9)Simple
上面按照SpringBoot缓存组件的加载顺序,列举了SpringBoot支持的9种缓存组件,在项目中添加某个缓存管理组件(例如Redis)后,SpringBoot项目会选择并启用对应的缓存管理器。如果在项目中同时添加了多个缓存组件,且没有指定缓存管理器或者缓存解析器(CacheManager或者cacheResolver),那么SpringBoot会按照上述顺序在添加的多个缓存组件中优先启用排在前面的某个缓存组件进行缓存管理(例如,同时添加了Couchbase和Redis这两个缓存组件,那么优先启用Couchbase组件)。
在上一篇文章 SpringBoot缓存管理(一) 默认缓存管理 介绍的默认缓存管理中,我们搭建的项目没有添加任何缓存管理组件,但是依旧实现了缓存管理。这是因为开启缓存管理后,SpringBoot会按照上述缓存组件顺序查找有效的缓存组件进行缓存管理,如果没有任何缓存组件,会默认使用最后一个Simple缓存组件进行管理。Simple缓存组件是SpringBoot默认的缓存管理组件,它默认使用内存中的ConcurrentMap进行缓存存储,所以在没有添加任何第三方缓存组件的情况下,依旧可以实现内存中的缓存管理,但是不推荐这种缓存管理方式。
基于注解的Redis缓存实现
在 SpringBoot缓存管理(一) 默认缓存管理 搭建的项目基础上引入Redis缓存组件,使用基于注解的方式讲解SpringBoot整合Redis缓存的具体实现。
(1)添加Spring Data Redis依赖启动器
在pom.xml文件中添加Spring Data Redis依赖启动器:
<dependency>

  <groupId>org.springframework.boot</groupId>

  <artifactId>spring-boot-starter-data-redis</artifactId>

</dependency>
当我们添加Redis相关的依赖启动器后,SpringBoot会使用RedisCacheConfigratioin作为自动配置类进行缓存相关的自动装配类(之前为默认的SimpleCacheConfiguration),容器中使用的缓存管理器变为了RedisCacheManager(之前为默认为cacheManager),这个缓存管理器创建的Cache为RedisCache,进而操控Redis进行数据的缓存。
(2)Redis服务器连接配置
在项目的全局配置文件application.properties中添加Redis数据库的连接配置,示例代码如下:
# Redis服务器地址

spring.redis.host=127.0.0.1

# Redis服务器连接端口

spring.redis.port=6379

# Redis服务器连接密码(默认为空)

spring.redis.password=
(3)对CommentService类中的方法进行修改
使用@Cacheable、@CachePut、@CacheEvict三个注解进行缓存管理,分别进行缓存存储、缓存更新及缓存删除等操作:
package com.hardy.springbootdatacache.service;

import com.hardy.springbootdatacache.entity.Comment;

import com.hardy.springbootdatacache.repository.CommentRepository;

import org.springframework.beans.factory.annotation.Autowired;

import org.springframework.cache.annotation.CacheEvict;

import org.springframework.cache.annotation.CachePut;

import org.springframework.cache.annotation.Cacheable;

import org.springframework.stereotype.Service;

import java.util.Optional;

/**

 * @Author: HardyYao

 * @Date: 2021/6/19

 */

@Service

public class CommentService {

    @Autowired

    private CommentRepository commentRepository;

    /**

     * 根据评论id查询评论

     * @Cacheable:将该方法的查询结果comment存放在SpringBoot默认缓存中

     * cacheNames:起一个缓存命名空间,对应缓存唯一标识

     * @param id

     * @return

     */

    @Cacheable(cacheNames = "comment", unless = "#result==null")

    public Comment findCommentById(Integer id){

        Optional<Comment> comment = commentRepository.findById(id);

        if(comment.isPresent()){

            Comment comment1 = comment.get();

            return comment1;

        }

        return null;

    }

    /**

     * 更新评论

     * @param comment

     * @return

     */

    @CachePut(cacheNames = "comment",key = "#result.id")

    public Comment updateComment(Comment comment) {

        commentRepository.updateComment(comment.getAuthor(), comment.getaId());

        return comment;

    }

    /**

     * 删除评论

     * @param comment_id

     */

    @CacheEvict(cacheNames = "comment")

    public void deleteComment(int comment_id) {

        commentRepository.deleteById(comment_id);

    }

}
在上述代码中,使用了@Cacheable、@CachePut、@CacheEvict注解在数据查询、数据更新及数据删除方法上进行了缓存管理。
其中,查询缓存@Cacheable注解中没有标记key值,将会使用默认参数值comment_id作为key进行数据保存,在进行缓存更新时必须使用同样的的key;同样,在使用查询缓存@Cacheable注解中,定义了 unless= "#result==null" 表示查询结果为空则不进行缓存。
(4)在CommentController类中新增两个接口
新增更新和删除的接口:
package com.hardy.springbootdatacache.controller;

import com.hardy.springbootdatacache.entity.Comment;

import com.hardy.springbootdatacache.service.CommentService;

import org.springframework.beans.factory.annotation.Autowired;

import org.springframework.web.bind.annotation.RequestMapping;

import org.springframework.web.bind.annotation.RestController;

/**

 * @Author: HardyYao

 * @Date: 2021/6/19

 */

@RestController

public class CommentController {

    @Autowired

    private CommentService commentService;

    @RequestMapping(value = "/findCommentById")

    public Comment findCommentById(Integer id){

        Comment comment = commentService.findCommentById(id);

        return comment;

    }

    @RequestMapping(value = "/updateComment")

    public Comment updateComment(Comment comment){

        Comment oldComment = commentService.findCommentById(comment.getId());

        oldComment.setAuthor(comment.getAuthor());

        Comment comment1 = commentService.updateComment(oldComment);

        return comment1;

    }

    @RequestMapping(value = "/deleteComment")

    public void deleteComment(Integer id){

        commentService.deleteComment(id);

    }

}
(5)基于注解的Redis查询缓存测试
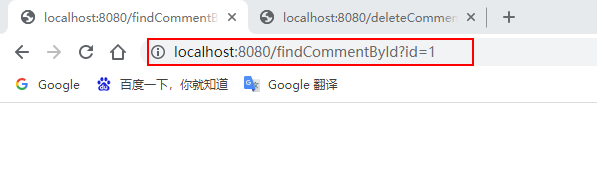
在浏览器中输入:http://localhost:8080/findCommentById?id=1 进行访问:
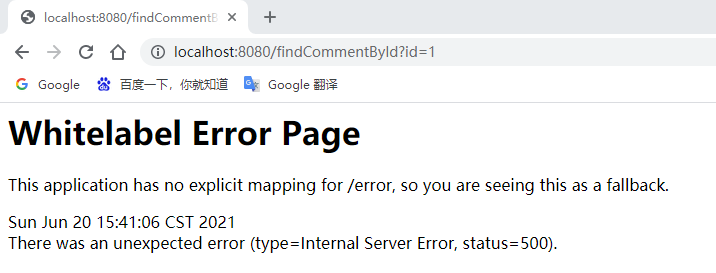
页面报错了,查看控制台信息:

根据报错信息可知:查询用户评论信息Comment时执行了相应的SQL语句,但是在进行缓存存储时出现了IllegalArgumentException非法参数异常,提示信息要求对应的Comment实体类必须实现序列化(DefaultSerializer requires a Serializable payload but received an object of type [com.hardy.springbootdatacache.entity.Comment])。
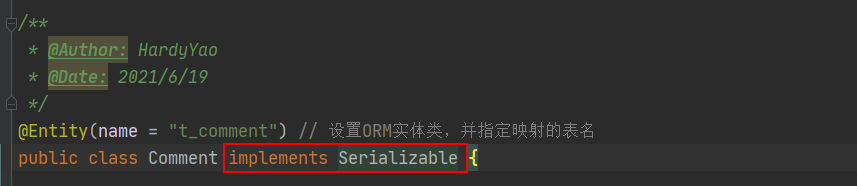
(6)将缓存对象实现序列化
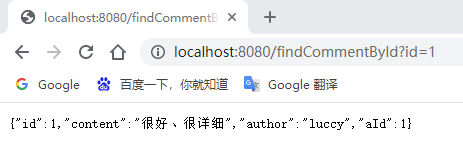
(7)重启项目测试查询缓存
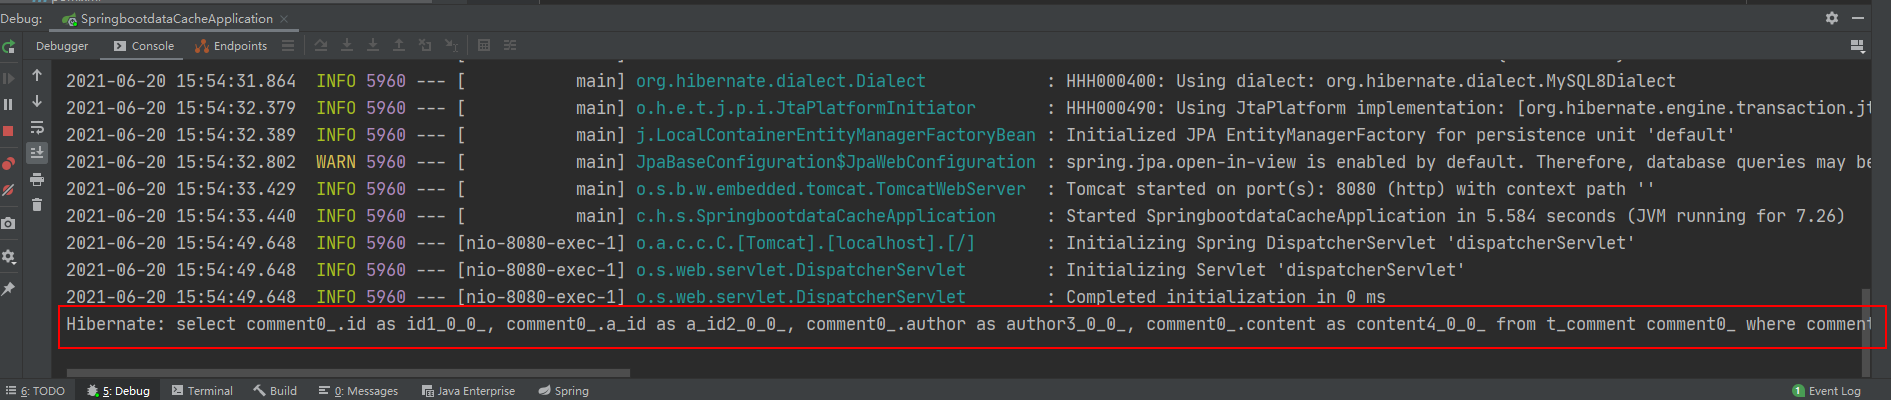
在浏览器中输入:http://localhost:8080/findCommentById?id=1 进行访问(连续访问三次):
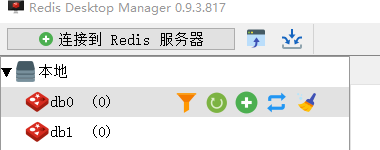
打开Redis客户端可视化工具Redis Desktop Manager,连接本地启用的Redis服务,查看具体的数据缓存效果:

执行findById()方法查询出的用户评论信息Comment正确存储到了Redis缓存库中名为comment的名称空间下。
其中缓存数据的唯一标识key值是以“名称空间comment::+参数值(comment::1)”的字符串形式体现的,而value值则是经过JDK默认序列格式化后的HEX格式存储。这种JDK默认序列格式化后的数据显然不方便缓存数据的可视化查看和管理,所以在实际开发中,通常会自定义数据的序列化格式,这方面的内容在后面会介绍。
(8)基于注解的Redis缓存更新测试
先通过浏览器访问:http://localhost:8080/updateComment?id=1&author=hardy;
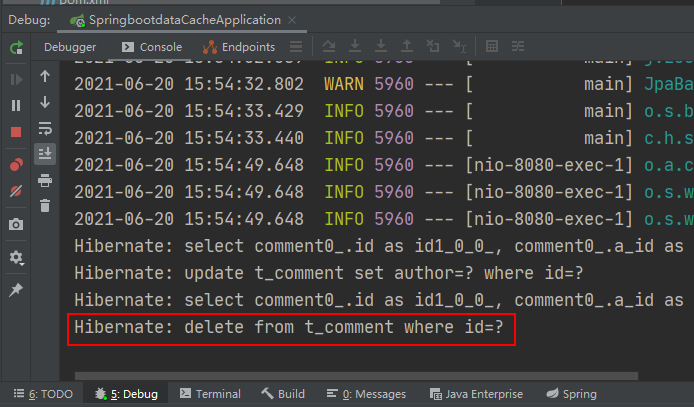
接着在访问:http://localhost:8080/findCommentById?id=1,查看浏览器返回信息及控制台打印信息:
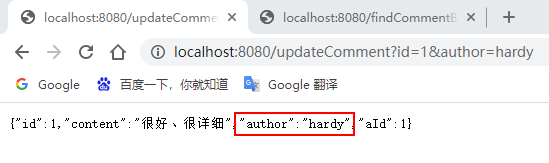
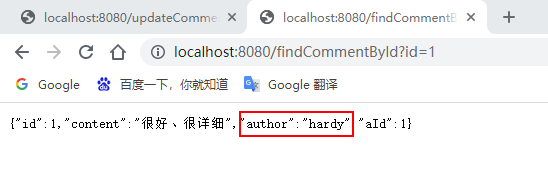
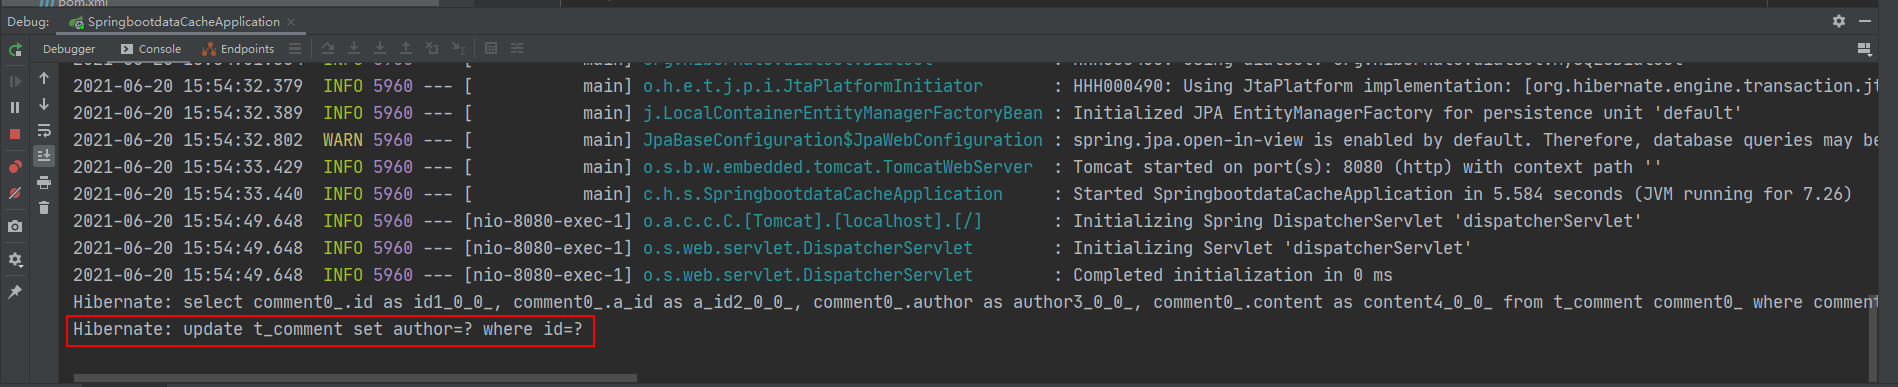
可以看到,执行updateComment()更新id为1的数据时执行了一条更新的SQL语句,后续调用findById()方法查询id为1的用户评论信息时没有再次执行查询的SQL语句,且浏览器返回了更新后的正确结果,这说明@CachePut缓存更新配置成功。
(9)基于注解的Redis缓存删除测试
通过浏览器访问:http://localhost:8080/deleteComment?id=1 和 http://localhost:8080/findCommentById?id=1
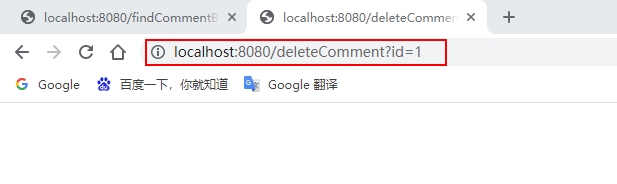
执行deleteComment()方法删除id为1的数据后查询结果为空,查看Redis缓存数据库:
可以看到之前存储的comment相关数据被删除掉了,这表明@CacheEvict注解缓存删除成功实现。
通过上面的案例可以看出:使用基于注解的Redis缓存实现只需要添加Redis依赖、并使用几个注解在对应的方法上,就可以实现对数据的缓存管理。
另外,还可以在SpringBoot全局配置文件中配置Redis有效期,示例代码如下:
# 对基于注解的Redis缓存数据统一设置有效期为1分钟,单位毫秒

spring.cache.redis.time-to-live=60000
上述代码中,在SpringBoot全局配置文件中添加了“spring.cache.redis.time-to-live”属性统一设置Redis数据的有效期(单位为毫秒),但这种方式不够灵活,因此一般不用。
基于API的Redis缓存实现
在SpringBoot整合Redis缓存实现中,除了基于注解形式的Redis缓存形式外,还有一种开发中更常用的方式——基于API的Redis缓存实现。这种基于API的Redis缓存实现,需要在某种业务需求下通过Redis提供的API调用相关方法实现数据缓存管理。同时,这种方法还可以手动管理缓存的有效期。
下面,通过Redis API的方式讲解SpringBoot整合Redis缓存的具体实现。
(1)使用Redis API进行业务数据缓存管理
在 com.hardy.springbootdatacache.service 包下新建一个 ApiCommentService:
package com.hardy.springbootdatacache.service;

import com.hardy.springbootdatacache.entity.Comment;

import com.hardy.springbootdatacache.repository.CommentRepository;

import org.springframework.beans.factory.annotation.Autowired;

import org.springframework.cache.annotation.CacheEvict;

import org.springframework.cache.annotation.CachePut;

import org.springframework.cache.annotation.Cacheable;

import org.springframework.data.redis.core.RedisTemplate;

import org.springframework.stereotype.Service;

import java.util.Optional;

import java.util.concurrent.TimeUnit;

/**

 * @Author: HardyYao

 * @Date: 2021/6/19

 */

@Service

public class ApiCommentService {

    @Autowired

    private CommentRepository commentRepository;

    @Autowired

    private RedisTemplate redisTemplate;

    /**

     * 根据评论id查询评论

     * @param id

     * @return

     */

    public Comment findCommentById(Integer id){

        // 先查Redis缓存

        Object o = redisTemplate.opsForValue().get("comment_" + id);

        if (o != null) {

            return (Comment) o;

        } else {

            // 如果缓存中没有,则从数据库查询

            Optional<Comment> dbComment = commentRepository.findById(id);

            if (dbComment.isPresent()) {

                Comment redisComment = dbComment.get();

                // 将查询结果存储到缓存中,并设置有效期为1天

                redisTemplate.opsForValue().set("comment_"+id, redisComment,1, TimeUnit.DAYS);

                return redisComment;

            } else {

                return null;

            }

        }

    }

    /**

     * 更新评论

     * @param comment

     * @return

     */

    public Comment updateComment(Comment comment) {

        commentRepository.updateComment(comment.getAuthor(), comment.getId());

        // 更新数据库数据后进行缓存更新

        redisTemplate.opsForValue().set("comment_" + comment.getId(), comment);

        return comment;

    }

    /**

     * 删除评论

     * @param comment_id

     */

    public void deleteComment(int comment_id) {

        commentRepository.deleteById(comment_id);

        // 删除数据库数据后进行缓存删除

        redisTemplate.delete("comment_" + comment_id);

    }

}
(2)编写Web访问层ApiCommentController
package com.hardy.springbootdatacache.controller;

import com.hardy.springbootdatacache.entity.Comment;

import com.hardy.springbootdatacache.service.ApiCommentService;

import org.springframework.beans.factory.annotation.Autowired;

import org.springframework.web.bind.annotation.RequestMapping;

import org.springframework.web.bind.annotation.RestController;

/**

 * @Author: HardyYao

 * @Date: 2021/6/19

 */

@RestController

@RequestMapping("api")  // 改变请求路径

public class ApiCommentController {

    @Autowired

    private ApiCommentService apiCommentService;

    @RequestMapping(value = "/findCommentById")

    public Comment findCommentById(Integer id){

        Comment comment = apiCommentService.findCommentById(id);

        return comment;

    }

    @RequestMapping(value = "/updateComment")

    public Comment updateComment(Comment comment){

        Comment oldComment = apiCommentService.findCommentById(comment.getId());

        oldComment.setAuthor(comment.getAuthor());

        Comment comment1 = apiCommentService.updateComment(oldComment);

        return comment1;

    }

    @RequestMapping(value = "/deleteComment")

    public void deleteComment(Integer id){

        apiCommentService.deleteComment(id);

    }

}
(3)测试基于API的Redis缓存实现
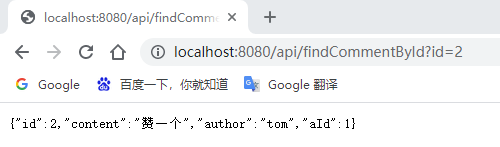
输入:http://localhost:8080/api/findCommentById?id=2(连续输入三次)、http://localhost:8080/api/updateComment?id=2&author=hardy、http://localhost:8080/deleteComment?id=2进行访问:
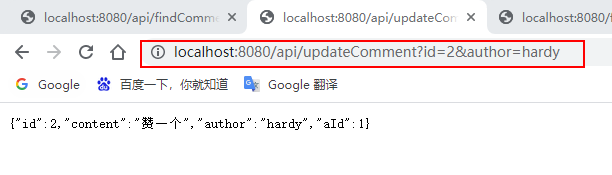

查看控制台消息及Redis数据库:
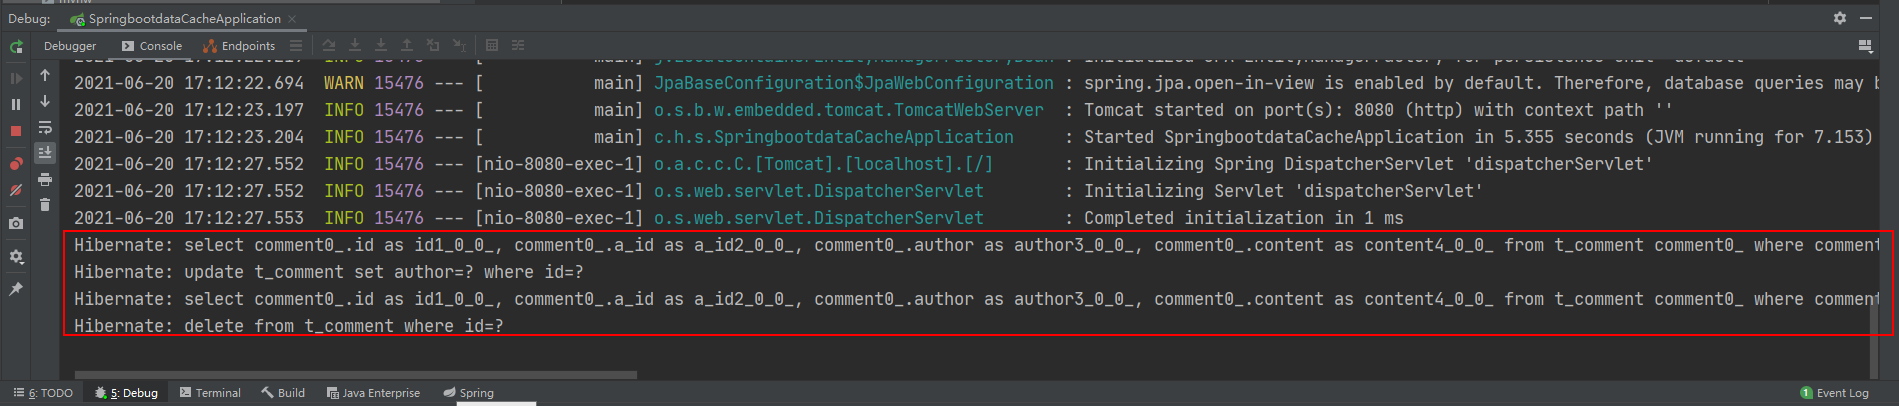

基于API的Redis缓存实现的相关配置:基于API的Redis缓存实现不需要@EnableCaching注解开启基于注解的缓存支持,所以这里可以选择将添加在项目启动类上的@EnableCaching注解进行删除或者注释,不会影响项目的功能实现。
SpringBoot缓存管理(二) 整合Redis缓存实现的更多相关文章
- java框架之SpringBoot(11)-缓存抽象及整合Redis
Spring缓存抽象 介绍 Spring 从 3.1 版本开始定义了 org.springframework.cache.Cache 和 org.springframework.cache.Cache ...
- 使用本地缓存快还是使用redis缓存好?
使用本地缓存快还是使用redis缓存好? Redis早已家喻户晓,其性能自不必多说. 但是总有些时候,我们想把性能再提升一点,想着redis是个远程服务,性能也许不够,于是想用本地缓存试试!想法是不错 ...
- 实例讲解Springboot以Template方式整合Redis及序列化问题
1 简介 之前讲过如何通过Docker安装Redis,也讲了Springboot以Repository方式整合Redis,建议阅读后再看本文效果更佳: (1) Docker安装Redis并介绍漂亮的可 ...
- 完整SpringBoot Cache整合redis缓存(二)
缓存注解概念 名称 解释 Cache 缓存接口,定义缓存操作.实现有:RedisCache.EhCacheCache.ConcurrentMapCache等 CacheManager 缓存管理器,管理 ...
- springboot整合redis缓存一些知识点
前言 最近在做智能家居平台,考虑到家居的控制需要快速的响应于是打算使用redis缓存.一方面减少数据库压力另一方面又能提高响应速度.项目中使用的技术栈基本上都是大家熟悉的springboot全家桶,在 ...
- SpringBoot入门系列(七)Spring Boot整合Redis缓存
前面介绍了Spring Boot 中的整合Mybatis并实现增删改查,.不清楚的朋友可以看看之前的文章:https://www.cnblogs.com/zhangweizhong/category/ ...
- SpringBoot 整合 Redis缓存
在我们的日常项目开发过程中缓存是无处不在的,因为它可以极大的提高系统的访问速度,关于缓存的框架也种类繁多,今天主要介绍的是使用现在非常流行的NoSQL数据库(Redis)来实现我们的缓存需求. Spr ...
- SpringBoot整合redis缓存(一)
准备工作 1.Linux系统 2.安装redis(也可以安装docker,然后再docker中装redis,本文章就直接用Linux安装redis做演示) redis下载地址: 修改redis,开启远 ...
- springboot整合redis缓存
使用springBoot添加redis缓存需要在POM文件里引入 org.springframework.bootspring-boot-starter-cacheorg.springframewor ...
随机推荐
- bug修复
bug严重级别 bug个数 bug修复率 上个版本的bug修复率 和arm对比 arm已修复
- 怎么样在同一个word文件中删除不同节数的页眉
1.双击页眉,进入页眉编辑状态2.选择准备删除页眉的节,直接额删除即可.注意:为不至于因该节的改动影响其他节的页眉,需要在页眉设置上,每节都要取消链接到前一节页眉 把那张的前面和后面都插入分隔符,在页 ...
- python3 ftplib模块连接FTP
from ftplib import FTP_TLS import os import re class MyFtp(FTP_TLS): """继承FTP类"& ...
- 有关Git基础操作的学习
Git简介 Git是一个免费的开源 分布式版本控制系统,旨在快速高效地处理从小型到大型项目的所有内容. Git 易于学习, 占地面积小,具有闪电般的快速性能.它具有诸如Subversion,CVS,P ...
- 解决mysql无法远程连接的问题
前言 最近开发中遇到一个问题,mysql在服务器本地可以登录,但是远程通过3306端口却不可以.这个问题困扰了我一周之久,终于在今天解决了.在解决的过程中试了很多的方法,遂记录下来,希望能给大家一些提 ...
- Windows 下QT程序发布
方法1:利用QT自带打包工具 1.新建文件夹,把编译好的exe文件放入该文件夹 2.使用QT下的命令行 3.进入该exe所在文件,执行windeployqt xxx.exe,若出现找不到命令的情况 4 ...
- node.js学习(4)事件
1 导入事件库
- Go语言web开发---Cronexpr 包实现并发定时任务
安装Cronexpr包: go get -u github.com/gorhill/cronexpr 这个包支持七位时间控制 *(秒) *(分) *(时) *(日) *(月) *(周) *(年) 栗子 ...
- MLIR算子量化Quantization
MLIR算子量化Quantization 本文概述了MLIR量化系统的设计.虽然术语"量化"是高度过载的,用于将浮点计算转换为以整数数学表示,适配的变量进行推理的技术的相当窄的范围 ...
- MinkowskiEngine Miscellaneous Classes杂类
Miscellaneous Classes杂类 内核生成器 class MinkowskiEngine.KernelGenerator(kernel_size = -1,stride = 1,dila ...