python编程训练
1. 反转字符串:
 1 #encoding=utf-8

 2 #import string

 3 from collections import deque

 4

 5 def reverse1(string):

 6     """利用切片"""

 7     return string[::-1]

 8

 9 def reverse2(string):

10     """1. 将字符串转为列表,利用列表的reverse()函数反转 2. 使用join连接"""

11     alist = list(string)

12     alist.reverse()

13     newString = "".join(alist)

14     return newString

15

16 def reverse3(string):

17     """利用双端队列,双端队列左侧进右侧出"""

18     q = deque()

19     q.extendleft(string)  #注意:extendleft(string)会将字符串string反向存入到双端队列中

20     return "".join(q)

21

22 def reverse4(string):

23     """递归的方式,每次只取一个字母"""

24     if len(string)<=1:

25         return string

26     else:

27         return reverse4(string[1:]) + string[0]

28

29 def reverse5(string):

30     """交换首尾字符的位置"""

31     alist = list("".join(string.split(" ")))

32     for i, j in zip(range(len(alist)/2), range(len(alist)-1, 0, -1)):

33         alist[i], alist[j] = alist[j], alist[i]

34     return "".join(alist)

35

36 def reverse6(string):

37     """利用fort循环从右往左输出"""

38     list = []

39     for i in range(len(string)-1, -1, -1):

40         list.append(string[i])

41     return "".join(list)

42

43

44

45

46 if __name__ == "__main__":

47     string = "I am a string"

48     print(reverse1(string))

49     print reverse2(string)

50     print reverse3(string)

51     print reverse4(string)

52     print reverse5(string)

53     print reverse6(string)
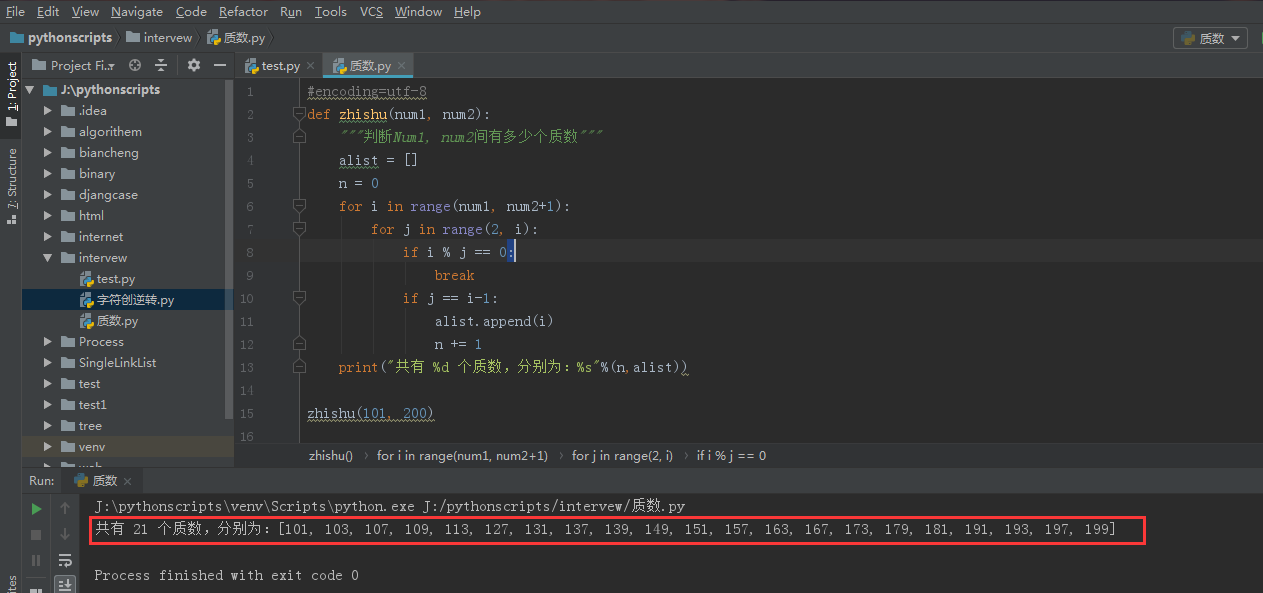
2. 求num1到num2间的质数及其个数。
 1 #encoding=utf-8

 2 def zhishu(num1, num2):

 3     """判断Num1, num2间有多少个质数"""

 4     alist = []

 5     n = 0

 6     for i in range(num1, num2+1):

 7         for j in range(2, i):

 8             if i % j == 0:

 9                 break

10             if j == i-1:

11                 alist.append(i)

12                 n += 1

13     print("共有 %d 个质数,分别为:%s"%(n,alist))

14

15 zhishu(101, 200)

3. 求两个列表的交集,并集,补集。
 1 #encoding=utf-8

 2 def interSection(alist1, alist2):

 3     """利用集合set求交集、并集"""

 4     alist1_set = set(alist1)

 5     alist2_set = set(alist2)

 6     Intersection = alist1_set.intersection(alist2_set) #交集

 7     Union = alist1_set.union(alist2_set)    #并集

 8     Difference = alist1_set.difference(alist2_set)  #在集合alist1_set中但不在集合alist2_set中

 9     Sym_difference = alist1_set.symmetric_difference(alist2_set)  #两集合交集的补集

10     Intersection_alist = list(Intersection)

11     Union_alist = list(Union)

12     Difference_alist = list(Difference)

13     Sym_difference_alist = list(Sym_difference)

14     print("两个集合的交集为:%s\n两个集合的并集为:%s\n在集合a中但不在集合b中的集合为:%s\n集合a,b交集的补集为%s"%(Intersection_alist,Union_alist, Difference_alist, Sym_difference_alist))

15

16

17 if __name__=="__main__":

18     alist1 = ["a", "b", "d", 1, 5, 7]

19     alist2 = ["a", "c", "d", 3, 5, 9]

20     interSection(alist1, alist2)

4. 快速求链表中间节点
 1 #coding:utf-8

 2 class Node(object):

 3     def __init__(self, item):

 4         self.item = item

 5         self.next = None

 6

 7 class SingleLinkList(object):

 8     def __init__(self, node=None):

 9         self.head = node

10

11     def appendList(self,item):

12         node = Node(item)

13         cur = self.head

14         if self.head == None:

15             self.head = node

16         else:

17             while cur.next != None:

18                 cur = cur.next

19             cur.next = node

20

21     def travle(self):

22         if self.head == None:

23             print ("This is an empty List!")

24         else:

25             cur = self.head

26             while cur != None:

27                 print cur.item,

28                 cur = cur.next

29             print ("\n")

30

31     def find(self, k):

32         count = 1

33         cur = self.head

34         if self.head == None:

35             print ("No nodes!")

36         else:

37             while cur.next != None:

38                 if count == k:

39                     print cur.item

40                     break

41                 else:

42                     count += 1

43                     cur = cur.next

44     def findCerter(self):

45         count, count2 = 0, 0

46         cur = self.head

47         cur2 = self.head

48         if self.head == None:

49             print ("No nodes!")

50         else:

51             while cur != None:

52                 count += 1

53                 cur = cur.next

54             print count

55             while cur2.next != None:

56                 if count2 == count/2 and count % 2 == 0:

57                     print cur2.item,cur2.next.item

58                     break

59                 elif count2 == count/2 and count % 2 != 0:

60                     print cur2.item

61                     break

62                 else:

63                     count2 += 1

64                     cur2 = cur2.next

65

66

67

68 if __name__ == "__main__":

69     list = SingleLinkList()

70     for i in range(9):

71         list.appendList(i)

72     list.travle()

73     list.find(3)

74     list.findCerter()
5. 需求:(1)文本分割:按IP地址分割文件,同时以IP地址命名新文件。
(2)检索出某用户名所在的所有IP地址
原文本信息如下:
------------------------------

IP 192.168.109.31

用户名 用户主组名 附属组

nobody  nobody nogroup

xxx  users xxxx

xxxx  xxxx

xxxx  xxxx

xxxxx  xxxx

------------------------------

IP 192.168.109.32

用户名 用户主组名 附属组

nobody  nobody nogroup

xxxx  users xxxx

xxxx  aiuap

xxxxx  xxxx

xxxxx  users
#encoding=utf-8
import re
import os
"""文本按IP地址分割成多个已IP地址命名的小文件"""
#1. 读取文件每行,当匹配到该行有"IP"时,创建新的文件并以该行命名,同时往一个文件中写,如果匹配到下一个IP,则重新写入到新文件,
def splitText(file):
    f = open(file)
    newFile = open("temp", "w")
    for line in f.readlines():
        if re.search("IP", line):
            newFile.close()
            newFile = open(line.split(" ")[1].strip(), "w")
        newFile.write(line)
    f.close()

def searchIp(file):
    f = open(file, "r")
    dic = {}
    ip = []
    for line in f.readlines():
    # print os.popen('tr -s ["\n"]< %s'%file).readlines()  #python调用shell命令可以将文本中的空行去除,os.popen()返回的是文件,os.system()返回的是shell指令运行退出后的状态码。
         if re.search("IP", line):
             ip = line.split(" ")[1].strip()
             continue
         elif re.match("---", line) :
             continue
         elif re.match("用户名", line):
             continue
         else:
             user = line.split(" ")[0].strip()
             if user:
                 if dic.has_key(user):
                     dic.get(user).append(ip)
                 else:
                      dic.setdefault(user, []).append(ip) #键user不在字典中,则新增[user: ip]
    print dic
下面同事写的:
def getAllDiraccount(path):
    stack = []
    set1 = set()
    stack.append(path)  # 处理栈,当栈为空的时候结束循环
    while len(stack) != 0:  # 从栈里取出数据
        dirPath = stack.pop()
        # print(dirPath)
        # 目录下所有文件
        filesList = os.listdir(dirPath)
        # print(filesList)
        # 处理每一个文件,如果是普通文件则处理找出,如果是目录则将该目录的地址压栈
        for fileName in filesList:
            fileAbsPath = os.path.join(dirPath, fileName)
            if os.path.isdir(fileAbsPath):  # 是目录就压栈
                print("目录:" + fileName)
                stack.append(fileAbsPath)
            else:
                # 找到了普通文件里面的所有账号
                print("普通文件:" + fileAbsPath)
                res = os.popen("awk '{print $1}' %s" % (fileAbsPath))#调用shell指令,取出文件第一列数据。
                for temp in res.readlines():
                    set1.add(temp.strip())
    print(list(set1))
if __name__=="__main__":
    #splitText("user")
    searchIp("user")
   getALLDiraccount("J:\peng")

6. 输出某路径下的所有文件和目录下的所有文件。
 1 #encoding=utf-8

 2 import os

 3 #获取当前路径

 4 # print os.getcwd()

 5 def findFileDir(path):

 6     """判断该路径下是文件还是目录,如果是文件则输出,如果是目录则输出目录下的文件。"""

 7     fileDirList = os.listdir(path)  #返回指定目录path下的所有文件和目录名

 8     dic = {}

 9     for file in fileDirList:

10         newPath = path + '/' + file

11         if os.path.isdir(newPath):

12             findFileDir(newPath)

13         elif os.path.isfile(newPath):

14             if dic.has_key(path):

15                 dic.get(path).append(file)

16             else:

17                 dic.setdefault(path, []).append(file)

18         else:

19             return 1

20     print("%s目录下的文件有:%s"%(dic.keys(), str(dic.values()).strip("[]")))

21

22

23 if __name__=="__main__":

24     path = "J:\pythonscripts"

25     findFileDir(path)
结果如下:

shell脚本如下:
  1 #!/bin/bash

  2 #coding=utf-8

  3 fileOrDir()

  4 {

  5         if [ -d $1 ] #中括号间有空格,必须有空格

  6         then

  7                 echo "$1 is a dir!"

  8                 for temp in `ls $1`  #反单引号

  9                 do

 10                         fileOrDir $1"/"$temp

 11                 done

 12         elif [ -f $1 ]

 13         then

 14                 echo "$1 is a file."

 15         fi

 16 }

 17

 18 fileOrDir $1
运行前需要先改该脚本的权限,chown u+x 文件名。或者直接执行:source ./findDirFile.sh filedir。shell中运行的结果如下:

7. python连接mysql数据库。
(1)封装连接mysql数据库相关操作。
#encoding=utf-8

import mysql.connector


class MysqlClient(object):

    def __init__(self, host, user, passwd, port, db):

        self.config = {

            'user': user,

            'password': passwd,

            'host': host,

            'port': port,

            'database': db,

            'charset': 'utf8'

        }

        self.con = None

        self.cursor = None

    def connectMysql(self):

        try:

            self.con = mysql.connector.connect(**self.config) #与数据库建立连接

            self.cursor = self.con.cursor() #创建游标

        except mysql.connector.Error, e:

            print('connect fails!{}'.format(e))

    def qury(self, sql):

        try:

            self.cursor.execute(sql)  #执行ql命令

            return self.cursor.fetchone()  #获取查询结果的第一行

        except mysql.connector.Error, e:

            print('query error!{}'.format(e))

    def quryAll(self, sql):

        try:

            self.cursor.execute(sql)

            return self.cursor.fetchall() #获取查询结果的所有行

        except mysql.connector.Error, e:

            print e.message

    def insert(self, sql):

        try:

            self.cursor.execute(sql)

            self.con.commit() #提交事务

        except mysql.connector.Error, e:

            print e.message

    def close(self):

        try:

            self.cursor.close()

            self.con.close()

        except mysql.connector.Error, e:

            print e.message
(2)调用MYSQLClient模块。
#encoding=utf-8

import MYSQLClient

if __name__=="__main__":

    client = MYSQLClient.MysqlClient('localhost', 'root', "", 3306, 'student')

#     sql = 'select clname from classinfo t1 inner join (select clid, count(*) as rf from stuscore where course = "数学" and score >90 group by clid having rf\

# >=2) t2 on t1.clid=t2.clid'

    sql ='select * from student'

    client.connectMysql()

    res = client.quryAll(sql)

    for data in res:

        print ("%s%10s%10s%10s"%(data[0],data[1],data[2],data[3]))

8. 爬取百度贴吧下的某网址下的所有图片:
 1 #encoding=utf-8

 2 import urllib

 3 import re

 4 import os

 5 def getHtml(url):

 6     page = urllib.urlopen(url)

 7     html = page.read()

 8     # print html.decode("UTF-8")

 9     return html

10

11 def getPicture(html):

12     pic = 'http.+?\.jpg'

13     mng = re.compile(pic)

14     jpgList = re.findall(mng, html)

15     print jpgList

16     count = 0

17     path = r'J:\picture'

18     if not os.path.exists(path):

19         os.makedirs(path)

20     for jpg in jpgList:

21         count += 1

22         urllib.urlretrieve(jpg, 'J:\\picture\\%s.png'%count)

23

24

25 if __name__=="__main__":

26     url = "https://tieba.baidu.com/f?ie=utf-8&kw=%E5%8A%A8%E7%89%A9&fr=search"

27     html = getHtml(url)

28     getPicture(html)
结果如下:

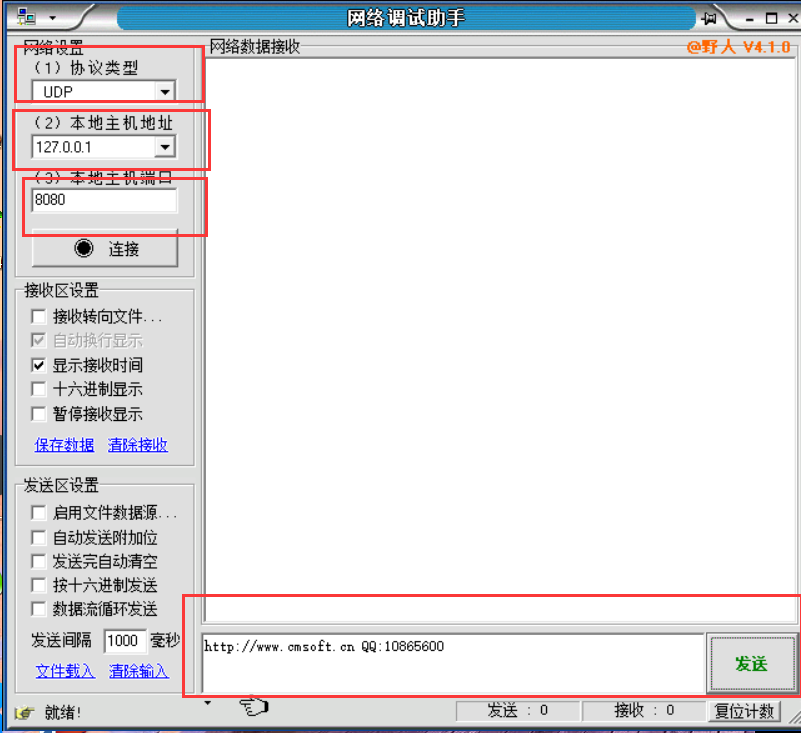
9. 多线程聊天,可用netAssist模拟多个应用进程。
# -*- coding: utf-8 -*-

from threading import Thread

from socket import *

#多线程完成聊天

#1. 线程recvData 收数据

def recvData(udpsocket):

    while True:

        recvinfo = udpsocket.recvfrom(1024)

        print(recvinfo)

        print(" %s,  %s"%(recvinfo[1], recvinfo[0].decode("gb2312")))

#2. 线程sendData发数据

def sendData(udpsocket):

    sendAddr = ('192.168.137.2 ', 8080)

    while True:

        sendinfo = raw_input()

        #udpsocket.sendto(sendinfo, sendAddr)

        udpsocket.sendto(sendinfo.decode('utf-8').encode("gb2312"), sendAddr)

#3.创建线程

def main():

    # global udpsocket

    udpsocket = socket(AF_INET, SOCK_DGRAM)

    setaddr = ("", 9090)

    udpsocket.bind(setaddr)

    recvdata = Thread(target=recvData, args=(udpsocket,))

    senddata = Thread(target=sendData, args=(udpsocket,))

    recvdata.start()

    senddata.start()

    senddata.join()

    recvdata.join()

    udpsocket.close()
NetAssist如下:

7. 客户端向服务器提出下载图片请求,并下载到本地。使用tftpd64查看下载情况。
#coding:utf-8

#C/S模式,实现客户端向服务端提出下载图片请求,并下载成功。

from socket import *

import struct

#1. 创建udp套接字,绑定客户端端口

udpsocket = socket(AF_INET, SOCK_DGRAM)

setaddr = ("172.20.10.7", 13578)

udpsocket.bind(setaddr)

#2. 构造下载请求数据,并发送到指定服务器

destaddr = ("172.20.10.3", 69)

# destaddr = ("192.168.137.2", 69)

senddata = struct.pack("!H10sb5sb", 1, "flower.jpg", 0, "octet", 0)

udpsocket.sendto(senddata, destaddr)

#3.接受服务器反馈数据

num = 1 #记录数据包快编号

recvfile = ''

while True:

    recvdata = udpsocket.recvfrom(1024)

    #print(recvdata[0])

    datas = struct.unpack("!HH", recvdata[0][:4])if datas[0] == 3: #是数据包

        if datas[1] == 1: #第一次接受数据包,需要创建文件

            recvfile = open("flower.jpg", "a")

        if num == datas[1]:

            recvfile.write(recvdata[0][4:])

            print("第 %d 次收到数据"%num)

            num += 1

        print("请求第%d个包"%num)

        ack = struct.pack("!HH", 4, num)

        udpsocket.sendto(ack, destaddr)

        if len(recvdata[0]) < 516:

            recvfile.close()

            print("下载成功!")

            break

        else:

            print(len(recvdata[0]))elif datas[0] == 5:

        print("error num : %d"%datas[1])

        recvfile.close()

        break

udpsocket.close()
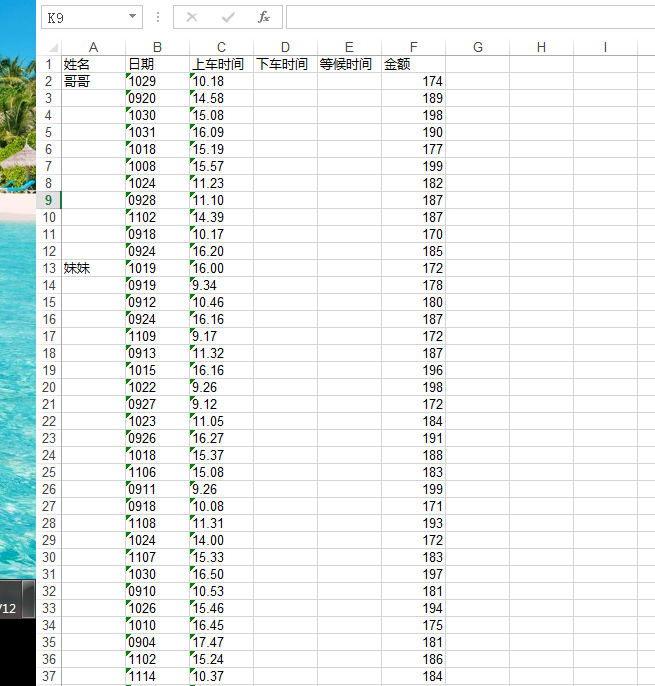
8. 交通费登记:要求,日期如:8月2日,则输入0802。时间14:35则填入14.35,中间是顿点。工作日上班时间。
 1 #encoding=utf-8

 2 from xlwt import *

 3 from random import *

 4 from datetime import *

 5

 6

 7 def createFee(temp):

 8     count = 0

 9     def Fee(temp):

10         count = 0

11         fee = []

12         while True:

13             fee1 = randint(170, 199)

14             fee.append(fee1)

15             count += fee1

16             if count >= temp:

17                 break

18         return count, fee

19     if count < temp:

20         (count, fee) = Fee(temp)

21     while count > (temp+100):

22         (count, fee) = Fee(temp)

23     length = len(fee)

24     print count

25     print ("有%s张"%len(fee))

26     # print ("总金额为:%s"%count)

27     # print("金额为:%s"%fee)

28     return fee, length

29

30

31 def createDate(length, startTime, endTime):

32     date = []

33     # while True:

34     #     date1 = str('%02d' % randint(9, 11)) + str('%02d' % randint(1, 30))

35     #     if date1 not in ("1001", "1002", "1003", "1004", "1005", "1006", "1007") and date1 not in date:

36     #         # if date1 not in date:

37     #         date.append(date1)

38     start = datetime.strptime(startTime, '%Y%m%d')

39     # print start

40     end = datetime.strptime(endTime, '%Y%m%d')

41     # print end

42     while start < end:

43         start = start + timedelta(days=1)

44         substart = start.strftime('%m%d')

45         weekday = start.isoweekday()

46         if weekday in range(1, 6) and int(substart) not in range(1001, 1008):  # 判断是否工作日

47             date.append(start.strftime('%m%d'))

48     shuffle(date)

49     # print date

50     return date

51

52

53 def createTime(length):

54     num = [9, 10, 11, 14, 15, 16, 17]

55     time = []

56     while True:

57         time1 = str(choice(num)) + "." + str('%02d' % randint(00, 59))

58         time.append(time1)

59         if len(time) == length:

60             break

61     # print time

62     return time

63

64

65 def writeExcel(y, name1, date, time, fee):

66     n = y

67     # print("新的起始行号为:%s"%(n+1))

68     table.write(n+1, 0, name1)

69     for k, m, l in zip(date, time, fee):

70         arg = (k, m, "", "", l)

71         n += 1

72         for i, item in enumerate(arg):

73                 table.write(n, i+1, item)

74     # print("结束行号为:%s"%n)

75     return file, n

76

77

78 if __name__ == "__main__":

79     name = [U'哥哥', U'妹妹']

80     total = [2000, 5600]

81     startTime = "20180902"

82     endTime = "20181115"

83     y = 0

84     file = Workbook(encoding='utf-8')

85     table = file.add_sheet(U'交通')

86     head = [U'姓名', U'日期', U'上车时间', U'下车时间', U'等候时间', U'金额']

87     for i, item in enumerate(head):

88         table.write(0, i, item)

89     for temp, name1 in zip(total, name):

90         (fee, length) = createFee(temp)

91         time = createTime(length)

92         date = createDate(length, startTime, endTime)

93         (rb, y) = writeExcel(y, name1, date, time, fee)

94         table = rb.get_sheet(0)

95         rb.save(r"C:\Users\lenovo\Desktop\tax.xls")


9. 冒泡、选择、快速排序算法:
(1)冒泡:相邻元素两两比较,两层循环,平均时间复杂度为o(n^2),稳定。
(2)选择:设置一个索引,每趟各元素与该索引存在的值比较,找到每趟的最小值,交换。平均时间复杂度为o(n^2),不稳定。
(3)快速:设定一个基准值,所有比基准值小的放在前面,比基准值大的放后面,再分别对前、后部分递归。平均时间复杂度为O(nlongn),不稳定。
#encoding=utf-8

def bubble_sort_asc(alist, n): #时间复杂度o(n^2), 稳定

    for i in range(0, n-1):

        for j in range(0, n-1-i):

            if alist[j] > alist[j+1]:

                alist[j+1], alist[j] = alist[j], alist[j+1]

        # print alist

    return alist

def select_sort_asc(alist, n): #时间复杂度o(n^2), 不稳定

    for i in range(0, n-1):

        min = i

        for j in range(i+1, n):

            if alist[j] < alist[min]:

                min = j

        alist[i],alist[min] = alist[min],alist[i]

    return alist

def quic_sort_asc(alist,begin,end):

    low = begin

    high = end

    key = low

    if begin > high:

        return

    while high != low:

        while alist[high] > alist[key] and low < high:

            high -= 1

        while alist[low] <= alist[key] and low < high:

            low += 1

        if low < high:

            alist[low], alist[high] = alist[high], alist[low]

    alist[key], alist[low] = alist[low], alist[key]

    quic_sort_asc(alist, begin, high-1)

    quic_sort_asc(alist, high+1, end)

    print alist

if __name__=="__main__":

    alist = [5, 2, 6, 9, 1, 7]

    n = len(alist)

    # breslist = bubble_sort_asc(alist, n)

    # # print breslist

    # sreslist = select_sort_asc(alist, n)

    # print sreslist

    quic_sort_asc(alist,0,n-1)
10. 爬虫图片后,将图片转为pdf和ppt,程序如下(URL我已改过,不可用,可改为自己的URL):
# -*- coding:utf-8 -*-

#encoding=utf-8

import urllib

import re

import os

import pptx

from pptx.util import Inches

from fitz import *

from time import sleep

def getPicture(html, i, path):

    pic = 'https.+?\.PNG'

    mng = re.compile(pic)

    jpgList = re.findall(mng, html)

    # print jpgList

    if not os.path.exists(path):

        os.makedirs(path)

    for jpg in jpgList:

        urllib.urlretrieve(jpg, (path + '%s.png') % i)

def clean_png(path):

    if os.path.exists(path):

        for fn in os.listdir(path):

            if fn.endswith('.png'):

                os.remove(path + fn)

def png2ppt(path):

    pptFile = pptx.Presentation()

    # print os.listdir(path)

    picFiles = [fn for fn in os.listdir(path) if fn.endswith('.png')]

    newPicFiles = sorted(picFiles, key=lambda i: int(re.match(r'(\d+)', i).group()))

    print newPicFiles

    for fn in newPicFiles:

        slide = pptFile.slides.add_slide(pptFile.slide_layouts[1])

        slide.shapes.add_picture(path + fn, Inches(0), Inches(0), Inches(10), Inches(7.5))

    pptFile.save(path + 'Qxyou.pptx')

def png2pdf(path):

    doc = fitz.open()

    picFiles = [fn for fn in os.listdir(path) if fn.endswith('.png')]

    newPicFiles = sorted(picFiles, key=lambda i: int(re.match(r'(\d+)', i).group()))

    for fn in newPicFiles:

        imgdoc = fitz.open(path + fn)                 # 打开图片

        pdfbytes = imgdoc.convertToPDF()        # 使用图片创建单页的 PDF

        imgpdf = fitz.open("pdf", pdfbytes)

        doc.insertPDF(imgpdf)                   # 将当前页插入文档

    if os.path.exists(path + "Qxyou.pdf"):

        os.remove(path +"Qxyou.pdf")

    doc.save(path +"Qxyou.pdf")                   # 保存pdf文件

    doc.close()

if __name__=="__main__":

    path = 'E:\\mylearning\\tmp\\'

    for i in range(1, 126):

        url = "https://www.qxy.com/qxy/web/res/img/school/handout/473257cd-429c-444a-8d24-fe55430554db/" + str(i) + ".PNG"

        getPicture(url, i, path)

    sleep(0.5)

    png2ppt(path)

    png2pdf(path)

    clean_png(path)
python编程训练的更多相关文章
- Linux运维人员如何学习python编程
Linux运维人员如何学习python编程 从不会写代码,到自己独立能写代码解决问题 .这个问题很重要!盲目学习所谓的项目,最后 还是不会自己写代码解决问题.首先解决了独立能写代码解决问题,再通过项目 ...
- 《趣学Python编程》
<趣学Python编程> 基本信息 作者: (美)Jason Briggs 译者: 尹哲 出版社:人民邮电出版社 ISBN:9787115335951 上架时间:2014-2-21 出版日 ...
- Python黑帽编程2.1 Python编程哲学
Python黑帽编程2.1 Python编程哲学 本节的内容有些趣味性,涉及到很多人为什么会选择Python,为什么会喜欢这门语言.我带大家膜拜下Python作者的Python之禅,然后再来了解下P ...
- Python编程核心之makeTextFile.py和readTextFile.py
引言: 最近大半年都在学习python编程,在双十一的时候购买了<Python编程核心>,看到makeTextFile.py和readTextFile.py两个例子有点错误,所以在这里给修 ...
- Python编程规范(PEP8)
Python编程规范(PEP8) 代码布局 缩进 对于每一次缩进使用4个空格.使用括号.中括号.大括号进行垂直对齐,或者缩进对齐. 制表符还是空格? 永远不要将制表符与空格混合使用.Python最常用 ...
- Python 编程规范-----转载
Python编程规范及性能优化 Ptyhon编程规范 编码 所有的 Python 脚本文件都应在文件头标上 # -*- coding:utf-8 -*- .设置编辑器,默认保存为 utf-8 格式. ...
- 学习Python编程的11个资源
用 Python 写代码并不难,事实上,它一直以来都是被声称为最容易学习的编程语言.如果你正打算学习 web 开发,Python 是一个不错的选择,甚至你想学游戏开发也可 以从 Python 开始,因 ...
- Emacs 配置 Python 编程环境
python编程环境设置涉及到:自动完成.语法检查.虚拟环境. 为了不把系统搞乱,在python的虚拟环境中安装相关的插件. 一.安装python虚拟环境 virtualenvwrapper sudo ...
- Python编程规范及性能优化(转载)
转载地址:http://codeweblog.com/python编程规范及性能优化/
随机推荐
- 控制器网关/dns设置
如果控制器ping内网可以,但是ping不同外网,十有八九是因为网关的问题,可以使用route命令设置网关,如设置为192.168.31.1(不是192.168.31.0),route add def ...
- mysql开启远程访问和oracl用户锁定问题
开启mysql远程访问 Grant all privileges on *.* to 'root'@'%' identified by 'root'; Flush privileges; oracl锁 ...
- ExpressionHelp2
public static class ExpressionHelp { private static Expression<T> Combine<T>(this Expres ...
- descriptor 'decode' requires a 'bytes' object but received a 'NoneType'
记录在使用python过程中踩的坑------ 使用xlwt库对excel文件进行保存时报错 descriptor 'decode' requires a 'bytes' object but rec ...
- 云ERP真的已经玩不转了吗?
欢迎关注微信公众号:sap_gui (ERP咨询顾问之家) 注:以下云ERP特指Saas ERP,非指ERP系统部署在云端. 不得不说,如今市场对传统ERP的接受度要远比云ERP高得多,95%的中大型 ...
- js中reduce用法详解
介绍reduce reduce() 方法接收一个函数作为累加器,reduce 为数组中的每一个元素依次执行回调函数,不包括数组中被删除或从未被赋值的元素,接受四个参数:初始值(上一次回调的返回值),当 ...
- VS Code 调试 OneFlow
VS Code 调试 OneFlow 本文介绍如何配置 VS Code,搭建 OneFlow 的 GUI 开发环境. 如果对于 VS Code 及其插件系统还不熟悉,可以参阅官方文档. 本文包括: 如 ...
- OFRecord 图片文件制数据集
OFRecord 图片文件制数据集 在 OFRecord 数据格式 和 加载与准备 OFRecord 数据集 中,分别学习了 OFRecord 数据格式,以及如何将其它数据集转为 OFRecord 数 ...
- CVPR 2020目标跟踪多篇开源论文(下)
CVPR 2020目标跟踪多篇开源论文(下) 6. Cooling-Shrinking Attack: Blinding the Tracker with Imperceptible Noises 作 ...
- 3D点云深度学*
3D点云深度学* 在自动驾驶中关于三维点云的深度学*方法应用.三维场景语义理解的方法以及对应的关键技术介绍. 1. 数据 但是对于3D点云,数据正在迅速增长.大有从2D向3D发展的趋势,比如在open ...
