SpringCloud之Eureka:集群搭建
上篇文章《SpringCloud之Eureka:服务发布与调用例子》实现了一个简单例子,这次对其进行改造,运行两个服务器实例、两个服务提供者实例,服务调用者请求服务,使其可以进行集群部署。
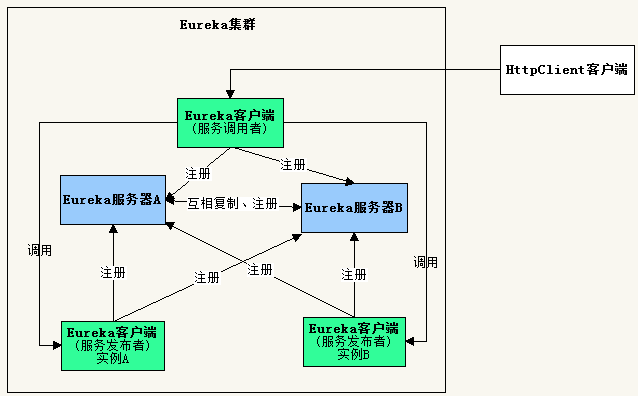
集群结构如下图所示。
由于开发环境只有一台电脑,要构建集群,需要修改hosts文件,在里面添加主机名映射。
127.0.0.1 slave1 slave2
一、服务器端
1、创建项目
开发工具:IntelliJ IDEA 2019.2.2
IDEA中创建一个新的SpringBoot项目,名称为“first-cloud-server”,SpringBoot版本选择2.1.9,在选择Dependencies(依赖)的界面勾选Spring Cloud Discovery ->
Eureka Server,创建完成后的pom.xml配置文件自动添加SpringCloud最新稳定版本依赖,当前为Greenwich.SR3。
pom.xml完整内容可参考上篇文章《SpringCloud之Eureka:服务发布与调用例子》。
2、修改配置application.yml
由于需要对同一个应用程序启动两次,因此需要使用profiles配置。
下面配置了两个profiles,名称分别为slave1和slave2,当使用slave1启动服务器后,会向http://slave2:8762/eureka/注册自己,当使用slave2启动服务器后,会向
http://slave1:8761/eureka/注册自己,即两个服务器启动后,互相注册。
server:

  port: 8761

spring:

  application:

    name: first-cloud-server

  profiles: slave1

eureka:

  instance:

    hostname: slave1

  client:

    serviceUrl:

      defaultZone: http://slave2:8762/eureka/

---

server:

  port: 8762

spring:

  application:

    name: first-cloud-server

  profiles: slave2

eureka:

  instance:

    hostname: slave2

  client:

    serviceUrl:

      defaultZone: http://slave1:8761/eureka/
3、修改启动类代码FirstEkServerApplication.java
除了增加注解@EnableEurekaServer,还让类在启动时读取控制台输入,决定使用哪个profiles来启动服务器。
package com.example.firstcloudserver;

import org.springframework.boot.autoconfigure.SpringBootApplication;

import org.springframework.boot.builder.SpringApplicationBuilder;

import org.springframework.cloud.netflix.eureka.server.EnableEurekaServer;

import java.util.Scanner;

@SpringBootApplication

@EnableEurekaServer

public class FirstCloudServerApplication {

    public static void main(String[] args) {

        //SpringApplication.run(FirstCloudServerApplication.class, args);

        Scanner scan = new Scanner(System.in);

        String profiles = scan.nextLine();

        new SpringApplicationBuilder(FirstCloudServerApplication.class)

                .profiles(profiles).run(args);

    }

}
二、编写服务提供者
1、创建项目
IDEA中创建一个新的SpringBoot项目,除了名称为“first-cloud-provider”,其它步骤和上面创建服务器端一样。
2、修改配置application.yml
spring:

  application:

    name: first-cloud-provider

eureka:

  instance:

    hostname: localhost

  client:

    serviceUrl:

      defaultZone: http://localhost:8761/eureka/,http://localhost:8762/eureka/
3、添加类 User.java
package com.example.firstcloudprovider;

public class User {

    private Integer id;

    private String name;

    private String message;

    public User(Integer id, String name){

        this.id = id;

        this.name = name;

    }

    public Integer getId() {

        return id;

    }

    public void setId(Integer id) {

        this.id = id;

    }

    public String getName() {

        return name;

    }

    public void setName(String name) {

        this.name = name;

    }

    public String getMessage() {

        return message;

    }

    public void setMessage(String message) {

        this.message = message;

    }

}
4、添加控制器 UserController.java
package com.example.firstcloudprovider;

import org.springframework.http.MediaType;

import org.springframework.web.bind.annotation.PathVariable;

import org.springframework.web.bind.annotation.RequestMapping;

import org.springframework.web.bind.annotation.RequestMethod;

import org.springframework.web.bind.annotation.RestController;

import javax.servlet.http.HttpServletRequest;

@RestController

public class UserController {

    @RequestMapping(value = "/user/{userId}", method = RequestMethod.GET, produces = MediaType.APPLICATION_JSON_VALUE)

    public User findUser(@PathVariable("userId") Integer userId, HttpServletRequest request){

        User user = new User(userId, "gdjlc");

        user.setMessage(request.getRequestURL().toString());

        return user;

    }

}
5、修改启动类代码FirstCloudProviderApplication.java
除了增加注解@EnableEurekaClient,还让类在启动时读取控制台输入,决定使用哪个端口启动服务器。
package com.example.firstcloudprovider;

//import org.springframework.boot.SpringApplication;

import org.springframework.boot.autoconfigure.SpringBootApplication;

import org.springframework.boot.builder.SpringApplicationBuilder;

import org.springframework.cloud.netflix.eureka.EnableEurekaClient;

import java.util.Scanner;

@SpringBootApplication

@EnableEurekaClient

public class FirstCloudProviderApplication {

    public static void main(String[] args) {

        //SpringApplication.run(FirstCloudProviderApplication.class, args);

        Scanner scan = new Scanner(System.in);

        String port = scan.nextLine();

        new SpringApplicationBuilder(FirstCloudProviderApplication.class).properties("server.port=" + port).run(args);

    }

}
三、编写服务调用者
1、创建项目
IDEA中创建一个新的SpringBoot项目,除了名称为“first-cloud-invoker”,其它步骤和上面创建服务器端一样。
2、修改配置application.yml
server:

  port: 9000

spring:

  application:

    name: first-cloud-invoker

eureka:

  instance:

    hostname: localhost

  client:

    serviceUrl:

      defaultZone: http://slave1:8761/eureka/,http://slave2:8762/eureka/
3、添加控制器 InvokerController.java
package com.example.firstcloudinvoker;

import org.springframework.cloud.client.loadbalancer.LoadBalanced;

import org.springframework.context.annotation.Bean;

import org.springframework.context.annotation.Configuration;

import org.springframework.http.MediaType;

import org.springframework.web.bind.annotation.RequestMapping;

import org.springframework.web.bind.annotation.RequestMethod;

import org.springframework.web.bind.annotation.RestController;

import org.springframework.web.client.RestTemplate;

@RestController

@Configuration

public class InvokerController {

    @Bean

    @LoadBalanced

    public RestTemplate getRestTemplate(){

        return new RestTemplate();

    }

    @RequestMapping(value = "/router", method = RequestMethod.GET, produces = MediaType.APPLICATION_JSON_VALUE)

    public String router(){

        RestTemplate restTpl = getRestTemplate();

        //根据应用名称调用服务

        String json = restTpl.getForObject("http://first-cloud-provider/user/1", String.class);

        return json;

    }

}
4、修改启动类代码FirstCloudInvokerApplication.java
添加注解@EnableDiscoveryClient,使得服务调用者可以去Eureka中发现服务。
package com.example.firstcloudinvoker;

import org.springframework.boot.SpringApplication;

import org.springframework.boot.autoconfigure.SpringBootApplication;

import org.springframework.cloud.client.discovery.EnableDiscoveryClient;

@SpringBootApplication

@EnableDiscoveryClient

public class FirstCloudInvokerApplication {

    public static void main(String[] args) {

        SpringApplication.run(FirstCloudInvokerApplication.class, args);

    }

}
四、编写REST客户端进行测试
1、创建项目
IDEA中创建一个新的SpringBoot项目,名称为“first-cloud-rest-client”,SpringBoot版本选择2.1.9,在选择Dependencies(依赖)的界面勾选Web->Spring Web。
在pom.xml中增加httpclient依赖。
<?xml version="1.0" encoding="UTF-8"?>

<project xmlns="http://maven.apache.org/POM/4.0.0" xmlns:xsi="http://www.w3.org/2001/XMLSchema-instance"

         xsi:schemaLocation="http://maven.apache.org/POM/4.0.0 https://maven.apache.org/xsd/maven-4.0.0.xsd">

    <modelVersion>4.0.0</modelVersion>

    <parent>

        <groupId>org.springframework.boot</groupId>

        <artifactId>spring-boot-starter-parent</artifactId>

        <version>2.1.9.RELEASE</version>

        <relativePath/> <!-- lookup parent from repository -->

    </parent>

    <groupId>com.example</groupId>

    <artifactId>first-cloud-rest-client</artifactId>

    <version>0.0.1-SNAPSHOT</version>

    <name>first-cloud-rest-client</name>

    <description>Demo project for Spring Boot</description>

    <properties>

        <java.version>1.8</java.version>

    </properties>

    <dependencies>

        <dependency>

            <groupId>org.springframework.boot</groupId>

            <artifactId>spring-boot-starter-web</artifactId>

        </dependency>

        <dependency>

            <groupId>org.springframework.boot</groupId>

            <artifactId>spring-boot-starter-test</artifactId>

            <scope>test</scope>

        </dependency>

        <dependency>

            <groupId>org.apache.httpcomponents</groupId>

            <artifactId>httpclient</artifactId>

        </dependency>

    </dependencies>

    <build>

        <plugins>

            <plugin>

                <groupId>org.springframework.boot</groupId>

                <artifactId>spring-boot-maven-plugin</artifactId>

            </plugin>

        </plugins>

    </build>

</project>
2、修改配置application.yml
server:

  port: 9001
3、修改启动类代码FirstCloudRestClientApplication.java
编写调用REST服务的代码
package com.example.firstcloudrestclient;

import org.apache.http.HttpResponse;

import org.apache.http.client.methods.HttpGet;

import org.apache.http.impl.client.CloseableHttpClient;

import org.apache.http.impl.client.HttpClients;

import org.apache.http.util.EntityUtils;

import org.springframework.boot.SpringApplication;

import org.springframework.boot.autoconfigure.SpringBootApplication;

import org.springframework.web.bind.annotation.RequestMapping;

import org.springframework.web.bind.annotation.RestController;

@SpringBootApplication

@RestController

public class FirstCloudRestClientApplication {

    public static void main(String[] args) {

        SpringApplication.run(FirstCloudRestClientApplication.class, args);

    }

    @RequestMapping("/")

    public String testHttpClient(){

        StringBuilder sb = new StringBuilder();

        try{

            CloseableHttpClient httpClient = HttpClients.createDefault();

            for(int i=0;i<10;i++){

                HttpGet httpGet = new HttpGet("http://localhost:9000/router");

                HttpResponse response = httpClient.execute(httpGet);

                sb.append(EntityUtils.toString(response.getEntity()) + "<br />");

            }

        }catch(Exception ex){

            return ex.getMessage();

        }

        return sb.toString();

    }

}
4、测试
(1)启动两个服务器端,在控制台中分别输入slave1和slave2启动。
(2)启动两个服务提供者,在控制台中分别输入8763和8764启动。
(3)启动服务调用者。
(4)启动REST客户端。
浏览器访问 http://slave1:8761/,页面如下
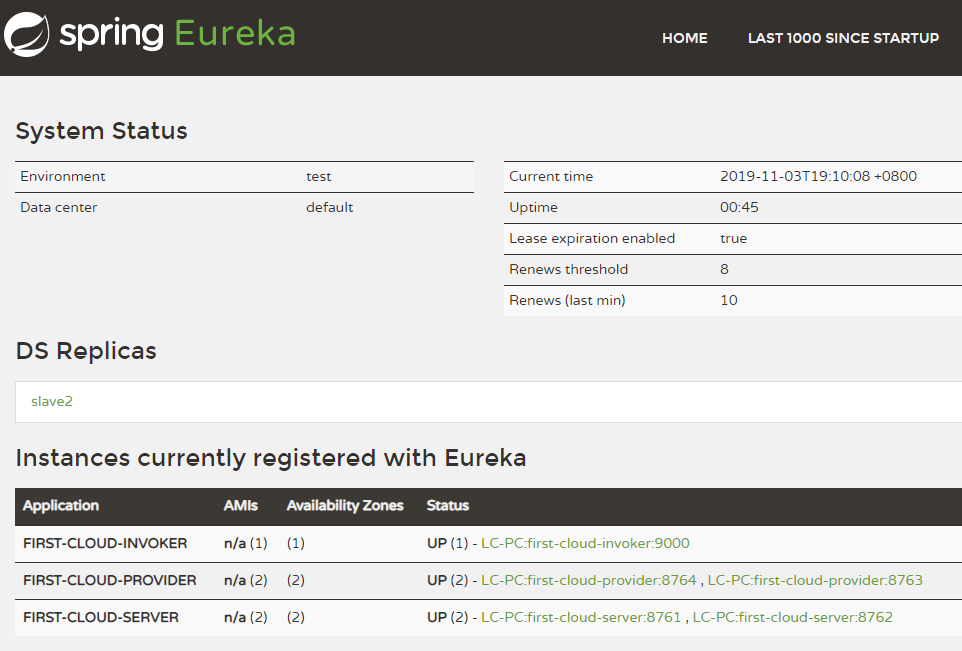
浏览器访问 http://slave2:8762/,页面如下

浏览器访问 http://localhost:8763/user/1,页面输出:
{"id":1,"name":"gdjlc","message":"http://localhost:8763/user/1"}
浏览器访问 http://localhost:8764/user/1,页面输出:
{"id":1,"name":"gdjlc","message":"http://localhost:8764/user/1"}
浏览器访问 http://localhost:9000/router,多次刷新页面,页面输出在8763和8764切换:
{"id":1,"name":"gdjlc","message":"http://localhost:8763/user/1"}
{"id":1,"name":"gdjlc","message":"http://localhost:8764/user/1"}
浏览器访问 http://localhost:9001/,页面输出
{"id":1,"name":"gdjlc","message":"http://localhost:8764/user/1"}

{"id":1,"name":"gdjlc","message":"http://localhost:8763/user/1"}

{"id":1,"name":"gdjlc","message":"http://localhost:8764/user/1"}

{"id":1,"name":"gdjlc","message":"http://localhost:8763/user/1"}

{"id":1,"name":"gdjlc","message":"http://localhost:8764/user/1"}

{"id":1,"name":"gdjlc","message":"http://localhost:8763/user/1"}

{"id":1,"name":"gdjlc","message":"http://localhost:8764/user/1"}

{"id":1,"name":"gdjlc","message":"http://localhost:8763/user/1"}

{"id":1,"name":"gdjlc","message":"http://localhost:8764/user/1"}

{"id":1,"name":"gdjlc","message":"http://localhost:8763/user/1"}
请求了10次,8763和8764分别被请求5次,可见已经达到负载均衡。
SpringCloud之Eureka:集群搭建的更多相关文章
- SpringCloud学习之—Eureka集群搭建
Eureka集群的搭建 上次说过了在SpringCloud应用中使用Eureka注册中心,用来对服务提供者进行服务注册与发现,但同时,它也是一个"微服务",单个应用使用空间有限,因 ...
- SpringCloud之Eureka集群
前面我们介绍了SpringCloud注册中心Eureka,但是存在一个单点故障的问题,一个注册中心远远不能满足实际的生产环境,现在我们介绍一下如何搭建一个Eureka集群. 一:集群环境搭建 我们先建 ...
- F版本SpringCloud 5—Eureka集群和自我保护机制
源码地址:https://gitee.com/bingqilinpeishenme/Java-Tutorials 前言 上篇文章中,通过代码搭建了Eureka注册中心和客户端,是Eureka的简单应用 ...
- 微服务架构:Eureka集群搭建
版权声明:本文为博主原创文章,转载请注明出处,欢迎交流学习! 服务注册.发现是微服务架构的关键原理之一,由于微服务架构是由一系列职责单一的细粒度服务构成的网状结构,服务之间通过轻量机制进行通信,这就必 ...
- Eureka集群搭建
服务注册.发现是微服务架构的关键原理之一,由于微服务架构是由一系列职责单一的细粒度服务构成的网状结构,服务之间通过轻量机制进行通信,这就必然引入一个服务注册发现的问题,也就是说服务提供方要注册报告服务 ...
- 三(2)、springcloud之Eureka集群配置
1)原理说明** 服务启动后向Eureka注册,Eureka Server会将注册信息向其他Eureka Server进行同步,当服务消费者要调用服务提供者,则向服务注册中心获取服务提供者地址,然后会 ...
- Spring Cloud Eureka 集群搭建 - 以及发现一个 “直觉BUG”
首先解释一下标题所说的“直觉BUG”,这个是我自己的定义.就是我们直觉上认为这是一个BUG,是一个错误,而实际并没有出错. 比如下图: 虽然出现报错信息,但是,整个程序并没有出错.至于原因,图片上的文 ...
- 十六、springcloud(二)Eureka集群
1.创建子工程spring-cloud-peer(jar) 2.创建application-peer1.properties,application-peer2.properties applicat ...
- springcloud中eureka集群unavailable-replicas
unavailable-replicas 配置了集群,但是在注册中心显示另外的几个集群地址是不可用的: 1 首先需要再host中添加服务名映射,如果应映射了再看是否在yml中配置了prefer-ip- ...
- springcloud(三) eureka集群
上一节讲到user微服务和order微服务和eureka注册中心一起使用,那么问题来了如何注册中心挂了怎么办?ok, 注册中心集群就来了. 原理图: 注意euraka 之间是通过复制(replicat ...
随机推荐
- AutoCAD中的螺旋究竟是什么螺旋?
AutoCad从很早的时候就开始提供了螺旋线的功能,它的用法相对简单,非常适合用来对等距螺旋的理论进行演练. 选择螺旋线工具,首先画出一个基准圆,再向内(或向外)移动鼠标,拖出一个旋转3个周期的螺旋. ...
- 2017 ACM/ICPC 沈阳 F题 Heron and his triangle
A triangle is a Heron’s triangle if it satisfies that the side lengths of it are consecutive integer ...
- python光标图片获取
# -*- coding:utf-8 -*- import win32api import win32gui,win32ui import time while True : time.sleep(1 ...
- 快速掌握zabbix配置
有人说zabbix难点在配置,面对很多的配置项,不知道所以然了,其实我觉得这是没掌握好zabbix的学习方法,要掌握了zabbix的学习思路,可以在一个小时内快速掌握zabbix的各种配置,下面我将重 ...
- 基于iCamera测试500w摄像头-mt9p001,mt9p031,mt9p001模块小结
基于iCamera测试500w摄像头-mt9p001,mt9p031,mt9p001模块小结 先看实物 M12标准无畸变镜头效果 标准CS镜头效果 iCamera底板+mt9p001安装效果 再看看c ...
- inline以及inline-block行内元素:vertical-align属性
- 【CentOS7】开发环境配置
[CentOS7]开发环境配置 目录 ===================================================================== 1.安装openjdk ...
- 阿里最新38道Java面试题解析(MyBatis+消息队列+Redis)
一.谈谈你对 MyBatis 的理解? 1. Mybatis是一个半ORM(对象关系映射)框架,它内部封装了 JDBC,开发时只需要关注 SQL 语句本身,不需要花费精力去处理加载驱动.创建连接.创建 ...
- Laravel 中使用 swoole 项目实战开发案例二 (后端主动分场景给界面推送消息)
推荐阅读:Laravel 中使用 swoole 项目实战开发案例一 (建立 swoole 和前端通信) 需求分析 我们假设有一个需求,我在后端点击按钮 1,首页弹出 “后端触发了按钮 1”.后端点了 ...
- Redis面试热点工程架构篇之数据同步
温馨提示 更佳阅读体验:[决战西二旗]|Redis面试热点之工程架构篇[2] 前言 前面用了3篇文章介绍了一些底层实现和工程架构相关的问题,鉴于Redis的热点问题还是比较多的,因此今天继续来看工程架 ...