MyBatis 源码分析
MyBatis 运行过程
传统的 JDBC 编程查询数据库的代码和过程总结。
- 加载驱动。
- 创建连接,Connection 对象。
- 根据 Connection 创建 Statement 或者 PreparedStatement 来执行 sql 语句。
- 返回结果集到 ResultSet 中。
- 手动将 ResultSet 映射到 JavaBean 中。
        public static void main(String[] args) {
            //声明Connection对象
            Connection con = null;
            //遍历查询结果集
            try {
                //加载驱动程序
                Class.forName("com.mysql.jdbc.Driver");
                //创建 connection 对象
                con = DriverManager.getConnection("jdbc:mysql://localhost:3306/db","username","password");

                //使用 connection 对象创建statement 或者 PreparedStatement 类对象,用来执行SQL语句
                Statement statement = con.createStatement();
                //要执行的SQL语句
                String sql = "select * from emp";
                //3.ResultSet类,用来存放获取的结果集!!
                ResultSet rs = statement.executeQuery(sql);

                String job = "";
                String id = "";
                while(rs.next()){
                    //获取stuname这列数据
                    job = rs.getString("job");
                    //获取stuid这列数据
                    id = rs.getString("ename");

                    //输出结果
                    System.out.println(id + "\t" + job);
                }
            } catch(ClassNotFoundException e) {
                e.printStackTrace();
            } catch(SQLException e) {
                //数据库连接失败异常处理
                e.printStackTrace();
            }catch (Exception e) {
                e.printStackTrace();
            }finally{
                rs.close();
                con.close();
            }
        }
编码方式实现 MyBatis 查询数据库,方便大家理解,不使用 SpringMybatis,加入 Spring 后整体流程会复杂很多。使用 MyBatis 后能将原来的传统的 JDBC 编程编的如此简单。具体流程总结。
- 使用配置文件构建 SqlSessionFactory。
- 使用 SqlSessionFactory 获得 SqlSession,SqlSession 相当于传统 JDBC 的 Conection。
- 使用 SqlSession 得到 Mapper。
- 用 Mapper 来执行 sql 语句,并返回结果直接封装到 JavaBean 中。
//获取 sqlSession,sqlSession 相当于传统 JDBC 的 Conection
public static SqlSession getSqlSession(){
        InputStream configFile = new FileInputStream(filePath);
    SqlSessionFactory sqlSessionFactory = new SqlSessionFactoryBuilder.build(configFile);
    return sqlSessionFactory.openSession();
}

//使用 sqlSession 获得对应的 mapper,mapper 用来执行 sql 语句。
public static User get(SqlSession sqlSession, int id){
    UserMapper userMapper = sqlSession.getMapper(UserMapper.class);
    return userMapper.selectByPrimaryKey(id);
}
总结
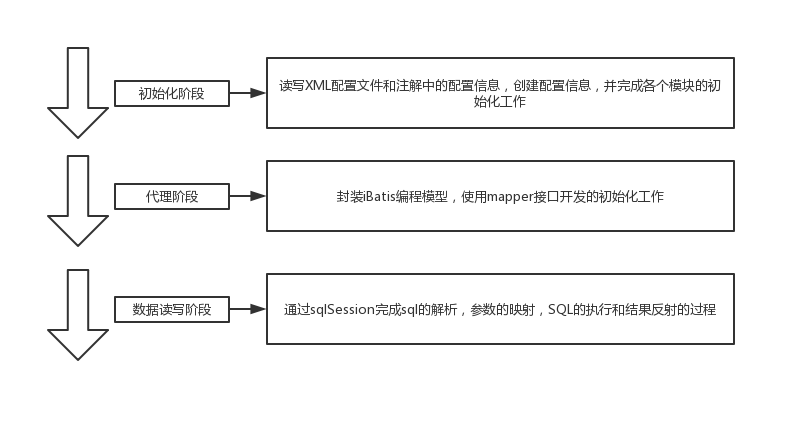
MyBatis 源码分析
下面来具体分析 MyBatis 代码的执行过程**
整体架构
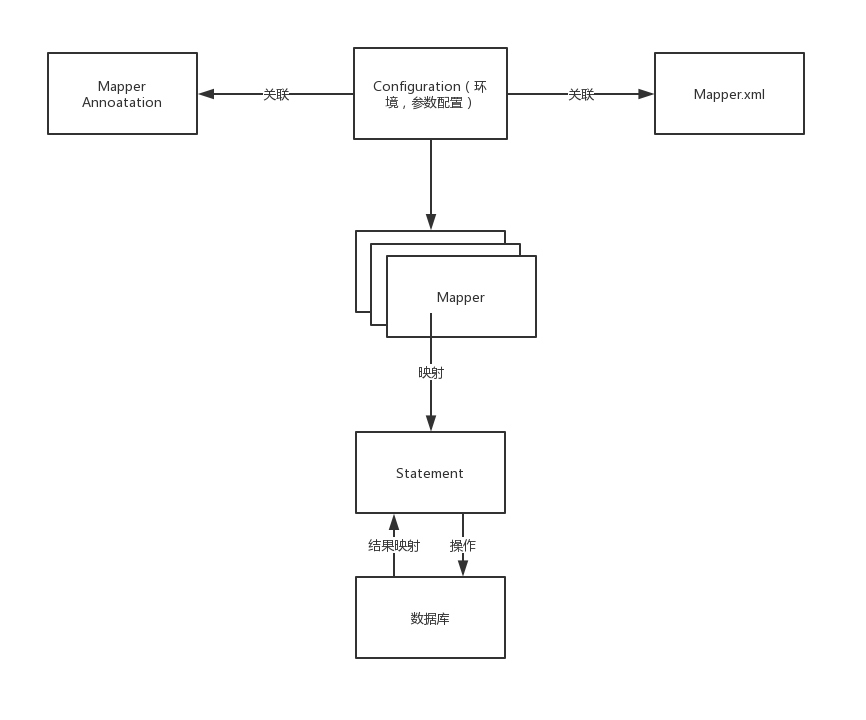
源码分析
先说一下大部分框架的代码流程:
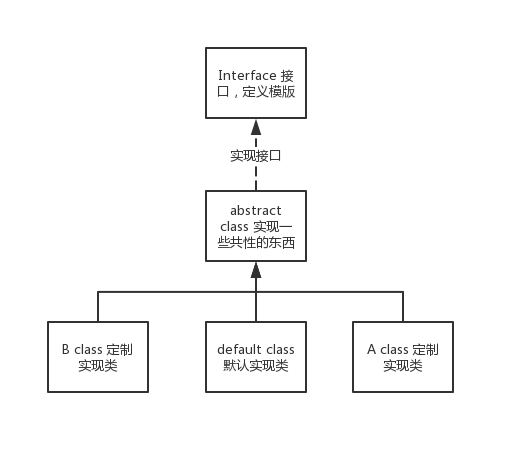
再看我们的配置文件。
<configuration>
    <environments default="development">
    <environment id="development">
        <transactionManager type="JDBC">
        <dataSource type="POOLED">
          <property name="driver" value="com.mysql.jdbc.Driver"/>
          <property name="url" value="jdbc:mysql://localhost:3306/db"/>
          <property name="username" value="root"/>
          <property name="password" value="123456"/>
        </dataSource>
      </transactionManager>
    </environment>
  </environments>
</configuration>
<mappers>
  <mapper resource="xml/UserMapper.xml"/>
</mappers>
public static SqlSession getSqlSession(){
//读取上面的配置文件
InputStream configFile = new FileInputStream(filePath);
//根据上面配置的 dataSource 配置 SqlSessionFactory,并且建立 Mapper 接口和 xml 之间的关系。
SqlSessionFactory sqlSessionFactory = new SqlSessionFactoryBuilder.build(configFile);
//工厂方法返回一个 sqlSession
return sqlSessionFactory.openSession();
}
//我们来重点看看 openSession 做了什么操作, DefaultSqlSessionFactory.java
@Override
public SqlSession openSession() {
return this.openSessionFromDataSource(this.configuration.getDefaultExecutorType(), (TransactionIsolationLevel)null, false);
}
public Configuration getConfiguration() {
return this.configuration;
}
//这个函数里面有着事务控制相关的代码。
private SqlSession openSessionFromDataSource(ExecutorType execType, TransactionIsolationLevel level, boolean autoCommit) {
Transaction tx = null;
DefaultSqlSession var8;
try {
Environment environment = this.configuration.getEnvironment();
TransactionFactory transactionFactory = this.getTransactionFactoryFromEnvironment(environment);
//根据上面的参数得到 TransactionFactory,通过 TransactionFactory 生成一个 Transaction,可以理解为这个 SqlSession 的事务控制器
tx = transactionFactory.newTransaction(environment.getDataSource(), level, autoCommit);
// 将这个事务控制器封装在 Executor 里
Executor executor = this.configuration.newExecutor(tx, execType);
// 使用 configuration 配置类,Executor,和 configuration(是否自动提交) 来构建一个 DefaultSqlSession。
var8 = new DefaultSqlSession(this.configuration, executor, autoCommit);
} catch (Exception var12) {
this.closeTransaction(tx);
throw ExceptionFactory.wrapException("Error opening session. Cause: " + var12, var12);
} finally {
ErrorContext.instance().reset();
}
return var8;
}SqlSession 的实现流程。
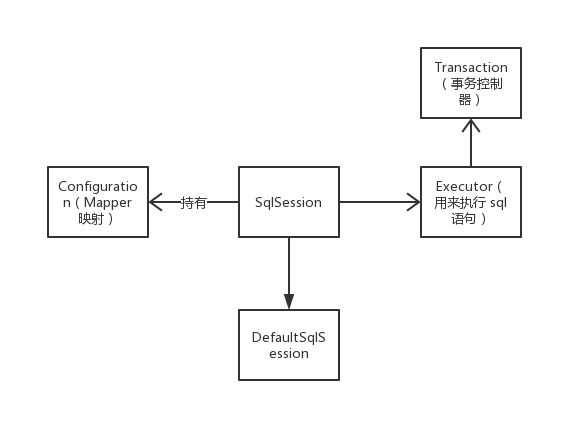
SqlSession 的接口定义:里面定义了增删改查和提交回滚等方法。
public interface SqlSession extends Closeable {
    <T> T selectOne(String var1);

    <T> T selectOne(String var1, Object var2);

    <E> List<E> selectList(String var1);

    <E> List<E> selectList(String var1, Object var2);

    <E> List<E> selectList(String var1, Object var2, RowBounds var3);

    <K, V> Map<K, V> selectMap(String var1, String var2);

    <K, V> Map<K, V> selectMap(String var1, Object var2, String var3);

    <K, V> Map<K, V> selectMap(String var1, Object var2, String var3, RowBounds var4);

    <T> Cursor<T> selectCursor(String var1);

    <T> Cursor<T> selectCursor(String var1, Object var2);

    <T> Cursor<T> selectCursor(String var1, Object var2, RowBounds var3);

    void select(String var1, Object var2, ResultHandler var3);

    void select(String var1, ResultHandler var2);

    void select(String var1, Object var2, RowBounds var3, ResultHandler var4);

    int insert(String var1);

    int insert(String var1, Object var2);

    int update(String var1);

    int update(String var1, Object var2);

    int delete(String var1);

    int delete(String var1, Object var2);

    void commit();

    void commit(boolean var1);

    void rollback();

    void rollback(boolean var1);

    List<BatchResult> flushStatements();

    void close();

    void clearCache();

    Configuration getConfiguration();

    <T> T getMapper(Class<T> var1);

    Connection getConnection();
}
接下来用 sqlSession 获取对应的 Mapper:
//使用 sqlSession 获得对应的 mapper,mapper 用来执行 sql 语句。
public static User get(SqlSession sqlSession, int id){
    UserMapper userMapper = sqlSession.getMapper(UserMapper.class);
    return userMapper.selectByPrimaryKey(id);
}
DefaultSqlSession 的 getMapper 实现:
public <T> T getMapper(Class<T> type) {
  return this.configuration.getMapper(type, this);
}

//从 configuration 里面 getMapper,Mapper 就在 Configuration 里
public <T> T getMapper(Class<T> type, SqlSession sqlSession) {
  return this.mapperRegistry.getMapper(type, sqlSession);
}
MapperRegistry 里 getMapper 的最终实现:
这里就要说明一下,我们的接口里面只定义了抽象的增删改查,而这个接口并没有任何实现类,那么这个 xml 到底是如何与接口关联起来并生成实现类那?
public class MapperRegistry {
    private final Configuration config;
    // 用一个 Map 来存储接口和 xml 文件之间的映射关系,key 应该是接口,但是 value 是 MapperProxyFactory
    private final Map<Class<?>, MapperProxyFactory<?>> knownMappers = new HashMap();

    public MapperRegistry(Configuration config) {
        this.config = config;
    }

    public <T> T getMapper(Class<T> type, SqlSession sqlSession) {
      //获取到这个接口对应的 MapperProxyFactory。
        MapperProxyFactory<T> mapperProxyFactory = (MapperProxyFactory)this.knownMappers.get(type);
        if (mapperProxyFactory == null) {
            throw new BindingException("Type " + type + " is not known to the MapperRegistry.");
        } else {
            try {
                //用上一步获取的 MapperProxyFactory 和 sqlSession 构建对应的 Class
                return mapperProxyFactory.newInstance(sqlSession);
            } catch (Exception var5) {
                throw new BindingException("Error getting mapper instance. Cause: " + var5, var5);
            }
        }
    }
}
接下来我们看看 newInstance 的具体实现:
public T newInstance(SqlSession sqlSession) {
  // mapperInterface 就是接口
  MapperProxy<T> mapperProxy = new MapperProxy(sqlSession, this.mapperInterface, this.methodCache);
  return this.newInstance(mapperProxy);
}

protected T newInstance(MapperProxy<T> mapperProxy) {
  //动态代理,这里的动态代理有一些不一样
  return Proxy.newProxyInstance(this.mapperInterface.getClassLoader(), new Class[]{this.mapperInterface}, mapperProxy);
}
正常流程的动态代理:
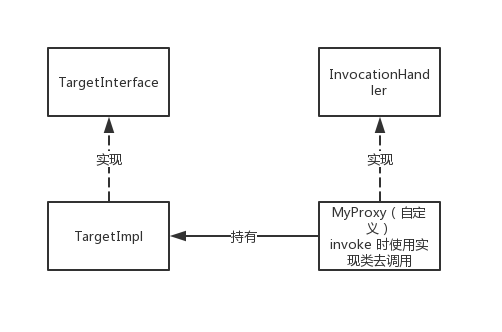
与传统的动态代理相比,MyBatis 的接口是没有实现类的,那么它又是怎么实现动态代理的那?
我们来看一下 MapperProxy 的源码:
public class MapperProxy<T> implements InvocationHandler, Serializable {
    private static final long serialVersionUID = -6424540398559729838L;
    private final SqlSession sqlSession;
    private final Class<T> mapperInterface;
    private final Map<Method, MapperMethod> methodCache;

    public MapperProxy(SqlSession sqlSession, Class<T> mapperInterface, Map<Method, MapperMethod> methodCache) {
        this.sqlSession = sqlSession;
        this.mapperInterface = mapperInterface;
        this.methodCache = methodCache;
    }
        // 正常的动态代理中 Object proxy 这个参数应该是接口的实现类
    // com.paul.pkg.UserMapper@5a123uf
    // 现在里面是 org.apache.ibatis.binding.MapperProxy@6y213kn, 这俩面
    public Object invoke(Object proxy, Method method, Object[] args) throws Throwable {
        try {
            if (Object.class.equals(method.getDeclaringClass())) {
                return method.invoke(this, args);
            }

            if (this.isDefaultMethod(method)) {
                return this.invokeDefaultMethod(proxy, method, args);
            }
        } catch (Throwable var5) {
            throw ExceptionUtil.unwrapThrowable(var5);
        }
        // Mapper 走这个流程,先尝试在缓存里获取 method
        MapperMethod mapperMethod = this.cachedMapperMethod(method);
        return mapperMethod.execute(this.sqlSession, args);
    }

    private MapperMethod cachedMapperMethod(Method method) {
        MapperMethod mapperMethod = (MapperMethod)this.methodCache.get(method);
        if (mapperMethod == null) {
            // mapperMethod 的构建,通过接口名,方法,和 xml 配置(通过 sqlSession 的 Configuration 获得)
            mapperMethod = new MapperMethod(this.mapperInterface, method, this.sqlSession.getConfiguration());
          //通过 execute 执行方法,因为 sqlSession 封装了 Executor,所以还要传进来,execute 方法使用
          //sqlSession 里面的方法。
            this.methodCache.put(method, mapperMethod);
        }

        return mapperMethod;
    }

}
来看 MapperMethod 的定义:
// command 里面包含了方法名,比如 com.paul.pkg.selectByPrimaryKey
// type, 表示是 SELECT,UPDATE,INSERT,或者 DELETE
// method 是方法的签名
public class MapperMethod {
    private final MapperMethod.SqlCommand command;
    private final MapperMethod.MethodSignature method;

    public MapperMethod(Class<?> mapperInterface, Method method, Configuration config) {
        this.command = new MapperMethod.SqlCommand(config, mapperInterface, method);
        this.method = new MapperMethod.MethodSignature(config, mapperInterface, method);
    }
}
进入 DefaultSqlSession 执行对应的 sql 语句:
public <T> T selectOne(String statement, Object parameter) {
  List<T> list = this.selectList(statement, parameter);
  if (list.size() == 1) {
    return list.get(0);
  } else if (list.size() > 1) {
    throw new TooManyResultsException("Expected one result (or null) to be returned by selectOne(), but found: " + list.size());
  } else {
    return null;
  }
}

public <E> List<E> selectList(String statement, Object parameter, RowBounds rowBounds) {
  List var5;
  try {
    // 这里又需要 configuration 来获取对应的 statement
    // MappedStatement 里面有 xml 文件,和要执行的方法,就是 xml 里面的 id,statementType,以及 sql 语句。
    MappedStatement ms = this.configuration.getMappedStatement(statement);
    // 用 executor 执行 query,executor 里面应该是包装了 JDBC。
    var5 = this.executor.query(ms, this.wrapCollection(parameter), rowBounds, Executor.NO_RESULT_HANDLER);
  } catch (Exception var9) {
    throw ExceptionFactory.wrapException("Error querying database.  Cause: " + var9, var9);
  } finally {
    ErrorContext.instance().reset();
  }

  return var5;
}
Executor 的实现类里面执行 query 方法:
public <E> List<E> query(MappedStatement ms, Object parameterObject, RowBounds rowBounds, ResultHandler resultHandler) throws SQLException {
  BoundSql boundSql = ms.getBoundSql(parameterObject);
  CacheKey key = this.createCacheKey(ms, parameterObject, rowBounds, boundSql);
  return this.query(ms, parameterObject, rowBounds, resultHandler, key, boundSql);
}
public <E> List<E> query(MappedStatement ms, Object parameterObject, RowBounds rowBounds, ResultHandler resultHandler, CacheKey key, BoundSql boundSql) throws SQLException {
  Cache cache = ms.getCache();
  if (cache != null) {
    this.flushCacheIfRequired(ms);
    if (ms.isUseCache() && resultHandler == null) {
      this.ensureNoOutParams(ms, boundSql);
      List<E> list = (List)this.tcm.getObject(cache, key);
      if (list == null) {
        list = this.delegate.query(ms, parameterObject, rowBounds, resultHandler, key, boundSql);
        this.tcm.putObject(cache, key, list);
      }

      return list;
    }
  }
  // 使用 delegate 去 query,delegate 是 SimpleExecutor。里面使用 JDBC 进行数据库操作。
  return this.delegate.query(ms, parameterObject, rowBounds, resultHandler, key, boundSql);
}
手动实现一个简单的 MyBatis
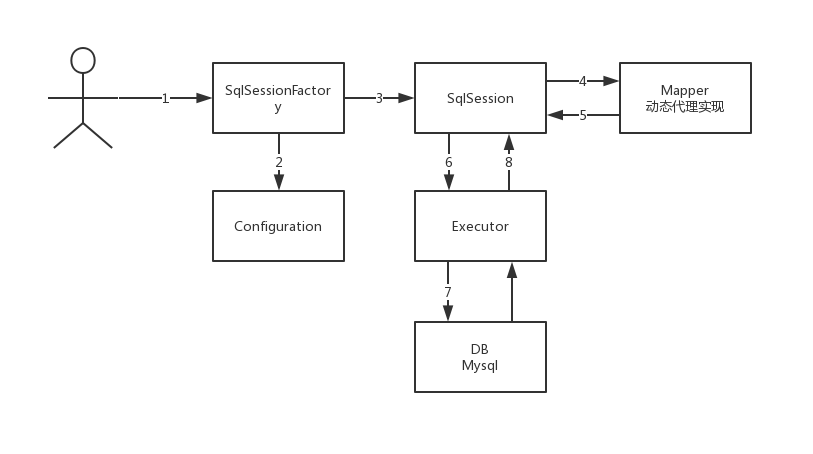
- 创建 SqlSessionFactory 实例。
- 实例化过程,加载配置文件创建 Configuration 对象。
- 通过 factory 创建 SqlSession。
- 通过 SqlSession 获取 mapper 接口动态代理。
- 动态代理回调 SqlSession 中某查询方法。
- SqlSession 将查询方法转发给 Executor。
- Executor 基于 JDBC 访问数据库获取数据。
- Executor 通过反射将数据转换成 POJO并返回给 SqlSession。
- 将数据返回给调用者。
项目整体使用 Maven 构建,mybatis-demo 是脱离 Spring 的 MyBatis 使用的例子。paul-mybatis 是我们自己实现的 mybatis 框架。
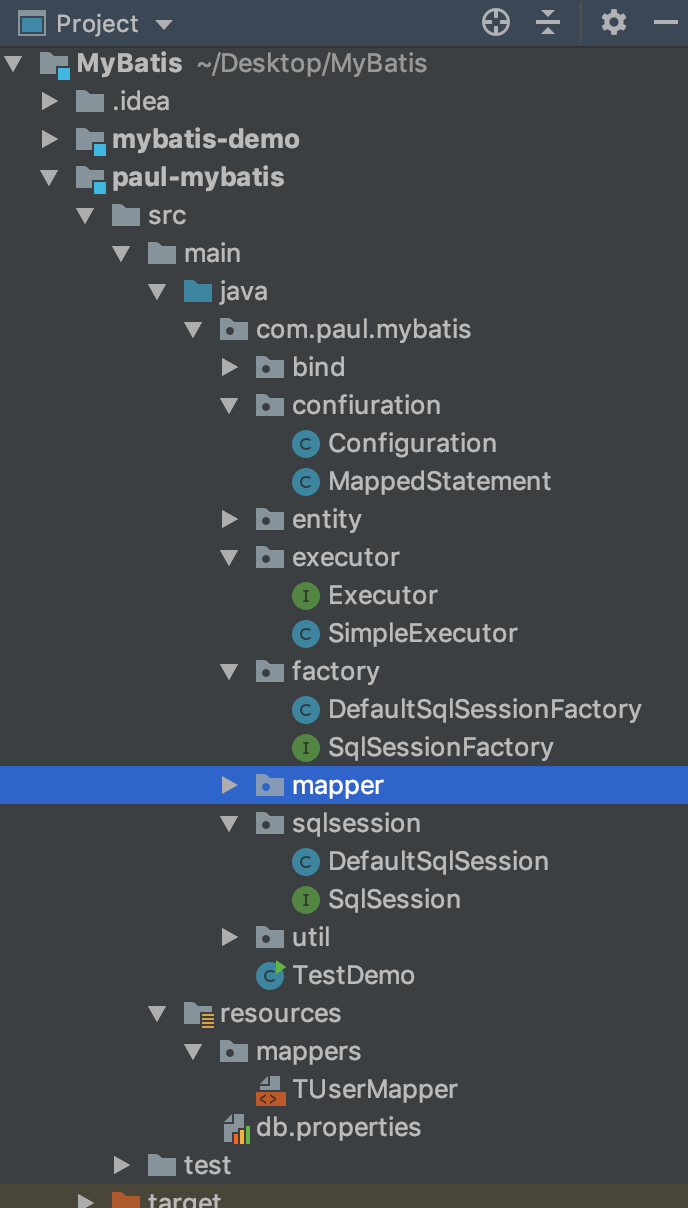
首先按照我们以前的使用 mybatis 代码时的流程,创建 mapper 接口,xml 文件,和 POJO以及集一些配置文件。
接口:TUserMapper
  package com.paul.mybatis.mapper;

  import com.paul.mybatis.entity.TUser;

  import java.util.List;

  public interface TUserMapper {

      TUser selectByPrimaryKey(Integer id);

      List<TUser> selectAll();
  }
xml 文件
  <?xml version="1.0" encoding="UTF-8" ?>
  <!DOCTYPE mapper
          PUBLIC "-//mybatis.org//DTD Config 3.0//EN"
          "http://mybatis.org/dtd/mybatis-3-mapper.dtd">
  <mapper namespace="com.paul.mybatis.mapper.TUserMapper">

      <select id="selectByPrimaryKey" resultType="TUser">
          select *
          from t_user
          where id = #{id,jdbcType=INTEGER}
      </select>

      <select id="selectAll" resultType="TUser">
          select *
          from t_user
      </select>

  </mapper>
实体类,属性应该与数据库想匹配
  package com.paul.mybatis.entity;

  public class TUser {

  private Integer id;

  private String userName;

  private String realName;

  private Byte sex;

  private String mobile;

  public Integer getId() {
      return id;
  }

  public void setId(Integer id) {
      this.id = id;
  }

  public String getUserName() {
      return userName;
  }

  public void setUserName(String userName) {
      this.userName = userName;
  }

  public String getRealName() {
      return realName;
  }

  public void setRealName(String realName) {
      this.realName = realName;
  }

  public Byte getSex() {
      return sex;
  }

  public void setSex(Byte sex) {
      this.sex = sex;
  }

  public String getMobile() {
      return mobile;
  }

  public void setMobile(String mobile) {
      this.mobile = mobile;
  }
  }
数据库连接配置文件,db.properties
  jdbc.driver=com.mysql.jdbc.Driver
  jdbc.url=jdbc:mysql://localhost:3306/mybatis?useUnicode=true&characterEncoding=utf8
  jdbc.username=root
  jdbc.password=root
下面我们来关注 xml 文件,mapper 文件里的 namespace,id,resultType 和 sql 语句都要存储起来,我们定义一个 POJO 来存储这些信息。
  package com.paul.mybatis.confiuration;

  /**
  *
  * XML 中的 sql 配置信息加载到这个类中
  *
  */
  public class MappedStatement {

  private String namespace;

  private String id;

  private String resultType;

  private String sql;

  public String getNamespace() {
      return namespace;
  }

  public void setNamespace(String namespace) {
      this.namespace = namespace;
  }

  public String getId() {
      return id;
  }

  public void setId(String id) {
      this.id = id;
  }

  public String getResultType() {
      return resultType;
  }

  public void setResultType(String resultType) {
      this.resultType = resultType;
  }

  public String getSql() {
      return sql;
  }

  public void setSql(String sql) {
      this.sql = sql;
  }
  }
下面来创建一个 Configuration 类,用来保存所有配置文件和 xml 文件里的信息。
  package com.paul.mybatis.confiuration;

  import java.util.HashMap;
  import java.util.List;
  import java.util.Map;

  /**
  *
  * 所有的配置信息
  *
  */
  public class Configuration {

  private String jdbcDriver;

  private String jdbcUrl;

  private String jdbcPassword;

  private String jdbcUsername;

  private Map<String,MappedStatement> mappedStatement = new HashMap<>();

  public Map<String, MappedStatement> getMappedStatement() {
      return mappedStatement;
  }

  public void setMappedStatement(Map<String, MappedStatement> mappedStatement) {
      this.mappedStatement = mappedStatement;
  }

  public String getJdbcDriver() {
      return jdbcDriver;
  }

  public void setJdbcDriver(String jdbcDriver) {
      this.jdbcDriver = jdbcDriver;
  }

  public String getJdbcUrl() {
      return jdbcUrl;
  }

  public void setJdbcUrl(String jdbcUrl) {
      this.jdbcUrl = jdbcUrl;
  }

  public String getJdbcPassword() {
      return jdbcPassword;
  }

  public void setJdbcPassword(String jdbcPassword) {
      this.jdbcPassword = jdbcPassword;
  }

  public String getJdbcUsername() {
      return jdbcUsername;
  }

  public void setJdbcUsername(String jdbcUsername) {
      this.jdbcUsername = jdbcUsername;
  }
  }
有了配置类之后,我们可以通过这个配置类构建一个 SqlSessionFactory 了。
SqlSessionFactory 抽象模版package com.paul.mybatis.factory; import com.paul.mybatis.sqlsession.SqlSession; public interface SqlSessionFactory { SqlSession openSession(); }Default 实现类主要完成了两个功能,加载配置信息到 Configuration 对象里,实现创建 SqlSession 的功能。
  package com.paul.mybatis.factory;

  import com.paul.mybatis.confiuration.Configuration;
  import com.paul.mybatis.confiuration.MappedStatement;
  import com.paul.mybatis.sqlsession.DefaultSqlSession;
  import com.paul.mybatis.sqlsession.SqlSession;
  import org.dom4j.Document;
  import org.dom4j.DocumentException;
  import org.dom4j.Element;
  import org.dom4j.io.SAXReader;

  import java.io.File;
  import java.io.IOException;
  import java.io.InputStream;
  import java.net.URL;
  import java.util.ArrayList;
  import java.util.List;
  import java.util.Properties;

  /**
   *
   * 1.初始化时就完成了 configuration 的实例化
   * 2.工厂类,生成 sqlSession
   *
   */
  public class DefaultSqlSessionFactory implements SqlSessionFactory{

      //希望Configuration 是单例子并且唯一的
      private final Configuration configuration = new Configuration();

      // xml 文件存放的位置
      private static final String MAPPER_CONFIG_LOCATION = "mappers";

      // 数据库信息存放的位置
      private static final String DB_CONFIG_FILE = "db.properties";

      public DefaultSqlSessionFactory() {
          loadDBInfo();
          loadMapperInfo();
      }

      private void loadDBInfo() {
          InputStream db = this.getClass().getClassLoader().getResourceAsStream(DB_CONFIG_FILE);
          Properties p = new Properties();

          try {
              p.load(db);
          } catch (IOException e) {
              e.printStackTrace();
          }
          //将配置信息写入Configuration 对象
          configuration.setJdbcDriver(p.get("jdbc.driver").toString());
          configuration.setJdbcUrl(p.get("jdbc.url").toString());
          configuration.setJdbcUsername(p.get("jdbc.username").toString());
          configuration.setJdbcPassword(p.get("jdbc.password").toString());

      }

      //解析并加载xml文件
      private void loadMapperInfo(){
          URL resources = null;
          resources = this.getClass().getClassLoader().getResource(MAPPER_CONFIG_LOCATION);
          File mappers = new File(resources.getFile());
          //读取文件夹下面的文件信息
          if(mappers.isDirectory()){
              File[] files = mappers.listFiles();
              for(File file:files){
                  loadMapperInfo(file);
              }
          }
      }

      private void loadMapperInfo(File file){
          SAXReader reader = new SAXReader();
          //通过read方法读取一个文件转换成Document 对象
          Document document = null;
          try {
              document = reader.read(file);
          } catch (DocumentException e) {
              e.printStackTrace();
          }
          //获取根结点元素对象<mapper>
          Element e = document.getRootElement();
          //获取命名空间namespace
          String namespace = e.attribute("namespace").getData().toString();
          //获取select,insert,update,delete子节点列表
          List<Element> selects = e.elements("select");
          List<Element> inserts = e.elements("select");
          List<Element> updates = e.elements("select");
          List<Element> deletes = e.elements("select");

          List<Element> all = new ArrayList<>();
          all.addAll(selects);
          all.addAll(inserts);
          all.addAll(updates);
          all.addAll(deletes);

          //遍历节点,组装成 MappedStatement 然后放入到configuration 对象中
          for(Element ele:all){
              MappedStatement mappedStatement = new MappedStatement();
              String id = ele.attribute("id").getData().toString();
              String resultType = ele.attribute("resultType").getData().toString();
              String sql = ele.getData().toString();

              mappedStatement.setId(namespace+"."+id);
              mappedStatement.setResultType(resultType);
              mappedStatement.setNamespace(namespace);
              mappedStatement.setSql(sql);

              configuration.getMappedStatement().put(namespace+"."+id,mappedStatement);
          }
      }

      @Override
      public SqlSession openSession() {
          return new DefaultSqlSession(configuration);
      }
  }
在 SqlSessionFactory 里创建了 DefaultSqlSession,我们看看它的具体实现。SqlSession里面应该封装了所有数据库的具体操作和一些获取 mapper 实现类的方法。使用动态代理生成一个加强类。这里面最终还是把数据库的相关操作转给 SqlSession,使用 mapper 能使编程更加优雅。
SqlSession 接口,定义模版方法package com.paul.mybatis.sqlsession; import java.util.List; /** * * 封装了所有数据库的操作 * 所有功能都是基于 Excutor 来实现的,Executor 封装了 JDBC 操作 * * */ public interface SqlSession { /** * 根据传入的条件查询单一结果 * @param statement 方法对应 sql 语句,namespace+id * @param parameter 要传入 sql 语句中的查询参数 * @param <T> 返回指定的结果对象 * @return */ <T> T selectOne(String statement, Object parameter); <T> List<T> selectList(String statement, Object parameter); <T> T getMapper(Class<T> type); }Default 的 SqlSession 实现类。里面需要传入 Executor,这个 Executor 里面封装了 JDBC 操作数据库的流程。我们重点关注 getMapper 方法。
  package com.paul.mybatis.sqlsession;

  import com.paul.mybatis.bind.MapperProxy;
  import com.paul.mybatis.confiuration.Configuration;
  import com.paul.mybatis.confiuration.MappedStatement;
  import com.paul.mybatis.executor.Executor;
  import com.paul.mybatis.executor.SimpleExecutor;

  import java.lang.reflect.Proxy;
  import java.util.List;

  public class DefaultSqlSession implements  SqlSession {

      private final Configuration configuration;

      private Executor executor;

      public DefaultSqlSession(Configuration configuration) {
          super();
          this.configuration = configuration;
          executor = new SimpleExecutor(configuration);
      }

      @Override
      public <T> T selectOne(String statement, Object parameter) {
          List<T> selectList = this.selectList(statement,parameter);
          if(selectList == null || selectList.size() == 0){
              return null;
          }
          if(selectList.size() == 1){
              return (T) selectList.get(0);
          }else{
              throw new RuntimeException("too many result");
          }
      }

      @Override
      public <T> List<T> selectList(String statement, Object parameter) {
          MappedStatement ms = configuration.getMappedStatement().get(statement);
          return executor.query(ms,parameter);
      }

      @Override
      public <T> T getMapper(Class<T> type) {
          MapperProxy mp = new MapperProxy(this);
          //给我一个接口,还你一个实现类
          return (T)Proxy.newProxyInstance(type.getClassLoader(),new Class[]{type},mp);
      }
  }
动态代理的 InvocationHandler。
  package com.paul.mybatis.bind;

  import com.paul.mybatis.sqlsession.SqlSession;

  import java.lang.reflect.InvocationHandler;
  import java.lang.reflect.Method;
  import java.util.Collection;
  import java.util.Collections;

  /**
   *
   * 将请求转发给 sqlSession
   *
   */
  public class MapperProxy implements InvocationHandler {

      private SqlSession sqlSession;

      public MapperProxy(SqlSession sqlSession) {
          this.sqlSession = sqlSession;
      }

      @Override
      public Object invoke(Object proxy, Method method, Object[] args) throws Throwable {
          System.out.println(method.getDeclaringClass().getName()+"."+method.getName());
          if(Collection.class.isAssignableFrom(method.getReturnType())){
              return sqlSession.selectList(method.getDeclaringClass().getName()+"."+method.getName(),args==null?null:args[0]);
          }else{
              return sqlSession.selectOne(method.getDeclaringClass().getName()+"."+method.getName(),args==null?null:args[0]);
          }
      }
  }
最后来看我们的测试类
 package com.paul.mybatis;

 import com.paul.mybatis.entity.TUser;
 import com.paul.mybatis.factory.DefaultSqlSessionFactory;
 import com.paul.mybatis.factory.SqlSessionFactory;
 import com.paul.mybatis.mapper.TUserMapper;
 import com.paul.mybatis.sqlsession.SqlSession;

 public class TestDemo {

     public static void main(String[] args) {
         SqlSessionFactory sqlSessionFactory = new DefaultSqlSessionFactory();

         SqlSession sqlSession = sqlSessionFactory.openSession();

         TUserMapper mapper = sqlSession.getMapper(TUserMapper.class);

         TUser user = mapper.selectByPrimaryKey(1);

         System.out.println(user.toString());
     }
 }
整个项目的源码在项目源码,如果你觉得或多或少对你有些帮助,希望大家 在github 上 star 一下,大家一起改进。
MyBatis 源码分析的更多相关文章
- MyBatis源码分析-MyBatis初始化流程
MyBatis 是支持定制化 SQL.存储过程以及高级映射的优秀的持久层框架.MyBatis 避免了几乎所有的 JDBC 代码和手动设置参数以及获取结果集.MyBatis 可以对配置和原生Map使用简 ...
- MyBatis源码分析-SQL语句执行的完整流程
MyBatis 是支持定制化 SQL.存储过程以及高级映射的优秀的持久层框架.MyBatis 避免了几乎所有的 JDBC 代码和手动设置参数以及获取结果集.MyBatis 可以对配置和原生Map使用简 ...
- MyBatis源码分析(5)——内置DataSource实现
@(MyBatis)[DataSource] MyBatis源码分析(5)--内置DataSource实现 MyBatis内置了两个DataSource的实现:UnpooledDataSource,该 ...
- MyBatis源码分析(4)—— Cache构建以及应用
@(MyBatis)[Cache] MyBatis源码分析--Cache构建以及应用 SqlSession使用缓存流程 如果开启了二级缓存,而Executor会使用CachingExecutor来装饰 ...
- MyBatis源码分析(3)—— Cache接口以及实现
@(MyBatis)[Cache] MyBatis源码分析--Cache接口以及实现 Cache接口 MyBatis中的Cache以SPI实现,给需要集成其它Cache或者自定义Cache提供了接口. ...
- MyBatis源码分析(2)—— Plugin原理
@(MyBatis)[Plugin] MyBatis源码分析--Plugin原理 Plugin原理 Plugin的实现采用了Java的动态代理,应用了责任链设计模式 InterceptorChain ...
- 【MyBatis源码分析】select源码分析及小结
示例代码 之前的文章说过,对于MyBatis来说insert.update.delete是一组的,因为对于MyBatis来说它们都是update:select是一组的,因为对于MyBatis来说它就是 ...
- MyBatis源码分析之环境准备篇
前言 之前一段时间写了[Spring源码分析]系列的文章,感觉对Spring的原理及使用各方面都掌握了不少,趁热打铁,开始下一个系列的文章[MyBatis源码分析],在[MyBatis源码分析]文章的 ...
- Mybatis源码分析-BaseExecutor
根据前文Mybatis源码分析-SqlSessionTemplate的简单分析,对于SqlSession的CURD操作都需要经过Executor接口的update/query方法,本文将分析下Base ...
- Mybatis源码分析-StatementHandler
承接前文Mybatis源码分析-BaseExecutor,本文则对通过StatementHandler接口完成数据库的CRUD操作作简单的分析 StatementHandler#接口列表 //获取St ...
随机推荐
- Java实现查找二叉树&C++的做法
写了个Java的查找二叉树,用递归做的,不用递归的还没弄出来.先贴一下.回头再研究. BTreeTest.java: public class BTreeTest{ class Node{ Node ...
- 将 WPF、UWP 以及其他各种类型的旧 csproj 迁移成基于 Microsoft.NET.Sdk 的新 csproj
原文 将 WPF.UWP 以及其他各种类型的旧 csproj 迁移成基于 Microsoft.NET.Sdk 的新 csproj 写过 .NET Standard 类库或者 .NET Core 程序的 ...
- uwp - 做一个相对炫酷的动画按钮/按钮动画
原文:uwp - 做一个相对炫酷的动画按钮/按钮动画 看腻了系统自带的button animation何不尝试下自定义一个较为炫酷的动画顺便提升用户体验.效果图: 动画分为几个部分,分别是:内圆从中心 ...
- ASP.NET Core Razor 编辑表单 - ASP.NET Core 基础教程 - 简单教程,简单编程
原文:ASP.NET Core Razor 编辑表单 - ASP.NET Core 基础教程 - 简单教程,简单编程 ASP.NET Core Razor 编辑表单 上一章节我们介绍了标签助手和 HT ...
- java堆 (转)
Java栈和堆 ----这两个概念未知很长一段时间,终于找到了一个很好的文本.使用和共享 1. 堆(stack)堆(heap)他们是Java使用Ram本地存储的数据. 与C++不同,Java主动管理 ...
- N+1:创新点的设计
定义.公式.模型.算法的提出: 0. 如何进行抽象,如何定义数学表达式 二次衰减函数: f(z)=1z2 ⇒ f(z)=11+z2 噪声衰减因子: 对值域的要求,单调性的要求,必须是可调的: 2n1+ ...
- HDOJ 2189 悼念512四川汶川大地震遇难者——来生一起走 【生成函数】
意甲冠军:没有解释的很清楚. 策略:如果, 这是改变一个简单的生成函数. 这道题做了好久,才明确是那有毛病.还是理解的不够深刻. AC代码: #include<stdio.h> #incl ...
- Entity framework 更改模型,新增表
在Package Manager Console 中运行命令Enable-Migrations 再次运行可以更新 抄袭 在实体类中增加一个属性以后,执行 Update-Database 命令 ,可以更 ...
- 潜移默化学会WPF(转载篇)--屏幕显示Label,鼠标移上去变成textBox
原文:潜移默化学会WPF(转载篇)--屏幕显示Label,鼠标移上去变成textBox <Window x:Class="WpfApplication1.Window1" x ...
- ASP .NET DropDownList多级联动事件
思路 假如有三级省.市.区,先加载出所有省选择省之后,加载出该省所有市选择市之后,加载出该市所有区重新选择省,则清空市和区重新选择市,则清空区想好数据结构,不同的数据结构做法不同 例子 数据结构 pu ...
