Flink源码分析 - 剖析一个简单的Flink程序
本篇文章首发于头条号Flink程序是如何执行的?通过源码来剖析一个简单的Flink程序,欢迎关注头条号和微信公众号“大数据技术和人工智能”(微信搜索bigdata_ai_tech)获取更多干货,也欢迎关注我的CSDN博客。
在这之前已经介绍了如何在本地搭建Flink环境和如何创建Flink应用和如何构建Flink源码,这篇文章用官方提供的SocketWindowWordCount例子来解析一下一个常规Flink程序的每一个基本步骤。
示例程序
public class SocketWindowWordCount {public static void main(String[] args) throws Exception {// the host and the port to connect tofinal String hostname;final int port;try {final ParameterTool params = ParameterTool.fromArgs(args);hostname = params.has("hostname") ? params.get("hostname") : "localhost";port = params.getInt("port");} catch (Exception e) {System.err.println("No port specified. Please run 'SocketWindowWordCount " +"--hostname <hostname> --port <port>', where hostname (localhost by default) " +"and port is the address of the text server");System.err.println("To start a simple text server, run 'netcat -l <port>' and " +"type the input text into the command line");return;}// get the execution environmentfinal StreamExecutionEnvironment env = StreamExecutionEnvironment.getExecutionEnvironment();// get input data by connecting to the socketDataStream<String> text = env.socketTextStream(hostname, port, "\n");// parse the data, group it, window it, and aggregate the countsDataStream<WordWithCount> windowCounts = text.flatMap(new FlatMapFunction<String, WordWithCount>() {@Overridepublic void flatMap(String value, Collector<WordWithCount> out) {for (String word : value.split("\\s")) {out.collect(new WordWithCount(word, 1L));}}}).keyBy("word").timeWindow(Time.seconds(5)).reduce(new ReduceFunction<WordWithCount>() {@Overridepublic WordWithCount reduce(WordWithCount a, WordWithCount b) {return new WordWithCount(a.word, a.count + b.count);}});// print the results with a single thread, rather than in parallelwindowCounts.print().setParallelism(1);env.execute("Socket Window WordCount");}// ------------------------------------------------------------------------/*** Data type for words with count.*/public static class WordWithCount {public String word;public long count;public WordWithCount() {}public WordWithCount(String word, long count) {this.word = word;this.count = count;}@Overridepublic String toString() {return word + " : " + count;}}}
上面这个是官网的SocketWindowWordCount程序示例,它首先从命令行中获取socket连接的host和port,然后获取执行环境、从socket连接中读取数据、解析和转换数据,最后输出结果数据。
每个Flink程序都包含以下几个相同的基本部分:
- 获得一个execution environment,
- 加载/创建初始数据,
- 指定此数据的转换,
- 指定放置计算结果的位置,
- 触发程序执行
Flink执行环境
final StreamExecutionEnvironment env = StreamExecutionEnvironment.getExecutionEnvironment();
Flink程序都是从这句代码开始,这行代码会返回一个执行环境,表示当前执行程序的上下文。如果程序是独立调用的,则此方法返回一个由createLocalEnvironment()创建的本地执行环境LocalStreamEnvironment。从其源码里可以看出来:
//代码目录:org/apache/flink/streaming/api/environment/StreamExecutionEnvironment.javapublic static StreamExecutionEnvironment getExecutionEnvironment() {if (contextEnvironmentFactory != null) {return contextEnvironmentFactory.createExecutionEnvironment();}ExecutionEnvironment env = ExecutionEnvironment.getExecutionEnvironment();if (env instanceof ContextEnvironment) {return new StreamContextEnvironment((ContextEnvironment) env);} else if (env instanceof OptimizerPlanEnvironment || env instanceof PreviewPlanEnvironment) {return new StreamPlanEnvironment(env);} else {return createLocalEnvironment();}}
获取输入数据
DataStream<String> text = env.socketTextStream(hostname, port, "\n");
这个例子里的源数据来自于socket,这里会根据指定的socket配置创建socket连接,然后创建一个新数据流,包含从套接字无限接收的字符串,接收的字符串由系统的默认字符集解码。当socket连接关闭时,数据读取会立即终止。通过查看源码可以发现,这里实际上是通过指定的socket配置来构造一个SocketTextStreamFunction实例,然后源源不断的从socket连接里读取输入的数据创建数据流。
//代码目录:org/apache/flink/streaming/api/environment/StreamExecutionEnvironment.java@PublicEvolvingpublic DataStreamSource<String> socketTextStream(String hostname, int port, String delimiter, long maxRetry) {return addSource(new SocketTextStreamFunction(hostname, port, delimiter, maxRetry),"Socket Stream");}
SocketTextStreamFunction的类继承关系如下:
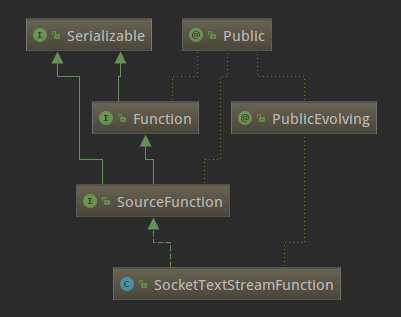
可以看出SocketTextStreamFunction是SourceFunction的子类,SourceFunction是Flink中所有流数据源的基本接口。SourceFunction的定义如下:
//代码目录:org/apache/flink/streaming/api/functions/source/SourceFunction.java@Publicpublic interface SourceFunction<T> extends Function, Serializable {void run(SourceContext<T> ctx) throws Exception;void cancel();@Publicinterface SourceContext<T> {void collect(T element);@PublicEvolvingvoid collectWithTimestamp(T element, long timestamp);@PublicEvolvingvoid emitWatermark(Watermark mark);@PublicEvolvingvoid markAsTemporarilyIdle();Object getCheckpointLock();void close();}}
SourceFunction定义了run和cancel两个方法和SourceContext内部接口。
- run(SourceContex):实现数据获取逻辑,并可以通过传入的参数ctx进行向下游节点的数据转发。
- cancel():用来取消数据源,一般在run方法中,会存在一个循环来持续产生数据,cancel方法则可以使该循环终止。
- SourceContext:source函数用于发出元素和可能的watermark的接口,返回source生成的元素的类型。
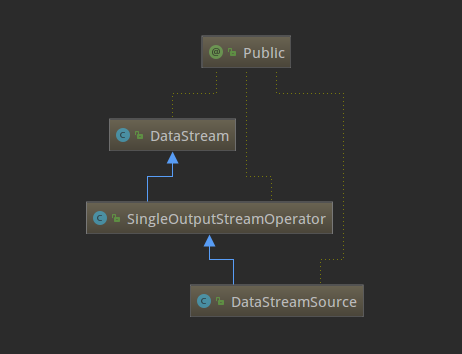
了解了SourceFunction这个接口,再来看下SocketTextStreamFunction的具体实现(主要是run方法),逻辑就已经很清晰了,就是从指定的hostname和port持续不断的读取数据,按回车换行分隔符划分成一个个字符串,然后再将数据转发到下游。现在回到StreamExecutionEnvironment的socketTextStream方法,它通过调用addSource返回一个DataStreamSource实例。思考一下,例子里的text变量是DataStream类型,为什么源码里的返回类型却是DataStreamSource呢?这是因为DataStream是DataStreamSource的父类,下面的类关系图可以看出来,这也体现出了Java的多态的特性。
数据流操作
对上面取到的DataStreamSource,进行flatMap、keyBy、timeWindow、reduce转换操作。
DataStream<WordWithCount> windowCounts = text.flatMap(new FlatMapFunction<String, WordWithCount>() {@Overridepublic void flatMap(String value, Collector<WordWithCount> out) {for (String word : value.split("\\s")) {out.collect(new WordWithCount(word, 1L));}}}).keyBy("word").timeWindow(Time.seconds(5)).reduce(new ReduceFunction<WordWithCount>() {@Overridepublic WordWithCount reduce(WordWithCount a, WordWithCount b) {return new WordWithCount(a.word, a.count + b.count);}});
这段逻辑中,对上面取到的DataStreamSource数据流分别做了flatMap、keyBy、timeWindow、reduce四个转换操作,下面说一下flatMap转换,其他三个转换操作读者可以试着自己查看源码理解一下。
先看一下flatMap方法的源码吧,如下。
//代码目录:org/apache/flink/streaming/api/datastream/DataStream.javapublic <R> SingleOutputStreamOperator<R> flatMap(FlatMapFunction<T, R> flatMapper) {TypeInformation<R> outType = TypeExtractor.getFlatMapReturnTypes(clean(flatMapper),getType(), Utils.getCallLocationName(), true);return transform("Flat Map", outType, new StreamFlatMap<>(clean(flatMapper)));}
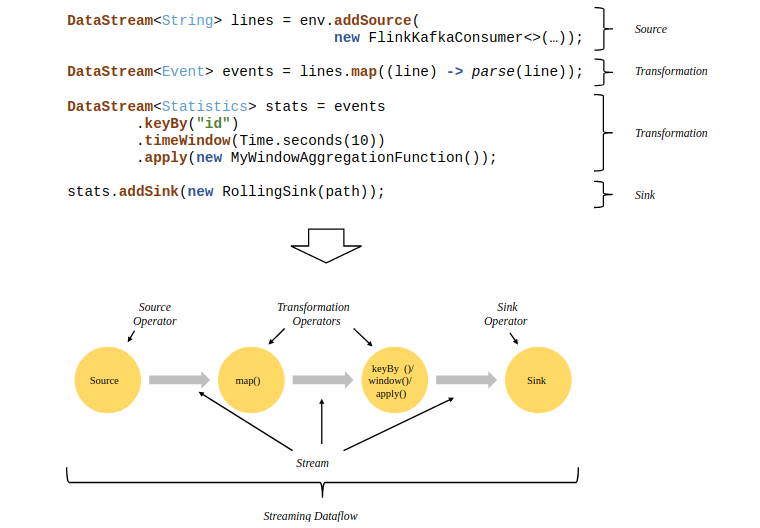
这里面做了两件事,一是用反射拿到了flatMap算子的输出类型,二是生成了一个operator。flink流式计算的核心概念就是将数据从输入流一个个传递给operator进行链式处理,最后交给输出流的过程。对数据的每一次处理在逻辑上成为一个operator。上面代码中的最后一行transform方法的作用是返回一个SingleOutputStreamOperator,它继承了Datastream类并且定义了一些辅助方法,方便对流的操作。在返回之前,transform方法还把它注册到了执行环境中。下面这张图是一个由Flink程序映射为Streaming Dataflow的示意图:
结果输出
windowCounts.print().setParallelism(1);
每个Flink程序都是以source开始以sink结尾,这里的print方法就是把计算出来的结果sink标准输出流。在实际开发中,一般会通过官网提供的各种Connectors或者自定义的Connectors把计算好的结果数据sink到指定的地方,比如Kafka、HBase、FileSystem、Elasticsearch等等。这里的setParallelism是设置此接收器的并行度的,值必须大于零。
执行程序
env.execute("Socket Window WordCount");
Flink有远程模式和本地模式两种执行模式,这两种模式有一点不同,这里按本地模式来解析。先看下execute方法的源码,如下:
//代码目录:org/apache/flink/streaming/api/environment/LocalStreamEnvironment.java@Overridepublic JobExecutionResult execute(String jobName) throws Exception {// transform the streaming program into a JobGraphStreamGraph streamGraph = getStreamGraph();streamGraph.setJobName(jobName);JobGraph jobGraph = streamGraph.getJobGraph();jobGraph.setAllowQueuedScheduling(true);Configuration configuration = new Configuration();configuration.addAll(jobGraph.getJobConfiguration());configuration.setString(TaskManagerOptions.MANAGED_MEMORY_SIZE, "0");// add (and override) the settings with what the user definedconfiguration.addAll(this.configuration);if (!configuration.contains(RestOptions.BIND_PORT)) {configuration.setString(RestOptions.BIND_PORT, "0");}int numSlotsPerTaskManager = configuration.getInteger(TaskManagerOptions.NUM_TASK_SLOTS, jobGraph.getMaximumParallelism());MiniClusterConfiguration cfg = new MiniClusterConfiguration.Builder().setConfiguration(configuration).setNumSlotsPerTaskManager(numSlotsPerTaskManager).build();if (LOG.isInfoEnabled()) {LOG.info("Running job on local embedded Flink mini cluster");}MiniCluster miniCluster = new MiniCluster(cfg);try {miniCluster.start();configuration.setInteger(RestOptions.PORT, miniCluster.getRestAddress().get().getPort());return miniCluster.executeJobBlocking(jobGraph);}finally {transformations.clear();miniCluster.close();}}
这个方法包含三部分:将流程序转换为JobGraph、使用用户定义的内容添加(或覆盖)设置、启动一个miniCluster并执行任务。关于JobGraph暂先不讲,这里就只说一下执行任务,跟进下return miniCluster.executeJobBlocking(jobGraph);这行的源码,如下:
//代码目录:org/apache/flink/runtime/minicluster/MiniCluster.java@Overridepublic JobExecutionResult executeJobBlocking(JobGraph job) throws JobExecutionException, InterruptedException {checkNotNull(job, "job is null");final CompletableFuture<JobSubmissionResult> submissionFuture = submitJob(job);final CompletableFuture<JobResult> jobResultFuture = submissionFuture.thenCompose((JobSubmissionResult ignored) -> requestJobResult(job.getJobID()));final JobResult jobResult;try {jobResult = jobResultFuture.get();} catch (ExecutionException e) {throw new JobExecutionException(job.getJobID(), "Could not retrieve JobResult.", ExceptionUtils.stripExecutionException(e);}try {return jobResult.toJobExecutionResult(Thread.currentThread().getContextClassLoader());} catch (IOException | ClassNotFoundException e) {throw new JobExecutionException(job.getJobID(), e);}}
这段代码的核心逻辑就是final CompletableFuture<JobSubmissionResult> submissionFuture = submitJob(job);,调用了MiniCluster类的submitJob方法,接着看这个方法:
//代码目录:org/apache/flink/runtime/minicluster/MiniCluster.javapublic CompletableFuture<JobSubmissionResult> submitJob(JobGraph jobGraph) {final CompletableFuture<DispatcherGateway> dispatcherGatewayFuture = getDispatcherGatewayFuture();// we have to allow queued scheduling in Flip-6 mode because we need to request slots// from the ResourceManagerjobGraph.setAllowQueuedScheduling(true);final CompletableFuture<InetSocketAddress> blobServerAddressFuture = createBlobServerAddress(dispatcherGatewayFuture);final CompletableFuture<Void> jarUploadFuture = uploadAndSetJobFiles(blobServerAddressFuture, jobGraph);final CompletableFuture<Acknowledge> acknowledgeCompletableFuture = jarUploadFuture.thenCombine(dispatcherGatewayFuture,(Void ack, DispatcherGateway dispatcherGateway) -> dispatcherGateway.submitJob(jobGraph, rpcTimeout)).thenCompose(Function.identity());return acknowledgeCompletableFuture.thenApply((Acknowledge ignored) -> new JobSubmissionResult(jobGraph.getJobID()));}
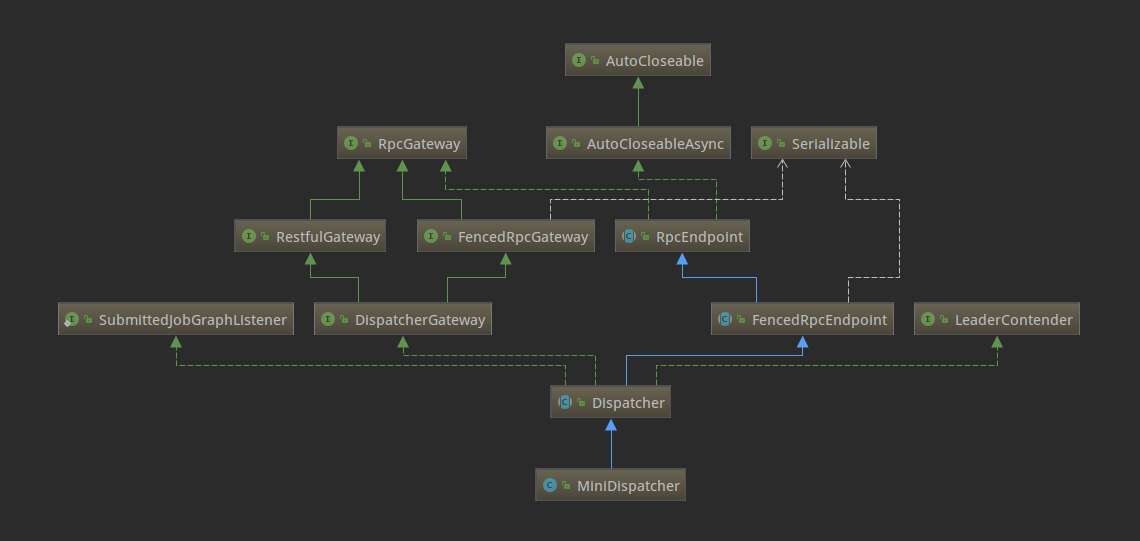
这里的Dispatcher组件负责接收作业提交,持久化它们,生成JobManagers来执行作业并在主机故障时恢复它们。Dispatcher有两个实现,在本地环境下启动的是MiniDispatcher,在集群环境上启动的是StandaloneDispatcher。下面是类结构图:
这里的Dispatcher启动了一个JobManagerRunner,委托JobManagerRunner去启动该Job的JobMaster。对应的代码如下:
//代码目录:org/apache/flink/runtime/jobmaster/JobManagerRunner.javaprivate CompletableFuture<Void> verifyJobSchedulingStatusAndStartJobManager(UUID leaderSessionId) {final CompletableFuture<JobSchedulingStatus> jobSchedulingStatusFuture = getJobSchedulingStatus();return jobSchedulingStatusFuture.thenCompose(jobSchedulingStatus -> {if (jobSchedulingStatus == JobSchedulingStatus.DONE) {return jobAlreadyDone();} else {return startJobMaster(leaderSessionId);}});}
JobMaster经过一系列方法嵌套调用之后,最终执行到下面这段逻辑:
//代码目录:org/apache/flink/runtime/jobmaster/JobMaster.javaprivate void scheduleExecutionGraph() {checkState(jobStatusListener == null);// register self as job status change listenerjobStatusListener = new JobManagerJobStatusListener();executionGraph.registerJobStatusListener(jobStatusListener);try {executionGraph.scheduleForExecution();}catch (Throwable t) {executionGraph.failGlobal(t);}}
这里executionGraph.scheduleForExecution();调用了ExecutionGraph的启动方法。在Flink的图结构中,ExecutionGraph是真正被执行的地方,所以到这里为止,一个任务从提交到真正执行的流程就结束了,下面再回顾一下本地环境下的执行流程:
- 客户端执行
execute方法; MiniCluster完成了大部分任务后把任务直接委派给MiniDispatcher;Dispatcher接收job之后,会实例化一个JobManagerRunner,然后用这个实例启动job;JobManagerRunner接下来把job交给JobMaster去处理;JobMaster使用ExecutionGraph的方法启动整个执行图,整个任务就启动起来了。
Flink源码分析 - 剖析一个简单的Flink程序的更多相关文章
- [源码分析] 从FlatMap用法到Flink的内部实现
[源码分析] 从FlatMap用法到Flink的内部实现 0x00 摘要 本文将从FlatMap概念和如何使用开始入手,深入到Flink是如何实现FlatMap.希望能让大家对这个概念有更深入的理解. ...
- Flink源码分析 - 源码构建
原文地址:https://mp.weixin.qq.com/s?__biz=MzU2Njg5Nzk0NQ==&mid=2247483692&idx=1&sn=18cddc1ee ...
- JVM源码分析之一个Java进程究竟能创建多少线程
JVM源码分析之一个Java进程究竟能创建多少线程 原创: 寒泉子 你假笨 2016-12-06 概述 虽然这篇文章的标题打着JVM源码分析的旗号,不过本文不仅仅从JVM源码角度来分析,更多的来自于L ...
- 自己根据java的LinkedList源码编写的一个简单的LinkedList实现
自己实现了一个简单的LinkedList /** * Create by andy on 2018-07-03 11:44 * 根据 {@link java.util.LinkedList}源码 写了 ...
- 精尽Spring Boot源码分析 - 剖析 @SpringBootApplication 注解
该系列文章是笔者在学习 Spring Boot 过程中总结下来的,里面涉及到相关源码,可能对读者不太友好,请结合我的源码注释 Spring Boot 源码分析 GitHub 地址 进行阅读 Sprin ...
- Flink源码分析
http://vinoyang.com/ http://wuchong.me Apache Flink源码解析之stream-source https://yq.aliyun.com/articles ...
- 容器_JDK源码分析_自己简单实现ArrayList容器
这几天仔细研究下关于ArrayList容器的jdk源码,感觉收获颇多,以前自己只知道用它,但它里面具体是怎样实现的就完全不清楚了.于是自己尝试模拟写下java的ArrayList容器,简单了实现的Ar ...
- WorkerMan源码分析 - 实现最简单的原型
之前一直认为workerman源码理解起很复杂,这段时间花了3个下午研究,其实只要理解 php如何守护化进程.信号.多进程.libevent扩展使用,对于如何实现就比较轻松了. 相关代码都在githu ...
- go源码分析(一) 通过调试看go程序初始化过程
参考资料:Go 1.5 源码剖析 (书签版).pdf 编写go语言test.go package main import ( "fmt" ) func main(){ fmt.Pr ...
随机推荐
- Linux下SQL Server安装及数据库迁移
有客户使用Linux服务器,SQL Server从2017开始已支持Linux,从未用过,今天测试了一下,比较简单,记录一下. Linux:CentOS 7.0 首先更新源: curl -o /etc ...
- 全新思维导图 XMind ZEN v10.0.0 中文破解版
http://www.carrotchou.blog/20331.html 官网 https://www.xmind.cn/ 注意事项 破解版本已经去除了全部的官方试用版的限制,让大家可以像正版用户一 ...
- Java学习-057-Jsoup爬虫获取中国所有的三级行政区划数据(二),并生成数据库 SQL 脚本插入语句
多不废话,直接上马,小主您稳着... package com.fanfengping.zeus.uitl; import com.alibaba.fastjson.JSONObject; import ...
- 最常见的Java面试题及答案汇总(六)
异常 74. throw 和 throws 的区别? throws是用来声明一个方法可能抛出的所有异常信息,throws是将异常声明但是不处理,而是将异常往上传,谁调用我就交给谁处理.而throw则是 ...
- 解决org.springframework.dao.DeadlockLoserDataAccessException
添加链接池后批量添加更新出现了死锁 org.springframework.dao.DeadlockLoserDataAccessException: ### Error updating datab ...
- 20 SSM三大框架的整合
1.SSM整合的相关概念 (1)整合说明:SSM整合可以使用多种方式,优先使用XML + 注解的方式(2)整合的思路 1.先搭建整合的环境 2.先把Spring的配置搭建完成 3.再使用Spring整 ...
- nginx+upsync+consul 构建动态nginx配置系统
参考: http://www.php230.com/weixin1456193048.html [upsync模块说明.性能评测] https://www.jianshu.com/p/76352ef ...
- was unable to refresh its cache! status = Cannot execute request on any known server
出现这种错误是因为: Eureka服务注册中心也会将自己作为客户端来尝试注册它自己,所以我们需要禁用它的客户端注册行为. 在 yml中设置 eureka.client.register-with-eu ...
- C++中const限定符
const基础 C++中的const,用于定义一个常量,这个常量的值不能被修改.因为const对象一旦创建就不能修改,所以const对象必须初始化.const常量特征仅仅在执行改变其本身的操作时才会发 ...
- DRF框架(六)——三大认证组件之认证组件、权限组件
drf认证组件 用户信息表 from django.db import models from django.contrib.auth.models import AbstractUser class ...