In Depth : Android Boot Sequence / Process
In Depth : Android Boot Sequence / Process
What is Android boot sequence ?
What is linux kernel ?
What is different between desktop linux kernel and Android linux kernel ?
What is bootloader ?
What is Zygote ?
What is x86 and ARM linux ?
What is init.rc ?
What is System Server ?
Many questions pop-up in mind when we think about Android boot sequence.
 |
| Android Boot Sequence / Process |
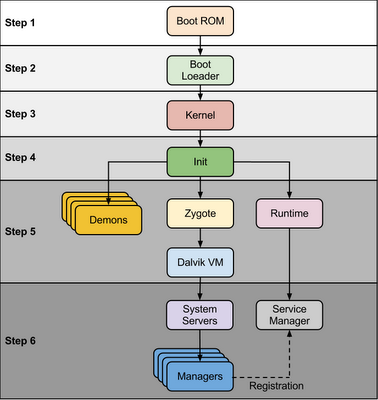
When power start Boot ROM code start execution from pre defined location which is hardwired on ROM. It load Bootloader into RAM and start execution
Step 2 : Bootloader
Bootloader is small program which runs before Android operating system running. Bootloader is first program to run so It is specific for board and processor. Device manufacturer either use popular bootloaders like redboot,uboot, qi bootloader or they develop own bootloaders, It’s not part of Android Operating System. bootloader is the place where OEMs and Carriers put there locks and restrictions.
Bootloader perform execution in two stages, first stage It to detect external RAM and load program which helps in second stage, In second stage bootloader setup network, memory, etc. which requires to run kernel, bootloader is able to provide configuration parameters or inputs to the kernel for specific purpose.
Android bootloader can be found at
2. main.c - Initializes hardware (clocks, board, keypad, console), creates Linux tags
Refer this link to know more about Android bootloader :
https://motorola-global-portal.custhelp.com/app/answers/detail/a_id/86208/~/bootloader-frequently-asked-questions
Step 3: Kernel
Android kernel start similar way as desktop linux kernel starts, as kernel launch it start setup cache, protected memory, scheduling, loads drivers. When kernel finish system setup first thing it look for “init” in system files and launch root process or first process of system.
Step 4: init process
init it very first process, we can say it is root process or grandmother of all processes. init process has two responsibilities 1. mount directories like /sys, /dev, /proc and 2. run init.rc script.
- init process can be found at init : <android source>/system/core/init
- init.rc file can be found in source tree at <android source>/system/core/rootdir/init.rc
- readme.txtfile can be found in source tree at <andorid source>/system/core/init/readme.txt
Android has specific format and rules for init.rc files. In Android we call it as “Android Init Language”
The Android Init Language consists of four broad classes of statements,which are Actions, Commands, Services, and Options.
Action : Actions are named sequences of commands. Actions have a trigger which is used to determine when the action should occur.
Syntax
on <trigger>
<command>
<command>
<command>
Service : Services are programs which init launches and (optionally) restarts when they exit. Syntax
service <name> <pathname> [ <argument> ]*
<option>
<option>
...
Options : Options are modifiers to services. They affect how and when init runs the service.
Let’s take a look of default init.rc file. Here I have listed only major events and services.
| Action / Service | Description |
| on early-init | Set init and its forked children's oom_adj. Set the security context for the init process. |
| on init | setup the global environment Create cgroup mount point for cpu accounting and many |
| on fs | mount mtd partitions |
| on post-fs | change permissions of system directories |
| on post-fs-data | change permission of /data folders and sub folders |
| on boot | basic network init ,Memory Management ,etc |
| service servicemanager | start system manager to manage all native services like location, audio, shared preference etc.. |
| service zygote | start zygote as app_process |
At this stage you can see “Android” logo on device screen.
Step 5: Zygote and Dalvik
1. Load ZygoteInit class,
Source Code :<Android Source> /frameworks/base/core/java/com/android/internal/os/ZygoteInit.java
2. registerZygoteSocket() - Registers a server socket for zygote command connections
3. preloadClasses() - “preloaded-classes” is simple text file contains list of classes that need to be preloaded, you cna find “preloaded-classes” file at <Android Source>/frameworks/base
4. preloadResources() - preloadReaources means native themes and layouts, everything that include android.R file will be load using this method.
Step 6: System Service or Services
Other services
Step 7 : Boot Completed
Once System Services up and running in memory, Android has completed booting process, At this time “ACTION_BOOT_COMPLETED” standard broadcast action will fire.
In Depth : Android Boot Sequence / Process的更多相关文章
- In Depth : Android Shutdown Sequence
What happened when I long press power button ?What is shutdown sequence ?How is it different from de ...
- Android Stduio 发生 Process 'command 'somePath:java.exe'' finished with non-zero exit value 2 异常的解决办法
有时你会发现,在你使用Android Studio 进行编译的时候提示: Error:Execution failed for task ':demo:dexDebug'.> com.andro ...
- com.android.ide.common.process.ProcessException: org.gradle.process.internal.ExecException: Process 'command ' finished with non-zero exit value 1
Error:Execution failed for task ':lenovoAlbum:processReleaseResources'. > com.android.ide.common. ...
- Error:Execution failed for task ':app:dexDebug'. > com.android.ide.common.process.ProcessException
异常Log: Error:Execution failed for task ‘:app:dexDebug’. > com.android.ide.common.process.ProcessE ...
- Error:Execution failed for task ':app:dexDebug'. > com.android.ide.common.process.ProcessException
异常Log: Error:Execution failed for task ':app:dexDebug'. > com.android.ide.common.process.ProcessE ...
- ionic 打包 报错Execution failed for task ':processDebugResources'. > com.android.ide.common.process.ProcessException: Failed to execute aapt
在platform --> android目录下找到build.gradle文件,打开并在def promptForReleaseKeyPassword() {...}函数前加入以下内容: 完整 ...
- java.util.concurrent.ExecutionException: com.android.ide.common.process.ProcessException 的解决办法之一
在查看别人的代码的时候,遇到了把工程导入到 Android Studio ,报:ExecutionException: com.android.ide.common.process.ProcessEx ...
- om.android.ide.common.process.ProcessException: org.gradle.process.internal.ExecException
Error:Execution failed for task ':app:dexDebug'.> com.android.ide.common.process.ProcessException ...
- 高德地图Demo运行报错 com.android.ide.common.process.ProcessException: Failed to execute aapt
最近由于有需求去做导航方面的Android开发,很是无奈,以前也的确是没有搞过,领导开大会当着所有人的面说这是给我分配的第一个工作,无论如何要做好,突然间感觉压力好大,自己已经多年没有敲过代码,而且A ...
随机推荐
- FreeImage裁剪示例
//截图 int cropImage(const char* file, int left, int top, int right, int bottom, BYTE* &dstData, D ...
- oracle 使用基本问题
Oracle服务端口号:1521Database Control URL : http://XXX:1158/em oracle主目录:X:\oracle\product\10.2.0\db_1/** ...
- VLC客户端和SDK的简单应用
VLC_SDK编程指南 VLC 是一款自由.开源的跨平台多媒体播放器及框架,可播放大多数多媒体文件,以及 DVD.音频 CD.VCD 及各类流媒体协议.它可以支持目前市面上大多数的视频解码,除了Rea ...
- Eloquent ORM 之关联查询
小伙伴们好,本文是在我的前一篇随笔的基础上完成的,还没有浏览的同学,请移尊驾哦 Eloquent ORM学习笔记. 前一篇文章用到了leftJoin方法,其实Eloquent对于模块之间的关联查询有自 ...
- java性能优化技巧
在JAVA程序中,性能问题的大部分原因并不在于JAVA语言,而是程序本身.养成良好的编码习惯非常重要,能够显著地提升程序性能. 1. 尽量使用final修饰符. 带有final修饰符的类是不可派生的. ...
- 计算两点间的距离,hdu-2001
计算两点间的距离 Problem Description 输入两点坐标(X1,Y1),(X2,Y2),计算并输出两点间的距离. Input 输入数据有多组,每组占一行,由4个实数组成,分别表示x1 ...
- TensorFlow深度学习笔记 文本与序列的深度模型
Deep Models for Text and Sequence 转载请注明作者:梦里风林 Github工程地址:https://github.com/ahangchen/GDLnotes 欢迎st ...
- Oracle EBS-SQL (QA-1):检查超出检验周期的检验数据.sql
select msi.segment1 物料编码, msi.DESCRIPTION ...
- Oracle EBS-SQL (BOM-16):检查多层BOM.sql
select rownum seq_num, lpad(to_char(level), decode(level, 1, 1, level + 1), '.') bom_level, bbm.ASSE ...
- USB device & USB controller & USB passthrough
目录 USB device USB controller Linux 相关命令 Python 相关库 Libvirt USB passthrough 参考资料 近期往 openstack 里倒腾 US ...