初探element+vue+vue-router
基本步骤先准备好
 npm install -g vue-cli

npm init webpack

cnpm i element-ui -S
修改/src/main.js
// The Vue build version to load with the `import` command

// (runtime-only or standalone) has been set in webpack.base.conf with an alias.

import Vue from 'vue'

import App from './App'

import router from './router'

import ElementUI from '_element-ui@2.10.1@element-ui'

import 'element-ui/lib/theme-chalk/index.css'

Vue.config.productionTip = false

Vue.use(ElementUI)

/* eslint-disable no-new */

new Vue({

  el: '#app',

  router,

  components: { App },

  template: '<App/>'

})
修改App.vue
<template>

  <div id="app">

    <el-container>

      <el-header>Header</el-header>

      <el-container>

        <el-aside width="200px">Aside</el-aside>

        <el-main>Main</el-main>

      </el-container>

    </el-container>

  </div>

</template>

<script>

export default {

  name: 'App'

}

</script>

<style>

#app {

  font-family: 'Avenir', Helvetica, Arial, sans-serif;

  -webkit-font-smoothing: antialiased;

  -moz-osx-font-smoothing: grayscale;

  text-align: center;

  color: #2c3e50;

  margin-top: 60px;

}

</style>
安装侧边菜单栏
//NavMenu

<template>

    <div>

        <el-row class="tac">

            <el-col :span="24">

                <el-menu default-active="2" class="el-menu-vertical-demo" @open="handleOpen" @close="handleClose"

                unique-opened

                router

                background-color="#545c64" text-color="#fff" active-text-color="#ffd04b">

                    <el-submenu index="1">

                    <template slot="title">

                        <i class="el-icon-location"></i>

                        <span>导航一</span>

                    </template>

                    <el-menu-item-group>

                        <el-menu-item index="1-1">选项1</el-menu-item>

                        <el-menu-item index="1-2">选项2</el-menu-item>

                        <el-menu-item index="1-3">选项3</el-menu-item>

                        <el-menu-item index="1-4">选项4</el-menu-item>

                    </el-menu-item-group>

                    </el-submenu>

                    <el-submenu index="2">

                    <template slot="title">

                        <i class="el-icon-location"></i>

                        <span>导航二</span>

                    </template>

                    <el-menu-item-group>

                        <el-menu-item index="2-1">选项1</el-menu-item>

                        <el-menu-item index="2-2">选项2</el-menu-item>

                        <el-menu-item index="2-3">选项3</el-menu-item>

                        <el-menu-item index="2-4">选项4</el-menu-item>

                    </el-menu-item-group>

                    </el-submenu>

                </el-menu>

            </el-col>

    </el-row>

    </div>

</template>

<script>

export default {

  methods: {

    handleOpen (key, keyPath) {

      console.log(key, keyPath)

    },

    handleClose (key, keyPath) {

      console.log(key, keyPath)

    }

  }

}

</script>
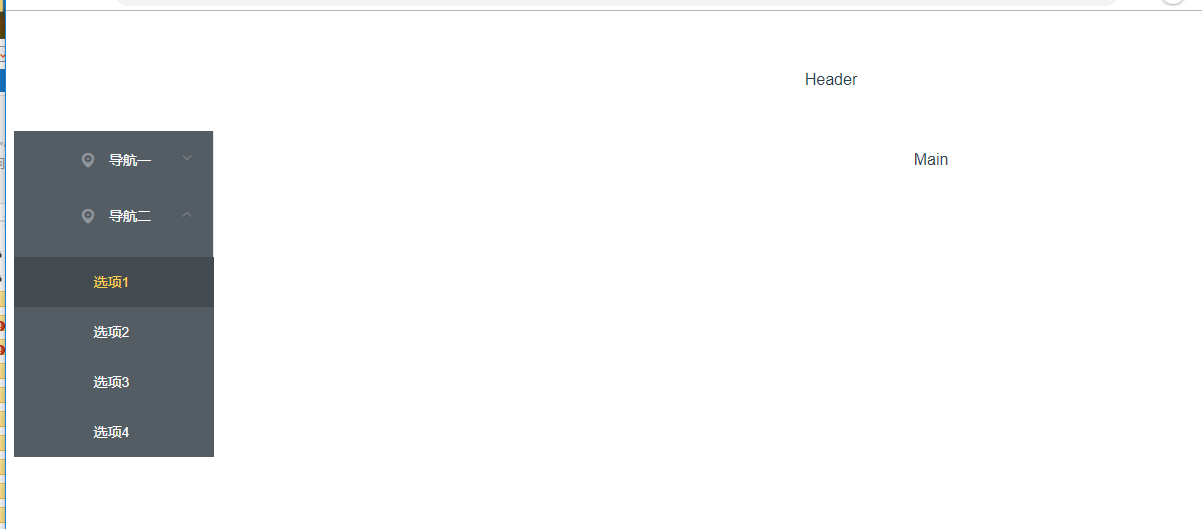
这个时候页面效果如下
import NavMenu from '@/components/NavMenu'中@的意思
在build/webpack.base.conf.js中有如下代码, alias就是起别名,@符号就是代表src路径,
所以@/components/NavMenu就是src/components/NavMenu。 这样webpack就知道如何引入文件了。
这样做的好处是不必到处去写src了。
 resolve: {

    extensions: ['.js', '.vue', '.json'],

    alias: {

      'vue$': 'vue/dist/vue.esm.js',

      '@': resolve('src'),

    }

  },
侧边菜单栏进阶
我们需要的功能:
每次只能展开一个一级菜单
每次点击一个二级菜单可以自动改变路由,跳转到对应的组件
由于菜单在路由中也会使用,所以最好抽象出来,做成一个配置文件
第1点和第二点比较好搞,Element上已经有配置文档:
unique-opened: 是否只保持一个子菜单的展开
router: 是否使用 vue-router 的模式,启用该模式会在激活导航时以 index 作为 path 进行路由跳转
添加一个暂时的路由:修改main.js
每次增加一个菜单都要写点html是不能忍的,能用js的,就别用html。
在src目录下创建一个config目录,目录下创建一个menu-config.js 文件:
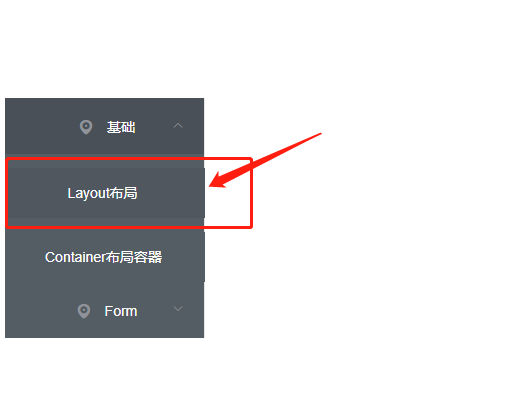
外层的数组代表一级菜单,内层sub数组代表二级菜单。
//menu-config.js

module.exports = [{

  name: '基础',

  id: 'basic',

  sub: [{

    name: 'Layout布局',

    componentName: 'BasicLayout'

  }, {

    name: 'Container布局容器',

    componentName: 'BasicContainer'

  }]

},

{

  name: 'Form',

  id: 'Form',

  sub: [{

    name: 'Radio单选框',

    componentName: 'FormRadio'

  }, {

    name: 'Checkbox多选框',

    componentName: 'FormCheckbox'

  }]

}]
在NavMenu.vue中引入这个文件,并使用v-for循环去渲染这个菜单:
//NavMenu.vue

<template>

  <el-row class="tac">

    <el-col :span="24">

      <el-menu

        default-active="2"

        class="el-menu-vertical-demo"

        @open="handleOpen"

        @close="handleClose"

        unique-opened

        router

        background-color="#545c64"

        text-color="#fff"

        active-text-color="#ffd04b">

        <el-submenu v-for="item in menu" :index="item.id" :key="item.id">

          <template slot="title">

            <i class="el-icon-location"></i>

            <span v-text="item.name"></span>

          </template>

          <el-menu-item-group

            class="over-hide"

            v-for="sub in item.sub"

            :key="sub.componentName"

          >

            <el-menu-item index="sub.componentName" v-text="sub.name"></el-menu-item>

          </el-menu-item-group>

        </el-submenu>

      </el-menu>

    </el-col>

  </el-row>

</template>

<script>

import menu from '@/config/menu-config'

export default {

  data () {

    return {

      menu: menu

    }

  },

  methods: {

    handleOpen (key, keyPath) {

      console.log(key, keyPath)

    },

    handleClose (key, keyPath) {

      console.log(key, keyPath)

    }

  }

}

</script>
这里要说明一下,我给二级菜单加上了over-hide类,二级菜单在展开时,有点溢出父元素了。
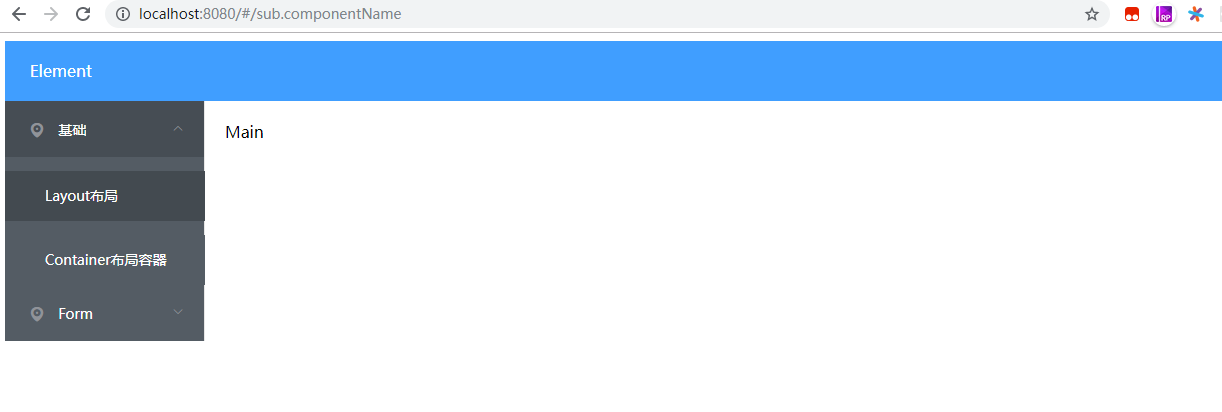
打开浏览器看看, 这时候菜单已经是根据配置文件渲染的了。
添加header
在componets文件夹下创建一个Header.vue, 并在App.vue中引入,
这时候打开浏览器看看, 是不是已经好看一点了。但是body有边框,不好看啊
再次美化
使用css reset Normalize.css
使用font-awesome vue-awesome图标库
安装Normalize.css, vue-awesome
npm install normalize.css -D

npm install vue-awesome -D
修改main.js
// The Vue build version to load with the `import` command

// (runtime-only or standalone) has been set in webpack.base.conf with an alias.

import Vue from 'vue'

import App from './App'

import router from './router'

import 'element-ui/lib/theme-chalk/index.css'

import ElementUI from 'element-ui'

import 'vue-awesome/icons'

import Icon from 'vue-awesome/components/Icon'

Vue.use(ElementUI)

Vue.component('icon', Icon)

/* eslint-disable no-new */

new Vue({

  el: '#app',

  router,

  components: { App },

  template: '<App/>'

})

//mormalize.css我引用了没有作用就删除了
组件路由与懒加载
新建这四个组件
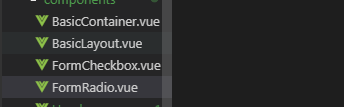
//BasicContainer.vue

<template>

    <div>

        这是:container布局容器

    </div>

</template>

<script>

export default {

  name: ' BasicContainer'

}

</script>
//BasicLayout

<template>

    <div>

        这是Layout布局

    </div>

</template>

<script>

export default {

  name: 'BasicLayout'

}

</script>
//FormCheckbox

<template>

    <div>

        这是:checkbox多选框

    </div>

</template>

<script>

export default {

  name: 'FormCheckbox'

}

</script>
//FormRadio

<template>

    <div>

        这是radio单选框

    </div>

</template>

<script>

export default {

  name: 'FormRadio'

}

</script>
注意:如果您使用的是 Babel,你将需要添加 syntax-dynamic-import 插件,才能使 Babel 可以正确地解析语法。
也就是说,你要先安装syntax-dynamic-import, 不然懒加载根本不行。
cnpm install --save-dev babel-plugin-syntax-dynamic-import
修改route/index.js文件
import Vue from 'vue'

import Router from 'vue-router'

import menus from '@/config/menu-config'

Vue.use(Router)

var routes = []

menus.forEach((item) => {

  item.sub.forEach((sub) => {

    routes.push({

      path: `/${sub.componentName}`,

      name: sub.componentName,

      component: () => import(`@/components/${sub.componentName}`)

    })

  })

})

export default new Router({routes})
运行发现跳转的路由不能展示出来

本文学习自:https://segmentfault.com/a/1190000012015667
初探element+vue+vue-router的更多相关文章
- 三、vue之router
三.vue之router 此时vue的脚手架.创建项目已经完成. ... vue的运行流程 index.html-->main.js-->App.vue-->router/index ...
- Vue中router两种传参方式
Vue中router两种传参方式 1.Vue中router使用query传参 相关Html: <!DOCTYPE html> <html lang="en"> ...
- 四 Vue学习 router学习
index.js: 按需加载组件: const login = r => require.ensure([], () => r(require('@/page/login')), 'log ...
- vue 中router.go;router.push和router.replace的区别
vue 中router.go:router.push和router.replace的区别:https://blog.csdn.net/div_ma/article/details/79467165 t ...
- Property 'validate' does not exist on type 'Element | Element[] | Vue | Vue[]'. Property 'valid...
使用vue-cli 3.0+Element-ui时候,调用form表单校验时候出现的问题是: Property 'validate' does not exist on type 'Element | ...
- 【vue】 router.beforeEach
import store from '@/store' const Vue = require('vue') const Router = require('vue-router') Vue.use( ...
- vue & this.$router.resolve
vue & this.$router.resolve gotoAutoUpdate (query = {}) { const { href } = this.$router.resolve({ ...
- vue & vue router & dynamic router
vue & vue router & dynamic router https://router.vuejs.org/guide/essentials/dynamic-matching ...
- vue & vue router & match bug
vue & vue router & match bug match bugs solution name must be router https://stackoverflow.c ...
随机推荐
- SPSS超详细操作:分层回归(hierarchical multiple regression)
SPSS超详细操作:分层回归(hierarchical multiple regression) 1.问题与数据 最大携氧能力(maximal aerobic capacity, VO2max)是评价 ...
- C++面向对象高级编程(下)-Geekband
11, 组合和继承 一, Composition 复合 has-a的关系 简单来讲, 就是: class A{ classB b1; }; 这里讲到Adapter设计模式: templa ...
- python基础-三元表达式/列表推导式/生成器表达式
1.三元表达式:如果成立返回if前的内容,如果不成立返回else的内容 name=input('姓名>>: ') res='SB' if name == 'alex' else 'NB' ...
- 网络流Sap算法
GDKOi就快要开始了.没时间打解析,直接上模板. #include <cstdio> #include <cstring> #include <algorithm> ...
- DBMS的四大特性
- Java虚拟机原理图解-- 1.1、class文件基本组织结构 [转]
作为Java程序猿,我们知道,我们写好的.java 源代码,最后会被Java编译器编译成后缀为.class的文件,该类型的文件是由字节组成的文件,又叫字节码文件.那么,class字节码文件里面到底是有 ...
- Java导出excel文件(使用jxl)
首先要导入jxl的jar包,可以去maven仓库下载:https://mvnrepository.com/artifact/net.sourceforge.jexcelapi/jxl 通过模拟实现创建 ...
- PAT甲级——A1058 A+B in Hogwarts
If you are a fan of Harry Potter, you would know the world of magic has its own currency system -- a ...
- Python - 集合与元素之集合定义和基本操作方法
集合(set) 定义:由不同元素组成的集合,集合中是一组无序排列可hash的值(不可变的值)例如数字.字符串.元组,可以作为字典的key 定义集合: # 定义集合 s = {1, 2, 3, 3, 3 ...
- python-web-webbrower-beautifuSoup
webbrowser:是 Python 自带的,打开浏览器获取指定页面. requests:从因特网上下载文件和网页. Beautiful Soup:解析 HTML,即网页编写的格式. seleniu ...