Nginx - SSI Module
SSI, for Server Side Includes, is actually a sort of server-side programming language interpreted by Nginx. Its name is based on the fact that the most used functionality of the language is the include command. Back in the 1990s, such languages were employed in order to render web pages dynamic, from simple static .html files with client-side scripts to complex pages with server-processed compositions. Within the HTML source code, webmasters could now insert server-interpreted directives, which would then lead the way to more advanced pre-processors such as PHP or ASP.
The most famous illustration of SSI is the quote of the day. In order to insert a new quote every day at the top of each page of their website, webmasters would have to edit out the HTML source of every page, replacing the former quote manually. With Server Side Includes, a single command suffices to simplify the task:
<html>
<head><title>My web page</title></head>
<body>
<h1>Quote of the day: <!--# include file="quote.txt" -->
</h1>
</body>
</html>
All you would have to do to insert a new quote is to edit the contents of the quote.txt file. Automatically, all pages would show the updated quote. As of today, most of the major web servers (Apache, IIS, Lighttpd, and so on) support Server Side Includes.
Module Directives and Variables
Having directives inserted within the actual content of files that Nginx serves raises one major issue — what files should Nginx parse for SSI commands? It would be a waste of resources to parse binary files such as images (.gif, .jpg, .png) or other kinds of media. You need to make sure to configure Nginx correctly with the directives introduced by this module:
ssi
Context: http, server, location, if
Enables parsing files for SSI commands. Nginx only parses files corresponding to MIME types selected with the ssi_types directive.
Syntax: on or off
Default value: off
Example: ssi on;
ssi_types
Context: http, server, location
Defines the MIME file types that should be eligible for SSI parsing. The text/html type is always included.
Syntax:
ssi_types type1 [type2] [type3...];
ssi_types *;
Default value: text/html
Example: ssi_types text/plain;
ssi_silent_errors
Context: http, server, location
Some SSI commands may generate errors; when that is the case, Nginx outputs a message at the location of the command — an error occurred while processing the directive. Enabling this option silences Nginx and the message does not appear.
Syntax: on or off
Default value: off
Example: ssi_silent_errors off;
ssi_value_length
Context: http, server, location
SSI commands have arguments that accept a value (for example, <!--# include file="value" -->). This parameter defines the maximum length accepted by Nginx.
Syntax: Numeric
Default: 256 (characters)
Example: ssi_value_length 256;
ssi_ignore_recycled_buffers
Context: http, server, location
When set to on, this directive prevents Nginx from making use of recycled buffers.
Syntax: on or off
Default: off
ssi_min_file_chunk
Context: http, server, location
If the size of a buffer is greater than ssi_min_file_chunk, data is stored in a file and then sent via sendfile. In other cases, it is transmitted directly from the memory.
Syntax: Numeric value (size)
Default: 1,024
A quick note regarding possible concerns about the SSI engine resource usage — by enabling the SSI module at the location or server block level, you enable parsing of at least all text/html files (pretty much any page to be displayed by the client browser). While the Nginx SSI module is efficiently optimized, you might want to disable parsing for files that do not require it.
Firstly, all your pages containing SSI commands should have the .shtml (Server HTML) extension. Then, in your configuration, at the location block level, enable the SSI engine under a specific condition. The name of the served file must end with .shtml:
server {
server_name website.com;
location ~* \.shtml$ {
ssi on;
}
}
On one hand, all HTTP requests submitted to Nginx will go through an additional regular expression pattern matching. On the other hand, static HTML files or files to be processed by other interpreters (.php, for instance) will not be parsed unnecessarily.
Finally, the SSI module enables two variables:
- $date_local: Returns the current time according to the current system time zone
- $date_gmt: Returns the current GMT time, regardless of the server time zone
SSI Commands
Once you have the SSI engine enabled for your web pages, you are ready to start writing your first dynamic HTML page. Again, the principle is simple — design the pages of your website using regular HTML code, inside which you will insert SSI commands.
These commands respect a particular syntax — at first sight, they look like regular HTML comments: <!-- A comment -->, and that is the good thing about it — if you accidentally disable SSI parsing of your files, the SSI commands do not appear on the
client browser; they are only visible in the source code as actual HTML comments. The full syntax is as follows:
<!--# command param1="value1" param2="value2" … -->
File includes
The main command of the Server Side Include module is obviously the include command. It comes in two different fashions.
First, you are allowed to make a simple file include:
<!--# include file="header.html" -->
This command generates an HTTP sub-request to be processed by Nginx. The body of the response that was generated is inserted instead of the command itself.
The second possibility is to use the include virtual command:
<!--# include virtual="/sources/header.php?id=123" -->
This also performs a sub-request to the server; the difference lies within the way that Nginx fetches the specified file (when using include file, the wait parameter is automatically enabled). Indeed, two parameters can be inserted within the include command tag. By default, all SSI requests are issued simultaneously, in parallel. This can cause slowdowns and timeouts in the case of heavy loads. Alternatively, you can use the wait="yes" parameter to specify that Nginx should wait for the completion of the request before moving on to other includes:
<!--# include virtual="header.php" wait="yes" -->
, 500, and so on), Nginx inserts the corresponding error page with its HTML: <html>[…]404 Not Found</body></html>. The message is displayed at the exact same place where you inserted the include command. If you wish to revise this behavior, you have the possibility to create a named block. By linking the block to the include command, the contents of the block will show at the location of the include command tag, in case an error occurs:
<html>
<head><title>SSI Example</title></head>
<body>
<center>
<!--# block name="error_footer" -->Sorry, the footer file was not found.<!--# endblock -->
<h1>Welcome to nginx</h1>
<!--# include file="footer.html" stub="error_footer" -->
</center>
</body>
</html>
The result as output in the client browser is shown as follows:
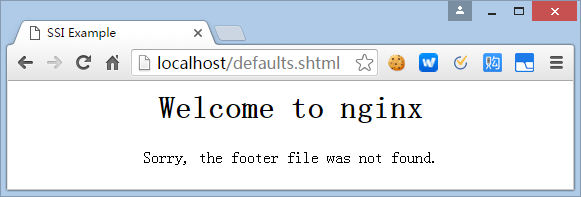
As you can see, the contents of the error_footer block were inserted at the location of include command, after the <h1> tag.
Working with Variables
The Nginx SSI module also offers the possibility to work with variables. Displaying a variable (in other words, inserting the variable value into the final HTML source code) can be done with the echo command:
<!--# echo var="variable_name" -->
The command accepts the following three parameters:
- var: The name of the variable you want to display, for example, REMOTE_ADDR to display the IP address of the client.
- default: A string to be displayed in case the variable is empty. If you don't specify this parameter, the output is (none).
- encoding: Encoding method for the string. The accepted values are none (no particular encoding), url (encode text like a URL — a blank space becomes %20, and so on) and entity (uses HTML entities: & becomes &).
You may also affect your own variables with the set command:
<!--# set var="my_variable" value="your value here" -->
The value parameter is itself parsed by the engine; as a result, you are allowed to make use of existing variables:
<!--# echo var="MY_VARIABLE" -->
<!--# set var="MY_VARIABLE" value="hello" -->
<!--# echo var="MY_VARIABLE" -->
<!--# set var="MY_VARIABLE" value="$MY_VARIABLE there" -->
<!--# echo var="MY_VARIABLE" -->
Here is the code that Nginx outputs for each of the three echo commands from the example above:
(none)
hello
hello there
Conditional Structure
The following set of commands will allow you to include text or other directives depending on a condition. The conditional structure can be established with the following syntax:
<!--# if expr="expression1" -->
[…]
<!--# elif expr="expression2" -->
[…]
<!--# else -->
[…]
<!--# endif -->
The expression can be formulated in three different ways:
- Inspecting a variable: <!--# if expr="$variable" -->. Similar to the if block in the Rewrite Module, the condition is true if the variable is not empty.
- Comparing two strings: <!--# if expr="$variable = hello" -->. The condition is true if the first string is equal to the second string. Use != instead of = to revert the condition (the condition is true if the first string is not equal to the second string).
- Matching a regular expression pattern: <!--# if expr="$variable = /pattern/" -->. Note that the pattern must be enclosed with / characters, otherwise it is considered to be a simple string (for example, <!-- # if expr="$MY_VARIABLE = /^/documents//" -->). Similar to the comparison, use != to negate the condition. Captures in regular expressions are supported.
The content that you insert within a condition block can contain regular HTML code or additional SSI directives, with one exception — you cannot nest if blocks.
Configuration
Last and probably least (for once) of the SSI commands offered by Nginx is the config command. It allows you to configure two simple parameters.
First, the message that appears when the SSI engine faces an error is malformed tags or invalid expressions. By default, Nginx displays [an error occurred while processing the directive]. If you want it to display something else, enter the following:
<!--# config errmsg="Something terrible happened" -->
Additionally, you can configure the format of the dates that are returned by the $date_local and $date_gmt variables using the timefmt parameter:
<!--# config timefmt="%A, %d-%b-%Y %H:%M:%S %Z" -->
The string you specify here is passed as the format string of the strftime C function. For more information about the arguments that can be used in the format string, please refer to the documentation of the strftime C language function at http://www.opengroup.org/onlinepubs/009695399/functions/strftime.html.
Nginx - SSI Module的更多相关文章
- Nginx - Rewrite Module
Initially, the purpose of this module (as the name suggests) is to perform URL rewriting. This mecha ...
- nginx ssi 配置小细节(一)
最近工作需要使用nginx的ssi (server side include)技术,在这里,将使用中的一点心得分享一下,也是一种备忘! 首先,nginx的ssi启用很简单,就只有三个最基本的指令: s ...
- How to Customize Server Header using NginX headers-more module
http://wiki.nginx.org/HttpHeadersMoreModule#Version headers_more When you are browsing a website, yo ...
- nginx上传模块—nginx upload module-
一. nginx upload module原理 官方文档: http://www.grid.net.ru/nginx/upload.en.html Nginx upload module通过ngin ...
- nginx upload module的使用
现在的网站,总会有一点与用户交互的功能,例如允许用户上传头像,上传照片,上传附件这类的.PHP写的程序,对于上传文件效率不是很高.幸好,nginx有一个名为upload的module可以解决这个问题. ...
- Nginx Upload Module 上传模块
传统站点在处理文件上传请求时,普遍使用后端编程语言处理,如:Java.PHP.Python.Ruby等.今天给大家介绍Nginx的一个模块,Upload Module上传模块,此模块的原理是先把用户上 ...
- Nginx Image Module图片缩略图 水印处理模块
Nginx Image Module图片缩略图 水印处理模块 下载Tengine tar -zxvf tengine-1.4.5.tar.gz cd tengine-1.4.5 下载Nginx tar ...
- nginx ssi + ngx_pagespeed 实现micro frontends 开发
nginx 的ssi 功能让我们可以将不同的拼接起来,ngx_pagespeed 是pagespeed 的nginx 模块,可以帮助 我们解决前端的一些性能优化的问题,通过简单的配置就可以搞定 一张参 ...
- 转:使用 Nginx Upload Module 实现上传文件功能
普通网站在实现文件上传功能的时候,一般是使用Python,Java等后端程序实现,比较麻烦.Nginx有一个Upload模块,可以非常简单的实现文件上传功能.此模块的原理是先把用户上传的文件保存到临时 ...
随机推荐
- ASCII,GB2312,GBK,Unicode,Utf-8
1.ASCII:American Stardand Code for Information Interchange,是当时美国制定出来的一套编码系统,使用7位或8位二进制来表示西文字符,0-31以及 ...
- Linux学习笔记----(2)
闲着无事,就敲起了Linux 命令,熟悉一下.记得昨天在书上看到了 find命令的用法,觉得挺神奇的. 其中 find 能够确定文件的查找深度 于是 敲了如下命令: #mkdir father #to ...
- Thinkphp框架----微信公众测试号开发(2)
---恢复内容开始--- 最近忙着投简历找工作.现在继续更 微信回复图文设置. 效果: 页面HTML需要一个form表单 简单效果: 接下来是数据库 字段:id title(标题) text(描述) ...
- Arduino 4X3键盘 AD模拟分量实现
//读分量测试 ---------------- ; //模拟口0 ; // 取得键AD模拟分量 void setup() { //通信波特率 Serial.begin(); } void loop( ...
- 线程池QueueUserWorkItem
// Test1.cpp : Defines the entry point for the console application. // #include "stdafx.h" ...
- 【每日一摩斯】-Index Skip Scan Feature (212391.1)
INDEX Skip Scan,也就是索引快速扫描,一般是指谓词中不带复合索引第一列,但扫描索引块要快于扫描表的数据块,此时CBO会选择INDEX SS的方式. 官方讲的,这个概念也好理解,如果将复合 ...
- api.connectionType 判断当前网络技术经验
使用 api.connectionType 判断当前网络的时候,需要注意,要加入大小写转换,三星返回的网络是大写 3G /** * 返回当前是否联网 * 周枫 * 3g 4g wifi none * ...
- iOS开发——混编Swift篇&OC移植为swift
将Ojective-C代码移植转换为Swift代码 2015-03-09 15:07发布:yuhang浏览:201 相比于Objective-C,Swift语言更加简练.有时我们需要把原来写的一些 ...
- cvsnt 设置用户、修改密码
忘记密码后,可以用administrator 新建一个用户,使用这个用户的账号. password agent 设置clear password不好使.. cvsnt配置 创建用户1 .下载cvs ...
- qwt总结1
废话不想太多,说下自己的使用总结. 一般来说,对于一个图表. 可能的话,应该有一个坐标轴,QWT中,是用QwtPlot这个类 来描述一个图的坐标系图(只表示坐标系的背景,没有描点).坐标(刻度)的设置 ...