MySQL高可用架构-MMM安装教程
安装指南:
一、架构以及服务器信息

| 用途 | IP | 主机名 | Server-id |
| MMM-Monitor01 | 192.168.0.30 | mon01 | - |
| MMM-Monitor02 | 192.168.0.31 | mon02 | - |
| Master01 | 192.168.0.1 | db1 | 1 |
| Master02 | 192.168.0.2 | db2 | 2 |
| Slave01 | 192.168.0.11 | db3 | 11 |
| Slave02 | 192.168.0.12 | db4 | 12 |
| Slave03 | 192.168.0.13 | db5 | 13 |
我使用了以下虚拟IP。它们将由MMM分发给主机。
| IP | 角色 | 描述 |
| 192.168.0.100 | writer | 应用程序应连接到此IP以进行写入查询 |
| 192.168.0.101 | reader | 应用程序应连接到这两个IP之一以进行读取查询 |
| 192.168.0.102 | reader |
二、配置服务器上的MySQL
echo '''[mysql-release-$basearch]

name = Percona-Release YUM repository - $basearch

baseurl = https://mirror.tuna.tsinghua.edu.cn/mysql/yum/mysql57-community-el7/

gpgcheck=''' > /etc/yum.repos.d/mysql.repo
yum -y install mysql mysql-server
[client]

default-character-set = utf8mb4

[mysql]

default-character-set = utf8mb4

[mysqld]

basedir=/var/lib/mysql

datadir=/var/lib/mysql

socket=/var/lib/mysql/mysql.sock

pid-file=/var/run/mysqld/mysqld.pid

# Disabling symbolic-links is recommended to prevent assorted security risks

symbolic-links=

default-storage-engine = InnoDB

########basic settings########

#服务器ID,不能重复

server-id =

character_set_server=utf8mb4

skip_name_resolve =

max_connections =

#MySQL读入缓冲区的大小

read_buffer_size = 16M

#MySQL的随机读缓冲区大小

read_rnd_buffer_size = 8M

#MySQL的顺序读缓冲区大小

sort_buffer_size = 8M

####innodb配置#################

innodb_buffer_pool_size=2G

innodb_log_file_size=256M

innodb_flush_method=O_DIRECT

#innodb独享表空间,优点很多,缺点会导致单个表文件过大

innodb_file_per_table =

# 从库需要加上只读选项,主库不需要此选项,另外super和replica权限的用户不受只读选项的影响。

#read_only=

########log settings########

log_error = /var/log/mysql/error.log

#开启慢查询日志

slow_query_log =

#超出次设定值的SQL即被记录到慢查询日志

long_query_time =

slow_query_log_file = /var/log/mysql/slow.log

#表示记录下没有使用索引的查询

log_queries_not_using_indexes =

#记录管理语句

log_slow_admin_statements =

#开启复制从库复制的慢查询的日志

log_slow_slave_statements =

#设置每分钟增长的没有使用索引查询的日志数量

log_throttle_queries_not_using_indexes =

expire_logs_days =

min_examined_row_limit =

log-bin = mysql-bin

log-bin-index = mysql-bin.index

max-binlog-size = 100M

# binlog-do-db = test

# binlog-ignore-db = mysql

sync-binlog =

relay-log = mysql-relay

relay-log-index = mysql-relay.index

log-slave-updates =

# replicate-do-db = test

# replicate-ignore-db = mysql

#设置为主节点人数

auto_increment_increment =

#在每台服务器上设置为唯一的递增数字,小于auto_increment_increment(两台就是1,)

auto_increment_offset =
最后启动MySQL:
systemctl enable mysql

#此处需要先创建mysql的日志文件夹

mkdir /var/log/mysql && chown -R mysql.mysql /var/log/mysqls

systemctl start mysql
查看MySQL的日志,可以看到如下信息:
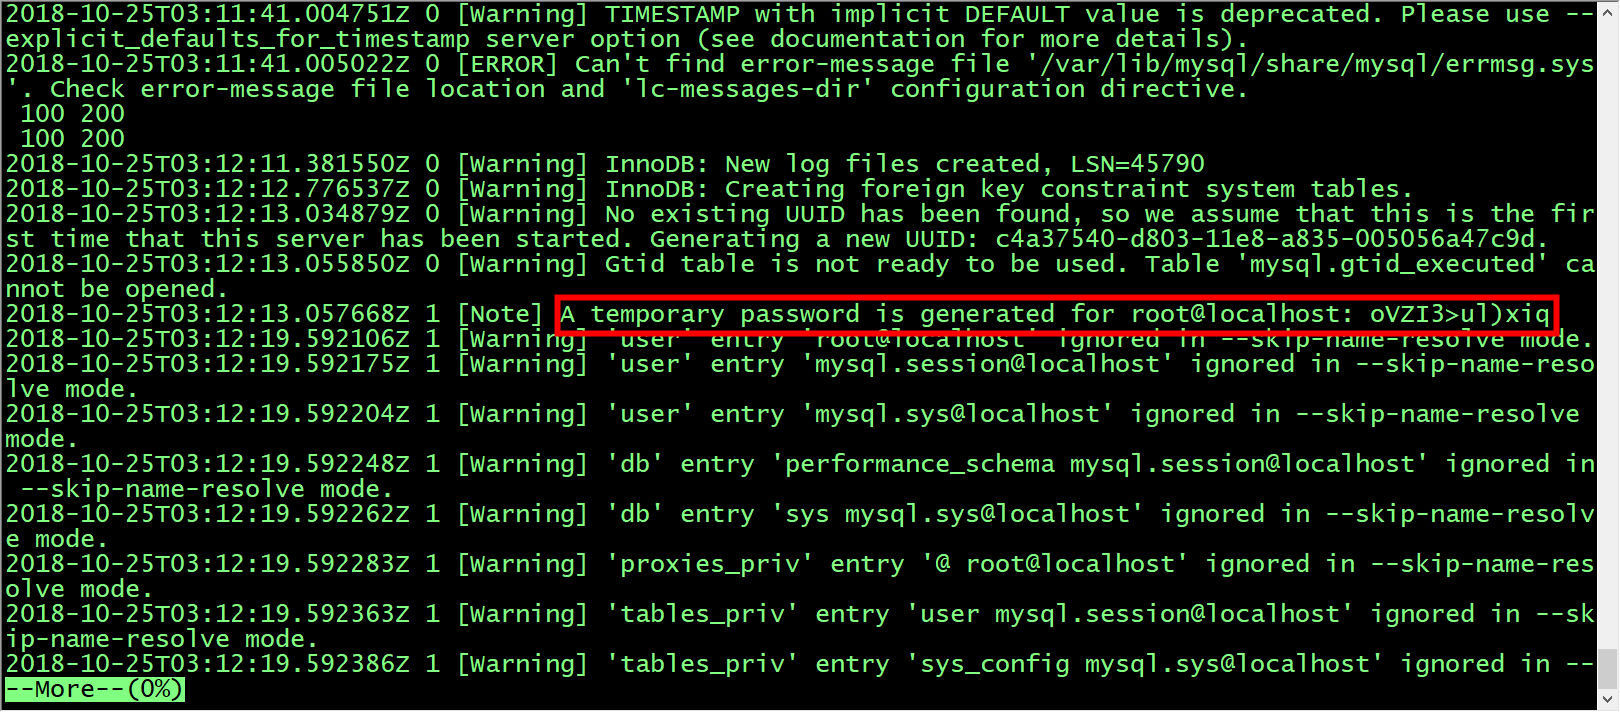
mysql -uroot -p<password>

> set password for 'root'@'localhost'=password('')
| 用途 | 描述 | 权限 |
| monitor user | mmm监视器使用它来检查MySQL服务器的运行状况 | REPLICATION CLIENT |
| agent user | mmm代理用于更改只读模式,复制主机等 | SUPER, REPLICATION CLIENT, PROCESS |
| replication user | 用于复制 | REPLICATION SLAVE |
> GRANT REPLICATION CLIENT                 ON *.* TO 'mmm_monitor'@'192.168.0.%' IDENTIFIED BY 'monitor_password';

> GRANT SUPER, REPLICATION CLIENT, PROCESS ON *.* TO 'mmm_agent'@'192.168.0.%'   IDENTIFIED BY 'agent_password';

> GRANT REPLICATION SLAVE                  ON *.* TO 'replication'@'192.168.0.%' IDENTIFIED BY 'replication_password';
三、db之间的数据同步配置
配置同步的准备工作
> FLUSH TABLES WITH READ LOCK;
> SHOW MASTER STATUS;

+------------------+----------+--------------+------------------+

| File             | Position | Binlog_Do_DB | Binlog_Ignore_DB |

+------------------+----------+--------------+------------------+

| mysql-bin. |       |              |                  |

+------------------+----------+--------------+------------------+

 row in set (0.00 sec)
mysqldump -u root -p --all-databases> /tmp/database-backup.sql
> UNLOCK TABLES;
scp /tmp/database-backup.sql <user> @ 192.168.0.2:/tmp

scp /tmp/database-backup.sql <user> @ 192.168.0.11:/tmp

scp /tmp/database-backup.sql <user> @ 192.168.0.12:/tmp

scp /tmp/database-backup.sql <user> @ 192.168.0.13:/tmp
mysql -u root -p < /tmp/database-backup.sql

mysql -u root -p < /tmp/database-backup.sql

mysql -u root -p < /tmp/database-backup.sql

mysql -u root -p < /tmp/database-backup.sql
flush privileges;

flush privileges;

flush privileges;

flush privileges;
安装复制
> CHANGE MASTER TO master_host ='192.168.0.1',master_port = ,master_user ='replication',

              master_password ='replication_password',master_log_file ='<file>',master_log_pos = <position>;

> CHANGE MASTER TO master_host ='192.168.0.1',master_port = ,master_user ='replication',

              master_password ='replication_password',master_log_file ='<file>',master_log_pos = <position>;

> CHANGE MASTER TO master_host ='192.168.0.1',master_port = ,master_user ='replication',

              master_password ='replication_password',master_log_file ='<file>',master_log_pos = <position>;

> CHANGE MASTER TO master_host ='192.168.0.1',master_port = ,master_user ='replication',

              master_password ='replication_password',master_log_file ='<file>',master_log_pos = <position>;
> START SLAVE;

> START SLAVE;

> START SLAVE;

> START SLAVE;
> SHOW SLAVE STATUS\G

*************************** . row ***************************

             Slave_IO_State: Waiting for master to send event

                Master_Host: 192.168.0.1

                Master_User: replication

                Master_Port:

              Connect_Retry:

…

> SHOW SLAVE STATUS\G

*************************** . row ***************************

             Slave_IO_State: Waiting for master to send event

                Master_Host: 192.168.0.1

                Master_User: replication

                Master_Port:

              Connect_Retry:

…

> SHOW SLAVE STATUS\G

*************************** . row ***************************

             Slave_IO_State: Waiting for master to send event

                Master_Host: 192.168.0.1

                Master_User: replication

                Master_Port:

              Connect_Retry:

…

> SHOW SLAVE STATUS\G

*************************** . row ***************************

             Slave_IO_State: Waiting for master to send event

                Master_Host: 192.168.0.1

                Master_User: replication

                Master_Port:

              Connect_Retry:

…
> SHOW MASTER STATUS;

+------------------+----------+--------------+------------------+

| File             | Position | Binlog_Do_DB | Binlog_Ignore_DB |

+------------------+----------+--------------+------------------+

| mysql-bin. |       |              |                  |

+------------------+----------+--------------+------------------+

 row in set (0.00 sec)
> CHANGE MASTER TO master_host = '192.168.0.2', master_port=, master_user='replication',

              master_password='replication_password', master_log_file='<file>', master_log_pos=<position>;
> START SLAVE;
SHOW SLAVE STATUS\G

*************************** . row ***************************

             Slave_IO_State: Waiting for master to send event

                Master_Host: 192.168.0.2

                Master_User: <replication>

                Master_Port:

              Connect_Retry:

…
四、安装MMM
创建用户
useradd --comment “MMM Script owner” --shell / sbin / nologin mmmd
监控主机
yum install mysql-mmm mysql-mmm-agent mysql-mmm-tools mysql-mmm-monitor -y
数据库主机
yum install -y mysql-mmm-agent
配置MMM
active_master_role      writer

<host default>

    cluster_interface       eno16777984

    pid_path                /run/mysql-mmm-agent.pid

    bin_path                /usr/libexec/mysql-mmm/

    replication_user        replication

    replication_password    replication_password

    agent_user              mmm_agent

    agent_password          agent_password

</host>

<host db1>

    ip      192.168.0.1

    mode    master

    peer    db2

</host>

<host db2>

    ip      192.168.0.2

    mode    master

    peer    db1

</host>

<host db3>

    ip      192.168.0.11

    mode    slave

</host>

<host db4>

    ip      192.168.0.12

    mode    slave

</host>

<host db5>

    ip      192.168.0.13

    mode    slave

</host>

<role writer>

    hosts   db1, db2

    ips     192.168.0.100

    mode    exclusive

</role>

<role reader>

    hosts   db3, db4, db5

    ips     192.168.0.101,192.168.0.102

    mode    balanced

</role>
include mmm_common.conf

this db1
include mmm_common.conf

<monitor>

    ip                  192.168.0.30

    pid_path            /run/mysql-mmm-monitor.pid

    bin_path            /usr/libexec/mysql-mmm

    status_path         /var/lib/mysql-mmm/mmm_mond.status

    ping_ips            192.168.0.254, 192.168.0.1, 192.168.0.2, 192.168.0.11, 192.168.0.12, 192.168.0.13

    auto_set_online

    # The kill_host_bin does not exist by default, though the monitor will

    # throw a warning about it missing.  See the section 5.10 "Kill Host

    # Functionality" in the PDF documentation.

    #

    # kill_host_bin     /usr/libexec/mysql-mmm/monitor/kill_host

    #

</monitor>

<host default>

    monitor_user        mmm_monitor

    monitor_password    monitor_password

</host>

debug
启动MMM
启动agent
systemctl enable mysql-mmm-agent

systemctl start mysql-mmm-agent
启动monitor
systemctl enable mysql-mmm-monitor

systemctl start mysql-mmm-monitor
$ mmm_control show

  db1(192.168.0.1) master/AWAITING_RECOVERY. Roles:

  db2(192.168.0.2) master/AWAITING_RECOVERY. Roles:

  db3(192.168.0.11) slave/AWAITING_RECOVERY. Roles:

  db4(192.168.0.12) slave/AWAITING_RECOVERY. Roles:

  db4(192.168.0.13) slave/AWAITING_RECOVERY. Roles:
$ tail /var/log/mysql-mmm/mmm_mon.warn

…

// ::  WARN Detected new host 'db1': Setting its initial state to 'AWAITING_RECOVERY'. Use 'mmm_control set_online db1' to switch it online.

// ::  WARN Detected new host 'db2': Setting its initial state to 'AWAITING_RECOVERY'. Use 'mmm_control set_online db2' to switch it online.

// ::  WARN Detected new host 'db3': Setting its initial state to 'AWAITING_RECOVERY'. Use 'mmm_control set_online db3' to switch it online.

// ::  WARN Detected new host 'db4': Setting its initial state to 'AWAITING_RECOVERY'. Use 'mmm_control set_online db4' to switch it online.

// ::  WARN Detected new host 'db5': Setting its initial state to 'AWAITING_RECOVERY'. Use 'mmm_control set_online db5' to switch it online.
$ mmm_control set_online db1

OK: State of 'db1' changed to ONLINE. Now you can wait some time and check its new roles!

$ mmm_control set_online db2

OK: State of 'db2' changed to ONLINE. Now you can wait some time and check its new roles!

$ mmm_control set_online db3

OK: State of 'db3' changed to ONLINE. Now you can wait some time and check its new roles!

$ mmm_control set_online db4

OK: State of 'db4' changed to ONLINE. Now you can wait some time and check its new roles!

$ mmm_control set_online db5

OK: State of 'db5' changed to ONLINE. Now you can wait some time and check its new roles!
cat /opt/scripts/mysql-mmm-backup.sh

#!/bin/bash

remote_port_status=`nc -z -w  192.168.0.1 ;echo $?`

local_mmm_svc_status=`systemctl status mysql-mmm-monitor.service | grep Active | awk -F '[(,)]' '{print $2}'`

if [ $remote_port_status -eq  ];then

    echo "远端服务正常!"

    if [ $local_mmm_svc_status = 'running' ];then

        echo "本地服务需要关闭!"

        systemctl stop mysql-mmm-monitor.service

        echo "远端服务器Mysql-mmm-monitor服务恢复,关闭备用服务!" | mail -s 'Mysql-mmm' admin@local.com

    fi

else

    echo "远端服务异常!"

    if [ $local_mmm_svc_status = 'dead' ];then

        echo "本地服务需要开启!"

        systemctl start mysql-mmm-monitor.service

        echo "远端服务器Mysql-mmm-monitor服务异常,启动备用服务!" | mail -s 'Mysql-mmm' admin@local.com

    fi

fi

#配置cron任务

vim /etc/crontab

*/ * * * * root for i in {..};do /opt/scripts/mysql-mmm-backup.sh;sleep ; done >> /opt/scripts/mysql-mmm-backup.log
MySQL高可用架构-MMM安装教程的更多相关文章
- MySQL高可用架构-MMM环境部署记录
MMM介绍MMM(Master-Master replication manager for MySQL)是一套支持双主故障切换和双主日常管理的脚本程序.MMM使用Perl语言开发,主要用来监控和管理 ...
- MySQL高可用架构-MMM、MHA、MGR、PXC
主从复制如何工作 在主库把数据记录到binlog(二进制日志). 备库开IO线程把binlog复制到自己的relaylog(中继日志). 备库读取中继日志,重放到备库上. 半同步复制 半同步复制可以确 ...
- [MySQL] 高可用架构MMM简单介绍
一.来源及原理: 众所周知,MySQL自身提供了AB复制(主从复制),然后可以很轻松实现master-master双向复制,同时再为其中一个Master节点搭建一个Slave库. 这样就实现了MySQ ...
- MySQL高可用架构之Mycat-关于Mycat安装和参数设置详解
MySQL高可用架构之Mycat-关于Mycat安装和参数设置详解 作者:尹正杰 版权声明:原创作品,谢绝转载!否则将追究法律责任. 一.Mycat介绍 1>.什么是Mycat Mycat背后是 ...
- (转)MySQL高可用架构之MHA
MySQL高可用架构之MHA 原文:http://www.cnblogs.com/gomysql/p/3675429.html 简介: MHA(Master High Availability)目前 ...
- 从mysql高可用架构看高可用架构设计
高可用HA(High Availability)是分布式系统架构设计中必须考虑的因素之一,它通常是指,通过设计减少系统不能提供服务的时间. 假设系统一直能够提供服务,我们说系统的可用性是100%.如果 ...
- mysql高可用架构之MHA,haproxy实现读写分离详解
MySQL高可用架构之MHA 一.运维人员需要掌握的MySQL技术: 1.基本SQL语句 2.基本的管理[库表数据的管理 权限的管理] 3.容灾 保证数据不丢失. 二.工作中MySQ ...
- 032:基于Consul和MGR的MySQL高可用架构
目录 一.Consul 1.Consul简介 2.准备环境 3.Consul 安装 4.Consul配置文件 5.Consul 服务检查脚本 6.Consul启动 二.MGR搭建 1.MGR配置 2. ...
- MySQL 高可用架构在业务层面的应用分析
MySQL 高可用架构在业务层面的应用分析 http://mp.weixin.qq.com/s?__biz=MzAxNjAzMTQyMA==&mid=208312443&idx=1&a ...
随机推荐
- 2018.10.26 NOIP模拟 图(最小生成树+线段树合并)
传送门 首先最开始说的那个一条路径的权值就是想告诉你两个点之间的贡献就是瓶颈边的权值. 那么肯定要用最小生成树算法. 于是我考场上想了30min+30min+30min+的树形dpdpdp 发现转移是 ...
- pytorch总结
PyTorch 深度学习:60分钟快速入门 用例子学习 PyTorch 手把手教你用PyTorch从零搭建图像分类模型
- 解决python代码中含有中文报错
python中写入中文时报错如下图所示: 依照网上解决方法:在py文件中加入:#encoding=utf-8 然后继续报错如下图所示: 解决方法: 在py文件中加入: import sysreload ...
- 添加wifi adb
https://blog.csdn.net/ouyang_peng/article/details/50370786 首先弄懂怎么设置adb wifi无线调试的功能,如下所示. 1. 手机端开启adb ...
- 批处理最完整人性化教程(.bat文件语法)
原文链接:http://www.cnitblog.com/seeyeah/archive/2009/01/15/53808.html 这是一篇技术教程,我会用很简单的文字表达清楚自己的意思,你要你识字 ...
- 使用 alt_disk_copy 克隆 rootvg
地址:http://www.ibm.com/developerworks/cn/aix/library/au-alt_disk_copy/ 简介 大多数系统管理员都遇到过以下情况: 一次 ML 升级失 ...
- 基于canvas+ajax+zui.js的蓄电池监控系统
今天抽空做的,仪表盘用canvas做的,数据采用ajax刷新,左边菜单用zui.js做的
- SCI投稿过程总结、投稿状态解析、拒稿后对策及接受后期相关问答
SCI投稿过程总结.投稿状态解析.拒稿后对策及接受后期相关问答 http://muchong.com/t-9174366-1 SCI投稿过程总结.投稿状态解析.拒稿后处理对策及接受后期相关问答综合 ...
- poj2481
题意:给定一些线段(s, e),起点为s,终点为e,求每一段线段被多少线段包含(不包括相等) 思路:很明显的树状数组题目..但是做的时候想了挺久..(下面的x为线段起点, y为线段终点) 做法1:先对 ...
- shell 命令 mkdir -p
开发中我们会遇到嵌套创建文件目录的需要,这时需要用到 mkdir -p 比如我要在本地嵌套创建 /Users/dairui/Downloads/zookeeper/dataLogDir目录 直接使用 ...