ActiveMQ: 搭建Broker集群(cluster)
上一篇介绍了基于Networks of Borkers的2节点HA方案,这一篇继续来折腾Networks of Brokers,当应用规模日渐增长时,2节点的broker可能仍然抗不住访问压力,这时候就需要多加一些broker,弄一个更大规模的Broker集群,但是怎么合理设置broker之间的网络桥接,却是有讲究的,先来看一种不太好的设计:
这个架构看上去没瑕疵,没毛病,3个broker之间两两互通,整体可用性极高,但是从消息的路由角度来看,却不是一个好的设计,当producer向broker1发送一条消息时,Consumer得到消息的路径可能有如下2条:
a) producer -> broker1 -> broker2
b) producer -> broker1 -> broker3 -> broker2
当broker更多时,情况会更复杂,比如下面这张图:
消息的路由途径将会更多:
a) producer -> broker1 -> broker4
b) producer -> broker1 -> broker2 -> broker4
c) producer -> broker1 -> broker2 -> broker3 -> broker4
d) producer -> broker1 -> broker3 -> broker4
不难想像,每多经过一个节点,消息处理的延时将会增加一些,如果Broker越多,情况越复杂,最终系统对外表现为消息处理有时很快,有时很慢,整体性能很不稳定,所以实际生产中,不要采用所有Broker之间两两互连的方案。
合理的方案如下:

这张图的灵感,应该来自组建局域网中的星形网络,在中心放置一个Borker充当Hub,与其它所有Broker互连,这样不管Consumer连接到外围的哪个Broker,消息的路由途径都比较稳定(最多经过3个Broker),这种架构性能虽然稳定了,但是中心的Hub就变成单点隐患,如果中间的DockerHub挂了,整个系统也就废了。
改进后的架构如下:
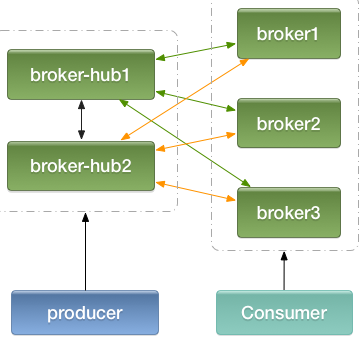
本质上仍然是一个星形网络,只不过将hub弄成二个互备,然后每个hub都与其它外围的broker相连,消费者连接到broker1/broker2/broker3,生产者(Producer)连接到hub1/hub2,消息的最长路径不超过3个broker (注:生产者也可以连接到broker1/2/3,与消费者一样,但是消息经过的最长路径会变成4)
如果以后要扩张,比如增加了Broker4,Broker5...,直接修改hub1/2上的配置,增加与新的broker的连接即可,不影响消息的路由途径长度。
最后,在本机演练一把,给出一些配置示例:
1、端口规划
|
1
2
3
4
5
|
activemq1: 61616 (broker1)activemq2: 61626 (broker2)activemq3: 61636 (broker3)activemq4: 61646 (broker-hub1)activemq5: 61656 (broker-hub2) |
共5个activemq实例,端口61616、61626、61636为broker1、broker2、broker3,61645、61656为broker-hub1、broker-hub2
2、activemq.xml配置
以boker1为例,配置文件内容如下:
<beans
xmlns="http://www.springframework.org/schema/beans"
xmlns:xsi="http://www.w3.org/2001/XMLSchema-instance"
xsi:schemaLocation="http://www.springframework.org/schema/beans http://www.springframework.org/schema/beans/spring-beans.xsd
http://activemq.apache.org/schema/core http://activemq.apache.org/schema/core/activemq-core.xsd">
<bean class="org.springframework.beans.factory.config.PropertyPlaceholderConfigurer">
<property name="locations">
<value>file:${activemq.conf}/credentials.properties</value>
</property>
</bean>
<broker xmlns="http://activemq.apache.org/schema/core" brokerName="broker1">
<persistenceAdapter>
<kahaDB directory="${activemq.data}/kahadb"/>
</persistenceAdapter>
<transportConnectors>
<transportConnector name="openwire"
uri="tcp://0.0.0.0:61616?maximumConnections=1000&wireFormat.maxFrameSize=104857600"/>
</transportConnectors>
</broker>
<import resource="jetty.xml"/>
</beans>
broker2及broker3,大家参考该配置修改端口号及brokerName即可。
broker-hub1的配置:
<beans
xmlns="http://www.springframework.org/schema/beans"
xmlns:xsi="http://www.w3.org/2001/XMLSchema-instance"
xsi:schemaLocation="http://www.springframework.org/schema/beans http://www.springframework.org/schema/beans/spring-beans.xsd
http://activemq.apache.org/schema/core http://activemq.apache.org/schema/core/activemq-core.xsd">
<bean class="org.springframework.beans.factory.config.PropertyPlaceholderConfigurer">
<property name="locations">
<value>file:${activemq.conf}/credentials.properties</value>
</property>
</bean>
<broker xmlns="http://activemq.apache.org/schema/core" brokerName="broker-hub1">
<networkConnectors>
<networkConnector uri="static:(tcp://127.0.0.1:61656,tcp://127.0.0.1:61616,tcp://127.0.0.1:61626,tcp://127.0.0.1:61636)" duplex="true"/>
</networkConnectors>
<persistenceAdapter>
<kahaDB directory="${activemq.data}/kahadb"/>
</persistenceAdapter>
<transportConnectors>
<transportConnector name="openwire"
uri="tcp://0.0.0.0:61646?maximumConnections=1000&wireFormat.maxFrameSize=104857600"/>
</transportConnectors>
</broker>
<import resource="jetty.xml"/>
</beans>
broker-hub2的配置:
<beans
xmlns="http://www.springframework.org/schema/beans"
xmlns:xsi="http://www.w3.org/2001/XMLSchema-instance"
xsi:schemaLocation="http://www.springframework.org/schema/beans http://www.springframework.org/schema/beans/spring-beans.xsd
http://activemq.apache.org/schema/core http://activemq.apache.org/schema/core/activemq-core.xsd">
<bean class="org.springframework.beans.factory.config.PropertyPlaceholderConfigurer">
<property name="locations">
<value>file:${activemq.conf}/credentials.properties</value>
</property>
</bean>
<broker xmlns="http://activemq.apache.org/schema/core" brokerName="broker-hub2">
<networkConnectors>
<networkConnector uri="static:(tcp://127.0.0.1:61616,tcp://127.0.0.1:61626,tcp://127.0.0.1:61636)" duplex="true"/>
</networkConnectors>
<persistenceAdapter>
<kahaDB directory="${activemq.data}/kahadb"/>
</persistenceAdapter>
<transportConnectors>
<transportConnector name="openwire"
uri="tcp://0.0.0.0:61656?maximumConnections=1000&wireFormat.maxFrameSize=104857600"/>
</transportConnectors>
</broker>
<import resource="jetty.xml"/>
</beans>
3、java代码中spring配置文件
a) 生产者
<bean id="jmsFactory" class="org.apache.activemq.pool.PooledConnectionFactory" destroy-method="stop">

<property name="connectionFactory">

<bean class="org.apache.activemq.ActiveMQConnectionFactory">

<!--broker服务的地址-->

<property name="brokerURL" value="failover:(tcp://localhost:61646,tcp://localhost:61656)"/>

<!--默认值为1000,如果不需要这么大,可以调小-->

<property name="maxThreadPoolSize" value="100"/>

<!--<property name="userName" value="system"/>-->

<!--<property name="password" value="manager"/>-->

</bean>

</property>

</bean>
b) 消费者
<bean id="jmsFactory" class="org.apache.activemq.pool.PooledConnectionFactory" destroy-method="stop">

<property name="connectionFactory">

<bean class="org.apache.activemq.ActiveMQConnectionFactory">

<!--broker服务的地址-->

<property name="brokerURL" value="failover:(tcp://localhost:61616,tcp://localhost:61626,tcp://localhost:61636)"/>

<!--默认值为1000,如果不需要这么大,可以调小-->

<property name="maxThreadPoolSize" value="100"/>

<!--<property name="userName" value="system"/>-->

<!--<property name="password" value="manager"/>-->

</bean>

</property>

</bean>


参考文章:

http://www.jakubkorab.net/2011/11/understanding-activemq-broker-networks.html

http://activemq.apache.org/networks-of-brokers.html
ActiveMQ: 搭建Broker集群(cluster)的更多相关文章
- ActiveMQ笔记(4):搭建Broker集群(cluster)
上一篇介绍了基于Networks of Borkers的2节点HA方案,这一篇继续来折腾Networks of Brokers,当应用规模日渐增长时,2节点的broker可能仍然抗不住访问压力,这时候 ...
- zookeeper+activemq高可用集群搭建
一.准备工作: 准备三台机器:192.168.35.111192.168.35.112192.168.35.113 二.搭建zookeeper 三台机器上均要搭建zookeeper服务// 下载zoo ...
- ActiveMQ此例简单介绍基于docker的activemq安装与集群搭建
ActiveMQ拓展连接 此例简单介绍基于Docker的activemq安装与集群搭建 一 :安装 1.获取activemq镜像 docker pull webcenter/activemq 2.启动 ...
- redis单点、redis主从、redis哨兵sentinel,redis集群cluster配置搭建与使用
目录 redis单点.redis主从.redis哨兵 sentinel,redis集群cluster配置搭建与使用 1 .redis 安装及配置 1.1 redis 单点 1.1.2 在命令窗口操作r ...
- ActiveMQ broker 集群, 静态发现和动态发现
下载 activemq 压缩包解压后,conf 目录下有各种示例配置文件,红线标出的是静态发现和动态发现的配置. 1. 静态配置 启动3个 broker,端口分别为61616,61618,61620, ...
- 超详细,多图文使用galera cluster搭建mysql集群并介绍wsrep相关参数
超详细,多图文使用galera cluster搭建mysql集群并介绍wsrep相关参数 介绍galera cluster原理的文章已经有一大堆了,百度几篇看一看就能有相关了解,这里就不赘述了.本文主 ...
- ActiveMq+zookeeper+levelDB集群整合配置
ActiveMq+zookeeper+levelDB集群整合配置 环境:linux系统,jdk1.7 三台linux系统电脑.我这里使用一台window,分别远程3台linux电脑.三台电脑的ip分 ...
- 基于zookeeper的activemq的主从集群配置
项目,要用到消息队列,这里采用activemq,相对使用简单点.这里重点是环境部署. 0. 服务器环境 RedHat710.90.7.210.90.7.1010.90.2.102 1. 下载安装zoo ...
- ActiveMQ 高可用集群安装、配置(ZooKeeper + LevelDB)
ActiveMQ 高可用集群安装.配置(ZooKeeper + LevelDB) 1.ActiveMQ 集群部署规划: 环境: JDK7 版本:ActiveMQ 5.11.1 ZooKeeper 集群 ...
随机推荐
- PHP 字符检测自定义函数
<?php /** * 转义字符替换 * * @param string $subject * @return string */public static function sReplace( ...
- Thymeleaf模板引擎使用
Thymeleaf模板引擎使用 什么是Thymeleaf Thymeleaf是一个Java库.它是一个XML / XHTML / HTML5模板引擎,能够在模板文件上应用一组转换,将程序产生的数据或者 ...
- WPF [调用线程无法访问此对象,因为另一个线程拥有该对象。] 解决方案以及如何实现字体颜色的渐变
本文说明WPF [调用线程无法访问此对象,因为另一个线程拥有该对象.] 解决方案以及如何实现字体颜色的渐变 先来看看C#中Timer的简单说明,你想必猜到实现需要用到Timer的相关知识了吧. C# ...
- WPF文字排列方式解析zz
WPF文字的处理是一个比较基础的技能.在使用WPF开发工具时,对于各种文字的处理时经常会遇到的情况.希望大家可以通过实践经验的积累,牢固掌握这一方面知识. AD:WOT2014:用户标签系统与用户 ...
- [转]shell 变量替换
转自:http://blog.csdn.net/xuhongning/article/details/6191515 1,参数替换: 不含有“:”的,只要定义了,就生效,不管是否为空 含有“:”的,即 ...
- ACM: POJ 1061 青蛙的约会 -数论专题-扩展欧几里德
POJ 1061 青蛙的约会 Time Limit:1000MS Memory Limit:10000KB 64bit IO Format:%lld & %llu Descr ...
- CSS 分享
原来的那个暂时不用了,贴出来一下,有兴趣可以参考,原型是Metro,不要禁用css 改了很多次~ 面码大法好!!! /*测试区域*/ /*标题备份*/ h7 { background: #2B6695 ...
- [Leetcode] Next Permutation
Implement next permutation, which rearranges numbers into the lexicographically next greater permuta ...
- CF 9D. How many trees?(dp)
题目链接 以前做过类似的,USACO,2.3,开始数组开小了,导致数据乱了,然后超数据范围了,.. #include <cstdio> #include <iostream> ...
- 【JAVA】JAVA 反射
在Java反射机制中,需要掌握的知识有: (1)掌握反射机制的概述. (2)能够使用Class类并结合java.lang.reflect包取得一个类的完整结构. ...