唉 调皮的ListView
唉 调皮的ListView
本次任务是
运用LisTView和自定义Adapter
来实现资料以列表的形式展现
来看代码
布局代码老规矩 直接贴上
   <LinearLayout

        android:layout_width="match_parent"

        android:layout_height="match_parent"

        android:id="@+id/show"

        android:orientation="vertical">

    </LinearLayout>
<ImageView

        android:id="@+id/list_img"

        android:src="@drawable/img1"

        android:layout_width="76dp"

        android:layout_height="89dp" />

    <LinearLayout

        android:layout_width="match_parent"

        android:layout_height="match_parent"

        android:orientation="vertical">

        <TextView

            android:id="@+id/list_name"

            android:hint="name"

            android:textSize="30sp"

            android:layout_width="wrap_content"

            android:layout_height="wrap_content" />

        <TextView

            android:id="@+id/list_age"

            android:hint="age"

            android:textSize="30sp"

            android:layout_width="wrap_content"

            android:layout_height="wrap_content" />

        <TextView

            android:id="@+id/list_hobby"

            android:hint="hobby"

            android:textSize="30sp"

            android:layout_width="wrap_content"

            android:layout_height="wrap_content" />

    </LinearLayout>
<ListView

        android:id="@+id/list_view"

        android:layout_width="wrap_content"

        android:layout_height="match_parent"/>
以上是三个界面的布局代码
布局代码都长得差不多 也就不上图了 啦啦啦
然后是主界面的Java代码
来看看Java代码
将对象的属性进行封装,给每个属性设置getter/setter方法

public class NameInfo {

    private String name;

    private String age;

    private String hobby;

    private int imgId;

    public NameInfo( int imgId,String name, String age, String hobby) {

        this.name = name;

        this.age = age;

        this.hobby = hobby;

        this.imgId = imgId;

    }

    public String getName() {

        return name;

    }

    public void setName(String name) {

        this.name = name;

    }

   ......等等 同上种方法
    public InfoAdapter(Context context, List datas) {

        this.datas = datas;

        this.context = context;

    }

    @Override

    public int getCount() {

        return datas.size();//一定要返回list长度!!!!

    }

    @Override

    public Object getItem(int i) {

        return datas.get(i);

    }

    @Override

    public long getItemId(int i) {

        return i;

    }

    @Override

    public View getView(int i, View view, ViewGroup viewGroup) {

        if(view == null){

            view = LayoutInflater.from(context).inflate(R.layout.item,null);

        }

        ImageView img = (ImageView)view.findViewById(R.id.list_img);

        TextView name =(TextView) view.findViewById(R.id.list_name);

        TextView age = (TextView)view.findViewById(R.id.list_age);

        TextView hobby = (TextView)view.findViewById(R.id.list_hobby);

        NameInfo nameminfo = datas.get(i);

        img.setImageResource(nameinfo.getImgId());

        name.setText(nameinfo.getName());

        age.setText(nameinfo.getAge());

        hobby.setText(nameinfo.getHobby());

        return view;

    }
    @Override

    protected void onCreate(Bundle savedInstanceState) {

        super.onCreate(savedInstanceState);

        setContentView(R.layout.activity_main);

        FragmentManager manager = getFragmentManager() ;

        transction = manager.beginTransaction();

        if(adapterFragment ==null){

            adapterFragment = new AdapterFragment();

            transction.add(R.id.show,adapterFragment);

        }

        transction.replace(R.id.show,adapterFragment);

        transction.commit();

    }
上面这段代码 有点难 Java里的代码每次都折磨我老半天
可能我还有些驾驭不了它

一定要想办法搞定他...
@Nullable
@Override
public View onCreateView(LayoutInflater inflater, @Nullable ViewGroup container, Bundle savedInstanceState) {
View view =inflater.inflate(R.layout.fragment_adapter,container,false);
List<NameInfo> datas = new ArrayList<>();
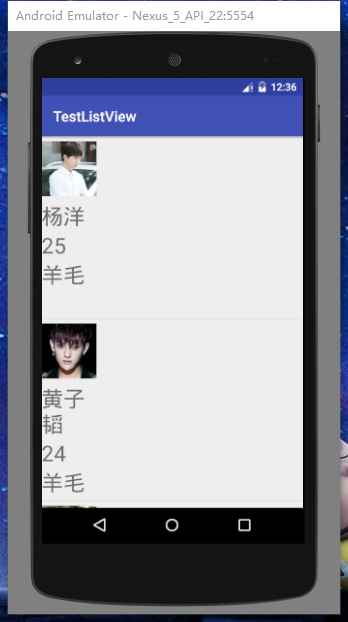
datas.add(new NameInfo(R.drawable.img1,"杨洋","25","羊毛"));
datas.add(new NameInfoe(R.drawable.img2,"黄子韬","24","羊毛"));
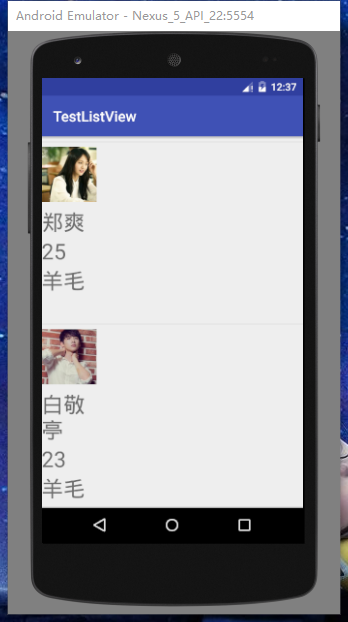
datas.add(new NameInfo(R.drawable.img3,"郑爽","25","羊毛"));
datas.add(new NameInfo(R.drawable.img4,"白敬亭","23","羊毛"));
datas.add(new NameInfo(R.drawable.img5,"赵丽颖","28","羊毛"));
InfoAdapter adapter = new InfoAdapter(getActivity(), datas);
ListView listView = (ListView) view.findViewById(R.id.list_view);
listView.setAdapter(adapter);
return view;
}
运行结果图如下
唉 调皮的ListView的更多相关文章
- 初探ListView
ListView可能是Android开发中最常用的一个控件,但要用的纯熟还需要不断的锻炼. 建立简单的ListView 1.在布局文件(.xml)中添加<ListView>标签 2.在Ma ...
- 张高兴的 UWP 开发笔记:横向 ListView
ListView 默认的排列方向是纵向 ( Orientation="Vertical" ) ,但如果我们需要横向显示的 ListView 怎么办? Blend for Visua ...
- Android—万能ListView适配器
ListView是开发中最常用的控件了,但是总是会写重复的代码,浪费时间又没有意义. 最近参考一些资料,发现一个万能ListView适配器,代码量少,节省时间,总结一下分享给大家. 首先有一个自定义的 ...
- Android—ListView条目背景为图片时,条目间距问题解决
ListView是android开发中使用最普遍的控件了,可有的listView条目的内容颇为丰富,甚至为了美观,背景用指定图片,如下图:
- Android中ListView实现图文并列并且自定义分割线(完善仿微信APP)
昨天的(今天凌晨)的博文<Android中Fragment和ViewPager那点事儿>中,我们通过使用Fragment和ViewPager模仿实现了微信的布局框架.今天我们来通过使用Li ...
- listview下拉刷新和上拉加载更多的多种实现方案
listview经常结合下来刷新和上拉加载更多使用,本文总结了三种常用到的方案分别作出说明. 方案一:添加头布局和脚布局 android系统为listview提供了addfootview ...
- Android listview和gridview以及view的区别
GridView 可以指定显示的条目的列数. listview一般显示的条目的列数都是一列 如果是列表(单列多行形式)的使用ListView,如果是多行多列网状形式的优先使用GridView andr ...
- mono for android Listview 里面按钮 view Button click 注册方法 并且传值给其他Activity 主要是context
需求:为Listview的Item里面的按钮Button添加一个事件,单击按钮时通过事件传值并跳转到新的页面. 环境:mono 效果: 布局代码 主布局 <?xml version=" ...
- 【腾讯Bugly干货分享】跨平台 ListView 性能优化
本文来自于腾讯Bugly公众号(weixinBugly),未经作者同意,请勿转载,原文地址:https://mp.weixin.qq.com/s/FbiSLPxFdGqJ00WgpJ94yw 导语 精 ...
随机推荐
- RuntimeError: module compiled against API version 0xb but this version of numpy is 0xa
两个python,一个是本机自带的,一个是anaconda.先前呢,用自带的安装了Opencv,由于自带的python,对应的numpy版本是13, 而anaconda对应的版本是12,导致impor ...
- html:布局class名和其他class名个人整理总结
一:app 二:header 三:main 四:footer 1:中横杠:布局(main-top.main-left等) 2:下横杠:状态(item-active:选中等)
- centos病毒
#!/bin/bash exec &>/dev/null {echo,ZXhlYyAmPi9kZXYvbnVsbApleHBvcnQgUEFUSD0kUEFUSDovYmluOi9zYm ...
- javascript中的map和reduce
今天在看“廖雪峰官方网站”的js教程时,看到了map和reduce.其中有一个练习题是:不使用js内置的parseInt()函数,利用map和reduce操作实现一个string2int()函数(先将 ...
- unique_ptr
[unique_ptr] unique_ptr 不共享它的指针.它无法复制到其他 unique_ptr,无法通过值传递到函数,也无法用于需要副本的任何标准模板库 (STL) 算法.只能移动unique ...
- gson 入门使用
参考文章:https://www.cnblogs.com/majay/p/6336918.html Java 对象与 Json 之间的互相转换,用的比较多大是 Jackson 与 Gson 第一步:添 ...
- VS2010 LNK1123: 转换到 COFF 期间失败: 文件无效或损坏
1嵌入清单问题 属性: 项目\属性\配置属性\清单工具\输入和输出\嵌入清单:原来是“是”,改成“否”. 项目\属性\配置属性\链接器\清单文件\生成清单:原来是“是”,改成“否”. 2文件老旧: c ...
- Hillstone设备管理-设备软件Stone-OS升级
1.通过sysloader进行StoneOS升级 1)给设备上电按提示按ESC并且进入 Sysloader.参照以下操作提示: 2)在下面选择对应的选项升级os,可以通过tftp.ftp.usb.系统 ...
- CentOS7+CDH5.14.0安装全流程记录,图文详解全程实测-4配置NTP服务
配置NTP服务.标准的做法是配置NTP服务器,但是这里为了方便就用简化的方式配置了. 这个在安装初期,不是必须的,只要保证各机器的时间同步就行,使用如下命令可以查看时间是否同步: [root@cdh1 ...
- 【redis 学习系列】API的理解与使用(一)
Redis提供了5种数据结构,以下介绍一些预备知识以及Redis的5种数据结构 1.预备知识 1.1 全局命令 Redis的5种数据结构,它们是键值对中的值,对于键来说有一些通用的命令. (1)查看所 ...