SpringBoot集成netty实现客户端服务端交互和做一个简单的IM
看了好几天的netty实战,慢慢摸索,虽然还没有摸着很多门道,但今天还是把之前想加入到项目里的
一些想法实现了,算是有点信心了吧(讲真netty对初学者还真的不是很友好......)
首先,当然是在SpringBoot项目里添加netty的依赖了,注意不要用netty5的依赖,因为已经废弃了
        <!--netty-->

        <dependency>

            <groupId>io.netty</groupId>

            <artifactId>netty-all</artifactId>

            <version>4.1.32.Final</version>

        </dependency>
将端口和IP写入application.yml文件里,我这里是我云服务器的内网IP,如果是本机测试,用127.0.0.1就ok
netty:

  port: 7000

  url: 172.16.0.7
在这之后,开始写netty的服务器,这里服务端的逻辑就是将客户端发来的信息返回回去
因为采用依赖注入的方法实例化netty,所以加上@Component注解
 package com.safelocate.app.nettyServer;

 import io.netty.bootstrap.ServerBootstrap;

 import io.netty.channel.*;

 import io.netty.channel.nio.NioEventLoopGroup;

 import io.netty.channel.socket.nio.NioServerSocketChannel;

 import org.apache.log4j.Logger;

 import org.springframework.stereotype.Component;

 import java.net.InetSocketAddress;

 @Component

 public class NettyServer {

     //logger

     private static final Logger logger  = Logger.getLogger(NettyServer.class);

     public void start(InetSocketAddress address){

         EventLoopGroup bossGroup = new NioEventLoopGroup(1);

         EventLoopGroup workerGroup = new NioEventLoopGroup();

         try {

             ServerBootstrap bootstrap = new ServerBootstrap()

                     .group(bossGroup,workerGroup)

                     .channel(NioServerSocketChannel.class)

                     .localAddress(address)

                     .childHandler(new ServerChannelInitializer())

                     .option(ChannelOption.SO_BACKLOG, 128)

                     .childOption(ChannelOption.SO_KEEPALIVE, true);

             // 绑定端口,开始接收进来的连接

             ChannelFuture future = bootstrap.bind(address).sync();

             logger.info("Server start listen at " + address.getPort());

             future.channel().closeFuture().sync();

         } catch (Exception e) {

             e.printStackTrace();

             bossGroup.shutdownGracefully();

             workerGroup.shutdownGracefully();

         }

     }

 }
Server.java
当然,这里的ServerChannelInitializer是我自己定义的类,这个类是继承ChannelInitializer<SocketChannel>的,里面设置出站和入站的编码器和解码器
package com.safelocate.app.nettyServer;

import io.netty.channel.ChannelInitializer;

import io.netty.channel.socket.SocketChannel;

import io.netty.handler.codec.string.StringDecoder;

import io.netty.handler.codec.string.StringEncoder;

import io.netty.util.CharsetUtil;

public class ServerChannelInitializer extends ChannelInitializer<SocketChannel> {

    @Override

    protected void initChannel(SocketChannel channel) throws Exception {

        channel.pipeline().addLast("decoder",new StringDecoder(CharsetUtil.UTF_8));

        channel.pipeline().addLast("encoder",new StringEncoder(CharsetUtil.UTF_8));

        channel.pipeline().addLast(new ServerHandler());

    }

}
ServerChannelinitializer.java
最好注意被别decoder和encoder写成了一样的,不然会出问题(我之前就是不小心都写成了StringDecoder...)
在这之后就是设置ServerHandler来处理一些简单的逻辑了
package com.safelocate.app.nettyServer;

import io.netty.channel.ChannelHandlerContext;

import io.netty.channel.ChannelInboundHandlerAdapter;

import io.netty.channel.SimpleChannelInboundHandler;

import java.io.IOException;

import java.io.OutputStream;

import java.io.PrintWriter;

import java.net.InetAddress;

import java.net.Socket;

public class ServerHandler extends ChannelInboundHandlerAdapter {

    @Override

    public void channelActive(ChannelHandlerContext ctx) {

        System.out.println("channelActive----->");

    }

    @Override

    public void channelRead(ChannelHandlerContext ctx, Object msg) throws Exception {

        System.out.println("server channelRead......");

        System.out.println(ctx.channel().remoteAddress()+"----->Server :"+ msg.toString());

        //将客户端的信息直接返回写入ctx

        ctx.write("server say :"+msg);

        //刷新缓存区

        ctx.flush();

    }

    @Override

    public void exceptionCaught(ChannelHandlerContext ctx, Throwable cause) throws Exception {

        cause.printStackTrace();

        ctx.close();

    }

}
ServerHandler.java
准备工作到这里,现在要做到就是去启动这个程序
将AppApplication实现CommandLineRunner这个接口,这个接口可以用来再启动SpringBoot时同时启动其他功能,比如配置,数据库连接等等
然后重写run方法,在run方法里启动netty服务器,Server类用@AutoWired直接实例化
package com.safelocate.app;

import com.safelocate.app.nettyServer.NettyServer;

import io.netty.channel.ChannelFuture;

import org.springframework.beans.factory.annotation.Autowired;

import org.springframework.beans.factory.annotation.Value;

import org.springframework.boot.CommandLineRunner;

import org.springframework.boot.SpringApplication;

import org.springframework.boot.autoconfigure.SpringBootApplication;

import java.net.InetAddress;

import java.net.InetSocketAddress;

@SpringBootApplication

public class AppApplication implements CommandLineRunner {

    @Value("${netty.port}")

    private int port;

    @Value("${netty.url}")

    private String url;

    @Autowired

    private NettyServer server;

    public static void main(String[] args) {

        SpringApplication.run(AppApplication.class, args);

    }

    @Override

    public void run(String... args) throws Exception {

        InetSocketAddress address = new InetSocketAddress(url,port);

        System.out.println("run  .... . ... "+url);

        server.start(address);

    }

}
AppApplication.java
ok,到这里服务端已经写完,本地我也已经测试完,现在需要打包部署服务器,当然这个程序只为练手...
控制台输入mvn clean package -D skipTests 然后将jar包上传服务器,在这之后,需要在腾讯云/阿里云那边配置好安全组,将之前yml文件里设定的端口的入站
规则设置好,不然访问会被拒绝
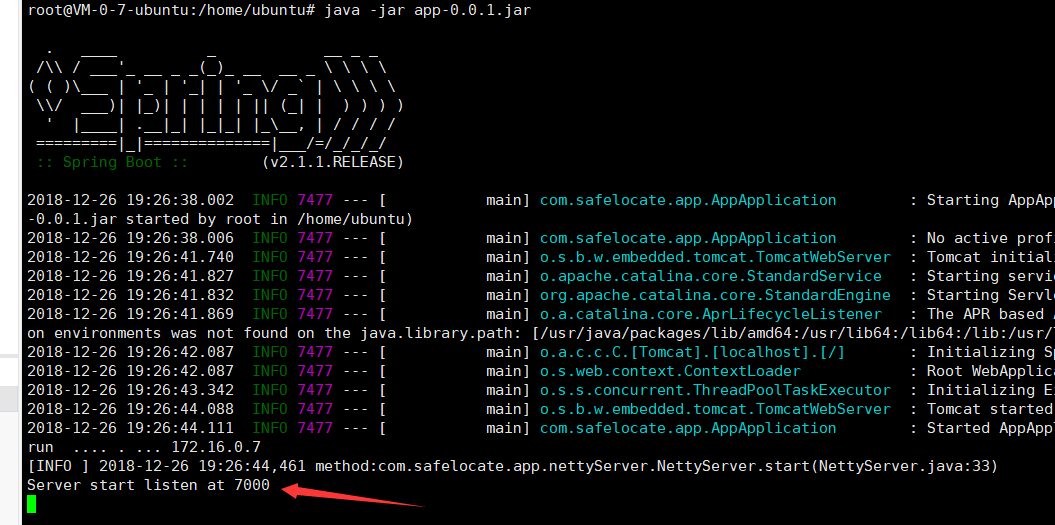
之后java -jar命令运行,如果需保持后台一直运行 就用nohup命令,可以看到程序已经跑起来了,等待客户端连接交互

之后就是写客户端了,客户端其实是依葫芦画瓢,跟上面类似
Handler
package client;

import io.netty.channel.ChannelHandlerContext;

import io.netty.channel.ChannelInboundHandlerAdapter;

public class ClientHandler extends ChannelInboundHandlerAdapter {

    @Override

    public void channelActive(ChannelHandlerContext ctx) {

        System.out.println("ClientHandler Active");

    }

    @Override

    public void channelRead(ChannelHandlerContext ctx, Object msg) {

        System.out.println("--------");

        System.out.println("ClientHandler read Message:"+msg);

    }

    @Override

    public void exceptionCaught(ChannelHandlerContext ctx, Throwable cause) {

        cause.printStackTrace();

        ctx.close();

    }

}
ClientHandler.java
ChannelInitializer
package client;

import io.netty.channel.ChannelInitializer;

import io.netty.channel.ChannelPipeline;

import io.netty.channel.socket.SocketChannel;

import io.netty.handler.codec.string.StringDecoder;

import io.netty.handler.codec.string.StringEncoder;

import io.netty.util.CharsetUtil;

public class ClientChannelInitializer extends ChannelInitializer<SocketChannel> {

    protected void initChannel(SocketChannel channel) throws Exception {

        ChannelPipeline p = channel.pipeline();

        p.addLast("decoder", new StringDecoder(CharsetUtil.UTF_8));

        p.addLast("encoder", new StringEncoder(CharsetUtil.UTF_8));

        p.addLast(new ClientHandler());

    }

}
ClientChannelInitializer
主函数所在类,即客户端
package client;

import io.netty.bootstrap.Bootstrap;

import io.netty.channel.*;

import io.netty.channel.nio.NioEventLoopGroup;

import io.netty.channel.socket.SocketChannel;

import io.netty.channel.socket.nio.NioSocketChannel;

import io.netty.handler.codec.string.StringDecoder;

import io.netty.handler.codec.string.StringEncoder;

public class Client {

    static final String HOST = System.getProperty("host", "服务器的IP地址");

    static final int PORT = Integer.parseInt(System.getProperty("port", "7000"));

    static final int SIZE = Integer.parseInt(System.getProperty("size", "256"));

    public static void main(String[] args) throws Exception {

        sendMessage("hhhh");

    }

    public static void sendMessage(String content) throws InterruptedException{

        // Configure the client.

        EventLoopGroup group = new NioEventLoopGroup();

        try {

            Bootstrap b = new Bootstrap();

            b.group(group)

                    .channel(NioSocketChannel.class)

                    .option(ChannelOption.TCP_NODELAY, true)

                    .handler(new ChannelInitializer<SocketChannel>() {

                        @Override

                        public void initChannel(SocketChannel ch) throws Exception {

                            ChannelPipeline p = ch.pipeline();

                            p.addLast("decoder", new StringDecoder());

                            p.addLast("encoder", new StringEncoder());

                            p.addLast(new ClientHandler());

                        }

                    });

            ChannelFuture future = b.connect(HOST, PORT).sync();

            future.channel().writeAndFlush(content);

            future.channel().closeFuture().sync();

        } finally {

            group.shutdownGracefully();

        }

    }

}
Client.java
启动客户端,这里就是简单发送一条"hhhh",可以看到客户端已经收到服务器发来的信息

然后再看服务端,也有相应的信息打印

推荐一个挺好的学netty的博客,https://blog.csdn.net/linuu/article/details/51306480,搭配netty实战这本书一起学习效果很好
实战:根据上面完成一个简(la)单(ji)的聊天室应用(无界面,基于CMD)
这里服务端可以单独分出来可以单独作为一个工程打包为jar,万万没必要Springboot,但这里懒得改了,就还是当后台用吧hhh
首先,服务端需要展示的就是每个人所发出来的信息,和对上线人数下线人数进行实时的更新,之前更新是利用一个静态变量,
但是这样硬核了一点,这里正好要用到群发的功能,所以我们需要一个list来存放Channel,然后将这个list的size作为在线人数就好了
群发就遍历这个数组,然后writeAndFlush
package com.safelocate.app.nettyServer;

import io.netty.channel.*;

import io.netty.channel.group.ChannelGroup;

import io.netty.channel.group.DefaultChannelGroup;

import io.netty.util.concurrent.GlobalEventExecutor;

public class ServerHandler extends ChannelInboundHandlerAdapter {

    private static ChannelGroup channels = new DefaultChannelGroup(GlobalEventExecutor.INSTANCE);

    @Override

    public void handlerAdded(ChannelHandlerContext ctx) throws Exception{

        channels.add(ctx.channel());//加入ChannelGroup

        System.out.println(ctx.channel().id()+" come into the chattingroom,"+"Online: "+channels.size());

    }

    @Override

    public void handlerRemoved(ChannelHandlerContext context){

        System.out.println(context.channel().id()+" left the chattingroom,"+"Online: "+channels.size());

    }

    @Override

    public void channelActive(ChannelHandlerContext ctx) {

    }

    @Override

    public void channelRead(ChannelHandlerContext ctx, Object msg) throws Exception {

        //打印消息然后群发

        System.out.println(msg.toString());

        for (Channel channel:channels){

            channel.writeAndFlush(msg.toString());

        }

    }

    @Override

    public void exceptionCaught(ChannelHandlerContext ctx, Throwable cause) throws Exception {

        System.out.println(ctx.channel().id()+" occurred into error,"+"Online: "+channels.size());

        ctx.close();

    }

}
ServerHandler
照样,打包成jar,java -jar命令运行就行,哦对由于这里是本地测试,所以yml文件中的IP应该换成127.0.0.1
接下来是客户端,首先明确的就是用户需要输入信息,所以肯定要用到输入函数,比如Scanner,另外,服务端需要知道每一个人的身份,这里
简单的用昵称来代替,在发送的时候将名字也一并发过去,这样就能简单分辨是谁发的信息(其实这样做主要是因为没来得及写数据库升级复杂一点的逻辑)
所以,在之前发信息的函数里稍微处理一下就行,即增加信息输入模块
public static void sendMessage() throws InterruptedException{

        // Configure the client.

        EventLoopGroup group = new NioEventLoopGroup();

        try {

            Bootstrap b = new Bootstrap();

            b.group(group)

                    .channel(NioSocketChannel.class)

                    .option(ChannelOption.TCP_NODELAY, true)

                    .handler(new ChannelInitializer<SocketChannel>() {

                        @Override

                        public void initChannel(SocketChannel ch) throws Exception {

                            ChannelPipeline p = ch.pipeline();

                            p.addLast("decoder", new StringDecoder(CharsetUtil.UTF_8));

                            p.addLast("encoder", new StringEncoder(CharsetUtil.UTF_8));

                            p.addLast(new ClientHandler());

                        }

                    });

            ChannelFuture future = b.connect(HOST, PORT).sync();

            Scanner sca=new Scanner(System.in);

            while (true){

                String str=sca.nextLine();//输入的内容

                if (str.equals("exit"))

                    break;//如果是exit则退出

                future.channel().writeAndFlush(name+"-: "+str);//将名字和信息内容一起发过去

            }

            future.channel().closeFuture().sync();

        } finally {

            group.shutdownGracefully();

        }

    }
sendMessage()
之后把IP改成127.0.0.1就行,打包的时候,需要在pom文件中添加打包插件,特别注意的是要制定mainClass,不然运行时会报“没有主清单属性”
这里贴上插件配置,这个插件其实对于所有Java程序都适用,因为他会把依赖全带上
<!-- java编译插件 -->

            <plugin>

                <groupId>org.apache.maven.plugins</groupId>

                <artifactId>maven-compiler-plugin</artifactId>

                <configuration>

                    <source>1.8</source>

                    <target>1.8</target>

                    <encoding>UTF-8</encoding>

                </configuration>

            </plugin>

            <plugin>

                <groupId>org.apache.maven.plugins</groupId>

                <artifactId>maven-jar-plugin</artifactId>

                <configuration>

                    <archive>

                        <manifest>

                            <addClasspath>true</addClasspath>

                            <classpathPrefix>lib/</classpathPrefix>

                            <mainClass>client.Client</mainClass>

                        </manifest>

                    </archive>

                </configuration>

            </plugin>

            <plugin>

                <groupId>org.apache.maven.plugins</groupId>

                <artifactId>maven-dependency-plugin</artifactId>

                <executions>

                    <execution>

                        <id>copy</id>

                        <phase>install</phase>

                        <goals>

                            <goal>copy-dependencies</goal>

                        </goals>

                        <configuration>

                            <outputDirectory>${project.build.directory}/lib</outputDirectory>

                        </configuration>

                    </execution>

                </executions>

            </plugin>
pom
打包后之后就是运行了,效果大概是这样.。。。。。。

哈哈哈哈有时间再完善一下
SpringBoot集成netty实现客户端服务端交互和做一个简单的IM的更多相关文章
- netty实现客户端服务端心跳重连
前言: 公司的加密机调度系统一直使用的是http请求调度的方式去调度,但是会出现网络故障导致某个客户端或者服务端断线的情况,导致很多请求信息以及回执信息丢失的情况,接着我们抛弃了http的方式,改为T ...
- netty系列之:小白福利!手把手教你做一个简单的代理服务器
目录 简介 代理和反向代理 netty实现代理的原理 实战 总结 简介 爱因斯坦说过:所有的伟大,都产生于简单的细节中.netty为我们提供了如此强大的eventloop.channel通过对这些简单 ...
- SpringBoot 集成Netty实现UDP Server
注:ApplicationRunner 接口是在容器启动成功后的最后一步回调(类似开机自启动). UDPServer package com.vmware.vCenterEvent.netty; im ...
- 实现Java Socket 客户端服务端交互实例
SocketService.java package socket; import java.io.BufferedReader; import java.io.IOException; import ...
- SpringBoot学习笔记(13)----使用Spring Session+redis实现一个简单的集群
session集群的解决方案: 1.扩展指定server 利用Servlet容器提供的插件功能,自定义HttpSession的创建和管理策略,并通过配置的方式替换掉默认的策略.缺点:耦合Tomcat/ ...
- 通过springBoot集成搭建webScoket服务器
前言: 最近工作中有一个需求,就是服务端要主动推送消息给客户端,而我们平常的Http请求只能一请求一响应,为此学习了webScokset通讯技术,以下介绍的是java 通过SpringBoot集成we ...
- springboot集成elasticsearch
在基础阶段学习ES一般是首先是 安装ES后借助 Kibana 来进行CURD 了解ES的使用: 在进阶阶段可以需要学习ES的底层原理,如何通过Version来实现乐观锁保证ES不出问题等核心原理: 第 ...
- 【springBoot】springBoot集成redis的key,value序列化的相关问题
使用的是maven工程 springBoot集成redis默认使用的是注解,在官方文档中只需要2步; 1.在pom文件中引入即可 <dependency> <groupId>o ...
- SpringBoot集成redis的key,value序列化的相关问题
使用的是maven工程 springBoot集成redis默认使用的是注解,在官方文档中只需要2步; 1.在pom文件中引入即可 <dependency> <groupId>o ...
随机推荐
- oracle service name sid , 用户 和 表空间
oracle 的四个概念: 数据库: 就是一堆静态的数据文件.注意是静态的 instance 实例: 可以类比数据库连接. 实例就是为了操作数据库而开辟的进程和内存空间,有了这个实例你才能操作数据库. ...
- AX_CreateAndPostPurch
static void CreateAndPostPurch(Args _args) { List il = new List(Types::Record); DocumentNum Document ...
- Jmeter 聚合报告---测试结果分析
当我们测试完后,最关心就是结果数据了,下面一起来分析Jmeter聚合报告数据. 首先来看下Jmeter的help是如何解释这些含义的. 1.Label - The label of the sampl ...
- 前端ajax技术之跨域问题解决
这里我使用jquery框架的ajax技术 <script type="text/javascript" src="Assets/js/jquery.min.js&q ...
- gitlab的安装和基本使用
一.gitlab的安装 1)安装依赖包 sudo yum install git vim gcc glibc-statc telnet -y sudo yum install -y curl poli ...
- java程序员随笔
之前坚持过一段时间的博客,不过后来因为一些琐事,也因为自己的懒惰,没坚持下来.一晃本科毕业到现在已经快9年了,本科毕业的时候经常想,自己十年之后会是什么样子,那时候筹措满志,心里的每一个答案,都离现在 ...
- 【js jQuery】map集合 循环迭代取值---以及 map、json对象、list、array循环迭代的方法和区别
后台给前台传来一个map @ResponseBody @RequestMapping(value = "getSys") public Map<Long,String> ...
- es6剩余参数
function show(a,b,...args){ console.log(a) console.log(b) console.log(args) } show(10,20,30,30,36)
- vs C++ scanf 不安全
项目->属性-> c/c++->预处理器->预处理器定义->加入下面这句: _CRT_SECURE_NO_DEPRECATE
- p112 the podocyte
正常人尿液只有一很少的蛋白质.尿蛋白特别是白蛋白的出现,是肾小球疾病的重要特征,也是众多肾脏疾病的关键的诊断标记,包括了统计数据或者说经济效应上都很重要的那些肾病.糖尿病肾病等等.可能没被广泛认识的是 ...
