vue阿里上传图片报400错误
首先我用vue上传阿里图片用的是分片上传,分片上传由于一片是以100kb为起始的,所以当图片大小小于100kb的时候不分片,可以正常上传,当大于100kb的时候,会报400错误如下
One or more of the specified parts could not be found or the specified entit
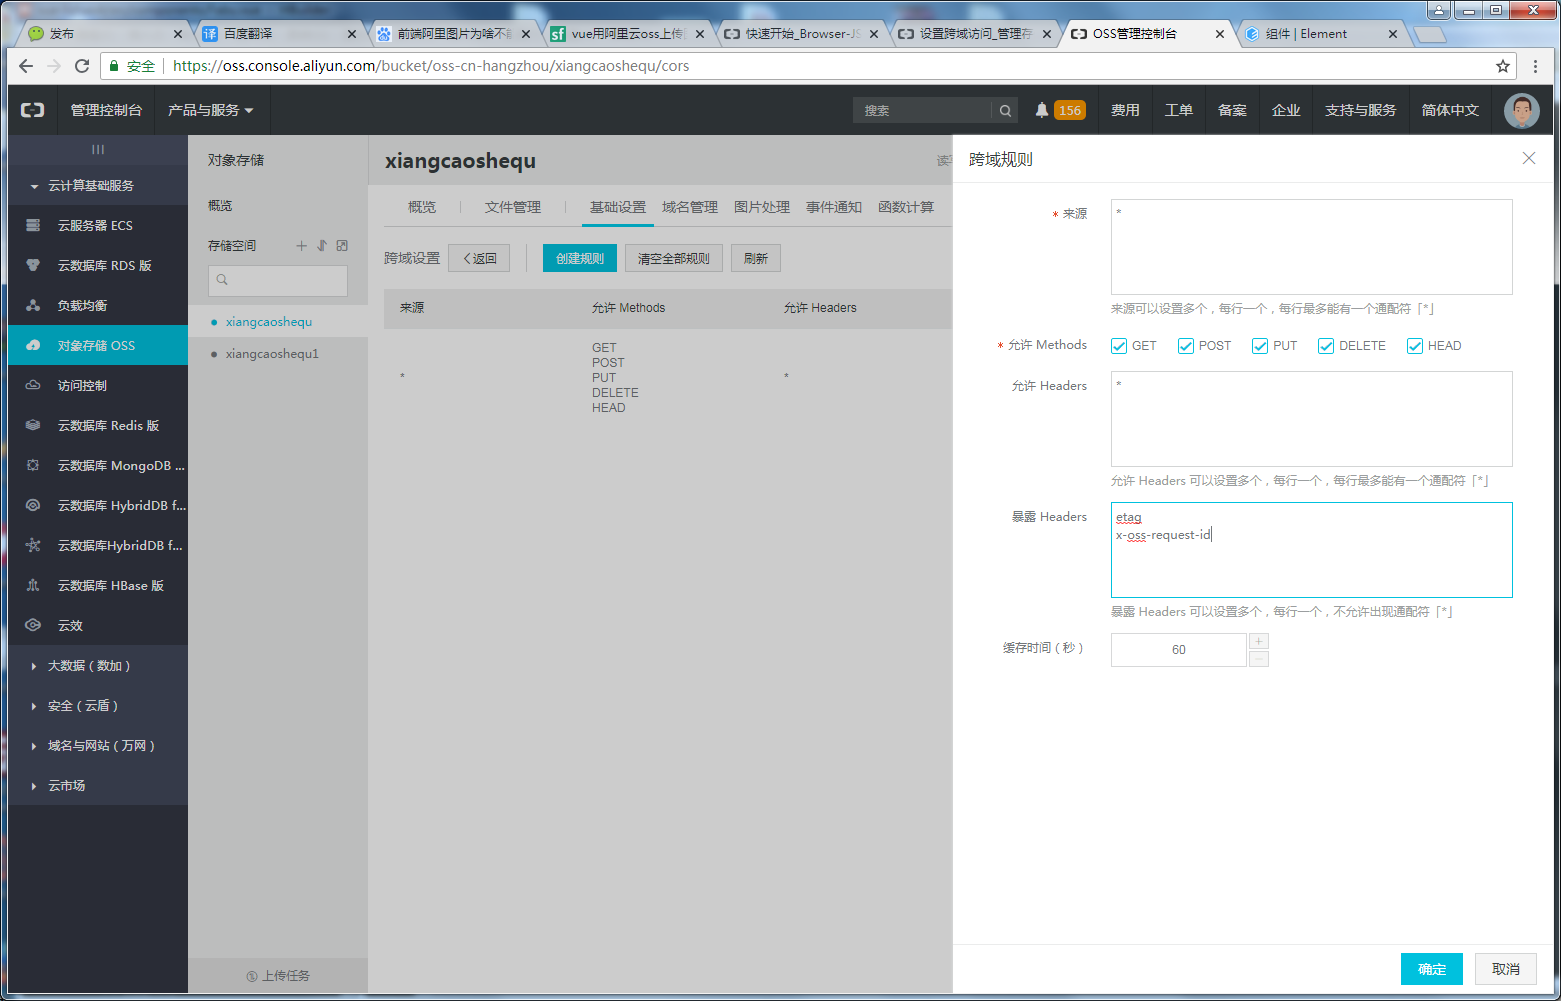
当报这个错误时你要去登录阿里后台设置一下
文档地址:https://help.aliyun.com/document_detail/32069.htm

exopose header 要设置为 ETag
设置如下图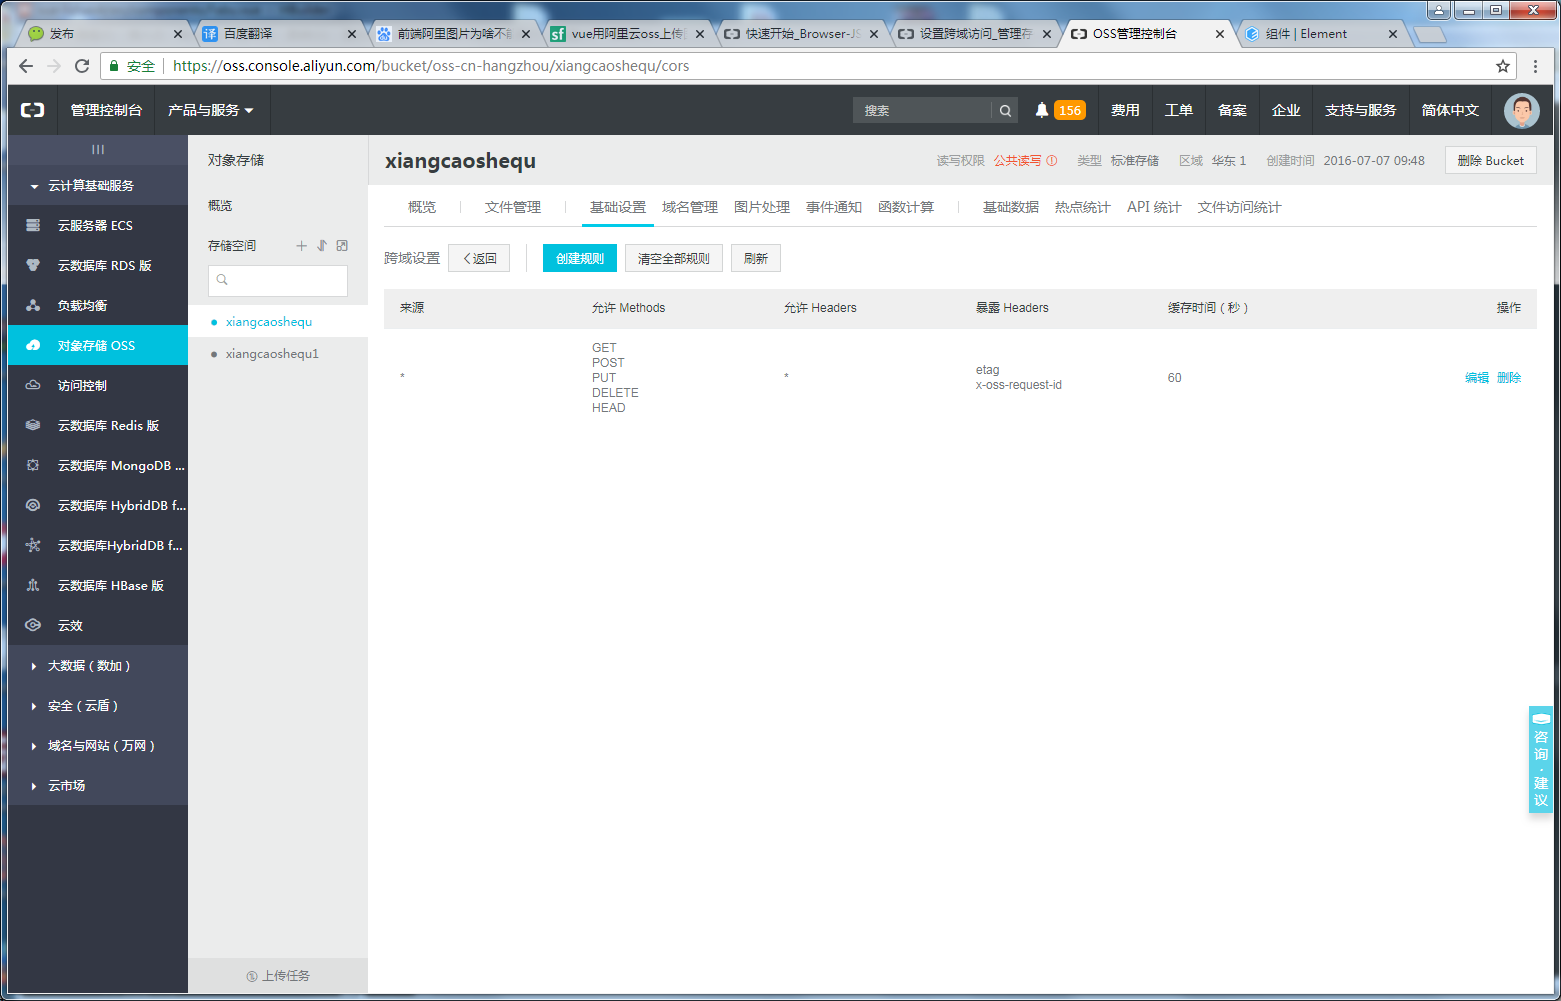
当你设置好了之后发现大于100kb也可以上传了,只不过阿里返回的图片链接格式有所不同
大于100kb的图片链接?后面带了一些参数你要截取
下面是我的代码,运用了element组件库,包含了图片上传阿里,图片压缩
<template>
<div class="fabu">
<div class="d1">
<div class="dd1">
<textarea placeholder="想要说的..." v-model="form.comment"></textarea>
<el-upload
action=""
:http-request="zidingyi_upload"
list-type="picture-card"
ref="upload"
:limit="3"
:auto-upload="false"
:on-preview="handlePictureCardPreview"
:on-remove="handleRemove"
:on-exceed="handleExceed"
:before-remove="beforeRemove"
:file-list="fileList"><!--auto-upload是否在选取文件后立即进行上传 exceed超出限制--><!--http-request点击发布--><!--:on-progress上传进度-->
<i class="el-icon-plus"></i>
</el-upload>
</div>
<!--图片查看-->
<el-dialog :visible.sync="dialogVisible">
<img width="100%" :src="dialogImageUrl" alt="">
</el-dialog> <div class="dd2"><p>红包个数</p><p><input type="number" v-model="form.packet_count" placeholder="填写个数"/>个</p></div>
<div class="dd3"><p>单个金额</p><p><input type="number" v-model="form.single_Amount" placeholder="填写金额"/>元</p></div> <el-button class="fa" @click="submitUpload">发布</el-button>
</div> </div>
</template> <script>
// var OSS = require('ali-oss')
export default{
name:'fabu',
data(){
return{
dialogImageUrl: '',
dialogVisible: false,
fileList:[], img_url_num:[],//用户发布时的图片 user_token:'',
form:{//发布时的参数
comment:'',
imagea:'',
imageb:'',
imagec:'',
lat:'',
lng:'',
single_Amount:'',//红包单价
packet_count:'',//红包个数
}, }
},
mounted(){
this.user_token=localStorage.getItem('user_token')
this.form.lat=localStorage.getItem('lat')
this.form.lng=localStorage.getItem('lng')
},
methods:{
//自定义点击上传
submitUpload(){
if(this.$refs.upload.submit()!=undefined){//如果用户点击发布时有上传图片
if(this.form.comment==''){
this.$alert('你还没有填写发布内容','提示',{
confirmButtonText: '确定',
callback:action => {
}
})
return
}
this.$refs.upload.submit()
}else{//如果用户点击发布时没有有上传图片
if(this.form.comment==''){
this.$alert('你还没有填写发布内容','提示',{
confirmButtonText: '确定',
callback:action => {
}
})
return
}
this.userLaunchEvent2()
} },
//移除图片
handleRemove(file, fileList) {
console.log(file, fileList);
},
//点击文件列表中已上传的文件时的钩子,可修改放大图片及删除
handlePictureCardPreview(file){
this.dialogImageUrl = file.url;
this.dialogVisible = true;
},
//超出限制
handleExceed(files, fileList) {
this.$message.warning(`当前限制选择 3 个文件,本次选择了 ${files.length} 个文件,共选择了 ${files.length + fileList.length} 个文件`);
},
//删除图片
beforeRemove(file, fileList) {
return this.$confirm(`确定移除 ${ file.name }?`);
},
//自定义图片上传
zidingyi_upload(event){
console.log(event)
//先压缩在上传
//利用H5的FileReader对象将上传的图片转成base64格式
this.h5_reader(event.file)
},
//阿里图片上传
doUpload(file){
let that =this
const client = new OSS.Wrapper({
secure: false,//http
region: 'oss-cn-hangzhou',
accessKeyId: '9eEB2RAzLHaW5Asu',
accessKeySecret: 'YdbWni4mRxDy0ndN6g4xH9ErpkV5ZT',
bucket: 'xiangcaoshequ'/*装图片的桶名*/
})
//获取图片的的格式
let type = file.type.split('/')[1];
//自定义上传的名字
let name = 'xcb'+file.lastModified+'.'+type;
// let name = 'lz'+this.user_phone+'.'+type; // console.log(type) if(file.size>this.fileSize){
this.$alert('亲,你上传的头像太大了,不能大于1M哦', '提示', {
confirmButtonText: '确定',
callback: action => {
}
});
return
}
client.multipartUpload(name, file,{
progress:function*(percentage, cpt){
// 上传进度
that.percentage = percentage
console.log(percentage)
}
}).then((result)=> {
console.log(result)//至此就拿到了返回的路径
//得到上传后的地址
let user_img = result.res.requestUrls[0];
//因为图片压缩之后大于100kb的情况下返回的图片路径有?而小于100kb没有,所以我做以下处理
let img_url=user_img.split('?')[0]
//上传是的图片路径放到数组里
this.img_url_num.push(img_url)
//调用后台接口
this.userLaunchEvent()
}).catch(function (err) {
console.log(err);
});
},
// 压缩图片
compress(img) {
let canvas = document.createElement("canvas");
let ctx = canvas.getContext("2d");
let initSize = img.src.length;
let width = img.width;
let height = img.height;
canvas.width = width;
canvas.height = height;
// 铺底色
ctx.fillStyle = "#fff";
ctx.fillRect(0, 0, canvas.width, canvas.height);
ctx.drawImage(img, 0, 0, width, height); //0.1进行最小压缩
let ndata = canvas.toDataURL("image/jpeg", 0.5);
// console.log("*******压缩后的图片大小*******");
// console.log(ndata)
// console.log(ndata.length);
return ndata;
},
//利用H5的FileReader对象将上传的图片转成base64格式
h5_reader(file){
var that=this
//创建一个reader
let reader = new FileReader();
//将图片转成base64格式
reader.readAsDataURL(file);
//读取成功后的回调
reader.onloadend = function() {
let result = this.result;
let img = new Image();
img.src = result;
console.log("********未压缩前的图片大小********");
console.log(result.length);
img.onload = function() {
let data = that.compress(img);
that.imgUrl = result; let blob = that.dataURItoBlob(data); console.log("*******base64转blob对象******");
console.log(blob); var formData = new FormData();
formData.append("file", blob);
console.log("********将blob对象转成formData对象********");
console.log(formData.get("file")); //压缩之后再阿里上传
let event =formData.get("file")
that.doUpload(event)
};
}; },
// base64转成bolb对象
dataURItoBlob(base64Data) {
var byteString;
if (base64Data.split(",")[0].indexOf("base64") >= 0)
byteString = atob(base64Data.split(",")[1]);
else byteString = unescape(base64Data.split(",")[1]);
var mimeString = base64Data
.split(",")[0]
.split(":")[1]
.split(";")[0];
var ia = new Uint8Array(byteString.length);
for (var i = 0; i < byteString.length; i++) {
ia[i] = byteString.charCodeAt(i);
}
return new Blob([ia], { type: mimeString });
},
//得到上传后的三个图片路径,调用接口
//阿里图片上传之后的请求的发布内容
userLaunchEvent(){
this.form.imagea=this.img_url_num[0]
this.form.imageb=this.img_url_num[1]
this.form.imagec=this.img_url_num[2]
if(this.form.imageb==undefined){
this.form.imageb=''
}
if(this.form.imagec==undefined){
this.form.imagec=''
}
console.log(this.form)
this.$http.post('https://www.52herb.com/yuandi/campaign/userLaunchEvent?token='+this.user_token,this.form).then((res)=>{
console.log(res)
})
},
//如果用户没有上传图片只是发了内容
userLaunchEvent2(){
console.log(this.form)
this.$http.post('https://www.52herb.com/yuandi/campaign/userLaunchEvent?token='+this.user_token,this.form).then((res)=>{
console.log(res)
})
},
//微信支付
zhifu_money(){
let url = window.location.href.split('#')[0];
url = encodeURIComponent(url)
this.$http.get('https://www.52herb.com/yuandi/app/weixinSign?url='+url).then((res)=>{
wx.config({
debug: false, // 开启调试模式,调用的所有api的返回值会在客户端alert出来,若要查看传入的参数,可以在pc端打开,参数信息会通过log打出,仅在pc端时才会打印。
appId: 'wx0e8a3c02faa5d089',
timestamp: res.body.data.timestamp,
nonceStr:res.body.data.nonceStr,
signature: res.body.data.signature,
jsApiList: [
'chooseWXPay'
] // 必填,需要使用的JS接口列表
});
}) let user_money = 0;
let money = input_value*100;//产品价格
let pay_type = 'reachW'//微信支付
this.$http.get("https://www.52herb.com/yuandi/pay/reach/weixin/preorderh5?money="+money+"&user_money="+user_money+"&pay_type="+pay_type+"&openId="+this.openid+"&shop_guid="+this.shop_guid+"&token="+this.user_token+"¬ify_url=http://www.xiangcaobang.com/webapp/saoma.html&status=1").then((res)=>{
// alert(JSON.stringify(res))
var orderId =res.body.orderId;
wx.chooseWXPay({
timestamp: res.body.timeStamp, // 支付签名时间戳,注意微信jssdk中的所有使用timestamp字段均为小写。但最新版的支付后台生成签名使用的timeStamp字段名需大写其中的S字符
nonceStr: res.body.nonceStr, // 支付签名随机串,不长于 32 位
package: res.body.package, // 统一支付接口返回的prepay_id参数值,提交格式如:prepay_id=\*\*\*)
signType: 'MD5', // 签名方式,默认为'SHA1',使用新版支付需传入'MD5'
paySign: res.body.paySign, // 支付签名
success: function (res) {
// 支付成功后的回调函数
that.$http.post("https://www.52herb.com/yuandi/pay/weixin/updateUserOrder?orderId="+orderId+"&token="+that.user_token+"&method=2").then((res)=>{
// alert(JSON.stringify(res))
if(res.body.code==0){
that.$confirm('支付成功', '提示', {
confirmButtonText: '继续支付',
cancelButtonText: '返回首页',
type: 'warning'
}).then(() => {
//获取用户当天余额抵扣多少钱
that.huoqucishu()
}).catch(() => {
that.$router.push({name:'Index'})
});
}
}) }
})
}) } }
}
</script> <style scoped="scoped">
/*.fa{font-size: 0.3rem;width: 50%;height: 0.8rem;line-height: 0.8rem;background: green;margin: auto;text-align: center;}*/
.up .el-upload{width: 0.5rem;height: 0.5rem;} .fabu{background: #f0f0f0;position: absolute;width: 100%;height: 100%;}
.d1 .dd1{height: 4rem;background: white;padding: 0.2rem 0.2rem 0 0.2rem;}
.d1 textarea{height: 2rem;width: 100%;padding: 0.1rem;box-sizing: border-box;line-height: 0.35rem;color: orange;} .d1 .dd2,.d1 .dd3{padding: 0 0.2rem;box-sizing: border-box; background: white;height: 0.8rem;line-height: 0.8rem;display: flex;font-size: 0.3rem;margin-top: 0.2rem;justify-content: space-between;}
.d1 .dd2 input,.d1 .dd3 input{width: 1.5rem;}
</style>
vue阿里上传图片报400错误的更多相关文章
- MVC中使用jquery uploadify上传图片报302错误
使用jquery uploadify上传图片报302错误研究了半天,发现我上传的action中有根据session判断用户是否登录,如果没有登录就跳到登陆页,所以就出现了302跳转错误.原来更新了fl ...
- Yii2请求,报400错误
出现400错误是yii2.0的csrf防范策略导致 在components里面添加request配置如下: 'request' => [ // !!! insert a secret key i ...
- 访问本机的WEB API 报400错误
当时用的IP是127.0.0.1 报400错误,换成 localhost 后正常.
- SpringMVC提交数据遭遇基础类型和日期类型报400错误解决方法
使用SpringMVC开发的时候,页面如果有日期格式的数据,后台接受也是java.util.Date,则报告400错误 .下面是解决方案的演示示例: 这个是实体类,里面createDate就是java ...
- Yii 1.1 请求报400错误
Yii的action可以带参数,比如: class PostController extends CController { public function actionCreate($categor ...
- swagger-ui中测试接口(enum传值) 报400错误
swagger-ui中测试接口(enum传值) 报400错误 PriceRuleController: @PostMapping("/update") @ApiOperation( ...
- cdnbest里站点域名不同步到节点,报400错误的一般原因
报400错误一般是站点里的域名没有同步到节点上面的原因,产生的原因一般是下面两点原因: 1.检查节点列表如下图所示的状态是否打钩,这是节点和主控的通信状态,打叉表示连接有问题 这里打叉的几种原因(1) ...
- 解决nginx转发websocket报400错误
解决nginx转发websocket报400错误 说明 由于个人服务器上面有多个项目,配置了二级域名,需要对二级域名进行转发,在转发工作这快采取了大名鼎鼎的nginx.在这之前所有的项目运行转发都没问 ...
- js 记一次带时间的表单提交报400错误
写一个功能的时候,表单里不填时间提交的时候,数据就正常传到后台了,一填上时间就报400错误,看了后台时间的处理也没问题,看了前端时间控件返回的格式也对,但是就是一直报错, 把提交的数据打印出来也没发现 ...
随机推荐
- 数据库设计理论与实践·<三>物理设计
一.物理设计核心任务与关键细节 二.物理设计经验之谈 1.数据类型的设计:建议字段数据类型定义时结合以下几点(以MYSQL为例) 1)不适用image,而使用varbinary等 2)不使用text和 ...
- cpp typename关键字
泛型编程关键字,C#内也有这个概念. 从属名称(dependent names):模板(template)内出现的名称, 相依于某个模板(template)参数, 如T t; 嵌套从属名称(neste ...
- span i s等行内元素标签之间出现奇怪空格符号
上述展开信息本来是这样写的,但是很奇怪windows下的测试环境支付时间前面莫名其妙多了个小方框 <p> <span><i>收货人:</i>{remar ...
- steps/align_si.sh
usage: steps/align_si.sh <data-dir> <lang-dir> <src-dir> <align-dir> e.g.: s ...
- GridsearchCV调参
在利用gridseachcv进行调参时,其中关于scoring可以填的参数在SKlearn中没有写清楚,就自己找了下,具体如下: parameters = {'eps':[0.3,0.4,0.5,0. ...
- react-踩坑记录——Link带参数跳转后this.props为空对象
原因,自组件在挂载时,父组件没向其传props划线部分不可缺少!!!!!!
- 课程8:《Maven精品教程视频》--视频目录
2017年3月18日 老师讲的课程 \day01视频\01maven依赖管理.avi; \day01视频\02maven项目构建.avi; \day01视频\03maven程序安装.avi; \day ...
- JAVA锁和volatile的内存语义&volatile的使用场景
JAVA锁的内存语义 当线程释放锁时,JMM(Java Memory Model)会把该线程对应的本地内存中的共享变量刷新到主内存中. 当线程获取锁时,JMM会将该线程对应的本地内存置为无效.从而使得 ...
- Javascript - ExtJs - 整合百度文章编辑器
ExtJs - 整合百度文章编辑器(ExtJs UEditor) 第一步:去官网下载最新版本的UEditor,UEditor下载. 第二步:在编辑器根目录创建一个Extjs-Editor.js,录入以 ...
- ASP.NET MVC - WEB API
ASP.NET WEB API 与WEB API有关的类型 HttpMessageHandler(System.Net.Http)(消息处理器) 表示Http请求的处理程序,处理程序类似于Http管道 ...