webpack4升级指南
webpack4升级指南
鉴于图书项目编译速度极慢的情况(项目里面module太多了,编译慢很正常)且最近需求不多(很少出现的空挡期)。所以我觉得搞一波webpack升级,看看有没有帮助。webpack于2018年2月25正式发布v4.0.0版本,代号legato。名字是不是很大器,不明觉厉的样子。废话少说下面正式进入主题。(本文的升级配置主要针对vue项目)
一、webpack4更新变化
先说一下webpack4有几个比较重要的更新:webpack4更新日志
1.环境支持: 官方不再支持Node 4,Node 6,最好使用v8.5.0以上稳定版本。支持93%的ES6语法。因为webpack4使用了很多JS新的语法,它们在新版本的 v8 里经过了优化。
2.0配置: 受Parcel打包工具启发,尽可能的让开发者运行项目的成本变低。webpack4不再强制需要 webpack.config.js 作为打包的入口配置文件了,它默认的入口为'./src/'和默认出口'./dist',这对于小项目来说确实是一件不错的事情。
3.mode选项: 告知 webpack 使用相应模式的内置优化。可选 development 或 production,举个栗子。
module.exports = {

  mode: 'production'

};
或者从 CLI 参数中传递:
webpack --mode = production
| 选项 | 描述 |
|---|---|
| development | 会将 process.env.NODE_ENV 的值设为 development。启用 NamedChunksPlugin 和 NamedModulesPlugin。 |
| production | 会将 process.env.NODE_ENV 的值设为 production。启用 FlagDependencyUsagePlugin, FlagIncludedChunksPlugin, ModuleConcatenationPlugin, NoEmitOnErrorsPlugin, OccurrenceOrderPlugin, SideEffectsFlagPlugin 和 UglifyJsPlugin. |
注意:只设置 NODE_ENV,则不会自动设置 mode
mode: development
// webpack.dev.config.js

module.exports = {

+ mode: 'development'

- plugins: [

-   new webpack.NamedModulesPlugin(),

-   new webpack.DefinePlugin({ "process.env.NODE_ENV": JSON.stringify("development") }),

- ]

}
mode: production
// webpack.prod.config.js

module.exports = {

+  mode: 'production',

-  plugins: [

-    new UglifyJsPlugin(/* ... */),

-    new webpack.DefinePlugin({ "process.env.NODE_ENV": JSON.stringify("production") }),

-    new webpack.optimize.ModuleConcatenationPlugin(),

-    new webpack.NoEmitOnErrorsPlugin()

-  ]

}
4.插件变化: webpack4删除了CommonsChunkPlugin插件,它使用内置API optimization.splitChunks 和 optimization.runtimeChunk,即webpack会默认为你生成共享的代码块。
5.Rule.loaders: 此选项已废弃(Rule.loaders 是 Rule.use 的别名。可以使用Rule.use)
6.WebAssembly: 开箱即用WebAssembly(这个没用到,不知道是啥)
二、升级webpack4 loader及插件的配置修改
升级webpack4首先需要更新webpack到v4.0.0以上版,然后安装webpack-cli,建议使用cnpm安装,有时候npm安装下载不下来。
npm install --save-dev webpack-cli
项目相关的loader和插件也是需要更新的,不然会报错。接下来介绍一些需要额外配置的loader和插件。
1.vue-loader(更多细节)
Vue Loader v15 现在需要配合一个 webpack 插件才能正确使用:
// webpack.config.js

const VueLoaderPlugin = require('vue-loader/lib/plugin')

module.exports = {

  // ...

  plugins: [

    new VueLoaderPlugin()

  ]

}
现在 Vue Loader v15 使用了一个不一样的策略来推导语言块使用的 loader。
拿 <style lang="less"> 举例:在 v14 或更低版本中,它会尝试使用 less-loader 加载这个块,并在其后面隐式地链上 css-loader 和 vue-style-loader,这一切都使用内联的 loader 字符串。
在 v15 中,<style lang="less"> 会完成把它当作一个真实的 *.less 文件来加载。因此,为了这样处理它,你需要在你的主 webpack 配置中显式地提供一条规则:
{

  module: {

    rules: [

      // ... 其它规则

      {

        test: /\.less$/,

        use: [

          'vue-style-loader',

          'css-loader',

          'less-loader'

        ]

      }

    ]

  }

}
这样做的好处是这条规则同样应用在 JavaScript 里普通的 *.less 导入中,并且你可以为这些 loader 配置任何你想要的选项。在 v14 或更低版本中,如果你想为一个推导出来的 loader 定制选项,你不得不在 Vue Loader 自己的 loaders 选项中将它重复一遍。在 v15 中你再也没有必要这么做了。如果是用cli搭建的项目,升级webpack4时,别忘记把配置中的样式规则删掉,如下:
//webpack.dev.conf.js

const devWebpackConfig = merge(baseWebpackConfig, {

    mode: 'development',

-   module: {

-     rules: utils.styleLoaders({ sourceMap: config.dev.cssSourceMap, usePostCSS: true })

-   },

    //其他配置...

})
webpack.prod.conf.js文件同上修改
鉴于 v15 中的推导变化,如果你导入一个 node_modules 内的 Vue 单文件组件,它的 <script> 部分在转译时将会被排除在外。为了确保 JS 的转译应用到 node_modules 的 Vue 单文件组件,你需要通过使用一个排除函数将它们加入白名单:
{

  test: /\.js$/,

  loader: 'babel-loader',

  exclude: file => (

    /node_modules/.test(file) &&

    !/\.vue\.js/.test(file)

  )

}
Vue Loader v15 还废弃了很多选项,它们应该使用普通的 webpack 模块的规则来配置:
- loader
- preLoaders
- postLoaders
- postcss
- cssSourceMap
- buble
- extractCSS
- template
下列选项已经被废弃了,它们应该使用新的 compilerOptions 选项来配置:
- preserveWhitespace (使用 compilerOptions.preserveWhitespace)
- compilerModules (使用 compilerOptions.modules)
- compilerDirectives (使用 compilerOptions.directives)
下列选项已经被改名了:
- transformToRequire (现在改名为 transformAssetUrls)
2.CommonsChunkPlugin
前面提及到webpack4删除了CommonsChunkPlugin插件,需要使用内置API optimization.splitChunks 和 optimization.runtimeChunk替代,具体替代配置如下:
//webpack.prod.conf.js

optimization: {

    //其他配置

    runtimeChunk: {

      name: 'manifest'

    },

    splitChunks:{

      chunks: 'async',

      minSize: 30000,

      minChunks: 1,

      maxAsyncRequests: 5,

      maxInitialRequests: 3,

      name: false,

      cacheGroups: {

        vendor: {

          name: 'vendor',

          chunks: 'initial',

          priority: -10,

          reuseExistingChunk: false,

          test: /node_modules\/(.*)\.js/

        },

        styles: {

          name: 'styles',

          test: /\.(scss|css)$/,

          chunks: 'all',

          minChunks: 1,

          reuseExistingChunk: true,

          enforce: true

        }

      }

    }

  },
由于CommonsChunkPlugin已经废弃,所以HtmlWebpackPlugin插件配置中的chunksSortMode也不再需要。
plugins: [

    //...

    new HtmlWebpackPlugin({

      filename: process.env.NODE_ENV === 'testing'? 'index.html': config.build.index,

      template: 'index.html',

      inject: true,

      inlineSource:/(app\.(.+)?\.css|manifest\.(.+)?\.js)$/,

      minify: {

        removeComments: true,

        collapseWhitespace: true,

        removeAttributeQuotes: true

        // more options: https://github.com/kangax/html-minifier#options-quick-reference

      },

-      chunksSortMode: 'dependency'

    }),

]
3.mini-css-extract-plugin(更多细节)(webpack4新插件)
介绍新插件之前先说一下extract-text-webpack-plugin,相信大家多少会听说过,它的作用是会将所有的入口 chunk(entry chunks)中引用的 *.css,移动到独立分离的 CSS 文件。因此,你的样式将不再内嵌到 JS bundle 中,而是会放到一个单独的 CSS 文件(即 styles.css)当中。 如果你的样式文件大小较大,这会做更快提前加载,因为 CSS bundle 会跟 JS bundle 并行加载。不过在webpack4中推荐使用mini-css-extract-plugin这个插件。具体配置如下:
//webpack.prod.conf.js

const MiniCssExtractPlugin = require("mini-css-extract-plugin")

plugins:[

    //其他配置

    new MiniCssExtractPlugin({

      filename: utils.assetsPath('css/[name].[contenthash].css'),//"[name].css"

      chunkFilename: utils.assetsPath('css/[id].css'),//"[id].css"

    }),

]
//webpack.base.conf.js

const MiniCssExtractPlugin = require("mini-css-extract-plugin")

const devMode = process.env.NODE_ENV === 'production'

module: {

    rules: [

      //...

      {

        test: /\.css$/,

        use: [

          devMode ?  MiniCssExtractPlugin.loader : 'vue-style-loader',

          {

            loader: 'css-loader',

            options: { importLoaders: 1 }

          },

          'postcss-loader'

        ]

      },

    ]

}
再来压缩一下css和js
//webpack.prod.conf.js

const UglifyJsPlugin = require("uglifyjs-webpack-plugin")

const OptimizeCSSAssetsPlugin = require("optimize-css-assets-webpack-plugin")

optimization: {

    minimizer: [

      new UglifyJsPlugin({

        cache: true,

        parallel: true,

        sourceMap: true // set to true if you want JS source maps

      }),

      new OptimizeCSSAssetsPlugin({})

    ],

}
我在升级过程中大概升级了这些东西:
"devDependencies": {

    //...

    "webpack": "^4.27.1",

    "webpack-cli": "^3.1.2",

    "webpack-dev-server": "^3.1.10",

    "vue-loader": "^15.4.2",

    "vue-style-loader": "^4.1.2",

    "html-webpack-plugin": "^3.2.0",

    "html-webpack-inline-source-plugin": "0.0.10",

    "babel-loader": "^7.1.3",

    "file-loader": "^2.0.0",

    "mini-css-extract-plugin": "^0.5.0",

    "ts-loader": "^5.3.1",

    "url-loader": "^1.1.2",

    "vue-html-loader": "^1.2.4",

}
因为不同的项目相关配置不同,所以接下来就可以npm run dev,看看有啥报错,哪个插件、loader有问题,升个级就好了。
三、项目运行起来了
咋回事样式乱了,看一眼控制台,发现:

组件的模板没有识别,这是什么毛病?在翻阅了大量资料后,得知:
在引入组件的时候,除了ES6的 import 之外,还可以用 webpack 的 require,比如,在vue文件里,就写了大量的如下代码:
const KingKong = require('../BookHomeCommon/KingKong.vue');

const BookList = require('../BookHomeCommon/BookList.vue');

const HomeAlert = require('../BookHomeCommon/HomeAlert.vue');

const DoubleElevenToast = require('../Activitys/DoudleEleven/DoubleElevenToast.vue');

const BrandVideo = require('./BrandVideo.vue');
在vue-loader v13.0.0的更新文档中提到:
New
- Now uses ES modules internally to take advantage of webpack 3 scope hoisting. This should result in smaller bundle sizes.
- Now uses PostCSS@6.
Breaking Changes
- The esModule option is now true by default, because this is necessary for ES-module-based scope hoisting to work. This means the export from a *.vue file is now an ES module by default, so async components via dynamic import like this will break:
const Foo = () => import('./Foo.vue')
Note: the above can continue to work with Vue 2.4 + vue-router 2.7, which will automatically resolve ES modules' default exports when dealing with async components. In earlier versions of Vue and vue-router you will have to do this:
const Foo = () => import('./Foo.vue').then(m => m.default)
Alternatively, you can turn off the new behavior by explicitly using esModule: false in vue-loader options.
Similarly, old CommonJS-style requires will also need to be updated:
// before

const Foo = require('./Foo.vue')

// after

const Foo = require('./Foo.vue').default
- PostCSS 6 might break old PostCSS plugins that haven't been updated to work with it yet.
官方文档说的很清楚:
- 可以在 vue-loader 的 options 里通过 esModule: false 配置来关闭 ES 模块
- 同步引入组件,正常用 import,而原来使用 require 引入 ES6 语法的文件(例如:export default {...}),现在需要多加一个 default 属性来引用。异步引入组件,需要用动态 import 语法
- 如果有通过 require 引入组件的话,全部改为 require(xxx).default
- 如果有异步引入组件的话,全部更新为动态 import 方式,() => import(xxx)
但是在vue-loader v14.0.0中已经移除options里的esModule配置。无法关闭ES模块。那咋整?项目中已经有大量的const Foo = require('./Foo.vue')的用法。一个一个修改,太费时间,这时自定义loader就是一个很好的解决方案。代码如下:
//compatible-es-module.js

module.exports = function(content) {

  return content.replace(new RegExp(/require\('\.[/\w\.]+[^(\.png|\.gif|\.jpg)]'\)(\.default)?/,'g'),function(res) {

    return  /(\.default)$/.test(res)  ? res :res + '.default';

  });

};

//

module: {

    rules: [

      {

        test: /\.(vue)$/,

        loader: './compatible-es-module'

      }

    ]

}
四、总结
费这么大劲升级,不能没有效果吧,下面看看编译时间对比,这是webpack3编译时长截图:
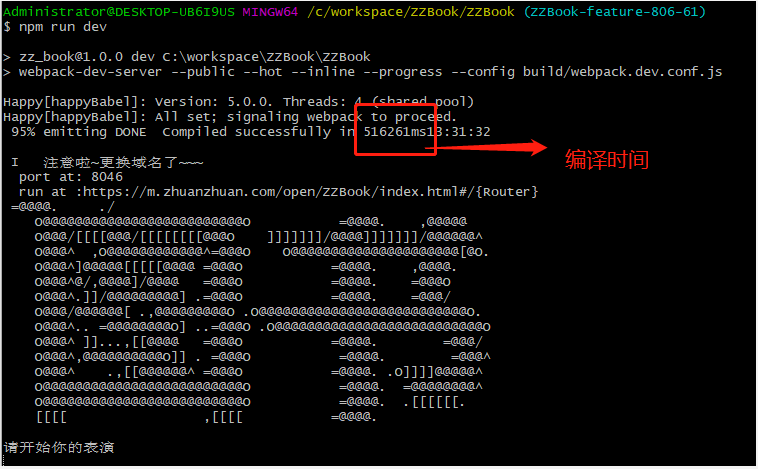
这是webpack4的:
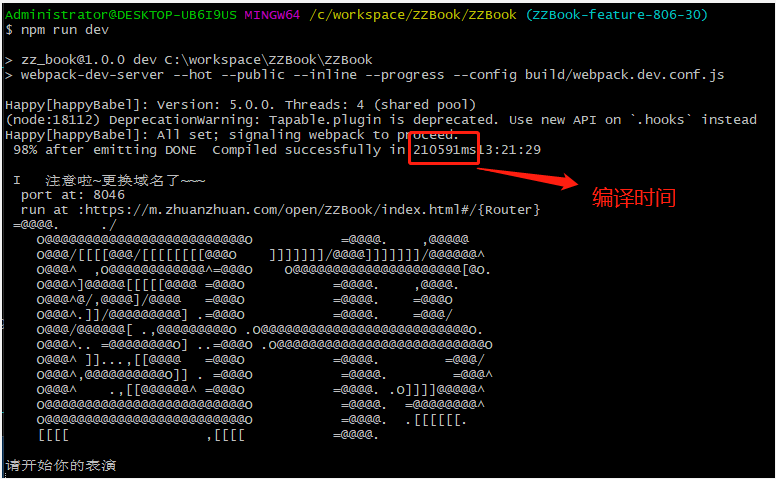
51万ms和21万ms编译速度足足提高了50%多。(不同项目情况不同,请以实际情况为准)
webpack4还有很多新的特性,有待继续学习。
人们总是对未知的东西,感到恐惧。直面自己的恐惧,学习理解它,你就会进步。(手动耶)

webpack4升级指南的更多相关文章
- 企业IT管理员IE11升级指南【17】—— F12 开发者工具
企业IT管理员IE11升级指南 系列: [1]—— Internet Explorer 11增强保护模式 (EPM) 介绍 [2]—— Internet Explorer 11 对Adobe Flas ...
- 企业IT管理员IE11升级指南【16】—— 使用Compat Inspector快速定位IE兼容性问题
企业IT管理员IE11升级指南 系列: [1]—— Internet Explorer 11增强保护模式 (EPM) 介绍 [2]—— Internet Explorer 11 对Adobe Flas ...
- 企业IT管理员IE11升级指南【15】—— 代理自动配置脚本
企业IT管理员IE11升级指南 系列: [1]—— Internet Explorer 11增强保护模式 (EPM) 介绍 [2]—— Internet Explorer 11 对Adobe Flas ...
- 企业IT管理员IE11升级指南【1】—— Internet Explorer 11增强保护模式 (EPM) 介绍
企业IT管理员IE11升级指南 系列: [1]—— Internet Explorer 11增强保护模式 (EPM) 介绍 [2]—— Internet Explorer 11 对Adobe Flas ...
- 企业IT管理员IE11升级指南【2】—— Internet Explorer 11 对Adobe Flash的支持
企业IT管理员IE11升级指南 系列: [1]—— Internet Explorer 11增强保护模式 (EPM) 介绍 [2]—— Internet Explorer 11 对Adobe Flas ...
- 企业IT管理员IE11升级指南【3】—— IE11 新的GPO设置
企业IT管理员IE11升级指南 系列: [1]—— Internet Explorer 11增强保护模式 (EPM) 介绍 [2]—— Internet Explorer 11 对Adobe Flas ...
- 企业IT管理员IE11升级指南【4】—— IE企业模式介绍
企业IT管理员IE11升级指南 系列: [1]—— Internet Explorer 11增强保护模式 (EPM) 介绍 [2]—— Internet Explorer 11 对Adobe Flas ...
- 企业IT管理员IE11升级指南【5】—— 不跟踪(DNT)例外
企业IT管理员IE11升级指南 系列: [1]—— Internet Explorer 11增强保护模式 (EPM) 介绍 [2]—— Internet Explorer 11 对Adobe Flas ...
- 企业IT管理员IE11升级指南【6】—— Internet Explorer 11面向IT专业人员的常见问题
企业IT管理员IE11升级指南 系列: [1]—— Internet Explorer 11增强保护模式 (EPM) 介绍 [2]—— Internet Explorer 11 对Adobe Flas ...
随机推荐
- 给xmpphp添加了几个常用的方法
给xmpphp添加给了以下的常用方法: registerNewUser //注册一个新用户 addRosterContact //发送添加好友的请求 acce ...
- Java Script 学习笔记 (二) Casper JS
1. click() VS mouse.click() 在写自动化脚本要勾选一个复选框时,用casper.mouse.click() 无法选上这个checkbox, 需要用到casper.click( ...
- eclipse下搭建hibernate5.0环境
hibernate引入的jar包:hibernate-release-5.0.12.Final.zip 数据库驱动:mysql-connector-java-5.1.46 二.安装hibernate插 ...
- wukong.go
package wukong import ( _ "github.com/boltdb/bolt" _ "github.com/cznic/kv&quo ...
- 理解Go Context机制
1 什么是Context 最近在公司分析gRPC源码,proto文件生成的代码,接口函数第一个参数统一是ctx context.Context接口,公司不少同事都不了解这样设计的出发点是什么,其实我也 ...
- Sql语言简介——检索数据
检索数据可以通过SELECT语句来实现. select子句:用于选择数据表.视图中的列. into子句:用于将原表中的结构和数据插入新表中. from子句:用于指定数据来源,包括表.视图和其他sele ...
- appium 元素定位find_element_by_android_uiautomator方法使用
若appium中给定的方法无法满足你的需求,刚好uiautomator中的方法可以满足你的需求时,你可使用find_element_by_android_uiautomator来调用uiautomat ...
- 发送email
package com.rjj.d; import java.security.GeneralSecurityException; import java.util.Date; import java ...
- LVM 移除PV步骤
1.先查看需要收缩文件系统的使用情况,收缩后的文件系统空间不能小于已经使用的空间 df -hT 2.卸载需要收缩的文件系统(以/dev/vg0/lvm1为例) umount /dev/vg0/lvm1 ...
- 从壹开始微服务 [ DDD ] 之终篇 ║当事件溯源 遇上 粉丝活动
回首 哈喽~大家好,时间过的真快,关于DDD领域驱动设计的讲解基本就差不多了,本来想着周四再开一篇,感觉没有太多的内容了,剩下的一个就是验证的问题,就和之前的JWT很类似,就不打开一个章节了,而且这个 ...