WPF入门教程系列三
WPF之Binding的使用(一)
一、 前言
初学WPF经常被Binding搞得苦不堪言,Binding的重用性就不做介绍了,在WPF应用程序开发中Binding是一个非常重要的部分。WPF也是近期才接触,学习WPF也是在网上查资料与微软的MSDN进行学习,写本博客的目为了温故而知新把学习过程记录下来,以备后查。
二、 WPF之Binding
1.) Binding的一般步骤:准备数据源,数据源需要实现INotifyPropertyChanged接口.如下实例
class Student: INotifyPropertyChanged

{

   public event PropertyChangedEventHandler PropertyChanged;

   private string name;

   public string Name

   {

    get { return name; }

    set{name = value;}

   //触发事件

   if (PropertyChanged != null)

     {

      PropertyChanged.Invoke(this, new PropertyChangedEventArgs("Name"));

     }

   }

}
2.) Binding对象
Student p = new Student ("曾小贤");

Binding binding = new Binding();

binding.Source = p;

binding.Path = new PropertyPath("Name");
3.) 用Binding对象将数据源和目标连结 假如在XAML处添加了一个TextBlock目标
<TextBlock x:Name="txtName"></TextBlock>
使用BindingOperations.SetBinding()方法将其进行binding了
BindingOperations.SetBinding(txtName, TextBlock.TextProperty, binding);
也可以使用UI元素的基类FramworkElement封装的SetBinding函数
txtName.SetBinding(TextBlock.TextProperty, binding);
两步结合在一起可以这样写
txtName.SetBinding(TextBlock.TextProperty, new Binding("Name") { Source=p});
三、 WPF对比WinForm实例
做这个例子也是上家公司同事想了解WPF,之前公司项目是用WinForm做His系统的,这个例子主要展示同一个需求用WinForm和WPF分别进行实现,通过这个例子,我们可以看到两者之间的区别和联系,同时也可以对我们的项目选型带来一定的参考作用(原型来自于Josh Smith与Knights Warrior的文章,个人觉得讲得非常不错,所以对原有例子进行了改造,进而有了这个案例)。
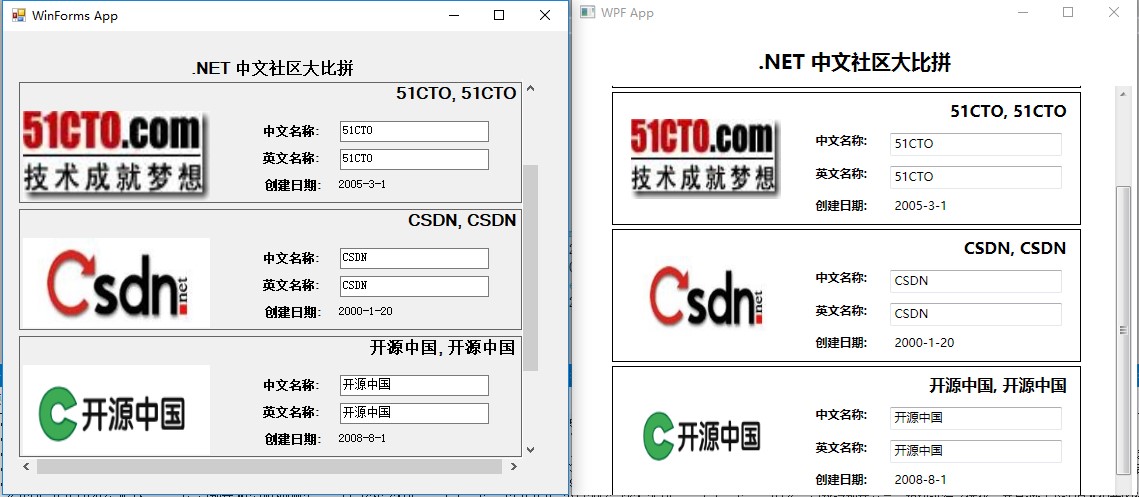
下面是WinForms版本与WPF版本的截图:

程序简介
这个例子非常简单,需求就是展示三大社区的基本信息,同时你可以在输入框对其进行修改,当焦点切换的时候,你就会看到它会自动进行修改,你把鼠标放在图片上面会提示社区的ID等等。我在这里没有用复杂的逻辑和高深的架构,只是想通过这个例子展示WinForm的WPF的差异和联系,所以在程序处理上可能会有很多漏洞,比如没有对输入进行验证,你可以输入空格和任意字符等。如果你编辑了某个社区的中文名称或者英文名称,然后把焦点移到另外一个地方,这些更改就会通过右上角的全名体现出来,因为他们都是通过绑定到公用字段来实现这些操作的。
- 公用代码部分(BusinessObjects)
这两个应用程序都是使用的BusinessObjects作为逻辑类库,BusinessObjects中的Company对UI所使用的数据进行了Mock。所以他们在需求方面都是一样的,由于比较简单,所以请看下面代码:
 using System;

 using System.ComponentModel;

 using System.IO;

 using System.Reflection;

 namespace BusinessObjects

 {

 public class Company : INotifyPropertyChanged

 {

     #region 创建数据方法

     public static Company[] GetCompanys()

     {

         // 在真正的应用程序中,这可能会调用数据访问层,从数据库中获取记录。

         return new Company[]

         {

             new Company(, "博客园", "CNBlogs", GetPictureFile(), new DateTime(, , )),

             new Company(, "51CTO", "51CTO", GetPictureFile(), new DateTime(, , )),

             new Company(, "CSDN", "CSDN", GetPictureFile(), new DateTime(, , )),

             new Company(, "开源中国", "开源中国", GetPictureFile(), new DateTime(, , )),

             new Company(, "ITEYE", "ItEye", GetPictureFile(), new DateTime(, , )),

         };

     }

     private static string GetPictureFile(int CompanyID)

     {

         string fileName = String.Format("emp{0}.jpg", CompanyID);

         string folder = Path.GetDirectoryName(Assembly.GetExecutingAssembly().Location);

         folder = Path.Combine(folder, "Images");

         return Path.Combine(folder, fileName);

     }

     private Company(int id, string chineseName, string EnglishName, string pictureFile, DateTime startDate)

     {

         this.ID = id;

         this.chineseName = chineseName;

         this.EnglishName = EnglishName;

         this.PictureFile = pictureFile;

         this.StartDate = startDate;

     }

     #endregion // 创建数据方法

     #region 实体属性

     public int ID { get; private set; }

     string _chineseName;

     public string chineseName//中文名称

     {

         get { return _chineseName; }

         set

         {

             if (value == _chineseName)

                 return;

             _chineseName = value;

             this.OnPropertyChanged("chineseName");

             this.OnPropertyChanged("FullName");

         }

     }

     string _EnglishName;

     public string EnglishName//英文名称

     {

         get { return _EnglishName; }

         set

         {

             if (value == _EnglishName)

                 return;

             _EnglishName = value;

             this.OnPropertyChanged("EnglishName");

             this.OnPropertyChanged("FullName");

         }

     }

     public string FullName

     {

         get { return String.Format("{0}, {1}", this.EnglishName, this.chineseName); }

     }

     public string PictureFile { get; private set; }//图片文件地址

     public DateTime StartDate { get; private set; }//开始时间

     #endregion // 实体属性

     #region INotifyPropertyChanged 接口

     public event PropertyChangedEventHandler PropertyChanged;

     protected virtual void OnPropertyChanged(string propertyName)//属性变更通知

         {

         PropertyChangedEventHandler handler = this.PropertyChanged;

         if (handler != null)

             handler(this, new PropertyChangedEventArgs(propertyName));

     }

     #endregion

 }

 }
上面这段代码没有什么不寻常的地方,大家写WinForm和Asp.Net也会写这样的逻辑类,只是要注意Company 实现了INotifyPropertyChanged 接口,大家看到这个接口只有一个OnPropertyChanged的方法,这个方法就是我们要说的属性变更通知方法,就是说当一个属性改变了,我们需要做些什么来响应这些改变。
- WPF实现介绍
WPF版本我这里就做得很简单了,由于开发WPF程序提供了很多模板和工具,所以我这里基本没写什么代码,全部的代码都是通过XAML实现,并且大部分都是自动生成的,只是我们要根据项目具体情况做一些修改就行。
这个WPF项目同样有一个Window和一个customUserControl, 和 WinForms 版本基本一样. 只是WinForms中用FlowLayoutPanel来承载EmployeeControl控件, 而WPF 用的是ItemsControl来承载这个用户控件.更加可喜的是,WPF通过模板来进行定制,所以我们就不需要像WinForms那样写循环加载控件的代码,下面就是WPF用XAML实现的窗体代码:
 <Window

   x:Class="WpfApp.Window1"

   xmlns="http://schemas.microsoft.com/winfx/2006/xaml/presentation"

   xmlns:x="http://schemas.microsoft.com/winfx/2006/xaml"

   xmlns:local="clr-namespace:WpfApp"

   xmlns:model="clr-namespace:BusinessObjects;assembly=BusinessObjects"

   Title="WPF App" Height="" Width=""

   WindowStartupLocation="CenterScreen"

   >

   <Window.DataContext>

     <ObjectDataProvider ObjectType="{x:Type model:Company}" MethodName="GetCompanys" />

   </Window.DataContext>

   <Grid Width="">

     <Label  Name="label1" HorizontalContentAlignment="Center" VerticalAlignment="Top" FontSize="" FontWeight="Bold" Height="36.6" Margin="0,16,0,0">

        .NET 中文社区大比拼

     </Label>

         <WrapPanel Margin="0,57.6,0,0">

             <ScrollViewer VerticalScrollBarVisibility="Auto" Height="" Width="" >

                 <ItemsControl  ItemsSource="{Binding}" HorizontalContentAlignment="Center"  Focusable="False" Height="">

                     <ItemsControl.ItemTemplate>

                         <DataTemplate>

                             <local:CompanyControl />

                         </DataTemplate>

                     </ItemsControl.ItemTemplate>

                 </ItemsControl>

             </ScrollViewer>

         </WrapPanel>

     </Grid>

 </Window>
在如下的XAML代码中,这里有几点需要注意,。Window的DataContext赋予了一个ObjectDataProvider的对象,而ObjectDataProvider又会调用GetEmployees这个方法。所以一旦把DataContext设置到Company 对象,并且把ItemsControl的ItemsSource设置为“{Binding}” 就意味着该控件里面会自动显示Company 对象的所有数据。
这里我们并不需要像WinForm一样用循环的方式创建CompanyControl的实例。这是因为ItemsControl中的ItemTemplate属性设置为了一个DataTemplate,同时ItemsControl中的ItemsSource绑定到了Company 的对象数组,那么ItemTemplate就会知道如何创建一个CompanyControl,所以大家看到这里写的代码就相对变少了,这也是XAML的一个优点之一。
该CompanyControl的后台CS文件也是空的(除了必须的InitializeComponent),所以它不像的WinForms应用程序那么累赘,界面和逻辑紧密的耦合在了一起。下面就是CompanyControl的XAML代码, 这个代码相对来说就比较简单了。
 <UserControl x:Class="WpfApp.CompanyControl"

     xmlns="http://schemas.microsoft.com/winfx/2006/xaml/presentation"

     xmlns:x="http://schemas.microsoft.com/winfx/2006/xaml"

     Height="" Width="">

   <Border BorderBrush="Black"  BorderThickness="" Margin="" SnapsToDevicePixels="True" Width="">

     <Grid Height="" Width="">

       <Image Source="{Binding PictureFile}"  Margin="" Name="image1" Stretch="Fill"  Width="" Height="" HorizontalAlignment="Left" >

         <Image.ToolTip>

           <TextBlock>

             <Run TextBlock.FontWeight="Bold">Company ID:</Run>

             <TextBlock Margin="4,0,0,0" Text="{Binding ID}" />

           </TextBlock>

         </Image.ToolTip>

       </Image>

         <Label  Content="{Binding FullName}"  Height="" Margin="99,2,0,0" Name="中英文名称" VerticalAlignment="Top"  HorizontalContentAlignment="Right" FontSize="" FontWeight="Bold" />

         <Label Margin="190,34,0,0" Name="chineseNameLabel" FontWeight="Bold" Height=""  VerticalAlignment="Top" HorizontalAlignment="Left" Width="">中文名称:</Label>

       <TextBox  Text="{Binding chineseName}"  HorizontalAlignment="Right" Margin="0,39,10,0"  Name="textBox1" Width="" Height=""  VerticalAlignment="Top" TextDecorations="None" />

       <Label FontWeight="Bold" Height="" Margin="190,0,0,34"   Name="EnglishNameLabel" VerticalAlignment="Bottom"  HorizontalAlignment="Left" Width="">英文名称:</Label>

       <TextBox   Text="{Binding EnglishName}" Height="" Margin="0,0,10,34" Name="textBox2"  VerticalAlignment="Bottom" HorizontalAlignment="Right" Width="" />

       <Label Height="" Margin="190,0,185,2"  Name="startDateLabel" VerticalAlignment="Bottom"  FontWeight="Bold">创建日期:</Label>

       <Label  Content="{Binding StartDate}" Height="" HorizontalAlignment="Right" Margin="0,0,10,2"  Name="startDateValueLabel" VerticalAlignment="Bottom"  Width="" />

     </Grid>

   </Border>

 </UserControl>
如上面的代码所示,UI上的很多元素我们都可以通过拖控件进行实现,有个功能需要自己简单的写一写代码,UI上面有一个功能就是你把鼠标放在图片上的时候会提示CompanyID,这个功能通过ToolTip属性进行实现的。ToolTip属性是WPF所有元素的基类FrameworkElement的一个属性,所以我们可以在这些子元素当中直接使用。
那么大家注意到,这个小功能在WinForm中我们要写一些代码,而在WPF就可以直接通过属性定制,所以在很多方面WPF对这些方面都做了封装和简化,也提高了我们的开发效率。
- WinForms实现介绍
WinForms版本就包含一个Form 和一个展示社区信息的custom UserControl, 这个Form 包含了一个FlowLayoutPanel控件, 它主要的作用就是用来承载每个社区的实例. 那么代码就如下所示:
 using System;

 using System.Collections.Generic;

 using System.ComponentModel;

 using System.Data;

 using System.Drawing;

 using System.Linq;

 using System.Text;

 using System.Windows.Forms;

 using BusinessObjects;

 namespace WinFormsApp

 {

     public partial class Form1 : Form

     {

         public Form1()

         {

             InitializeComponent();

             // 创建并初始化用户控件

             foreach (Company com in Company.GetCompanys())

             {

                 CompanyControl comCtrl = new CompanyControl();

                 comCtrl.Company = com;

                 this.flowLayoutPanel.Controls.Add(comCtrl);

             }

         }

     }

 }
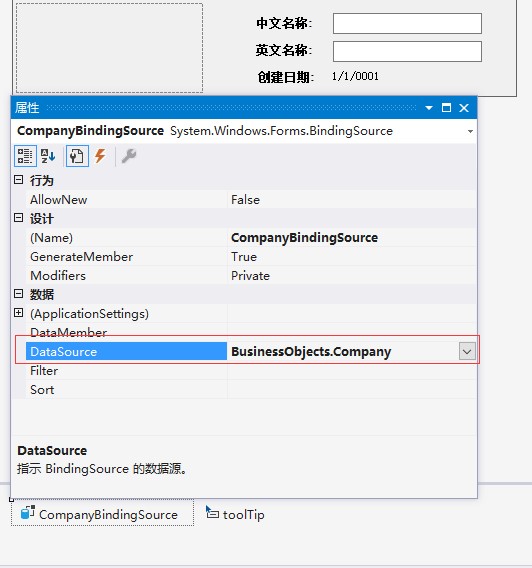
CompanyControl是我们创建的一个UserControl,由于每个CompanyControl都要显示一个Company对象的属性值,我在这里使用了BindingSource控件来进行绑定,这样做也是为了和WPF更接近考虑(增强对比性,呵呵)。具体如下截图:

如上图所示,我们用了BindingSource来获取数据,但有一个属性除外,那就是Company ID,请看下面代码:
 using System.Drawing;

 using System.Windows.Forms;

 using BusinessObjects;

 namespace WinFormsApp

 {

     /// <summary>

     /// 显示社区对象的WinForms控件

     /// </summary>

     public partial class CompanyControl : UserControl

     {

         public CompanyControl()

         {

             InitializeComponent();

             // 将图片文件路径转换为位图。

             Binding binding = this.CompanyPicture.DataBindings[];

             binding.Format += this.ConvertFilePathToBitmap;

         }

         void ConvertFilePathToBitmap(object sender, ConvertEventArgs e)

         {

             e.Value = Bitmap.FromFile(e.Value as string);

         }

         public Company Company

         {

             get { return this.CompanyBindingSource.DataSource as Company; }

             set

             {

                 this.CompanyBindingSource.DataSource = value;

                 // 该社区的图片显示ID提示。

                 if (value != null)

                 {

                     string msg = "Company ID:  " + value.ID;

                     this.toolTip.SetToolTip(this.CompanyPicture, msg);

                 }

             }

         }

     }

 }
这里有几点需要注意.在绑定的时候,我们对PictureFile 字段进行了转换,这个是必须做的. 如果不那样做, 这个图片会绑定失败,因为在绑定的时候它不能自动把string类型直接转化为Image类型.
现在我们已经把Company绑定到了我们的控件上, 这里我需要给PictureBox一个tooltip的效果. 这个tooltip将显示 Company ID, 前缀显示为 "Company ID:". 现在这个是在代码里面写的,没有在窗体中发现有WPF ToolTip等类似的工具,不知道大家用到过没有?
总的来说, 这是一个很简单的例子,我们的大部分功能也是用代码没有写代码,是通过visual designer进行实现的.然后通过一部分代码把它衔接起来, 我们看到Windows Forms是一个非常快速和实用的开发平台.
例子是用Visual Studio 2017编写的,所以大家可以下载下来进行查看.
Demo下载:WinFormsAndWPFCompare.rar
WPF入门教程系列三的更多相关文章
- WPF入门教程系列三——Application介绍(续)
接上文WPF入门教程系列二——Application介绍,我们继续来学习Application 三.WPF应用程序的关闭 WPF应用程序的关闭只有在应用程序的 Shutdown 方法被调用时,应用程序 ...
- WPF入门教程系列二十三——DataGrid示例(三)
DataGrid的选择模式 默认情况下,DataGrid 的选择模式为“全行选择”,并且可以同时选择多行(如下图所示),我们可以通过SelectionMode 和SelectionUnit 属性来修改 ...
- WPF入门教程系列二——Application介绍
一.Application介绍 WPF和WinForm 很相似, WPF与WinForm一样有一个 Application对象来进行一些全局的行为和操作,并且每个 Domain (应用程序域)中仅且只 ...
- WPF入门教程系列(二) 深入剖析WPF Binding的使用方法
WPF入门教程系列(二) 深入剖析WPF Binding的使用方法 同一个对象(特指System.Windows.DependencyObject的子类)的同一种属性(特指DependencyProp ...
- WPF入门教程系列(一) 创建你的第一个WPF项目
WPF入门教程系列(一) 创建你的第一个WPF项目 WPF基础知识 快速学习绝不是从零学起的,良好的基础是快速入手的关键,下面先为大家摞列以下自己总结的学习WPF的几点基础知识: 1) C#基础语法知 ...
- WPF入门教程系列一
WPF入门教程 一. 前言 公司项目基于WPF开发,最近项目上线有点空闲时间写一篇基于wpf的基础教材,WPF也是近期才接触,学习WPF也是在网上查资料与微软的MSDN进行学习,写本博客的目为了温 ...
- WPF入门教程系列十三——依赖属性(三)
四. 只读依赖属性 在以前在对于非WPF的功能来说,对于类的属性的封装中,经常会对那些希望暴露给外界只读操作的字段封装成只读属性,同样在WPF中也提供了只读属性的概念,如一些 WPF控件的依赖属性是只 ...
- WPF入门教程系列八——布局之Grid与UniformGrid(三)
五. Grid Grid顾名思义就是“网格”,它的子控件被放在一个一个实现定义好的小格子里面,整齐配列. Grid和其他各个Panel比较起来,功能最多也最为复杂.要使用Grid,首先要向RowDef ...
- WPF入门教程系列十七——WPF中的数据绑定(三)
四. XML数据绑定 这次我们来学习新的绑定知识,XML数据绑定.XmlDataProvider 用来绑定 XML 数据,该XML数据可以是嵌入.Xmal文件的 XmlDataProvider 标记中 ...
随机推荐
- python3爬虫爬取煎蛋网妹纸图片(下篇)2018.6.25有效
分析完了真实图片链接地址,下面要做的就是写代码去实现了.想直接看源代码的可以点击这里 大致思路是:获取一个页面的的html---->使用正则表达式提取出图片hash值并进行base64解码--- ...
- (寒假开黑gym)2018 USP Try-outs
layout: post title: (寒假开黑gym)2018 USP Try-outs author: "luowentaoaa" catalog: true tags: m ...
- Linux下判断字符串长度
方法1:使用wc -L命令 wc -L可以获取到当前行的长度,因此对于单独行的字符串可以用这个简单的方法获取,另外wc -l则是获取当前字符串内容的行数. echo 'abc' |wc -L 注意:这 ...
- DELPHI HMAC256
DELPHI HMAC256 unit HMAC;interfaceuses System.SysUtils, EncdDecd, IdHMAC, IdSSLOpenSSL, IdHas ...
- Bitcoin 比特币, LTC(litecoin)莱特币,
1.挖掘机 http://asicme.com/index 2.官方: http://bitcoin.org/zh_CN/ =============== 1\ 最好的比特币资讯网站 ht ...
- jquery的confirm插件介绍
参考:1.http://craftpip.github.io/jquery-confirm/ 2.http://www.bootcdn.cn/jquery-confirm/readme/ 3.h ...
- Python图像处理(16):图像金字塔
快乐虾 http://blog.csdn.net/lights_joy/ 欢迎转载,但请保留作者信息 图像金字塔是图像中多尺度表达的一种,最初用于机器视觉和图像压缩.一幅图像的金字塔是一系列以金字塔形 ...
- (如何理解gamma校准)GAMMA测试方法及分析
http://wenku.baidu.com/link?url=Wz5oXJsFQ-TVe3qxm9Zd4pp207cQ4jmjuBnwmWAvD1ibgoI2U8y7KCFhaR9xWtu9cGLE ...
- vue-resource的使用中需要注意的坑
先看一段代码: export default { name: 'app', data() { return { articles: [] } }, created: function() { this ...
- 一起來玩鳥 Starling Framework(8)BitmapFont
所謂BitmapFont,就是事先將我們會用到的字型,會用到的字,輸出成一張圖片,類似Sprite sheet,以及一個xml格式的Data file,然後我們一次將這文字圖片轉成Texture,up ...
