Eclipse 设置生成带有属性注释的getter/setter方法
1. 在开发中,一般类注释常注释在字段上面.但eclipse工具自动生成的getter和setter方法是没有注释的,而且还需要自己手动添加,这样比较麻烦.下面介绍如何通过修改eclipse的jar包类实现这样的功能.
首先看效果,在写字段时,我们带上了注释,当自动生成getter和setter方法时,也会自动把字段上面的注释生成了.这样方便我们的开发和以后维护.
   /**

     * 创建人

     */

    private String createdBy;

    /**

     * 创建时间

     */

    private Date createdDate;

    /**

     * 获取: 创建人

     */

    public String getCreatedBy() {

        return createdBy;

    }

    /**

     * 设置: 创建人

     */

    public void setCreatedBy(String createdBy) {

        this.createdBy = createdBy;

    }

    /**

     * 获取: 创建时间

     */

    public Date getCreatedDate() {

        return createdDate;

    }

    /**

     * 设置: 创建时间

     */

    public void setCreatedDate(Date createdDate) {

        this.createdDate = createdDate;

    }
2. 好了,下面我们开始讲解如何实现这样的配置.首先,eclipse上面没有自带这样的功能,所以我们需要通过修改eclipse的jar进行修改生成setter和getter的方法.
1. 我们先找到eclipse的安装目录,找到这个jar包 : org.eclipse.jdt.ui_xxxxx.jar , xxxxx是一个版本号.例如我的是org.eclipse.jdt.ui_3.12.2.v20160929-0804.jar
该jar所在目录eclipse/plugins/
2. 找到jar后,我们需要借用反编译工具,具体哪个工具都行,我使用的是jd-gui(下载地址:http://jd.benow.ca/).
3. 打开反编译工具,把org.eclipse.jdt.ui_xxxxx.jar包进行反编译,然后找到org.eclipse.jdt.internal.corext.codemanipulation.GetterSetterUtil类,保存生成对应的java文件
4. 打开eclipse,创建一个java工程,把生成的GetterSetterUtil.java文件放到工程中,注意:请保持改java文件所在的包目录为原来的目录: package org.eclipse.jdt.internal.corext.codemanipulation;
5. 把该java文件所关联的一些jar包也引到项目中.具体使用了如下部分jar包,该部分的jar包都能在eclipse/plugins/目录下能找到.具体版本请使用自己的eclipse里面的即可:

6. 到此,一切已准备就绪,接下来就是关键的时刻了. 在GetterSetterUtil.java类中找到getSetterStub和getGetterStub方法,然后分别在如下地方添加红框部分代码

红框的代码如下:
    ISourceRange sr = field.getJavadocRange();

      if (sr != null)

      {

        String fieldComment = field.getSource().substring(0, sr.getLength()).replaceAll("/", "").replaceAll("\\*", "").trim();

        comment = comment.replaceAll("bare_field_comment", fieldComment);

      }

      else

      {

        String str = getLineComment((SourceField)field);

        if (str != null) {

          comment = comment.replaceAll("bare_field_comment", str);

        }

      }
在该类后面添加该部分代码调用的getLineComment方法:
public static String getLineComment(SourceField field) throws JavaModelException {

		ISourceRange range = field.getSourceRange();

		if (range == null) {

			return null;

		}

		IBuffer buf = null;

		if (field.isBinary()) {

			buf = field.getClassFile().getBuffer();

		} else {

			ICompilationUnit compilationUnit = field.getCompilationUnit();

			if (!compilationUnit.isConsistent()) {

				return null;

			}

			buf = compilationUnit.getBuffer();

		}

		int start = range.getOffset();

		int length = range.getLength();

		if ((length > 0) && (buf.getChar(start) == '/')) {

			IScanner scanner = ToolFactory.createScanner(true, false, false, false);

			try {

				scanner.setSource(buf.getText(start, length).toCharArray());

				int docOffset = -1;

				int docEnd = -1;

				int terminal = scanner.getNextToken();

				switch (terminal) {

				case 1003:

					terminal = scanner.getNextToken();

					break;

				case 1001:

					docOffset = scanner.getCurrentTokenStartPosition();

					docEnd = scanner.getCurrentTokenEndPosition() + 1;

					terminal = scanner.getNextToken();

					break;

				case 1002:

					terminal = scanner.getNextToken();

				}

				if (docOffset != -1) {

					SourceRange sr = new SourceRange(docOffset + start, docEnd - docOffset);

					String str = field.getSource().substring(0, sr.getLength());

					char[] c = str.toCharArray();

					int beginIndex = 0;

					char[] arrayOfChar1;

					int j = (arrayOfChar1 = c).length;

					for (int i = 0; i < j; i++) {

						char cr = arrayOfChar1[i];

						if (cr != '/') {

							break;

						}

						beginIndex++;

					}

					return str.substring(beginIndex).trim();

				}

			} catch (InvalidInputException localInvalidInputException) {

			} catch (IndexOutOfBoundsException localIndexOutOfBoundsException) {

			}

		}

		return null;

	}
注意:加入的代码可能需要在GetterSetterUtil.java类引入一些包,为了大家方便,我把我引入的包贴一下方便大家查找:
import org.eclipse.core.runtime.CoreException;

import org.eclipse.jdt.core.Flags;

import org.eclipse.jdt.core.IBuffer;

import org.eclipse.jdt.core.ICompilationUnit;

import org.eclipse.jdt.core.IField;

import org.eclipse.jdt.core.IJavaProject;

import org.eclipse.jdt.core.IMethod;

import org.eclipse.jdt.core.ISourceRange;

import org.eclipse.jdt.core.IType;

import org.eclipse.jdt.core.JavaModelException;

import org.eclipse.jdt.core.NamingConventions;

import org.eclipse.jdt.core.Signature;

import org.eclipse.jdt.core.SourceRange;

import org.eclipse.jdt.core.ToolFactory;

import org.eclipse.jdt.core.compiler.IScanner;

import org.eclipse.jdt.core.compiler.InvalidInputException;

import org.eclipse.jdt.core.dom.AST;

import org.eclipse.jdt.core.dom.ASTNode;

import org.eclipse.jdt.core.dom.Assignment;

import org.eclipse.jdt.core.dom.CastExpression;

import org.eclipse.jdt.core.dom.Expression;

import org.eclipse.jdt.core.dom.ITypeBinding;

import org.eclipse.jdt.core.dom.IVariableBinding;

import org.eclipse.jdt.core.dom.InfixExpression;

import org.eclipse.jdt.core.dom.NumberLiteral;

import org.eclipse.jdt.core.dom.ParenthesizedExpression;

import org.eclipse.jdt.core.dom.PostfixExpression;

import org.eclipse.jdt.core.dom.PrefixExpression;

import org.eclipse.jdt.core.dom.PrimitiveType;

import org.eclipse.jdt.core.dom.rewrite.ASTRewrite;

import org.eclipse.jdt.internal.core.SourceField;

import org.eclipse.jdt.internal.corext.dom.ASTNodes;

import org.eclipse.jdt.internal.corext.dom.NecessaryParenthesesChecker;

import org.eclipse.jdt.internal.corext.util.JavaModelUtil;

import org.eclipse.jdt.internal.corext.util.JdtFlags;

import org.eclipse.jdt.ui.CodeGeneration;
修改完毕后,编译项目,然后找到编译出来的GetterSetterUtil.class文件.再通过压缩工具把GetterSetterUtil.class文件替换org.eclipse.jdt.ui_xxxxx.jar包中的GetterSetterUtil.class.
然后再把org.eclipse.jdt.ui_xxxxx.jar包替换eclipse/plugins/下的对应jar包.(注:替换前请备份,不然如果出问题了就悲剧了!!!)
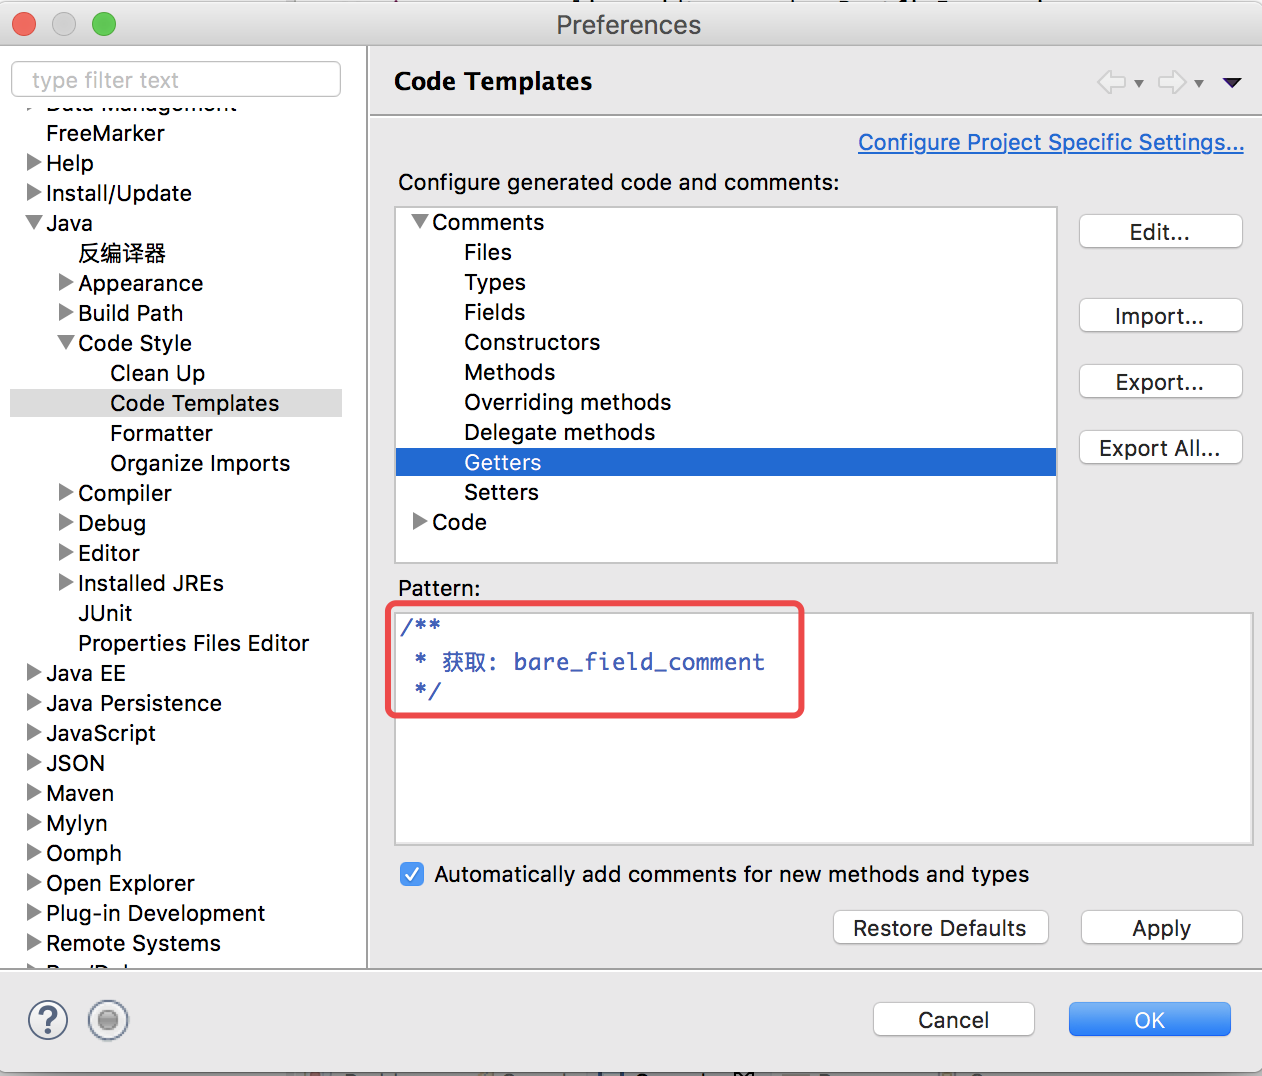
7. 重启eclipse,打开Window > Preferences > Java > Code Style > Code Templates然后在comments中分别设置Getters和Setters,如下图:

到此,大功告成啦!
8. 如果觉得反编译麻烦,那大家也可以到网上找被人反编译修改好的GetterSetterUtil.class文件或者org.eclipse.jdt.ui_xxxxx.jar 包来替换自己eclipse下的jar包.但是一定要注意版本一致,不然就会出错的
我使用的eclipse Neon.3 Release (4.6.3),如果有和我一样的版本,那可以直接下载我修改后的使用:
GetterSetterUtil.class (下载这个需要自己去替换org.eclipse.jdt.ui_3.12.2.v20160929-0804.jar包中的对应class文件)
或
org.eclipse.jdt.ui_3.12.2.v20160929-0804.jar (推荐)
Eclipse 设置生成带有属性注释的getter/setter方法的更多相关文章
- java中遍历类中的属性、调用getter&setter方法
public static void testReflect(Object model) throws NoSuchMethodException, IllegalAccessException, I ...
- android studio: 快捷键生成getter/setter方法时自动加m的问题
平时使用Android Studio 在写实体类的时候,习惯给实体类的成员变量前面加上一个"m" 修饰符表示这是一个成员变量,这也是搞java的一种约定俗成的写法,本来这是没有问题 ...
- 反射工具类.提供调用getter/setter方法, 访问私有变量, 调用私有方法, 获取泛型类型Class,被AOP过的真实类等工具函数.java
import org.apache.commons.lang3.StringUtils; import org.apache.commons.lang3.Validate; import org.ap ...
- getter/setter方法
1.setter方法 作用:用来设置成员变量,可以在方法里面过滤掉一些不合理的值 命名规范: 必须是对象方法 返回值类型为void 方法名必须以set开头,而且后面跟上成员变量名去掉"_&q ...
- Eclipse设置之:代码注释/server 控制台输出乱码解决
1 Eclipse设置 Configure clean up style The location is here: And the configuration should fo ...
- IDEA设置生成类基本注释信息
在eclipse中我们按一下快捷键就会生成类的基本信息相关的注释,其实在IDEA中也是可以的,需要我们手动设置,之后再创建类的时候就会自动加上这些基本的信息. File-->Setting 在E ...
- Eclipse如何生成带有自定tag的Java Doc
1. 选择要生成Java Doc的工程,单击鼠标右键,在弹出菜单中选择[Export],会弹出以下对话框: 2. 选择[Java]--->[Javadoc],点击[Next]按钮,弹出以下对话框 ...
- eclipse 设置 @author @version等注释模板
eclipse->window->preference->java->code styple->code template->Code->New Java f ...
- 使用lombok注解@Getter @Setter方法代码编译成功,但是没有生成get,set方法
现象描述: 在对应类对象中,添加lombok的@Getter或@Setter注解,编译没有问题,但是在使用类对象时,没有出现对应的get或set方法. 配置且编译ok,但是没有对应的get或set方法 ...
随机推荐
- 搭建ES6开发环境
https://github.com/IOJINDD/ES6-dev 在gulpfile最后一行加上: gulp.task('default', ['compile-es6', 'pack-js', ...
- oracle有三种类型的异常错误: 预定义 ( Predefined )错误里面的常见错误
oracle有三种类型的异常错误: 预定义 ( Predefined )错误, 非预定义 ( Predefined )错误, 用户定义(User_define) 错误 预定义 ( Predefined ...
- P4013 数字梯形问题 网络流
题目描述 给定一个由 nn 行数字组成的数字梯形如下图所示. 梯形的第一行有 mm 个数字.从梯形的顶部的 mm 个数字开始,在每个数字处可以沿左下或右下方向移动,形成一条从梯形的顶至底的路径. 分别 ...
- Mysql 创建事件任务
DELIMITER $$ CREATE DEFINER=`root`@`%` EVENT `test` ON SCHEDULE EVERY 1 DAY STARTS '2019-02-12 00:00 ...
- redis编译 报告错误 jemalloc/jemalloc.h:没有那个文件或目录 解决.
问题原因:没找到jemalloc头文件. 百度谷歌半天没找到有效的下载地址. github中有 到github下载.jemalloc https://github.com/jemalloc/jemal ...
- Python--day09(内存管理、垃圾回收机制)
昨天内容回顾 1. 操作文件的三个步骤: 1. 打开文件:硬盘的空间被操作系统持有,文件对象被用用程序持续 2. 操作文件:读写操作 3. 释放文件:释放操作系统对硬盘空间的持有 2. 基础 ...
- 【MySQL 读书笔记】普通索引和唯一索引应该怎么选择
通常我们在做这个选择的时候,考虑得最多的应该是如果我们需要让 Database MySQL 来帮助我们从数据库层面过滤掉对应字段的重复数据我们会选择唯一索引,如果没有前者的需求,一般都会使用普通索引. ...
- Fetch API & Async Await
Fetch API & Async Await const fetchJSON = (url = ``) => { return fetch(url, { method: "G ...
- win 执行puppet
C:\scripts\win_exec_proxy.bat \\adsoft.base-fx.com\puppet\puppet\files\Windows_10_x64\C\user\logon\ ...
- odoo 权限问题
odoo 权限问题 权限组问题 权限组是为了将人员按组划分同一分配权限.权限组的建立是基于每个应用来实现的 建立一个应用的分组(可省略,主要用于创建用户时有选择项) 建立一条record记录model ...