《OpenCV计算机视觉编程攻略(第3版)》这套书已经出到第3版了,如果你非要我说这本书有多好,我说不出来;只是很多我第一手的例子都是来源于这本书的—相比较OpenCV官方提供的代码,这本书的例子提供了更好的帮助。所以说这里我还将继续这个工作,将来我自己出书的时候这种模式也是可选的。
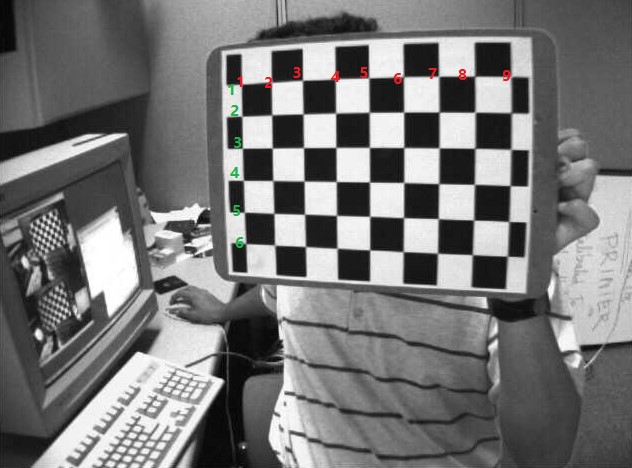
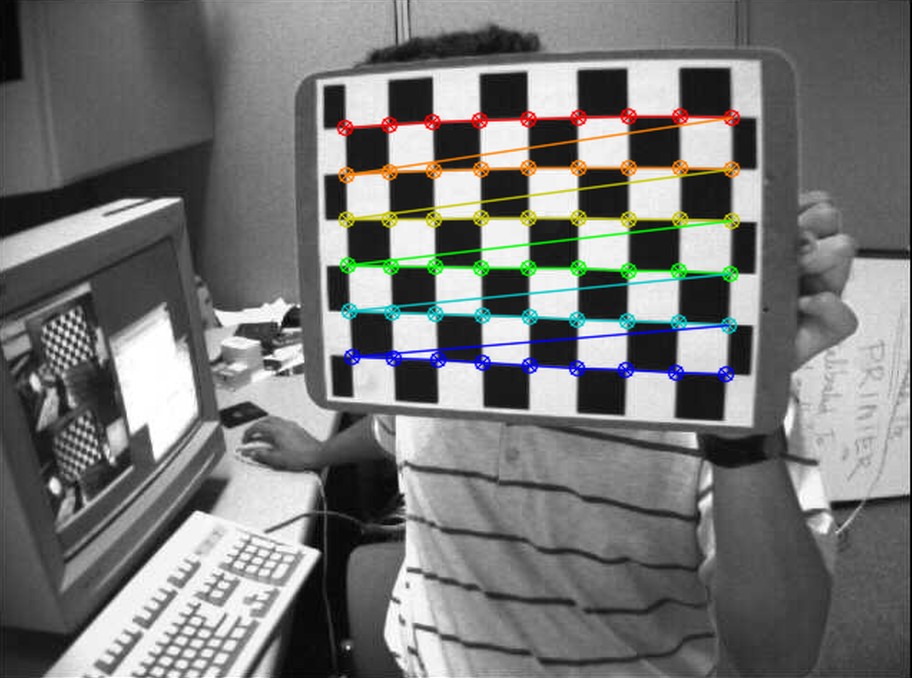
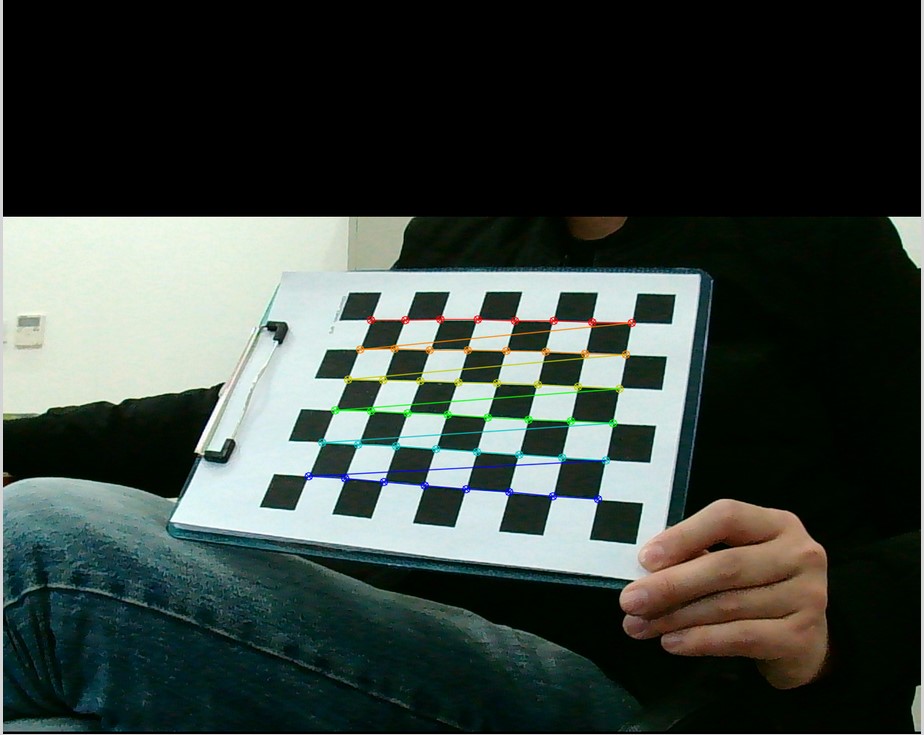
绘制图案的函数,相对来说比较简单。(E:\GItHub\opencv\modules\calib3d\src\calibinit.cpp 这个代码2250行,opencv可以的)
//// 画出角点
//cv::drawChessboardCorners(image, boardSize,
// imageCorners,
// found);
void drawChessboardCorners( InputOutputArray image, Size patternSize,
InputArray _corners,
bool patternWasFound )
{
CV_INSTRUMENT_REGION();
int type = image.type();
int cn = CV_MAT_CN(type);
CV_CheckType(type, cn == 1 || cn == 3 || cn == 4,
"Number of channels must be 1, 3 or 4" );
int depth = CV_MAT_DEPTH(type);
CV_CheckType(type, depth == CV_8U || depth == CV_16U || depth == CV_32F,
"Only 8-bit, 16-bit or floating-point 32-bit images are supported");
if (_corners.empty())
return;
Mat corners = _corners.getMat();
const Point2f* corners_data = corners.ptr<Point2f>(0);
int nelems = corners.checkVector(2, CV_32F, true);
CV_Assert(nelems >= 0);
const int shift = 0;
const int radius = 4;
const int r = radius*(1 << shift);
double scale = 1;
switch (depth)
{
case CV_8U:
scale = 1;
break;
case CV_16U:
scale = 256;
break;
case CV_32F:
scale = 1./255;
break;
}
int line_type = (type == CV_8UC1 || type == CV_8UC3) ? LINE_AA : LINE_8;
if (!patternWasFound) //是否找到了“棋盘”
{
Scalar color(0,0,255,0);
if (cn == 1)
color = Scalar::all(200);
color *= scale;
for (int i = 0; i < nelems; i++ )
{
cv::Point2i pt(
cvRound(corners_data[i].x*(1 << shift)),
cvRound(corners_data[i].y*(1 << shift))
);
line(image, Point(pt.x - r, pt.y - r), Point( pt.x + r, pt.y + r), color, 1, line_type, shift);//每个圆配一个X
line(image, Point(pt.x - r, pt.y + r), Point( pt.x + r, pt.y - r), color, 1, line_type, shift);
circle(image, pt, r+(1<<shift), color, 1, line_type, shift);
}
}
else
{
const int line_max = 7;
static const int line_colors[line_max][4] =
{
{0,0,255,0},
{0,128,255,0},
{0,200,200,0},
{0,255,0,0},
{200,200,0,0},
{255,0,0,0},
{255,0,255,0}
};
cv::Point2i prev_pt;
for (int y = 0, i = 0; y < patternSize.height; y++)
{
const int* line_color = &line_colors[y % line_max][0];
Scalar color(line_color[0], line_color[1], line_color[2], line_color[3]);
if (cn == 1)
color = Scalar::all(200);
color *= scale;
for (int x = 0; x < patternSize.width; x++, i++)
{
cv::Point2i pt(
cvRound(corners_data[i].x*(1 << shift)),
cvRound(corners_data[i].y*(1 << shift))
);
if (i != 0)
line(image, prev_pt, pt, color, 1, line_type, shift);
line(image, Point(pt.x - r, pt.y - r), Point( pt.x + r, pt.y + r), color, 1, line_type, shift);
line(image, Point(pt.x - r, pt.y + r), Point( pt.x + r, pt.y - r), color, 1, line_type, shift);
circle(image, pt, r+(1<<shift), color, 1, line_type, shift);
prev_pt = pt;
}
}
}
}
//bool found = cv::findChessboardCorners(
// image, // 包含棋盘图案的图像
// boardSize, // 图案的尺寸
// imageCorners); // 检测到的角点列表
bool findChessboardCorners(InputArray image_, Size pattern_size,
OutputArray corners_, int flags)
{
CV_INSTRUMENT_REGION();
DPRINTF("==== findChessboardCorners(img=%dx%d, pattern=%dx%d, flags=%d)",
image_.cols(), image_.rows(), pattern_size.width, pattern_size.height, flags);
bool found = false;
const int min_dilations = 0;
const int max_dilations = 7;
int type = image_.type(), depth = CV_MAT_DEPTH(type), cn = CV_MAT_CN(type);
Mat img = image_.getMat();
CV_CheckType(type, depth == CV_8U && (cn == 1 || cn == 3 || cn == 4),
"Only 8-bit grayscale or color images are supported");
if (pattern_size.width <= 2 || pattern_size.height <= 2)
CV_Error(Error::StsOutOfRange, "Both width and height of the pattern should have bigger than 2");
if (!corners_.needed())
CV_Error(Error::StsNullPtr, "Null pointer to corners");
std::vector<cv::Point2f> out_corners;
if (img.channels() != 1)
{
cvtColor(img, img, COLOR_BGR2GRAY);
}
int prev_sqr_size = 0;
Mat thresh_img_new = img.clone();
icvBinarizationHistogramBased(thresh_img_new); // process image in-place
SHOW("New binarization", thresh_img_new);
if (flags & CALIB_CB_FAST_CHECK)
{
//perform new method for checking chessboard using a binary image.
//image is binarised using a threshold dependent on the image histogram
if (checkChessboardBinary(thresh_img_new, pattern_size) <= 0) //fall back to the old method
{
if (!checkChessboard(img, pattern_size))
{
corners_.release();
return false;
}
}
}
ChessBoardDetector detector(pattern_size); //调用了预置的ChessBoard寻找类
// Try our standard "1" dilation, but if the pattern is not found, iterate the whole procedure with higher dilations.
// This is necessary because some squares simply do not separate properly with a single dilation. However,
// we want to use the minimum number of dilations possible since dilations cause the squares to become smaller,
// making it difficult to detect smaller squares.
for (int dilations = min_dilations; dilations <= max_dilations; dilations++)
{
//USE BINARY IMAGE COMPUTED USING icvBinarizationHistogramBased METHOD
dilate( thresh_img_new, thresh_img_new, Mat(), Point(-1, -1), 1 );
// So we can find rectangles that go to the edge, we draw a white line around the image edge.
// Otherwise FindContours will miss those clipped rectangle contours.
// The border color will be the image mean, because otherwise we risk screwing up filters like cvSmooth()...
rectangle( thresh_img_new, Point(0,0), Point(thresh_img_new.cols-1, thresh_img_new.rows-1), Scalar(255,255,255), 3, LINE_8);
detector.reset();
#ifdef USE_CV_FINDCONTOURS
Mat binarized_img = thresh_img_new;
#else
Mat binarized_img = thresh_img_new.clone(); // make clone because cvFindContours modifies the source image
#endif
detector.generateQuads(binarized_img, flags);
DPRINTF("Quad count: %d/%d", detector.all_quads_count, (pattern_size.width/2+1)*(pattern_size.height/2+1));
SHOW_QUADS("New quads", thresh_img_new, &detector.all_quads[0], detector.all_quads_count);
if (detector.processQuads(out_corners, prev_sqr_size))
{
found = true;
break;
}
}
DPRINTF("Chessboard detection result 0: %d", (int)found);
// revert to old, slower, method if detection failed
if (!found)
{
if (flags & CALIB_CB_NORMALIZE_IMAGE)
{
img = img.clone();
equalizeHist(img, img);
}
Mat thresh_img;
prev_sqr_size = 0;
DPRINTF("Fallback to old algorithm");
const bool useAdaptive = flags & CALIB_CB_ADAPTIVE_THRESH;
if (!useAdaptive)
{
// empiric threshold level
// thresholding performed here and not inside the cycle to save processing time
double mean = cv::mean(img).val[0];
int thresh_level = std::max(cvRound(mean - 10), 10);
threshold(img, thresh_img, thresh_level, 255, THRESH_BINARY);
}
//if flag CALIB_CB_ADAPTIVE_THRESH is not set it doesn't make sense to iterate over k
int max_k = useAdaptive ? 6 : 1;
for (int k = 0; k < max_k && !found; k++)
{
for (int dilations = min_dilations; dilations <= max_dilations; dilations++)
{
// convert the input grayscale image to binary (black-n-white)
if (useAdaptive)
{
int block_size = cvRound(prev_sqr_size == 0
? std::min(img.cols, img.rows) * (k % 2 == 0 ? 0.2 : 0.1)
: prev_sqr_size * 2);
block_size = block_size | 1;
// convert to binary
adaptiveThreshold( img, thresh_img, 255, ADAPTIVE_THRESH_MEAN_C, THRESH_BINARY, block_size, (k/2)*5 );
if (dilations > 0)
dilate( thresh_img, thresh_img, Mat(), Point(-1, -1), dilations-1 );
}
else
{
dilate( thresh_img, thresh_img, Mat(), Point(-1, -1), 1 );
}
SHOW("Old binarization", thresh_img);
// So we can find rectangles that go to the edge, we draw a white line around the image edge.
// Otherwise FindContours will miss those clipped rectangle contours.
// The border color will be the image mean, because otherwise we risk screwing up filters like cvSmooth()...
rectangle( thresh_img, Point(0,0), Point(thresh_img.cols-1, thresh_img.rows-1), Scalar(255,255,255), 3, LINE_8);
detector.reset();
#ifdef USE_CV_FINDCONTOURS
Mat binarized_img = thresh_img;
#else
Mat binarized_img = (useAdaptive) ? thresh_img : thresh_img.clone(); // make clone because cvFindContours modifies the source image
#endif
detector.generateQuads(binarized_img, flags);
DPRINTF("Quad count: %d/%d", detector.all_quads_count, (pattern_size.width/2+1)*(pattern_size.height/2+1));
SHOW_QUADS("Old quads", thresh_img, &detector.all_quads[0], detector.all_quads_count);
if (detector.processQuads(out_corners, prev_sqr_size))
{
found = 1;
break;
}
}
}
}
DPRINTF("Chessboard detection result 1: %d", (int)found);
if (found)
found = detector.checkBoardMonotony(out_corners);
DPRINTF("Chessboard detection result 2: %d", (int)found);
// check that none of the found corners is too close to the image boundary
if (found)
{
const int BORDER = 8;
for (int k = 0; k < pattern_size.width*pattern_size.height; ++k)
{
if( out_corners[k].x <= BORDER || out_corners[k].x > img.cols - BORDER ||
out_corners[k].y <= BORDER || out_corners[k].y > img.rows - BORDER )
{
found = false;
break;
}
}
}
DPRINTF("Chessboard detection result 3: %d", (int)found);
if (found)
{
if ((pattern_size.height & 1) == 0 && (pattern_size.width & 1) == 0 )
{
int last_row = (pattern_size.height-1)*pattern_size.width;
double dy0 = out_corners[last_row].y - out_corners[0].y;
if (dy0 < 0)
{
int n = pattern_size.width*pattern_size.height;
for(int i = 0; i < n/2; i++ )
{
std::swap(out_corners[i], out_corners[n-i-1]);
}
}
}
cv::cornerSubPix(img, out_corners, Size(2, 2), Size(-1,-1),
cv::TermCriteria(TermCriteria::EPS + TermCriteria::MAX_ITER, 15, 0.1));
}
Mat(out_corners).copyTo(corners_);
return found;
}
这段代码就不好理解了。不过需要清醒认识到的是,棋盘标定这个事情,不是需要重复做的事情,一次标定完了,后面反复使用就可以,所以OpenCV提供了可用的方法我们就使用,后面如果出现其它问题再进行研究。