Vue 旅游网首页开发2 - 首页编写
Vue 旅游网首页开发2 - 首页编写
项目结构

首页开发
效果图

项目开发组件化
将页面的各个部分划分成不同的组件,有助于项目的开发和维护。
项目代码初始化
项目结构修改
1.删除整个 compinents 文件夹。
2.创建 pages 文件夹用于存放各个页面。
3.在 pages 文件夹下,创建 home 文件夹,用于项目首页开发。
4. home 文件夹下,创建 components 文件夹,用于存放首页中的各个组件。
5. home 文件夹下创建 Home.vue 文件,用于首页界面内容开发。

项目代码修改
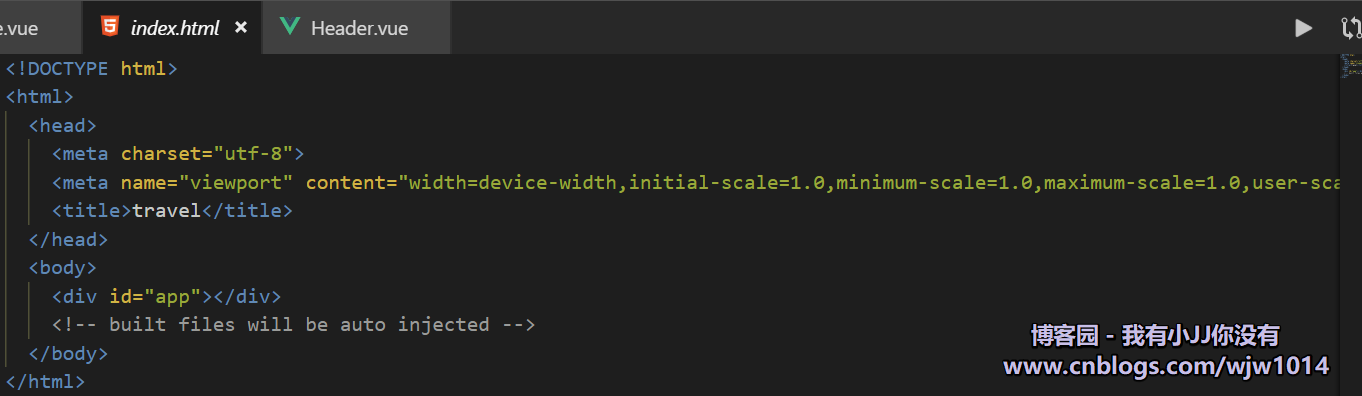
1.在 index.html 文件下的 meta 处修改如下:
<meta name="viewport" content="width=device-width,initial-scale=1.0,minimum-scale=1.0,maximum-scale=1.0,user-scalable=no">
因为我们开发的是手机端项目,因此修改html文件防止用户手指放大缩小,始终保持页面比例。
2.引入 reset.css 样式。 目的是重置样式表,文件自己从网上搜索。
放入 assets 文件夹下 styles 文件夹中。
在 main.js 文件中引用 reset.css 文件。
import 'styles/reset.css'

reset.css文件
@charset "utf-8";html{background-color:#fff;color:#000;font-size:12px}

body,ul,ol,dl,dd,h1,h2,h3,h4,h5,h6,figure,form,fieldset,legend,input,textarea,button,p,blockquote,th,td,pre,xmp{margin:;padding:}

body,input,textarea,button,select,pre,xmp,tt,code,kbd,samp{line-height:1.5;font-family:tahoma,arial,"Hiragino Sans GB",simsun,sans-serif}

h1,h2,h3,h4,h5,h6,small,big,input,textarea,button,select{font-size:100%}

h1,h2,h3,h4,h5,h6{font-family:tahoma,arial,"Hiragino Sans GB","微软雅黑",simsun,sans-serif}

h1,h2,h3,h4,h5,h6,b,strong{font-weight:normal}

address,cite,dfn,em,i,optgroup,var{font-style:normal}

table{border-collapse:collapse;border-spacing:;text-align:left}

caption,th{text-align:inherit}

ul,ol,menu{list-style:none}

fieldset,img{border:}

img,object,input,textarea,button,select{vertical-align:middle}

article,aside,footer,header,section,nav,figure,figcaption,hgroup,details,menu{display:block}

audio,canvas,video{display:inline-block;*display:inline;*zoom:}

blockquote:before,blockquote:after,q:before,q:after{content:"\0020"}

textarea{overflow:auto;resize:vertical}

input,textarea,button,select,a{outline:0 none;border: none;}

button::-moz-focus-inner,input::-moz-focus-inner{padding:;border:}

mark{background-color:transparent}

a,ins,s,u,del{text-decoration:none}

sup,sub{vertical-align:baseline}

html {overflow-x: hidden;height: 100%;font-size: 50px;-webkit-tap-highlight-color: transparent;}

body {font-family: Arial, "Microsoft Yahei", "Helvetica Neue", Helvetica, sans-serif;color: #333;font-size: .28em;line-height:;-webkit-text-size-adjust: none;}

hr {height: .02rem;margin: .1rem 0;border: medium none;border-top: .02rem solid #cacaca;}

a {color: #25a4bb;text-decoration: none;}
reset.css文件 复制即可
3. 引入 border.css 样式。 目的是解决1像素边框问题的方案,文件自己从网上搜索。
放入 assets 文件夹下 styles 文件夹中。
在 main.js 文件中引用 border.css 文件。
import 'styles/border.css'

border.css文件
@charset "utf-8";

.border,

.border-top,

.border-right,

.border-bottom,

.border-left,

.border-topbottom,

.border-rightleft,

.border-topleft,

.border-rightbottom,

.border-topright,

.border-bottomleft {

    position: relative;

}

.border::before,

.border-top::before,

.border-right::before,

.border-bottom::before,

.border-left::before,

.border-topbottom::before,

.border-topbottom::after,

.border-rightleft::before,

.border-rightleft::after,

.border-topleft::before,

.border-topleft::after,

.border-rightbottom::before,

.border-rightbottom::after,

.border-topright::before,

.border-topright::after,

.border-bottomleft::before,

.border-bottomleft::after {

    content: "\0020";

    overflow: hidden;

    position: absolute;

}

/* border

 * 因,边框是由伪元素区域遮盖在父级

 * 故,子级若有交互,需要对子级设置

 * 定位 及 z轴

 */

.border::before {

    box-sizing: border-box;

    top:;

    left:;

    height: 100%;

    width: 100%;

    border: 1px solid #eaeaea;

    transform-origin: 0 0;

}

.border-top::before,

.border-bottom::before,

.border-topbottom::before,

.border-topbottom::after,

.border-topleft::before,

.border-rightbottom::after,

.border-topright::before,

.border-bottomleft::before {

    left:;

    width: 100%;

    height: 1px;

}

.border-right::before,

.border-left::before,

.border-rightleft::before,

.border-rightleft::after,

.border-topleft::after,

.border-rightbottom::before,

.border-topright::after,

.border-bottomleft::after {

    top:;

    width: 1px;

    height: 100%;

}

.border-top::before,

.border-topbottom::before,

.border-topleft::before,

.border-topright::before {

    border-top: 1px solid #eaeaea;

    transform-origin: 0 0;

}

.border-right::before,

.border-rightbottom::before,

.border-rightleft::before,

.border-topright::after {

    border-right: 1px solid #eaeaea;

    transform-origin: 100% 0;

}

.border-bottom::before,

.border-topbottom::after,

.border-rightbottom::after,

.border-bottomleft::before {

    border-bottom: 1px solid #eaeaea;

    transform-origin: 0 100%;

}

.border-left::before,

.border-topleft::after,

.border-rightleft::after,

.border-bottomleft::after {

    border-left: 1px solid #eaeaea;

    transform-origin: 0 0;

}

.border-top::before,

.border-topbottom::before,

.border-topleft::before,

.border-topright::before {

    top:;

}

.border-right::before,

.border-rightleft::after,

.border-rightbottom::before,

.border-topright::after {

    right:;

}

.border-bottom::before,

.border-topbottom::after,

.border-rightbottom::after,

.border-bottomleft::after {

    bottom:;

}

.border-left::before,

.border-rightleft::before,

.border-topleft::after,

.border-bottomleft::before {

    left:;

}

@media (max--moz-device-pixel-ratio: 1.49), (-webkit-max-device-pixel-ratio: 1.49), (max-device-pixel-ratio: 1.49), (max-resolution: 143dpi), (max-resolution: 1.49dppx) {

    /* 默认值,无需重置 */

}

@media (min--moz-device-pixel-ratio: 1.5) and (max--moz-device-pixel-ratio: 2.49), (-webkit-min-device-pixel-ratio: 1.5) and (-webkit-max-device-pixel-ratio: 2.49), (min-device-pixel-ratio: 1.5) and (max-device-pixel-ratio: 2.49), (min-resolution: 144dpi) and (max-resolution: 239dpi), (min-resolution: 1.5dppx) and (max-resolution: 2.49dppx) {

    .border::before {

        width: 200%;

        height: 200%;

        transform: scale(.5);

    }

    .border-top::before,

    .border-bottom::before,

    .border-topbottom::before,

    .border-topbottom::after,

    .border-topleft::before,

    .border-rightbottom::after,

    .border-topright::before,

    .border-bottomleft::before {

        transform: scaleY(.5);

    }

    .border-right::before,

    .border-left::before,

    .border-rightleft::before,

    .border-rightleft::after,

    .border-topleft::after,

    .border-rightbottom::before,

    .border-topright::after,

    .border-bottomleft::after {

        transform: scaleX(.5);

    }

}

@media (min--moz-device-pixel-ratio: 2.5), (-webkit-min-device-pixel-ratio: 2.5), (min-device-pixel-ratio: 2.5), (min-resolution: 240dpi), (min-resolution: 2.5dppx) {

    .border::before {

        width: 300%;

        height: 300%;

        transform: scale(.33333);

    }

    .border-top::before,

    .border-bottom::before,

    .border-topbottom::before,

    .border-topbottom::after,

    .border-topleft::before,

    .border-rightbottom::after,

    .border-topright::before,

    .border-bottomleft::before {

        transform: scaleY(.33333);

    }

    .border-right::before,

    .border-left::before,

    .border-rightleft::before,

    .border-rightleft::after,

    .border-topleft::after,

    .border-rightbottom::before,

    .border-topright::after,

    .border-bottomleft::after {

        transform: scaleX(.33333);

    }

}
border.css文件 复制即可
4. 移动端300毫秒点击延时问题
在移动端的某些机型上的某些浏览器上,当使用 click 点击事件时,click 事件会延时300毫秒在执行,使 click 体验大打折扣。
解决方法是引入一个库,完美的解决使用 click 事件。
1) 项目中必须安装一个第三方模块,叫做 faskclick 。
npm install faskclick --save
一定要在当前路径下安装,并且安装完成之后重启服务器。
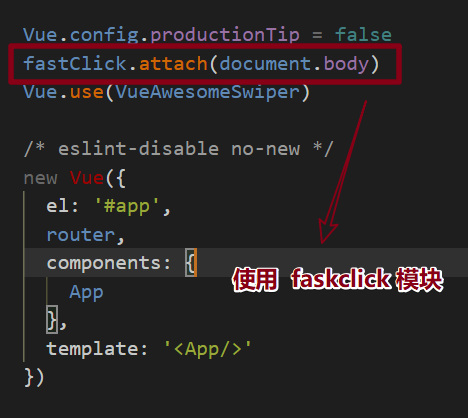
2) 引入 faskclick 到 main.js 文件中
import fastClick from 'fastclick'

3) 使用 faskclick 。
在 main.js 文件中使用
fastClick.attach(document.body)
初识化代码完成,接下来需要将我们的项目上传到 git 。
git add .

git commit -m project_init

git push
iconfont 技术
现在有一种前端非常火的技术,叫 iconfont 技术,是用来进行图标管理的技术。
官网 :www.iconfont.cn

首页 header 组件编写
安装 stylus 依赖包
1. 首先需要安装几个依赖包帮助我们开发。
npm install stylus --save

npm install stylus-loader --save
2. 重新启动项目
npm run dev
创建 Header 组件
1. 在 home > components 文件夹下创建 Header.vue 文件,用于Header组件开发。
2. 在 Home.vue 文件中,引入 Header.vue 组件。
1) 在 template 块中引入 header 组件
<home-header></home-header>
2) 在 Script 块中引入 header 组件
import HomeHeader from './components/Header'
3)在 export default 中添加 header 组件
export default {

  name: 'Home',

  components: {

    HomeHeader,

  }

}
编写 Header 组件
代码涉及一些图标、全局变量等知识点,会在后边记录。
此处 Header.vue 组件的代码不是最终代码!!
<template>
<div class='header'>
<div class='header-left'>
<div class='iconfont back-icon'></div>
</div>
<div class='header-input'>
<span class='iconfont'></span>
输入城市/景点/游玩主题
</div>
<div class='header-right'>
{{this.city}}
<span class='iconfont arrow-icon'></span>
</div>
</div>
</template> <script>
export default {
name: 'Home',
props:{
city:String
}
}
</script> <style lang='stylus' scoped>
@import '~styles/varibles.styl'; .header {
display: flex;
line-height: 0.86rem;
background: $bgColor;
color: #fff; .header-left {
width: 0.64rem;
float: left;
} .back-icon {
text-align: center;
font-size: 0.4rem;
} .header-input {
flex:;
color: #ccc;
margin-top: 0.12rem;
height: 0.64rem;
line-height: 0.64rem;
margin-left: 0.12rem;
background: #fff;
border-radius: 0.1rem;
padding-left: 0.2rem;
} .header-right {
text-align: center;
width: 1.24rem;
float: right;
} .arrow-icon {
font-size: 0.24rem;
margin-left: -0.04rem;
}
}
</style>
Header.vue
iconfont 使用和优化
1. 注册,创建项目,选择自己喜欢的图标放入购物车,下载。
2. 下载完成之后,会产生四个文件。
iconfont.eot
iconfont.svg
iconfont.ttf
iconfont.woff
将这四个文件全部放入 assets > iconfont 文件夹中。
3. main.js 引入
import 'asset/styles/iconfont.css'
4. 在 Header.vue 文件中就可以是用了。
<div class='iconfont back-icon'></div>
全局变量设置和使用
将通用(经常使用的变量参数)存放到一个单独的文件中,方便项目的管理和维护。
在多处使用一个相同的值是,将这个值作为变量存储在全局中,当项目后期维护需要修改此值时,便可以修改一处的全局变量来修改项目的所有使用此值的属性,例如:修改主题色调。
1. 在 styles 文件夹下创建 varibles.styl 文件。
2. 在文件中创建一个全局变量。
$bgColor = #00bcd4
3. 使用
引入全局变量文件 varibles.styl
@import '~styles/varibles.styl';
在 css 样式表中使用全局变量
background: $bgColor;
系统路径别名
在之前的学习中我们了解知道,在vue项目中,@符号表示 src 路径,如果我们想设置自己的路径别名该怎么办呢?
在 bulid 文件夹下有一个 webpack.base.conf.js 文件,在34行左右有一个 resolve alias 别名项,我们可以在这里修改我们自己想要的路径别名。
例如我们重新定义 styles 文件夹的别名。
'styles':resolve('src/assets/styles'),
注意:有时候细节很重要,逗号有没有也是个关键!
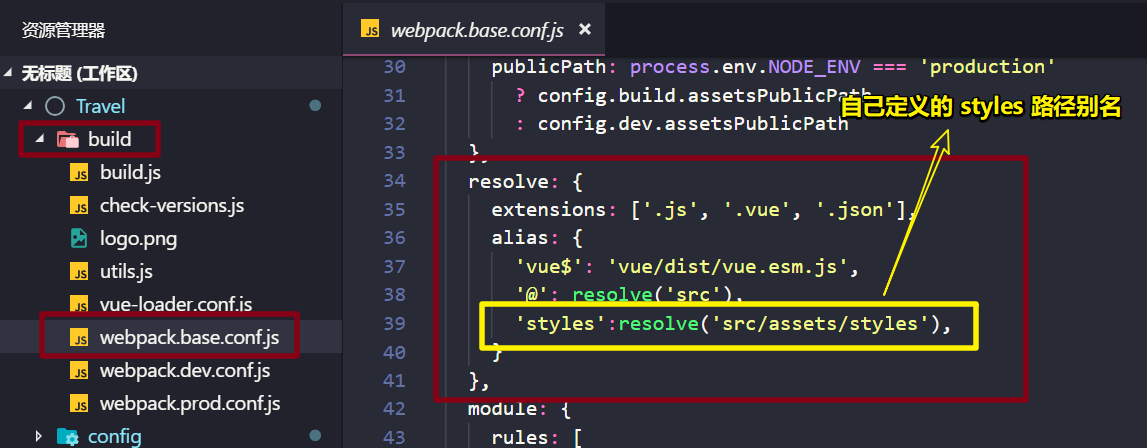
修改完项目设置之后需要重新启动服务器,否则项目会报错!
首页轮播图
分支使用
写几条git命令吧。
在项目开发过程中,我们可能会用到 git ,无论是 码云 也好还是 GitHub 也罢,在项目开发的过程中,建立一个仓库用于存储我们的项目,开发单独的组件时候应该建立一个分支,用于项目的存储。
轮播图开发之前,先建立一个轮播图的分支叫做 index-swiper 。
然后将项目同步到我们的线下。
git pull
然后切换我们的线下分支
git checkout index-swiper
查看一下我们的线下分支
git staute
然后我们就可以在 index-swiper 分支中开发我们的轮播图组件了。
编写 Swiper 组件
1. 使用轮播图插件。
在 vue 项目开发中,我们可以使用轮播图插件,帮助我们进行轮播图的开发,首先安装一下。
npm install vue-awesome-swiper@2.6.7 --save
轮播图组件官网 :https://github.com/surmon-china/vue-awesome-swiper
2. 使用轮播图插件。
在全局 main.js 文件中引入插件和css文件。
import VueAwesomeSwiper from 'vue-awesome-swiper'

// require styles

import 'swiper/dist/css/swiper.css'
使用插件
Vue.use(VueAwesomeSwiper)
3. 在 pages > home > components 文件夹下创建 Swiper.vue 文件
<template>

  <div class='wrapper'>

    <swiper :options='swiperOption'>

      <!-- slides -->

      <swiper-slide v-for='item of swiperList' :key='item.id'>

        <img

          class='swiper-img'

          :src='item.imgUrl'

        >

      </swiper-slide>

      <!-- Optional controls -->

      <div class='swiper-pagination' slot='pagination'></div>

    </swiper>

  </div>

</template>

<script>

export default {

  name: 'HomeSwiper',

  data () {

    return {

      swiperOption: {

        pagination: '.swiper-pagination',

        loop : true

      },

      swiperList : [

        {

            id:'0001',

            imgUrl:'http://mp-piao-admincp.qunarzz.com/mp_piao_admin_mp_piao_admin/admin/20193/ed5f4115226306e48e6fad106a038afe.jpg_750x200_64df48d6.jpg'

        },

        {

            id:'0002',

            imgUrl:'http://mp-piao-admincp.qunarzz.com/mp_piao_admin_mp_piao_admin/admin/20193/87a224d0349d94a11e97f31aa1aba4f5.jpg_750x200_1f78af87.jpg'

        }

    ]

    };

  }

};

</script>

<style lang='stylus' scoped>

.wrapper >>> .swiper-pagination-bullet-active {

  background: #fff !important;

}

.wrapper {

  overflow: hidden;

  width: 100%;

  height: 0;

  padding-bottom: 27%;

  background: #eee;

}

.swiper-img {

  width: 100%;

}

</style>
其中,wrapper 的 css 是为了 防抖。
.wrapper {

  overflow: hidden;

  width: 100%;

  height:;

  padding-bottom: 27%;

  background: #eee;

}
下面的代码是为了修改轮播图下页码小点的颜色,因为小点颜色是由组件本身的css决定的,在这个页面中修饰不了,因此需要使用穿透的方式去修改。
.wrapper >>> .swiper-pagination-bullet-active {

  background: #fff !important;

}
编写 Icon 组件
<template>

  <div class='icons'>

    <swiper>

      <swiper-slide v-for='(page,index) of pages' :key='index'>

        <div class='icon' v-for='item of page' :key='item.id'>

          <div class='icon-img'>

            <img class='icon-img-content' :src='item.imgUrl' alt>

          </div>

          <p class='icon-desc'>{{item.desc}}</p>

        </div>

      </swiper-slide>

    </swiper>

  </div>

</template>

<script>

export default {

  name: 'HomeIcons',

  data () {

    return {

      iconList: [

        {

          id: '0001',

          imgUrl:

            'http://img1.qunarzz.com/piao/fusion/1803/95/f3dd6c383aeb3b02.png',

          desc: '景点门票'

        },

        {

          id: '0002',

          imgUrl:

            'http://img1.qunarzz.com/piao/fusion/1804/ff/fdf170ee89594b02.png',

          desc: '济南必游'

        },

        {

          id: '0003',

          imgUrl:

            'http://img1.qunarzz.com/piao/fusion/1803/96/c70f1e85ae4a4f02.png',

          desc: '自然风光'

        },

        {

          id: '0004',

          imgUrl:

            'http://img1.qunarzz.com/piao/fusion/1803/bd/9f7b9b2b60c1502.png',

          desc: '一日游'

        },

        {

          id: '0005',

          imgUrl:

            'http://img1.qunarzz.com/piao/fusion/1803/f5/a963333e1fa802.png',

          desc: '踏青赏雪'

        },

        {

          id: '0006',

          imgUrl:

            'http://img1.qunarzz.com/piao/fusion/1803/20/831d62d2e1c7be02.png',

          desc: '当地好玩'

        },

        {

          id: '0007',

          imgUrl:

            'http://img1.qunarzz.com/piao/fusion/1803/20/831d62d2e1c7be02.png',

          desc: '名胜古迹'

        },

        {

          id: '0008',

          imgUrl:

            'http://img1.qunarzz.com/piao/fusion/1804/ff/fdf170ee89594b02.png',

          desc: '趵突泉'

        },

        {

          id: '0009',

          imgUrl:

            'http://img1.qunarzz.com/piao/fusion/1804/ff/fdf170ee89594b02.png',

          desc: '泉城美食'

        }

      ]

    }

  },

  computed: {

    pages() {

      const pages = [];

      this.iconList.forEach((item, index) => {

        const page = Math.floor(index / 8);

        if (!pages[page]) {

          pages[page] = [];

        }

        pages[page].push(item);

      });

      return pages;

    }

  }

};

</script>

<style lang='stylus' scoped>

@import '~styles/varibles.styl';

@import '~styles/mixins.styl';

.icons {

  margin-top :.1rem;

  width: 100%;

  overflow: hidden;

  height: 0;

  padding-bottom: 50%;

}

.icon {

  overflow: hidden;

  position: relative;

  float: left;

  width: 25%;

  height: 0;

  padding-bottom: 25%;

}

.icon-img {

  position: absolute;

  top: 0;

  left: 0;

  right: 0;

  bottom: 0.44rem;

  box-sizing: border-box;

  padding: 0.1rem;

}

.icon-img-content {

  display: block;

  margin: 0 auto;

  height: 100%;

}

.icon-desc {

  position: absolute;

  left: 0;

  right: 0;

  bottom: 0;

  height: 0.44rem;

  line-height: 0.44rem;

  color: $darkTextColor;

  text-align: center;

  ellipsis()

}

</style>
编写 Recomment 组件
<template>

  <div>

    <div class='recomment-title'>热销推荐</div>

    <ul>

      <li class='item' border-bottom v-for='item of recommentList' :key='item.id'>

        <img class='item-img' :src='item.imgUrl' alt>

        <div class='item-info'>

          <p class='item-title'>{{item.title}}</p>

          <p class='item-desc'>{{item.desc}}</p>

          <button class='item-button'>查看详情</button>

        </div>

      </li>

    </ul>

  </div>

</template>

<script>

export default {

  name: 'HomeRecomment',

  data() {

    return {

      recommentList: [

        {

          id: '0001',

          imgUrl:

            'http://img1.qunarzz.com/sight/p0/1508/fe/434ee530e21f1c11bad088e8cc8d5e93.water.jpg_200x200_912ce9f4.jpg',

          title: '鸟巢',

          desc: '2018年北京奥运会主会场'

        },

        {

          id: '0002',

          imgUrl:

            'http://img1.qunarzz.com/sight/p0/1508/fe/434ee530e21f1c11bad088e8cc8d5e93.water.jpg_200x200_912ce9f4.jpg',

          title: '鸟巢',

          desc: '2018年北京奥运会主会场'

        },

        {

          id: '0003',

          imgUrl:

            'http://img1.qunarzz.com/sight/p0/1508/fe/434ee530e21f1c11bad088e8cc8d5e93.water.jpg_200x200_912ce9f4.jpg',

          title: '鸟巢',

          desc: '2018年北京奥运会主会场'

        }

      ]

    };

  }

};

</script>

<style lang='stylus' scoped>

@import '~styles/mixins.styl';

.recomment-title {

  line-height: 0.8rem;

  background: #eee;

  text-indent: 0.2rem;

  margin-top: 0.2rem;

}

.item {

  overflow: hidden;

  display: flex;

  height: 1.9rem;

}

.item-img {

  width: 1.7rem;

  height: 1.7rem;

  padding: 0.1rem;

}

.item.info {

  flex: 1;

  padding: 0.1rem;

  min-width: 0;

}

.item-title {

  line-height: 0.54rem;

  font-size: 0.32rem;

  ellipsis();

}

.item-desc {

  line-height: 0.4rem;

  color: #ccc;

  ellipsis();

}

.item-button {

  background: #ff9300;

  line-height: 0.3rem;

  padding: 0.2rem;

  border-radius: 0.06rem;

  margin-top: 0.13rem;

  color: #fff;

}

</style>
编写 Weekend 组件
<template>

  <div>

    <div class='recomment-title'>周末去哪</div>

    <ul>

      <li class='item' border-bottom v-for='item of recommentList' :key='item.id'>

        <div class='item-img-wrapper'>

          <img class='item-img' :src='item.imgUrl' alt>

        </div>

        <div class='item-info'>

          <p class='item-title'>{{item.title}}</p>

          <p class='item-desc'>{{item.desc}}</p>

        </div>

      </li>

    </ul>

  </div>

</template>

<script>

export default {

  name: 'HomeWeekend',

  data() {

    return {

      recommentList: [

        {

          id: '0001',

          imgUrl:

            'http://img1.qunarzz.com/sight/source/1505/87/b46b43303b585c.jpg_r_640x214_af2aa659.jpg',

          title: '鸟巢',

          desc: '2018年北京奥运会主会场'

        },

        {

          id: '0002',

          imgUrl:

            'http://img1.qunarzz.com/sight/source/1505/87/b46b43303b585c.jpg_r_640x214_af2aa659.jpg',

          title: '鸟巢',

          desc: '2018年北京奥运会主会场'

        },

        {

          id: '0003',

          imgUrl:

            'http://img1.qunarzz.com/sight/source/1505/87/b46b43303b585c.jpg_r_640x214_af2aa659.jpg',

          title: '鸟巢',

          desc: '2018年北京奥运会主会场'

        }

      ]

    };

  }

};

</script>

<style lang='stylus' scoped>

@import '~styles/mixins.styl';

.recomment-title {

  line-height: 0.8rem;

  background: #eee;

  text-indent: 0.2rem;

}

.item-img-wrapper{

    overflow :hidden;

    height :0;

    padding-bottom :33.9%;

}

.item-img {

  width :100%;

}

.item.info {

  padding: 0.1rem;

}

.item-title {

  line-height: 0.54rem;

  font-size: 0.32rem;

  ellipsis();

}

.item-desc {

  line-height: 0.4rem;

  color: #ccc;

  ellipsis();

}

</style>
项目源码:https://gitee.com/wjw1014/Travel
Vue 旅游网首页开发2 - 首页编写的更多相关文章
- Vue 旅游网首页开发1-工具安装及码云使用
Vue 旅游网首页开发-工具安装及码云使用 环境安装 安装 node.js node.js 官网:https://nodejs.org/en/ 注册码云,创建私密仓库存储项目 码云:https://g ...
- Vue 旅游网首页开发3 - Ajax获取首页数据
之前的首页数据都是写死在页面上的,现在修改项目,使得数据通过ajax动态获取. 死胎了 ... 不想写了····
- Nuxt.js打造旅游网站第2篇_首页开发
页面效果: 1.初始化默认布局 nuxtjs提供了一个公共布局组件layouts/default.vue,该布局组件默认作用于所有页面,所以我们可以在这里加上一些公共样式,在下一小结中还会导入公共组件 ...
- 同程旅游网开放平台SDK开发完成
最近利用业余时间,使用了同程旅游网的开放平台,并对大部分的方法进行了调用,发现有很多不好用的地方,比如 1.同一个开放平台居然有几个调用地址,景区调用http://tcopenapi.17usoft. ...
- python-django框架-电商项目-首页开发_20191122
python-django框架-电商项目-首页开发 业务背景: 用户浏览网站一定是先到首页, 没有登陆的话首页内容完全一样,而且是不经常变化的, 一段时间内,有100用户访问,就要有几个用户就要查询多 ...
- SpringBoot开发五-社区首页开发
需求介绍-社区首页 根据之前的学习,我们一般都是先按照DAO->Service->Controller这个顺序去开发 分布实现: 开发社区首页,显示前十个帖子. 开发分页组件,分页显示所有 ...
- spring boot + vue + element-ui全栈开发入门——基于Electron桌面应用开发
前言 Electron是由Github开发,用HTML,CSS和JavaScript来构建跨平台桌面应用程序的一个开源库. Electron通过将Chromium和Node.js合并到同一个运行时环 ...
- spring boot + vue + element-ui全栈开发入门——主页面开发
目的 开发一个后台管理的前端,顶部是标题,左侧是菜单导航栏,中间是要显示的内容.而内容可以是各种图表,也可以是数据列表. 一.准备工作 1..修改App.vue文件 代码如下: <templat ...
- 【06】Vue 之 组件化开发
组件其实就是一个拥有样式.动画.js逻辑.HTML结构的综合块.前端组件化确实让大的前端团队更高效的开发前端项目.而作为前端比较流行的框架之一,Vue的组件和也做的非常彻底,而且有自己的特色.尤其是她 ...
随机推荐
- RemoveError: 'requests' is a dependency of conda and cannot be removed from conda's operating environment
(base)$ conda update conda conda remove -n *** --all 或者 (base)$ conda update --force conda conda rem ...
- Vue.js中使用select选择下拉框
在Vue.js中使用select选择下拉框有两种方法: 第一种: Add.html: <select v-model="sysNotice.noticeType" id=&q ...
- 《图解HTTP》读书笔记(二:各种协议与HTTP协议之间的关系)
涉及到DNS协议.TCP协议.IP协议,话不多说,上图:
- 导出IndoorGML
导出IndoorGML
- win10配置java环境变量,解决javac不是内部或外部命令等问题
win10配置java环境变量,解决javac不是内部或外部命令等问题 https://www.cnblogs.com/qianji/p/6402690.html
- ESP8266开发笔记
自1999年MIT的Kevin Ash-ton教授首次提出物联网(IoT)的概念至今已经有20年了.放眼现在国内外的物联网市场,真可谓是百家争鸣,方兴未艾,无数家软硬件公司在这里舞浪弄潮,逐鹿其中,上 ...
- 2018-2019-2 网络对抗技术 20165321 Exp1 PC平台逆向破解
1. 逆向及Bof基础实践说明 1.1 实践目标 本次实践的对象是一个名为pwn1的linux可执行文件.该程序正常执行流程是:main调用foo函数,foo函数会简单回显任何用户输入的字符串.该程序 ...
- ubuntu下zip文件操作
转自 https://blog.csdn.net/hpu11/article/details/71524013 .zip $ zip -r myfile.zip ./* 将当前目录下的所有文件和文件夹 ...
- 详解iBaits中SqlMapClientTemplate的使用
Apache iBatis(现已迁至Google Code下发展,更名为MyBatis)是当前IT项目中使用很广泛的一个半自动ORM框架,区别于Hibernate之类的全自动框架,iBatis对数据库 ...
- FB面经Prepare: Bipartite a graph
input friends relations{{1,2}, {2,3}, {3,4}} 把人分成两拨,每拨人互相不认识, 所以应该是group1{1,3}, group2{2,4} 这道题应该是ho ...