windows 7 下安装VMWARE 和 red-hat 7 64bit
按F2 进入BIOS:
在inter virtualization technology 选择YES
就可以安装linux 64bit 操作系统了
https://blog.csdn.net/coco2d_x2014/article/details/54587134
https://jingyan.baidu.com/article/86112f135e584a273697876b.html、
https://blog.csdn.net/lingdaz/article/details/40542537
yum 运行时提示There was a problem importing one of the Python modules required to run yum. The error lead
图形化界面点击 网卡标志,启动网卡
或者
ifup eth0
[root@pythontest ~]# service iptables stop
[root@pythontest ~]# chkconfig iptables off
#####
https://blog.csdn.net/yxc2959/article/details/79097470
记一次Red Hat Linux手动搭建本地Yum仓库
*感谢原作者的分享,这里主要是记录我操作的一些过程,我刚开始学习,所以如果有看到描述不太对的内容,麻烦评论告诉下我,鞠躬感谢啦~
(1)挂载光盘到mnt目录下
[root@QCTest ~]# mount /dev/cdrom /mnt
mount: block device /dev/sr0 is write-protected, mounting read-only
[root@QCTest ~]# ls /mnt
(2)在根目录下创建新文件夹QCTest_repo,将/mnt目录中Packages文件夹拷贝到新建的文件夹中
[root@QCTest ~]# cd /
[root@QCTest /]# mkdir QCTest_repo 创建新文件夹QCTest_repo
[root@QCTest /]# cd /mnt
[root@QCTest mnt]#cp -rv Packages /QCTest_repo 将光盘中Packages文件夹拷贝到新建的文件夹中(cp -r:递归复制目录及其子目录内的所有内容;-v: 详细显示命令执行的操作)
(3)安装必要工具包:包拷贝完成之后需要构建yum使用的数据库,以xml文件形式存在,该数据库会对所有包进行分类建立索引,方便yum程序快速搜索安装包和检查包之间的依赖关系。但创建数据库要用到一个工具包createrepo-0.9.9-18.el6.noarch.rpm,默认是没有的,先要对它进行安装
[root@QCTest mnt]# cd /QCTest_repo/Packages
[root@QCTest Packages]# rpm -ivh createrepo-* (*为通配符)
回车运行后会提示,安装这个包需要一个python-deltarpm的依赖关系包,加上去再次运行
[root@QCTest Packages]# rpm -ivh createrepo-* python-del*
回车运行后会提示python-deltarpm这个包也存在一个deltarpm = 3.5-0.5.20090913git.el6的依赖关系包,加上去再次运行
[root@QCTest Packages]# rpm -ivh createrepo-* python-del* deltarpm-*
这次就会安装成功了。
(4)创建yum数据库:安装完成后,就可使用createrepo进行创建yum数据库。创建之前注意在原光盘里面repodata文件夹下,即/mnt/repodata目录下有一个末尾为comps.xml的分类文件(系统版本不一样,实际情况也不太一样,本机显示的是如下图cda开头comps-rhel6-Server.xml结尾)也要一并拷贝过来并重建。
[root@QCTest Packages]# createrepo -g /mnt/repodata/*comps-rhel6-Server.xml /QCTest_repo/Pack*
or
createrepo -g /media/"RHEL-6.8 Server.x86_64"/repodata/*64.xml /QCTest_repo/Pack*
运行完成后,在/QCTest_repo/Packages目录下就会生成一个repodata的文件夹,里面存放着yum工作所需要的索引仓库,保存了所有的软件包索引信息。当使用yum进行安装时,会直接读取这些索引信息,而不必去逐一扫描软件包。
(5)创建yum配置文件:单独创建自己的配置文件。进入yum.repos.d文件夹,创建QCTest.repo文件并进行编辑。文件名随意起,但需要.repo结尾。
[root@QCTest Packages]# cd /etc/yum.repos.d
[root@QCTest yum.repos.d]# vi QCTest.repo 在这个目录下新建QCTest.repo文件,并打开编辑,编辑内容如下
[repo] 为yum仓库名字,可任意起;
name=myrepo为详细名字,可任意起;
baseurl=file:///QCTest_repo/Packages/ baseurl为关键字,file://告诉yum为本地仓库,/QCTest_repo/Packages/为绝对路径;
gpgcheck=0 关闭rpm包的gpg校验功能。如果个人环境,建议关闭,参数值为0,如果生产环境,建议打开,参数值为1。
输入以上内容后,保存并退出。
(6)清除yum缓存,并重新加载
[root@QCTest yum.repos.d]# yum clean all
[root@QCTest yum.repos.d]# yum repolist
现在就可以通过yum进行安装软件包,程序将自动解决包依赖的问题。
[root@QCTest ~]# yum install vnc-server
---------------------
作者:等晨光破晓
来源:CSDN
原文:https://blog.csdn.net/yxc2959/article/details/79097470
版权声明:本文为博主原创文章,转载请附上博文链接!
############## linux 虚拟机扩充磁盘空间
https://my.oschina.net/u/876354/blog/967848
最近在VMware虚拟机上使用Centos,用着用着,发现虚拟机的磁盘空间不够了。通过以下步骤成功扩展了根目录的磁盘空间
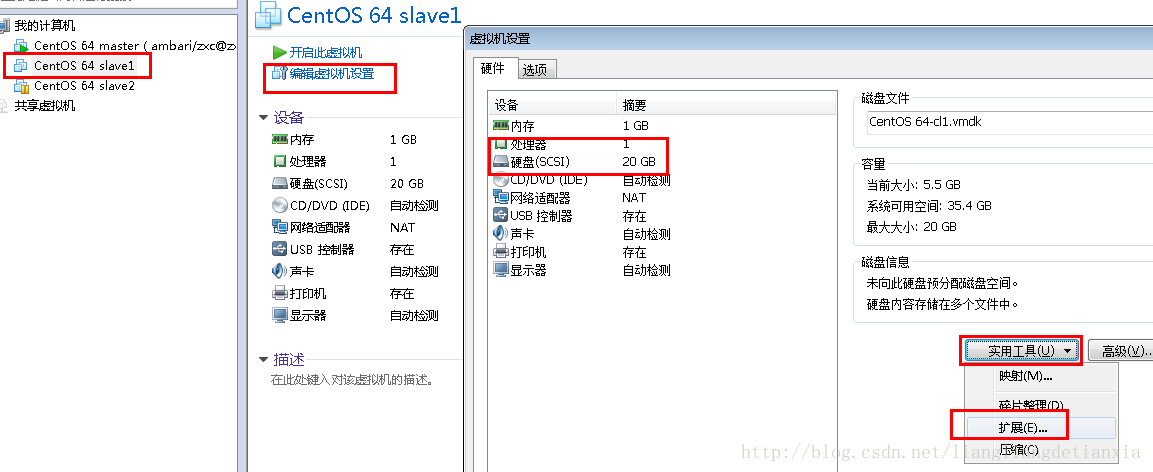
1、Centos 关机,选择编辑虚拟机设置,硬盘,在实用工具那里选择“扩展”

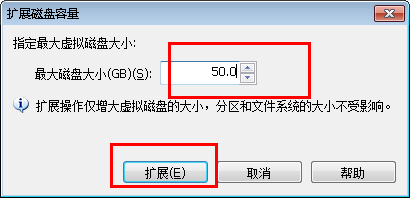
填写扩展的磁盘容量

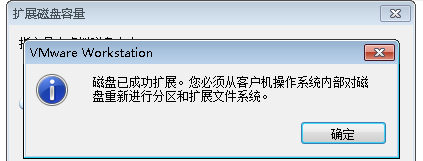
点击扩展后,VMware会提示磁盘已成功扩展。您必须从客户机操作系统内部对磁盘重新进行分区和扩展文件系统。也就是说,这里扩展的磁盘空间,在操作系统里面还不可用,还没生效,需要在操作系统里面进行设置后才能使用。

2、启动客户机操作系统Centos,查看磁盘情况
输入指令
fdisk -l显示结果如下
Disk /dev/loop0: 107.4 GB, 107374182400 bytes

255 heads, 63 sectors/track, 13054 cylinders

Units = cylinders of 16065 * 512 = 8225280 bytes

Sector size (logical/physical): 512 bytes / 512 bytes

I/O size (minimum/optimal): 512 bytes / 512 bytes

Disk identifier: 0x00000000

Disk /dev/loop1: 2147 MB, 2147483648 bytes

255 heads, 63 sectors/track, 261 cylinders

Units = cylinders of 16065 * 512 = 8225280 bytes

Sector size (logical/physical): 512 bytes / 512 bytes

I/O size (minimum/optimal): 512 bytes / 512 bytes

Disk identifier: 0x00000000

Disk /dev/sda: 37.6 GB, 37580963840 bytes

255 heads, 63 sectors/track, 4568 cylinders

Units = cylinders of 16065 * 512 = 8225280 bytes

Sector size (logical/physical): 512 bytes / 512 bytes

I/O size (minimum/optimal): 512 bytes / 512 bytes

Disk identifier: 0x000c8278

   Device Boot      Start         End      Blocks   Id  System

/dev/sda1   *           1          64      512000   83  Linux

Partition 1 does not end on cylinder boundary.

/dev/sda2              64        1306     9972736   8e  Linux LVM

Disk /dev/mapper/vg_test001-lv_root: 9135 MB, 9135194112 bytes

255 heads, 63 sectors/track, 1110 cylinders

Units = cylinders of 16065 * 512 = 8225280 bytes

Sector size (logical/physical): 512 bytes / 512 bytes

I/O size (minimum/optimal): 512 bytes / 512 bytes

Disk identifier: 0x00000000

Disk /dev/mapper/vg_test001-lv_swap: 1073 MB, 1073741824 bytes

255 heads, 63 sectors/track, 130 cylinders

Units = cylinders of 16065 * 512 = 8225280 bytes

Sector size (logical/physical): 512 bytes / 512 bytes

I/O size (minimum/optimal): 512 bytes / 512 bytes

Disk identifier: 0x00000000

Disk /dev/mapper/docker-253:0-264224-pool: 107.4 GB, 107374182400 bytes

255 heads, 63 sectors/track, 13054 cylinders

Units = cylinders of 16065 * 512 = 8225280 bytes

Sector size (logical/physical): 512 bytes / 512 bytes

I/O size (minimum/optimal): 512 bytes / 65536 bytes

Disk identifier: 0x00000000
其中,可以看到现在的分区情况如下
   Device Boot      Start         End      Blocks   Id  System

/dev/sda1   *           1          64      512000   83  Linux

Partition 1 does not end on cylinder boundary.

/dev/sda2              64        1306     9972736   8e  Linux LVM
3、创建分区 sda3
输入指令
fdisk /dev/sda然后根据命令提示创建分区,具体见以下 # 后面的注释
WARNING: DOS-compatible mode is deprecated. It s strongly recommended to

         switch off the mode (command 'c') and change display units to

         sectors (command 'u').

Command (m for help): n   # 输入 n 表示创建新分区

Command action

   e   extended

   p   primary partition (1-4)

p

Partition number (1-4): 3   # 输入 3 表示sda3,因为前面已经有两个了

First cylinder (1306-4568, default 1306):     # 回车,按默认值

Using default value 1306

Last cylinder, +cylinders or +size{K,M,G} (1306-4568, default 4568):   # 回车,按默认值

Using default value 4568

Command (m for help): w     # 输入 w 保存退出

The partition table has been altered!

Calling ioctl() to re-read partition table.

WARNING: Re-reading the partition table failed with error 16: Device or resource busy.

The kernel still uses the old table. The new table will be used at

the next reboot or after you run partprobe(8) or kpartx(8)

Syncing disks.
再次查看分区情况
fdisk -l这时可以看到
Disk /dev/loop0: 107.4 GB, 107374182400 bytes

255 heads, 63 sectors/track, 13054 cylinders

Units = cylinders of 16065 * 512 = 8225280 bytes

Sector size (logical/physical): 512 bytes / 512 bytes

I/O size (minimum/optimal): 512 bytes / 512 bytes

Disk identifier: 0x00000000

Disk /dev/loop1: 2147 MB, 2147483648 bytes

255 heads, 63 sectors/track, 261 cylinders

Units = cylinders of 16065 * 512 = 8225280 bytes

Sector size (logical/physical): 512 bytes / 512 bytes

I/O size (minimum/optimal): 512 bytes / 512 bytes

Disk identifier: 0x00000000

Disk /dev/sda: 37.6 GB, 37580963840 bytes

255 heads, 63 sectors/track, 4568 cylinders

Units = cylinders of 16065 * 512 = 8225280 bytes

Sector size (logical/physical): 512 bytes / 512 bytes

I/O size (minimum/optimal): 512 bytes / 512 bytes

Disk identifier: 0x000c8278

   Device Boot      Start         End      Blocks   Id  System

/dev/sda1   *           1          64      512000   83  Linux

Partition 1 does not end on cylinder boundary.

/dev/sda2              64        1306     9972736   8e  Linux LVM

/dev/sda3            1306        4568    26206700   83  Linux

Disk /dev/mapper/vg_test001-lv_root: 9135 MB, 9135194112 bytes

255 heads, 63 sectors/track, 1110 cylinders

Units = cylinders of 16065 * 512 = 8225280 bytes

Sector size (logical/physical): 512 bytes / 512 bytes

I/O size (minimum/optimal): 512 bytes / 512 bytes

Disk identifier: 0x00000000

Disk /dev/mapper/vg_test001-lv_swap: 1073 MB, 1073741824 bytes

255 heads, 63 sectors/track, 130 cylinders

Units = cylinders of 16065 * 512 = 8225280 bytes

Sector size (logical/physical): 512 bytes / 512 bytes

I/O size (minimum/optimal): 512 bytes / 512 bytes

Disk identifier: 0x00000000

Disk /dev/mapper/docker-253:0-264224-pool: 107.4 GB, 107374182400 bytes

255 heads, 63 sectors/track, 13054 cylinders

Units = cylinders of 16065 * 512 = 8225280 bytes

Sector size (logical/physical): 512 bytes / 512 bytes

I/O size (minimum/optimal): 512 bytes / 65536 bytes

Disk identifier: 0x00000000
其中,分区已变为3个了,但这时还没挂载,还不能用
   Device Boot      Start         End      Blocks   Id  System

/dev/sda1   *           1          64      512000   83  Linux

Partition 1 does not end on cylinder boundary.

/dev/sda2              64        1306     9972736   8e  Linux LVM

/dev/sda3            1306        4568    26206700   83  Linux
4、重启操作系统
reboot5、格式化新分区为ext3
输入指令
mkfs -t ext3 /dev/sda3结果为
mke2fs 1.41.12 (17-May-2010)

Filesystem label=

OS type: Linux

Block size=4096 (log=2)

Fragment size=4096 (log=2)

Stride=0 blocks, Stripe width=0 blocks

1638400 inodes, 6551675 blocks

327583 blocks (5.00%) reserved for the super user

First data block=0

Maximum filesystem blocks=4294967296

200 block groups

32768 blocks per group, 32768 fragments per group

8192 inodes per group

Superblock backups stored on blocks:

	32768, 98304, 163840, 229376, 294912, 819200, 884736, 1605632, 2654208,

	4096000

Writing inode tables: done

Creating journal (32768 blocks): done

Writing superblocks and filesystem accounting information: done

This filesystem will be automatically checked every 33 mounts or

180 days, whichever comes first.  Use tune2fs -c or -i to override.
6、将物理硬盘分区初始化为物理卷,以便被LVM使用,输入指令
lvs

pvcreate /dev/sda3
7、向卷组中添加物理卷来增加卷组的容量
查看lvm组名,输入指令 df -h
[root@test001 ~]# df -h

Filesystem            Size  Used Avail Use% Mounted on

/dev/mapper/vg_test001-lv_root

                      8.3G  5.4G  2.5G  69% /

tmpfs                1001M     0 1001M   0% /dev/shm

/dev/sda1             477M   54M  394M  12% /boot
其中,vg_test001 就是 根 所在的组名
输入指令,增加卷组的容量
vgextend vg_test001 /dev/sda38、查看可扩展的空间大小
输入指令,显示LNM卷组的元数据信息
vgdisplay结果为
  --- Volume group ---

  VG Name               vg_test001

  System ID

  Format                lvm2

  Metadata Areas        2

  Metadata Sequence No  4

  VG Access             read/write

  VG Status             resizable

  MAX LV                0

  Cur LV                2

  Open LV               2

  Max PV                0

  Cur PV                2

  Act PV                2

  VG Size               34.50 GiB

  PE Size               4.00 MiB

  Total PE              8831

  Alloc PE / Size       2434 / 9.51 GiB

  Free  PE / Size       6397 / 24.99 GiB

  VG UUID               JuPKc8-Ydps-1bsN-0Wld-fbYS-0Hd2-NgvX1q
其中 Free PE / Size 就是可供分配的自由空间,最多有 24.99G,在扩展时输入小于该值
9、扩充磁盘空间
lvextend -L+24G /dev/mapper/vg_test001-lv_root /dev/sda310、使用e2fsck指令检查文件系统错误
进入单用户模式 (参考https://blog.csdn.net/qq_34556414/article/details/78689225)
umount /
e2fsck -a /dev/mapper/vg_pythontest-lv_root
reboot
e2fsck -a /dev/mapper/vg_test001-lv_root11、使用resize2fs指令来增大或者收缩未加载的“ext2/ext3”文件系统的大小
resize2fs /dev/mapper/vg_test001-lv_root12、查看扩展空间后的结果
[root@test001 ~]# df -h

Filesystem            Size  Used Avail Use% Mounted on

/dev/mapper/vg_test001-lv_root

                       32G  5.4G   26G  18% /

tmpfs                1001M     0 1001M   0% /dev/shm

/dev/sda1             477M   54M  394M  12% /boot
可以看出,在根目录下磁盘空间已经扩容了,大功告成!
##############
https://jingyan.baidu.com/article/4ae03de3fa2ae93eff9e6bb0.html
怎么解决VMware“该虚拟机似乎正在使用中”问题
###网络配置,windows 与 linux 互联
https://blog.csdn.net/damishidai15/article/details/81368025
-》 网关配置
Vmnet1 局域网
Vmnet8 NAT 外部internet访问
192.168.61.1
- 调整vmnet 8 属性
NAT 网路 192.168.0.0 ( 原来192.168.61.0 )
勾选DHCP start/end ip服务 192.168.0.2 ~ 192.168.0.254 (原来192.168.61.128 ~ 192.168.61.254 )
NAT SETTING: 192.168.0.1 ( 原来192.168.61.2 )
-》linux 配置
虚拟机新建一个网卡eth2
Setup 新建一个网卡
linux下的网络参数配置
打开如下文件 :/etc/sysconfig/network-scripts/ifcfg-eth2将里面的参数设置为:
DEVICE="eth2"
ONBOOT=yes
BOOTPROTO="static"
HWADDR="00:0C:29:AD:E5:3A"
ONBOOT="yes"
IPADDR=192.168.0.10
NETMASK=255.255.255.0
GATEWAY=192.168.0.1
---------------------
source ifcfg-eth2
/etc/init.d/network restart
/etc/init.d/NetworkManager restart
https://blog.csdn.net/longlong3207/article/details/78413939
https://blog.csdn.net/damishidai15/article/details/81368025
windows 7 下安装VMWARE 和 red-hat 7 64bit的更多相关文章
- windows环境下安装: VMware 15 + centos 7
第一步: 下载 centos7 http://isoredirect.centos.org/centos/7/isos/x86_64/ 选择阿里云镜像下载,速度最快 注意: 尽量使用下载工具下载, ...
- windows 10 下安装VMware Workstation Pro 15.0(亲测可用!)
参考链接:https://blog.csdn.net/qq_39016934/article/details/90285915 VMware Workstation Pro 15.0的下载官网:htt ...
- Ubuntu杂记——Ubuntu下安装VMware
转战Ubuntu,不知道能坚持多久,但是自己还是要努力把转战过程中的学习到的给记录下来.这次就来记录一下,Ubuntu下如何安装VMware. 就我所知,Linux下有VirtualBox和VMwar ...
- Ubuntu 14.04/14.10下安装VMware Workstation 11图文教程
VMware workstation 是一个可以进行桌面操作的虚拟软件.它可以让我们在一台电脑或者虚拟机中运行多个虚拟机. 由VMware公司研发和维护.由于是商业软件,我们需要买他们家的许可证或者说 ...
- [转] Ubuntu 14.04/14.10下安装VMware Workstation 11图文教程
点击这里查看原文 译者:GuiltyMan 本文由 Linux公社翻译组 原创翻译 Linux公社 诚意奉献 更多请访问此处博客网站 VMware workstation 是一个可以进行桌面操作的虚 ...
- 如何在Windows环境下安装Linux系统虚拟机
如何在Windows环境下安装Linux系统虚拟机 本篇经验写给想要入门学习C语言的小白们.Windows系统因为使用窗口图形化,操作简单,功能多样,所以我们在Windows环境下可以做到很多,但想要 ...
- 在 windows 环境下安装 redislive
这是一篇在 windows 环境下安装 redislive 的教程! 项目地址:https://github.com/nkrode/RedisLive 配置文档:http://www.nkrode.c ...
- 【Docker 在 windows 10 / windows 8 下安装】
步骤: 1. 下载: a.https://github.com/boot2docker/windows-installer/releases 下载一个 windows 客户端: 安装时建议勾选:Boo ...
- windows 7 下安装 IIS 和 ArcGis Server 9.3 遇到的问题及解决方法
windows 7 下安装 IIS 和 ArcGis Server 9.3 遇到的问题及解决方法 分类: ArcGIS server 计算机2012-07-31 14:17 631人阅读 评论(0) ...
随机推荐
- Luogu 4409 [ZJOI2006]皇帝的烦恼
BZOJ 1863 lyd口中的夹B递推. 挺妙的解法. 第一个感觉是找到一个最大的相邻的$a_i + a_{i - 1}$就可以了,但是这个想法大概只对了一半,一半的意思是说只有在$n$为偶数的时候 ...
- (树)判断二叉树是否为BST
题目:判断一颗二叉树是否为BST. 思路:其实这个问题可以有多个解决方法. 方法一:递归解决.根据BST的特性.左边的小于根节点的值,右边的大于根节点的值.并且对于每一棵子树都是如此.所以我们可以直接 ...
- JVM-jvm学习大纲(0)
1.详细jvm内存模型 2.讲讲什么情况下回出现内存溢出,内存泄漏? 3.说说Java线程栈 4.JVM 年轻代到年老代的晋升过程的判断条件是什么呢? 5.JVM 出现 fullGC 很频繁,怎么去线 ...
- easyui textbox 设置只读不可编辑状态
在使用easyul的时候,发现输入框内容及不容易获取与设置,用jQuery的方式大部分失效.依稀记得好像是因为easyul会在原页面的基础上,生成了一些新的独有样式,并且暂时覆盖掉使用了easyul的 ...
- Sql Server 数据恢复-破解版
首先,恭喜大家进了误删误改使得数据丢失的坑~~~~~ 不要担心,恢复就好了. 下载地址:https://pan.baidu.com/s/1a59U--Y6EmbPF2CFsxmo2Q 密码:jb14 ...
- 机器学习基石笔记:11 Linear Models for Classification、LC vs LinReg vs LogReg、OVA、OVO
原文地址:https://www.jianshu.com/p/6f86290e70f9 一.二元分类的线性模型 线性回归后的参数值常用于PLA/PA/Logistic Regression的参数初始化 ...
- findControl 可以获取前台页面的控件
findControl 可以获取前台页面的控件
- Windows server iis部署Django详细操作
教程基于Windows server2012+Python3.6+IIS之上部署django的,同样适用于server2012之上的版本服务器和windows7以上的windows操作系统. 文章来自 ...
- springboot结合swagger生成接口文档
原文链接:https://www.cnblogs.com/xu-lei/p/7423883.html https://www.jianshu.com/p/b9ae3136b292 前后台分离的开发渐渐 ...
- 第一章:初识JAVA
一:计算机语言发展史 机器语言:典型的二进制文件和计算机交流. 汇编语言: 通过大量的标识符表示一些基本操作来和计算机做交流. 高级语言:通过常见的英语指令来编写程序,完成沟通 常见高级语言 Java ...
